Drawings of plywood ships: materials, preparation for work, cutting and assembling parts, final finishing. Wooden ship models Making prefabricated sailboat models with your own hands
The element of water has always attracted desperate travelers, brave sailors and fearless pirates. Sailing on the waves and watching new horizons open up before you is the most amazing thing that can happen in life. In order to set sail, you need to build a ship with your own hands. Even if it is not as huge as the Titanic, the main thing is that you created it yourself.
Everyone probably has (or had) a favorite activity that they don’t mind devoting their free time to. Some people have a collection of stamps, some are into photography, some like to cook, knit, draw,... and so on, you can’t list everything.
One of my favorite things, or, more simply put, hobbies, is. This news is dedicated to them.
After this, you can leave the “skeleton” to dry and start covering the deck.
Everything is not as simple as it seems from the outside - the covering boards must be laid in a certain pattern. Of course, you can just lay long planks, but it will look quite rough...
After this, the decks (or deck, if there is only one) are placed in their proper place and the first hull begins. Typically, a ship model is covered twice - the first skin is rough, it is made of very soft wood. 
One by one, the planks are attached to the “skeleton” using glue and small nails, which will be removed when the glue dries.
The work is delicate, the planks do not always bend easily and can break.
After painstaking work, the entire body is covered with the first layer!
Now you need to close the gaps between the planks and sand them properly.
Then you can start front trim. You need to be extremely careful with it - the planks are much thinner than rough ones and break easily.
The technology is the same - glue and nails.
You can imagine the amount of work (the ship in the photo, Victory, is 1300 mm long...)...
I described the assembly of the HMS Victory model in 17 reviews, everyone who wants to read it is welcome!
And this is the model, probably, of the famous ship in the world - “Santa Maria” (in the process of assembly, of course).
After the second skin is finished and sanded, everything can be varnished. And then we’ll take care of the deck - ladders, boats, hatches,...
Almost all parts are made of wood and brass. There is no plastic at all.
Exterior detailing is no less important. 
Well, after the hull is completed, we begin the rigging.
But before that you need to install masts and yards.
Each knot is tied by hand (the same sea knots :-).
And these knots are simply countless!
The sails must be pre-stitched. At Santa Maria they still needed to be painted.
If the set does not include a stand, then here you can give free rein to your imagination. 
For example, I made a stand for Santa Maria from a piece of oak parquet.
And only when the very last knot is tied can the ship be considered ready!
You can proudly put it in the most visible place and with an enthusiastic “Wow!” guests, looking down, say “Yes, I did it myself...”.
Wooden ships and sailboats
For many, prefabricated ship models are something more than an ordinary hobby and an interesting activity. This is, first of all, an opportunity for self-expression, a way to realize your talents and, at the same time, to be distracted and indulge in dreams. Regardless of whether it is a combat ship, a modern yacht, or a military galleon, each ship personifies all the power and splendor of the sea. 
Tabletop wooden ships have excellent decorative qualities; it is impossible not to admire them. Therefore, wooden ship models always become worthy decoration any room, be it a study or a home living room.
To work on each ship model you will need enviable patience and accuracy. But the result of painstaking work is an assembled model, which will become a well-deserved source of your pride.
Wooden ship models for beginners
CONSTRUCTO
Universal series of ships: 80620 1/85 St. Helena
Article: CNSB0620 80620 1/85 St. Helena
Two-masted schooner St. Helena was launched in 1814 and served as a link between England and its eastern colonies. The kit is a 1/85 scale replica of a schooner and is recommended for modelers with little experience.
Universal Ship Series: 80618 1/135 Bluenose II
Article: CNSB6118 80618 1/135 Bluenose II
Wooden model of the ship, the fishing schooner Bluenose II. Launched in 1921 in Nova Scotia. This fishing schooner gained fame after numerous victories won in classic races. Recommended for beginning modelers.
Universal Ship Series: 80615 1/100 Flyer
Article: CNSB6115 80615 1/100 Flyer
Wooden model of a pilot ship in 1/100 scale, Flyer. This American merchant ship, which was renowned for its speed, was converted into a warship and then used as a coast guard ship during the American Revolution and the War of 1812. This is a universal series kit from Constructo, quite easy to assemble and recommended for beginning modellers.
Universal Ship Series: 80616 1/100 Union
Article: CNSB6116 80616 1/100 Union
Model of the brigantine Union, a two-masted sailing ship with square sails. Such ships were very common during the 18th and 19th centuries, used as merchant or light warships, and also served as coast guard ships at a short distance from the coast. The model is recommended for beginning modelers.
Universal series of ships: 80702 1/55 Albatros Sailing Ship
Article: CNSB0702 80702 1/55 Albatros Sailing Ship
Albatros is a model of a sailing ship built in 1899 on the stocks of Holland, also known as the North Sea Clipper, one of the oldest sailing ships, still floating, one of the main advantages of which is the ability to be at sea under extremely adverse weather conditions.
Universal series of ships: 80703 1/80 Carmen Spanish Sailing Ship
Article: CNSB0703 80703 1/80 Carmen Spanish Sailing Ship
Sailing ship model, reproduction of the Spanish frigate The Carmen, built in 1861. Recommended for modelers with little experience.
ARTESANIA LATINA
Universal series of ships: 20145 1/35 Bremen Krabben Kutter
Article: LATB2145 20145 1/35 Bremen Krabben Kutter
The first shrimp fishing vessel appeared in 1898 and was virtually designed to work in the North Sea; these vessels eventually began to be equipped with 8-10 strong engines and were about 10 meters in length. Bremen Krabben Kutter, a small shrimp fishing boat built in 1953 in a small shipyard in Germany.
Universal series of ships: 22299 1/80 J.S. Elcano w/ABS Hull & Tools
Article: LATB2299 22299 1/80 J.S. Elcano w/ABS Hull & Tools
Model ship J.S. Elcano, a replica of the Spanish four-masted naval academy training vessel launched at Cadiz on March 5, 1927.
Universal Ship Series: 19004 1/25 Bounty Jolly
Article: LATB1904 19004 1/25 Bounty Jolly
A 1/25 scale wooden replica boat, Bounty Jolly, from the famous historic ship HMS Bounty, famous for the feat of sailing 3,600 miles across the ocean in three small vessels.
Universal Ship Series: 22400 1/35 Mare Nostrum Fishing Trawler w/Tools
Article: LATB2400 22400 1/35 Mare Nostrum Fishing Trawler w/Tools 
Latina Mare Nostrum - an all-wooden replica, in scale 1:35, of a typical fishing trawler Mediterranean Sea, built in the harbor of the Spanish city of Arenys de Mar. Trawler assembly kit complete with tools.
Universal series of ships: 22170 1/50 Marie Jeanne
Article: LATB2034 22170 1/50 Marie Jeanne
Universal Ship Series: 22445 1/35 Bremen Fishing Cutter w/Tools
Article: LATB2445 22445 1/35 Bremen Fishing Cutter w/Tools
A scale replica of the Bremen Krabben Kutter shrimp fishing vessel, a small vessel built in 1953 in a small shipyard in Germany. Ship assembly kit with tools.
Content
Recently, decorative items that are made from recycled materials or from materials that are conventionally called garbage, for example, cardboard boxes from appliances, have been in fashion. On the other hand, it has become fashionable to create various figures and models of equipment from paper. In this article we will try to create some interesting ship models from cardboard. For some of these models you will already need ready-made templates, and some products can be created without diagrams, using your imagination. At the end of the article you will definitely find a video tutorial that will help you consolidate your knowledge and create an interesting product from available materials. Let's not waste time, prepare the materials and start creating.
Templates
Let's first try to create a ship using templates. They are easier to work with. What you will need:
- thick cardboard (you can use an old box);
- scissors;
- pencil;
- ready-made template;
- glue or tape;
- colored paper and other decor.
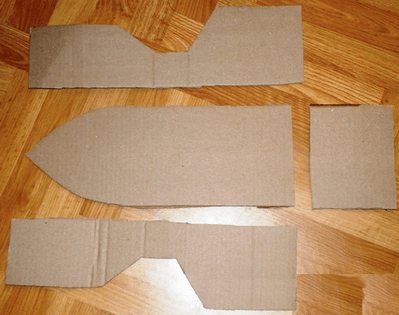
First you need to print the template and transfer it to the main material. By the way, if you are using cardboard that is not too thick, you can print the template directly on it.
You should get something like this:
Next, you need to dilute a little PVA glue with water, cut plain paper into pieces and dip them in the solution and glue them to the base of the ship. Remember the papier-mâché technique. It is better to connect the ship parts themselves using tape.
All that remains now is to decorate the blank with the prepared decor. This can be colored paper, wrapping paper, fabric. The ship can also be painted with ordinary watercolors.

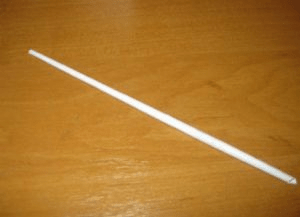
You also need to make a mast for the ship. You can use an ordinary twig and several round pieces of thick cardboard.
Every boat must have a flag. For it, use fabric and applique made of paper or material. The sail can also be made from cardboard; use toilet paper rolls.
Making a big ship
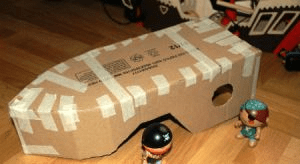
This option is suitable for young children who love exciting games. For such a ship you will need a large box. This could even be packaging from under a refrigerator or from a large TV.
First you need to connect the valves of the box and make a sharp bow of the vessel. On the sides you need to cut out several round timbers to make improvised portholes. Use a thick stick and fabric to make a flag. Use paints to decorate the ship.

Don't forget about details such as the anchor - it also needs to be made of thick material and decorated. A large do-it-yourself cardboard ship is ready to sail across the endless expanses of the apartment.
We use matchboxes
Let's call this modeling, because we will create from several matchboxes the whole ship. What you will need:
- cardboard;
- glue;
- matchboxes;
- wooden skewer or thick paper;
- colored paper;
- markers;
- scissors.
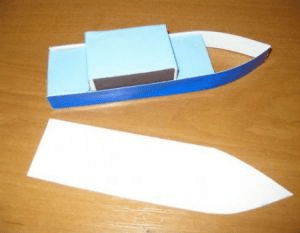
First you need to glue two matchboxes together with the short sides. Glue another box on top in the middle.

Now you need to cut out a rectangular piece of paper and glue it to the structure on top.

Now we need to cut out a strip from thick colored cardboard, with which we will form the bow of the vessel.

Now you need to cut out a piece of cardboard that will correspond to the contours of the ship, look at the photo:
Now the bottom and top of the ship need to be fastened with glue. Next you need to make the mast. You can use a wooden skewer or roll up an A4 sheet very tightly and secure the tip to prevent the sheet from unwinding.
A hole needs to be made in the top matchbox of the ship so that the mast can be inserted. Don't forget to use glue.
Now all that remains is to cut out the sails from colored paper, paint them and attach them to the mast.

The matchbox ship is ready! It can be made wider and higher if you use large quantity matchboxes. If you use very thick cardboard for the bottom of the ship, then it is quite possible to float it on the water and participate in competitions for the title of the fastest boat.
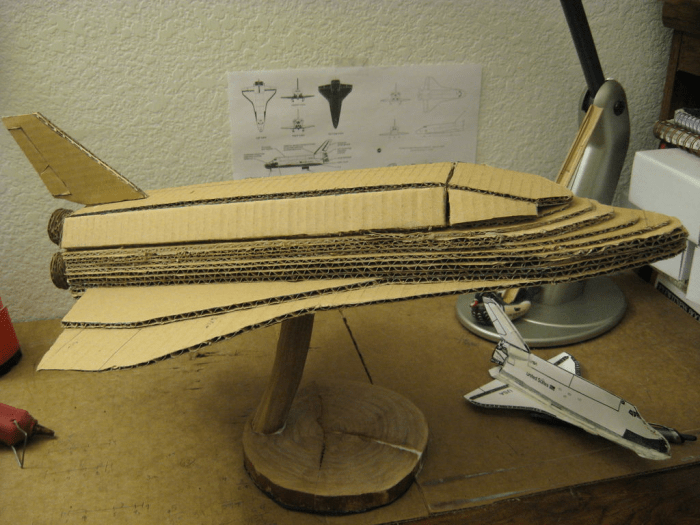
DIY cardboard spaceship
We suggest using a fairly simple option that will allow you to literally create a 3D model. To do this, you need to cut out several identical parts from cardboard, but different sizes. The parts need to be fastened together, but either a thin piece of foam rubber or a small piece of thick paper must be placed between them. It will look something like this:

Or like this:
An entire space station can be made using cardboard rolls from toilet paper and tape.

Use silver foil, a compass, a black marker and a pencil to give the spaceship a realistic look.
Cardboard is a fairly convenient and easy-to-work material, but if you know a few nuances, the work will seem even simpler, and the product itself will turn out neat:
- When working with very dense material, use fairly sharp scissors, or even better, a stationery knife;
- before bending the cardboard parts, it is better to draw along the dotted lines with the non-sharp side of scissors or old pen which does not write, then the material will bend neatly and evenly;
- Not in all cases you can use a glue gun. For example, if you are working with thin material, then it is better to use office glue or PVA;
- work in a room where the humidity is not too high, otherwise your products may delaminate or parts may not stick together;
- the room should be light, it is advisable to have a window that can be opened and ventilate the room;
- We also always advise you to work only in a good mood.
How to make a ship out of cardboard with your own hands - a few more interesting options
We would like to offer a few more interesting and beautiful options ships that you can make with your own hands.


IN in this case used milk carton, cardboard boxes and sleeve.

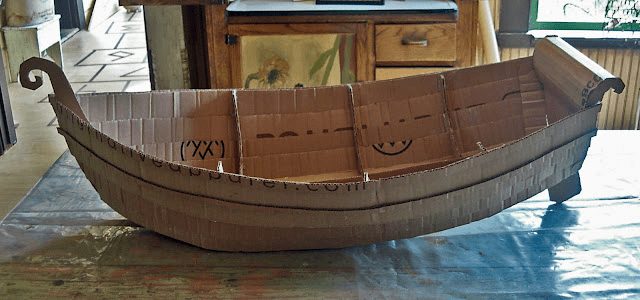
And this is a luxury boat made from an ordinary cardboard box.

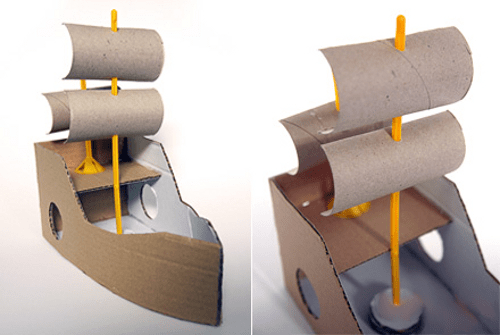
With a little practice and imagination, you can create such a beautiful pirate ship made of cardboard with your own hands. We always advise you to involve children in creativity. They will be especially pleased to know that they are creating a boat just for themselves. At the same time, you can think about a pirate costume, and also make a spyglass, a hat and a cardboard knife out of cardboard. Such participation of children in creativity helps to develop their imagination, attentiveness, perseverance, and the desire to create something with their own hands for themselves. Be sure to involve children in cleaning too. Explain to them that after themselves they need to fold all the materials, put them in their places, and also need to clean up workplace so that later you can get creative again.
For model making enthusiasts, sheets of pressed and glued wood veneer have always been one of the most sought after materials. They are easy to cut, perfectly processed, drawings of ships made of plywood are easy to find on the Internet, and therefore it is with plywood patterns that many craftsmen begin their acquaintance with modeling various ships.

Making models with your own hands is a very difficult task, requiring a significant amount of knowledge and a certain skill. In this article we will only talk about the most basic techniques, and you will hone further skills yourself. 
Materials for work
If you want to make a small model of a ship, then you will need the following materials:
- Wood - cedar, linden, walnut or other wood, preferably soft and non-fibrous. Wood blanks must be smooth, without knots or damage. Wood can be used both as a material for the main elements of the model (hull, deck) and for fine detailing.
- Plywood is perhaps the most popular material. For ship modeling, either balsa or birch is used, since these are the types of wood that provide the minimum number of chips when sawing. Model ship plywood, as a rule, has a thickness of 0.8 to 2 mm.

Note! Sheets of beech veneer of thin thickness are sometimes used as an alternative to birch: although they are inferior in strength, they bend much easier.
- Veneer – thin plates natural wood expensive breeds. As a rule, it is used for veneering, i.e. pasting surfaces from inexpensive material.
- Fastening elements - thin chains, laces, threads, brass and copper nails.
In addition, we will definitely need wood glue, cardboard and tracing paper for transferring templates, etc. Fine detailing is made from metal casting. As an alternative to metal, you can use colored polymer clay.
Making a souvenir boat
Preparing for work
Any work begins with preparation, and modeling will by no means be an exception.
- First we need to decide what we will build. If you have not previously dealt with shipbuilding art, we recommend downloading drawings of a ship made from plywood online: as a rule, they contain all the necessary information and are understandable even to a beginner.
Note! Kits are available for sale that allow you to assemble a ship from ready-made parts. Beginners will be interested in such kits (although the price of most of them is quite significant), but it is still better to master the technology from the basics.
- After analyzing the drawing, we check whether everything necessary is available. In principle, if something is missing, you can buy more a little later, because building a ship (even a miniature one) is not a quick task!

- After printing the drawing, we make templates for the main parts.
- We transfer the templates to .
Cutting out and assembling parts
You can cut blanks using either a manual or an electric jigsaw.
The latter costs more, but with it you will have less trouble cutting out small parts:
- We make a starting hole in the plywood sheet into which we insert a file or jigsaw blade.
- We cut out the part, trying to move exactly along the marked contour.
- We process the sawn workpiece with a file, removing small chamfers along the edges and removing the inevitable chips and burrs.
Advice! Working on one element (deck, sides, keel, etc.), we immediately cut out all the parts necessary for assembly. This way we will spend significantly less time, and the work will move faster.

When everything is ready, we begin assembling our ship.

- First, we put transverse frames on the longitudinal beam - the keel. At the bottom of each frame there is usually a groove for fastening to the plywood keel.
- For joining, you can use standard glue, or you can use special ones. adhesive mixtures, intended for ship modeling.
- We attach the upper parts of the frames to the deck. U simple models the deck is a single sheet of plywood, and for complex ones it can be multi-level.
- After the glue on the frames has dried, we begin to sheathe the sides with thin strips of plywood. The thickness of the material should be no more than 1.5 mm, since only in this case we will be able to bend the skin without the risk of damaging it.
- For bending, you can heat and humidify. After this, the material will bend without difficulty, and over time it will acquire a stable shape.
Note! The body can be covered with a continuous sheet for painting. But to imitate plank cladding, it is better to use strips up to 10 mm wide (depending on the scale).

- We fix the glued plywood with clamps and clamps and leave it to dry.
Final finishing
By and large, this is where carpentry ends and art begins.
When the body is assembled and dried, we need:
- Make from thin plywood and secure deck superstructures.

- Extend the sides so that they protrude above the plane of the deck.
- Cover the surface of the deck with wooden veneer or outline it with an awl, imitating plank cladding.
- Make and install all the small parts like the steering wheel and steering blade.
- Secure the masts with all additional devices (the so-called spar), install the sails and stretch this entire structure using rigging threads.
Finally, all plywood parts must be treated with stain and varnished. This will provide our souvenir with at least a couple of decades of preservation.
Conclusion

Almost anyone can make a simple plywood boat with their own hands - just patience and minimal skills in working with a jigsaw (read also the article). But if you want to implement a complex drawing with many small details, then you will have to work hard. That's why we recommend starting with the simplest models and gradually increasing your skill!
In the video presented in this article you will find Additional information on this topic.
Similar materials


Probably each of us read books about pirates in childhood. These were sea robbers who plied the seas and oceans, attacked merchant ships, and dumped all their loot in port taverns. These books were filled with intrigue, a special romanticism and a sense of adventure. For some people interested in the subject of piracy, their childhood hobby has grown into a permanent hobby, which is expressed in making wooden models of sailing ships. This is an extremely interesting activity, and ready-made models are an excellent element of interior decoration. For example, you can make a miniature copy of the famous pirate frigate on which the famous pirate Francis Drake sailed, who went down in history as one of the most famous corsairs of all times.
Who is Francis Drake?
In the Middle Ages there were a huge number of pirates, however, only a few managed to preserve their memory. One of the famous corsairs was the Englishman Francis Drake, who received the nickname “Iron Pirate.” He began his pirate career at a very young age as a ship's chaplain, after which he served as a sailor, and at the age of 16 he became a ship's captain. During his life he visited large quantities sea campaigns and was able to win no fewer battles, including those with the English Royal Navy, so among the pirates he was considered a very successful, experienced and formidable captain.
Drake commanded several ships, among which the flagship was a galleon with three decks and five masts, which was called "Golden Hind", which translated means "Golden Hind". The captain chose this name personally because the ship was so fast that it could overtake any merchant ship and escape pursuit by warships. It is thanks to its high speed and excellent maneuverability that the ship gained its popularity.
A little about modeling
 The creation of miniature ship models occurs in stages. Each stage is aimed at creating individual elements of sailing ships, which are subsequently combined into single design. This process is very painstaking and requires from the creator not only extreme concentration and perseverance, but also the manifestation of imagination, since very often it is necessary to change the materials used or replace them with others that are more suitable for a specific model. In addition, in order for the model to be more realistic and copy the original as best as possible, you should be careful with the size of the originals, which takes a lot of time to find and transfer to the model.
Making a wooden model of a ship: what is required for this?
 Various techniques can be used to create models of sailing ships, however, the most common is the production of prefabricated parts carved from wood. This process is quite complex and requires a certain set of tools. In order to make a model of a ship from prefabricated parts you will need a knife, a hammer, a chisel, a drill with a set of drills, wooden block, a piece of thin fabric for sails, a rope, a wooden spire of the required length, wood glue, and when making large-sized models, it would be useful to stock up on a saw.
Carving of a ship from wood
At the first stage of modeling, blanks are made from which the model will be assembled in the future. To do this, you will need a chisel and a hammer, with which you need to remove the old bolts, as well as sandpaper or a file to make the block perfectly smooth. Next, you should clean the bark from the bark. In order for the work to go quickly, and to avoid injury during its execution, it is necessary to hold it towards the plane.
 When the blank for the future ship is ready, you can proceed to the next stage of modeling. On the block you need to draw a sketch with the markings of the future ship, and then cut out the ship’s hull from it. It is worth noting that this will require a well-sharpened knife, the blade of which should be at an angle of 10 degrees with respect to the block. Despite the fact that this part of the work is one of the easiest to model, it is nevertheless the most responsible, since when performing it you have no right to make a mistake. Therefore, slowly remove the wood in small layers, trying to keep the workpiece symmetrical.
Carving of the bow and sides of the ship
 When the preliminary model of the ship's hull is ready, you can move on to the jewelry part of the work. On the blank you need to draw the side parts of the hull, as well as the bow and stern. This is done in a similar way which is described above. First, everything is drawn with a pencil, and then cut out with a knife. At the same time, you must try to make all parts even and smooth so that the model resembles the ship as closely as possible. When making the bow, one of the sides of the block is slightly filed, after which it is given the shape of a saw cut.
Preparing the model and installing ship rigging
 The ship "Golden Hind" had three masts, so on the model you need to drill three holes for them, the diameter of which should be slightly larger than the thickness of the spiers. The distance between the holes should be the same and sufficient to ensure that the block does not crack during drilling. If suddenly a crack appears, then it is better not to glue it, but to redo the model again, since cracks will ruin the entire appearance ship. To ensure that the masts stand securely and do not fall, it is better to place them on wood glue.
Raise the sails!
At the final stage, the sails are installed. Since our galleon model has only three masts, only six sails are required - one large and one small for each of them. To make them, you will need thin material, from which you need to cut the sails to the specified dimensions. The sails must be trapezoidal in shape. Before installing them on the mast, you need to make notches on the spiers, after which the sails are set with glue. Both edges should be glued strictly in the middle of the sails. To ensure that the process is as comfortable as possible, and the result does not disappoint you, it is better to start installing the sails from the rear mast, gradually moving towards the bow.
 To decorate the sail, you can use a flag or a top sail, which is called a flying sail. Everything is clear with the flag and no one will have any problems with its production, so there is no point in describing the process of sewing it. But the flying sail deserves special attention. To make it, you need to cut a diamond out of fabric, its shape resembling a kite. Next, two perpendicular threads are glued to the part, which connect the opposite corners decorative element, and a thread is attached to one of the corners, with the help of which the flying sail is fixed on the back side of the main sail. It is worth noting that a flying sail can be made both for the stern mast and for all others. It all depends on your wishes and perseverance.
Once the ship model is completed, it can be painted in Brown color and open it with varnish, after which it can either be used to decorate the interior or even be launched into the water.
Ship modeling is one of the leading hobby areas in Russia. By purchasing a wooden ship model, you will receive not just an interior decoration, but also a museum-quality model. There is no shame in giving a wooden sailboat to friends and family. When making, you will develop skills such as perseverance, accuracy and patience. Let’s say right away that for assembly complex models It takes many months, but believe us, it's worth it. Prefabricated ship models made of wood is one of the most exciting and challenging trends in modeling. Most prefabricated models are copies of real ships with rich history. In our collection you will find a Viking ship, a pirate ship, ships from the time of Admiral Nelson, and many yachts. Ready model sailboat you will be proud to show to your friends.If this is your first ship model, then we recommend paying attention to the companies Amati and Occre. Since we have translated instructions into Russian for almost all models, the price/quality ratio is higher than that of other manufacturers.