Bush chrysanthemum in a foamiran pot. DIY foamiran chrysanthemum: step-by-step master class. Collecting a sprig of bush chrysanthemum, MK
This step-by-step master class covers a chrysanthemum made from foamiran for beginning needlewomen.
It is easy to find a practical use for a luxurious flower. It can be used to decorate brooches, hairpins, and hairbands. If you have a lot of time, make a bouquet, wreath or flower arrangement in a basket. Flowers made of plastic suede look like natural plants. Thanks to tinting, the petals turn out natural and very believable.
Craft materials
To make a beautiful chrysanthemum with your own hands, prepare:
- foamiran green and the color of baked milk (size A4); What kind of material is this and how to work with it;
- simple and manicure scissors;
- notebook and landscape sheets;
- glue;
- acrylic paints in pink and marsh shades;
- pencil, pen with a non-working rod.

Additionally, you need an iron with a temperature switch.
If you have never worked with foamiran and are afraid, try starting with an even simpler craft -. However, handicrafts with this material cannot be considered difficult.
Preparing patterns for petals and leaves
First you need to make a chrysanthemum pattern from foamiran:
- From a notebook sheet, cut out a square with a side of 10 cm.
- Fold it in half.
- Fold the resulting rectangle in half again.
- Bend the square diagonally.
- Fold the triangle in half too.
- Cut the resulting segment roundly into the shape of a petal.


Unfold the blank, you should get a flower template. Trace it with a pencil on a landscape sheet and fold it again. Trim about 0.5 cm from the edge. You should end up with a smaller template.


Repeat this four more times, cutting out a smaller template each time. The smallest blanks should have thinner petals. There are six patterns in total.

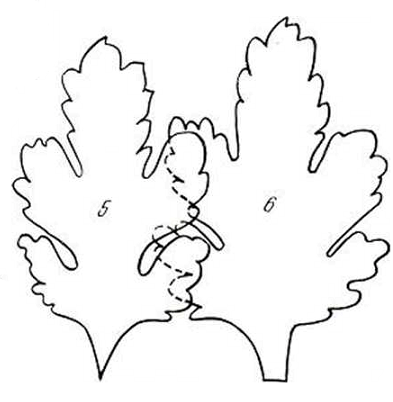
To pattern the chrysanthemum leaf, first draw a trefoil. From the top draw three more petals. Draw the cloves of the shamrock.

How to make a chrysanthemum from foamiran
Place the paper blank on the foamiran and trace it with a pen with a non-working rod (no paste!). Cut out the leaf and draw the veins with a pen.

Also, using a non-working pen, make flower blanks. There should be 9 layers in total, more is possible. Also cut out a circle with a diameter of 2.5 cm and cut its edges with a fringe of 1 mm.

Lightly dilute acrylic paints with water. Using a brush or fingers, apply the tint in a circle. The edges will appear.

Cut out all the layers of the flower; it is more convenient to do this with nail scissors. Tint the reverse side. Let it dry. Heat the iron to the "Wool" setting.
After a few seconds, the edges of the workpiece will begin to bend inward.

Also tint and treat the leaves of the flower.

Now you need to give the chrysanthemum made from foamiran a realistic shape. To do this, bend the petal and carefully rub it left and right with your fingers. Be careful not to tear.

In this way, you need to process each petal. For the center, prepare a strip 25 cm long and 1.5 cm thick. Cut the fringe 0.9 cm long and 1 mm thick along the edge. Iron for 2-3 seconds. Coat the edges with glue and roll it up.

Consistently assemble the chrysanthemum, applying glue to the middle of each layer of foamiran. Lastly, glue the leaves.

These are the luxurious flowers you will get in the end.

Due to the fact that acrylic paints were used in the work, the chrysanthemum will not suffer from minor ingress of water. But you should not expose it to washing or washing in the shower. We recommend paying attention to and, which are also made of plastic suede.
Secrets of how to make a beautiful chrysanthemum from foamiran with your own hands were prepared by Natalya Neustroyeva, step-by-step photos by the author. Get creative and have fun!
Good afternoon, dear friends, today I want to show you another interesting master class on making chrysanthemums from foamiran, the author of this master class is Irina Konshina. Chrysanthemum is a very beautiful and unusual flower, it is increasingly winning the love of our dear craftswomen. Indeed, due to the fact that chrysanthemum has so many beautiful shades and various shapes, it is very popular. After all, a chrysanthemum can be both simple and more complex in shape, so for any, even a novice craftswoman, it will not be difficult to make a chrysanthemum with your own hands. Irina has already shared with us a simpler way of making chrysanthemums from Thomas, if you are interested, you can.
To make a chrysanthemum we will need:
* Foamiran in the desired colors.
* Scissors.
* Thermal gun.
* Iron.
* Toothpick.
Method for making chrysanthemums from Thomas:
Let's make templates for making our chrysanthemum. We take cardboard and draw blanks of the required size on it: 1 circle - 10 cm. 2 circle - 8.5 cm. 3 circle - 8 cm. 4 circle - 7.5 cm. 5 circle - 6.5 cm. 6 circle - 5. cm 5 circle - 3 cm.

If you wish, you can draw flowers on the blanks or use ready-made templates; below you can find all the necessary templates for making chrysanthemums. We draw and cut out the blanks.

Now we apply them to foamiran and cut out circles of different sizes from it that we translated. There should be 1 circle each. 10 cm; 8.5 cm; 8 cm; 7.5 cm; 6.5 cm; 5 cm - 2 pcs. and 3 cm - 3 pcs.


Let's start making chrysanthemum. Take the circle and fold it in half and cut along the fold on both sides, not reaching the middle. Then we cut the semicircle in the center, also not reaching the middle. I also cut the resulting quarters in two places.

We round the edges and get the shape of a flower.


We do everything exactly the same with all the other blanks. We receive ready-made blanks for making our chrysanthemum.

We heat the iron and, one by one, heat our workpieces on it. First, we apply the smallest flower to the heated iron for about 2 seconds, it bends under the heat, twist it with our hands in the center, forming a twisted center of the flower.


Then we start working with other blanks. We apply each petal to the iron for 1-2 seconds and quickly, until the fom has cooled, we form a petal. Bend it lengthwise and pull it down with your fingers. The result is a semi-oval petal shape. We straighten the petal. The smaller the workpiece, the more we bend the petals.


We do this with each petal on all blanks.

After all the blanks have been processed, we begin assembling the chrysanthemum. We coat the middle of the largest flower with glue and glue the next size piece to it. We do this with all the blanks. We glue the last smallest, twisted piece into the center. It turns out to be a very pretty chrysanthemum.


Next we need to make leaves for the chrysanthemum, you can use the template below. Cut out 2 leaves. for chrysanthemums from green foamiran. We heat them and apply them to the mold. If there is no mold, then you can draw veins with a toothpick or something else.


Glue the leaves to our chrysanthemum. Our foamiran chrysanthemum is ready! We do the fastening at your discretion. Irina says that such chrysanthemum flowers look very beautiful on headbands.

And here are the promised templates for making chrysanthemums that you can use.


If you want your home to be decorated with amazing flowers that will never wither and have a beautiful appearance, then we recommend that you attend our master class on creating chrysanthemums from foamiran.
A foamiran chrysanthemum will require you to put in all your imagination and vision, as well as a lot of effort, but you will understand that it is worth it when you see the result of your creativity. By the way, such a flower can become a hairpin on your hair or a brooch on your dress. Before you start making it, make sure you have all the materials at hand.
Making a chrysanthemum from foamiran with your own hands in a master class
Foamiran is often used to make flowers and dolls, and is also called plastic suede. If you don’t have foamiran, then purchase the component at any craft store. To work, you should have at hand:
- Foamiran of different colors, at your discretion.
- Scissors.
- Super glue.
- Iron.
- Toothpick.
- Acrylic lacquer.
You can add pastels to this list if you want to give the piece a tinted effect.
Independent templates for chrysanthemums from foamiran.Before you start working, you need to cut out the templates so as not to spoil the base material on which they will be transferred. To make a template, take cardboard and cut out 7 circles from it, as shown in the photo:

Apply the resulting templates to the foamiran and cut along the contour of the mug. Fold each of the shapes in half. Cut the curve on both sides and then the center half of the circle. Now make a cut in the center of the circle mat. Also cut the resulting parts in two places. To create a flower shape, use scissors to round the edges of the cutout:

We analyze ready-made templates for chrysanthemums from foamiran
To simplify the task, you can use ready-made templates for creating a flower. Just cut them out and attach them to the foamiran to repeat the procedure. Similar to the template, you can add more pieces of the same shape but different sizes.
And also use templates for making leaves of different types, each of which can be repeated on one flower from 2 to 46 times.
A complete set of templates for creating a flower and its silhouette:

You can come up with various details for the flower by cutting them out of foamiran and applying them to the main composition. Each part undergoes mandatory processing with an iron before its use.
The basis of the chrysanthemum is made of foamiran.Prepare all the parts cut out according to the foamiran template and follow the following rules:
Take the smallest part and place it on a slightly heated iron for a couple of seconds. After this, twist the ends of the part so that they point upward.
Do the same procedure with other parts, modeling the petals:

Be sure that all parts are ironed, and then proceed with assembly. Take the largest piece and attach the smaller one to it using regular superglue. Using a similar principle, attach the remaining parts, from largest to smallest. The smallest one should be glued in the center. You will get such a beautiful flower:

If you want to follow the standards, use green foamiran to make the leaves, but you can use any color you like. Using the template, select the leaves, place them on foamiran and cut along the contour. It is best to use two leaves. Heat them with an iron, pressing them against the surface for a couple of minutes, and make thin veins on the leaf using a toothpick. Glue the finished leaves to the chrysanthemum, and the job is complete!
We shape a needle-shaped chrysanthemum from foamiran
You can give a different shape to the flower if you slightly change the manufacturing technique. The needle-shaped foamiran chrysanthemum looks very beautiful. To do this, follow these recommendations:
- Cut the foamiran into six longitudinal strips with a width of 1.5, 3, 4, 5 and 6 centimeters, respectively.
- Give the smallest strip a fence shape using scissors. Cut the sharp ends to create a fringe.
- Cut the other strips so that they have a tapered shape at the end and resemble petals.
- Turn the smallest strip into a bud using wire.
- All strips must be glued to the bud in sequence from short to long.
You can understand why the flower got this name by looking at this photo:

The petals of a flower are like many needles.
Video on the topic of the article
Strengthen your knowledge of making chrysanthemums from foamiran by watching a selection of our videos that present master classes. After receiving the information, you will definitely make a stunning foamiran flower!
Chrysanthemum is a widespread flower from which beautiful large bouquets are collected; it is also often used in wedding floristry. There are quite a lot of varieties of chrysanthemums. You can make any of them from foamiran. We will collect a large white chrysanthemum « Shamrock » , then we’ll make a bright, sun-yellow terry chrysanthemum, and we’ll finish this big master class with the popular bush chrysanthemum made from foamiran.
Chrysanthemum from foamiran master class (variety “Shamrock”), photo step by step
Before the master class, we stock up on foamiran and available tools.
To create a chrysanthemum you will need:
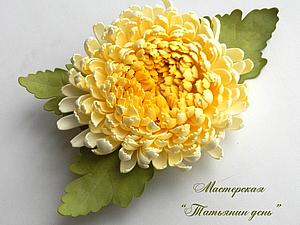
First, let's see what kind of flower we should get as a result of our work.
Chrysanthemum from foamirna, photo

Making a template for chrysanthemum. From white foamiran we cut out chrysanthemum petals of four sizes (15 pieces of each size). Small - 4.5 * 3 cm, second - 5.5 * 4.5 cm, third - 6.5 * 5 cm, fourth - 7.5 * 6.5 cm. Cut all petals according to the indicated dotted lines . Then cut out a strip of 2 cm * 15 centimeters from yellow foamiran.

Cut the strip into medium-sized fringe.

We process petals of the first and second sizes on an iron at silk-wool temperature, so that the petals are bent, and on the wrong side of each petal we apply a strip (texture) with the blunt side of a knife.

Petals of the third and fourth sizes are also processed using an iron, but we apply the texture to the petals from the wrong side at 1-3-5. Turn the petal over and apply a strip to petals 2 and 4.

We prepare the center of the chrysanthemum from the yellow fringe. We take the wire, make a hook on it, put a fringe on it and wind it at the same level, sometimes gluing it.

Then we take small petals and begin to glue them to the base slightly overlapping, 5 petals in a row. We glue the remaining small petals overlapping in a checkerboard pattern.

In the same order we glue the petals of sizes 2 and 3.


This is how we collected the entire chrysanthemum from foamiran. Now let's move on to the leaves.

From green foamiran we cut out a sepal and several leaves.

We process them with an iron at silk-wool temperatures and squeeze them well using a universal mold. We process each sepal leaf separately, first heat it one at a time, then squeeze it one at a time onto the mold. If there is no mold, draw the texture of the leaves and sepals with a stick.

We apply the tint with oil pastels, using several shades of green; if desired, you can tint the edges a little with brown pastel.

Treat the tops of the leaves with a lighter, heat them, then pinch the tip and pull.

Glue the leaves onto the litons and cover with acrylic glossy varnish.


Since the chrysanthemum has a fairly strong stem, today I will use cocktail tubes to thicken the wire. Place the tube on the wire and glue it to the sepals on top.

We take tape and process the stem of the chrysanthemum and immediately attach the leaves to the stem.

The white chrysanthemum is ready. It can be added to any bouquet of foamiran chrysanthemums.
MK chrysanthemum from foamiran (terry)
To create a terry chrysanthemum from foamiran you will need:
- yellow foamiran for the bud and green for the leaves;
- orange, brown, green oil pastels and sponge;
- acrylic lacquer;
- elastic band, hairpin or brooch holder;
- pink foamiran for flowers and green for leaves;
- brown, green (several shades) oil pastel and sponge;
- iron;
- second glue;
- zigzag and manicure scissors;
- wire No. 26-28 and 1 mm;
- tape tape.
- - foamiran Silk LUX apricot color;
- - dark green foamiran;
- - scissors;
- - stick or toothpick;
- - second glue;
- - two sheets of thick white paper;
- - sheet mold;
- - foil;
- - pastel white, orange, red, green;
- - iron;
- - base (rim, comb, clip, pin);
- - enormous patience.
We start the MK with a photo of the finished flower.

This is the yellow chrysanthemum you will learn to make with your own hands.
Chrysanthemum flower from foamiran, MK
First, let's make the preparations.

To make this chrysanthemum we need: a strip of yellow foamiran measuring 1 cm * 15 cm and squares 4 cm * 4 cm - 3 pieces, 2 squares 5 cm * 5 cm, 7 cm * 7 cm, 8 cm * 8 cm, 9 cm*9 cm.

Strip mode on a fence 3-4 mm wide.

Then we sharpen the edges of the fence and cut out circles from the squares.

Circles with a diameter of 4 cm will be completely tinted on both sides. On the remaining circles, apply a tint in the middle of the circle, the size of which is equal to the size of the small circles, that is, 4 cm. Apply the tint on both sides with orange oil pastel and shade it well with a sponge. We will also apply tint on both sides to the ends of the fence.

Then we cut circles with a diameter of 4 cm into 12 equal parts without cutting to the center 1 cm. We cut all other circles into 16 parts.

We sharpen each ray, making a chrysanthemum petal.

We process all petal circles with an iron at a temperature of click-wool. As you work, slightly curl the chrysanthemum petals with your fingers. After this, each petal is individually bent in half and pulled out. We do this on absolutely all petals.

We also iron the strip of the fence.

Then we take the wire and make a hook on it and begin to evenly wind and glue the middle. Since I will be making a brooch, in this case the middle can be screwed onto a toothpick.

We begin to glue the petal circles to the base. Glue the first small petal circles to the base, lift them a little and press each petal.


We glue subsequent petal circles at the base, and arrange the petals in a checkerboard pattern in relation to the petals of the previous row.

This is how we glued all the petal circles.

We got such a beautiful yellow chrysanthemum for a brooch. Now let's make leaves for it.
Chrysanthemum leaf from foamiran, MK

We cut out two chrysanthemum leaves from olive foamiran.

We use chopsticks to apply the texture of the leaf. If you have a chrysanthemum mold, use an iron and carefully squeeze the mold.

We apply the tint with oil pastels, using two shades of green and brown pastel. We apply the tint on one side.

We cover the leaves with acrylic varnish.

We take a brooch mount, glue the leaves to it first, only then attach the flower itself from foamiran.

This is the brooch we got with a chrysanthemum.
Bush chrysanthemum from foamiran: how to make?
To create a bush chrysanthemum you will need:

Photo of a sprig of bush chrysanthemum that we will make. We will also cut out the flowers for this branch without a pattern.
Making small chrysanthemums from foamiran, MK

Using scissors, cut out a 1 cm zigzag strip from pink foamiran. The length of the strip depends on how many colors you will make. For one flower 1 cm - 1.5 cm. We also cut out circles with a diameter of 3 cm and 3.5 cm. For each flower there are 3 circles.

Divide the circles into 12 and 8 parts, without cutting to the middle 1 cm.

Then we form the petals on the petal circles.

We form a fence on the strip.

The strip needs to be ironed so that the teeth are slightly bent.

We take the wire, make a loop or hook and form the middle, make 2 turns, glue it and tear off the strip.

Then we iron all the petal circles at silk-wool temperature and slightly help all the petals to rise with our fingers.

We begin to glue the petal circles to the base of the flower.

These are the chrysanthemum flowers we got. We tint the middle of the flower a little with light green pastel.

We cut out circles with a diameter of 2.5 cm from green foamiran and prepare the sepals, just as we cut out the petals. We roll the sepals between our fingers and glue them to the flowers.
Making leaves, step by step photo

From green foamiran we cut out three chrysanthemum leaves and tint them with oil pastels, take several shades of green and a little brown along the edges of the leaves. Blend well with a sponge.

We glue the leaves onto the litons (the size of the litons is 8 * 10 cm). We glue the liton in height to the middle of the sheet so that it holds tightly and can be bent in the desired direction.

We treat the litons with tape.
Collecting a sprig of bush chrysanthemum, MK

We collect a sprig of flowers, treating the wire with tape.

We attach the leaves to the branch of flowers and once again treat the stem with tape. Don't forget to stretch the tape. These are the small chrysanthemums we made from foamiran. They can be used for small interior compositions. If you make them white, they will look good with a foamiran sunflower.
Chrysanthemum from foamiran (foma) master class | DIY flowers
Chrysanthemum from foamiran (foma) master class

Good afternoon, dear friends, today I want to show you another interesting master class on making chrysanthemums from foamiran, the author of this master class is Irina Konshina. Chrysanthemum is a very beautiful and unusual flower, it is increasingly winning the love of our dear craftswomen. Indeed, due to the fact that chrysanthemum has so many beautiful shades and various shapes, it is very popular. After all, a chrysanthemum can be both simple and more complex in shape, so for any, even a novice craftswoman, it will not be difficult to make a chrysanthemum with your own hands. Irina has already shared with us a simpler way of making chrysanthemums from Thomas, if you are interested, you can watch the master class here. But a chrysanthemum can also be made from satin ribbon, leather, plastic bottles, etc., and everywhere it also turns out very beautiful and unusual. You can also find master classes on making chrysanthemums from other materials on the site through a search engine. Just enter the word CHRYSANTHEMUM and you will be given many interesting master classes on how to make it. Now let’s return to the topic and consider the MK of chrysanthemums made from foamiran.
To make a chrysanthemum we will need:
* Foamiran in the desired colors.
* Scissors.
* Thermal gun.
* Iron.
* Toothpick.
Method for making chrysanthemums from Thomas:
Let's make templates for making our chrysanthemum. We take cardboard and draw blanks of the required size on it: 1 circle - 10 cm. 2 circle - 8.5 cm. 3 circle - 8 cm. 4 circle - 7.5 cm. 5 circle - 6.5 cm. 6 circle - 5. cm 5th circle - 3 cm. If you want to make the chrysanthemum smaller in size, then the large blank can be removed.
If you wish, you can draw flowers on the blanks right away or use ready-made templates; below you can find all the necessary templates for making chrysanthemums. We draw and cut out the blanks.
Now we apply them to foamiran and cut out circles of different sizes from it that we translated. There should be 1 circle each. 10 cm; 8.5 cm; 8 cm; 7.5 cm; 6.5 cm; 5 cm - 2 pcs. and 3 cm - 3 pcs.
Let's start making chrysanthemum. If you did not use a template and did not select the petals, then take the circle and fold it in half, and cut along the fold on both sides, not reaching the middle. Then we cut the semicircle in the center, also not reaching the middle. We also cut the resulting quarters in two places.
We round the edges with scissors and get the shape of a flower.
We do everything exactly the same with all the other blanks. We receive ready-made blanks for making our chrysanthemum. The smallest pieces can be cut differently, or you can leave them unchanged, see what is more convenient and pleasant for you.
We heat the iron (no more than two) and take turns heating our workpieces on it. First, we apply the smallest flower to the heated iron for about 2 seconds, it bends under the heat, twist it with our hands in the center, forming a twisted center of the flower.
Then we start working with other blanks. We apply each petal to the iron for 1-2 seconds and quickly, until the fom has cooled, we form a petal. Bend it lengthwise and pull it down with your fingers. The result is a semi-oval petal shape. We straighten the petal. The smaller the workpiece, the more we bend the petals.
We do this with each petal on all the blanks and we get just such a blank for making our chrysanthemum.
After all the blanks have been processed, we begin assembling the chrysanthemum. We coat the middle of the largest flower with glue and glue the next size piece to it. We do this with all the blanks. We glue the last smallest, twisted piece into the center. It turns out to be a very pretty chrysanthemum.
Next we need to make leaves for the chrysanthemum, you can use the template below. Cut out 2 leaves. for chrysanthemums from green foamiran. We heat them and apply them to the mold. If there is no mold, then you can draw veins with a toothpick or something else.
Glue the leaves to our chrysanthemum. Our foamiran chrysanthemum is ready! We do the fastening at your discretion. Irina says that such chrysanthemum flowers look very beautiful on headbands.
And here are the promised templates for making chrysanthemums that you can use.
Making a chrysanthemum from foamiran
Truly, chrysanthemum is the divine Queen of Autumn!
Bright summer flowers have faded and faded, giving way to the slightly sad and exquisite beauty of chrysanthemums. There is some kind of mystery in this flower - as if the chrysanthemum, which is often called the last flower of the year, knows some important secret of life and is unable to tell us people about it, but strives to at least prolong the passing summer with its flowering...
So, today I will show you how to make a chrysanthemum from the amazing material foamiran or plastic suede.
To work we will need:

1. Foamiran of two colors - ivory (can be replaced with another color) and green.
2. Dry pastel, in my case two shades of yellow and green.
3. Regular scissors, scissors with sharp tips, and you can take curly scissors and a stationery knife.
4. Wire and tape or floral wire.
5. Glue gun and superglue.
7. Wet wipes.
8. Base for a brooch or hairpin.
10. Stacks or improvised materials (thin brush, hook or knitting needle).
12. Patience, as there are more than 300 petals.

Print out the pattern. We transfer each size of petals separately onto paper, trace and cut out. We copy only the left half of the circle from III to VII petal numbers. We attach the templates to light foamiran and trace them with a toothpick (or a sharp stick, or a non-writing pen). There are only five sizes of petals, 11 pieces each. I cut out the entire petal with curly scissors, and then cut it into narrow petals. It's faster that way. But you can simply cut it using regular scissors according to the template. We also cut out a strip of 13x2 cm and two circles with a diameter of 4 cm from light foamiran, and one circle with a diameter of 6 cm from green foam. We cut narrow petals on the green circle and on the strip.

We tint the petals. I took two yellow colors, dark and light. We will tint the circles, stripes and the smallest petals dark yellow. We finely trim the pastel with a stationery knife, dip a damp cloth in these shavings and paint the petals. It is convenient to hold the petals by the corner and paint from the center to the edges; the unpainted corner in the flower will not be visible. We tint the next size of petals with light yellow, but paint them well. We don't paint the next petals so much, but we slightly tint the tips of the last ones. Let's tint the green backing a little with dark green.

We make veins on the leaf. If there is no mold, then you can simply draw on it with a toothpick. If there is a mold, place the sheet of paper on the iron for a couple of seconds and press it onto the mold while still hot. Then the leaves can be tinted with dark green pastel, then the veins will be better visible.

Let's start modeling the petals. We apply the strip to the iron, the petals themselves shrink a little and bend inward. We also apply small petals to the iron, then quickly onto the palm and press with a stick or stack along the petal almost to the very tips to form a hollow. We twist the stack a little around the axis in one direction, then in the other direction, pressing the petal into the palm. Then we heat the corner of the petals and also fold it inward. And so four sizes of petals.

We heat the largest petals not entirely, but in parts. We move the stack more forcefully from side to side, thereby thinning the petal. Then we fold each individual petal in half and very carefully stretch the fold, thereby giving it a convex shape. Heat the corner and bend the petal inward. Also apply the green glue to the iron and slightly curl the ends with your fingers.

Cut a piece of wire, make a loop at the end and glue a piece of foil to it. We compact the foil into a ball with a diameter of 2 cm. Heat the heat gun. We smear the middle of one of the yellow circles and glue the circle to the ball, stretching it slightly. Cut out the corners of the circle and glue the remaining parts to the foil ball. We do the same with the next yellow circle. It turns out to be a ball covered with two layers of foamiran.

We take scissors with sharp edges and very carefully cut the top layer with small corners. Then we take a strip with petals and begin to glue it in the middle of the ball, so that the edges of the petals meet at the top. We wrap the strip twice around the ball, gradually gluing it with glue. The result is the middle of the flower.

We take the smallest petals, first try them on top of the flower, retreating 1 mm from the previous row. Holding the petals with your hand, turn the ball over, bend the corner and glue the petal from the corner to the middle of the petals so that it sticks to the edge of the strip in the previous row. Glue the next petal in a circle, overlapping one small petal. And so on.

We continue gluing the petals, first aligning the tips, moving them from the center by 1 mm and forming the top, and then gluing only the corner of the petal from below. And so on until all the petals are gone. We cut the wire close to the flower and glue the green backing, covering the lower part of the flower.

In the middle of the leaves on the back side we glue pieces of wire 10 cm long. If you don’t have floral wire, you can take regular thin wire and wrap it with tape. It’s easier to glue it with superglue. Then we coat the edge of the wire with glue and glue the leaves to the flower. The final stage - take the base for the brooch or hairpin, I have a universal one, coat it well with glue from a hot-melt gun and glue it to the bottom of the flower.

That's all. You can wear it! I wish you an autumn full of love, warm colors and the smell of chrysanthemums.

Tatyana and my Workshop “Tatiana’s Day” were with you
www.livemaster.ru
Chrysanthemum from foamiran - how to make a hair decoration with your own hands
With the arrival of autumn, it’s time to remember another seasonal flower - the chrysanthemum. She is sung and revered by poets and artists. Many myths and legends are dedicated to her. It is known that archaeologists found images of the solar flower on fragments of pottery and marble, on ancient coins and in patterns of oriental porcelain. As you may have guessed, this master class is dedicated to chrysanthemums made from foamiran.

Materials and tools:
Chrysanthemum can be almost any color. Translated from Greek, the word “chrysos” means golden, and “antemos” means golden flower. Translated from Japanese, chrysanthemum means sun and is called “kiku”. In any case, it is understood that the color of the classic chrysanthemum varies from yellow to yellow-orange (sunny).
In our version we will use apricot colored foamiran.
Cut out squares: 10 pcs. size 12 cm, 2 pcs. - 10 cm, 1 pc. - 8 and 9 cm.

We iron each cut. We place the fom sheet between sheets of white paper, iron it on both sides, wait for it to cool, and separate it from the paper.

By subjecting the foamiran to heat treatment, we thinned it and it became more elastic.

Cut out circles from the squares. This can be done by eye or using a template.

We find the center. We mark the circle with a stick into 8 sectors, each sector is divided into 5 equal segments.

From the marks to the center we cut the entire circle and get 40 future petals.

Cut off the ends of each petal on both sides.

We tint the ends with white (one side only) and orange pastel (both sides).


On the side where the tips of the petals were tinted with white, we enhance the brightness with red pastel.

On one blank (12 cm in diameter) we tint it green. This will be the very last part in the assembly.

We paint blanks with a diameter of 8 and 9 cm in the same way as all the details, but we make the tips of the petals green.

We stock up on patience and begin to form the petals. We apply the tip of one petal to the iron, fold it in half and slightly flatten it and fold it up.
///Attention! The white tip should be on the convex side, which means that you need to apply the unpainted tip to the iron. ///

We form petals on all 14 parts. If we make a mathematical calculation, then we need to give shape to 560 petals (14x40).

Cut out leaves 8 to 10 cm long.

Since chrysanthemum is an autumn flower, the color of the leaves should be appropriate. First of all, we draw veins along the leaf with green pastel on both sides. Add a little orange and yellow to the front side of the sheet.

Heat the sheet and apply it face down to the mold. Using our fingers we try to press the foamiran well into the mold. Fold the sheet in the center and bring the fold to the iron for less than a second. Press the bend with your fingers.

We apply a section of the sheet (from the end to the central vein) to the edge of the iron - we get a convexity.

Take a small piece of foil.

Roll into a ball and place on a toothpick.

Cut out the part shown in the photo.

Glue it to a ball of foil. We tint it green. The center of the chrysanthemum is done.

We begin assembling the chrysanthemum with the smallest part (8 cm).

Lubricate the entire round center with glue and lift all the petals.

We plant a second piece measuring 9 cm.

Apply glue to half the height of the glued part, raise part of the petals.

Glue all the petals in small sections. Using this method of fixation, the petals are glued more evenly.

We add two more parts, but apply the glue a little lower.

Glue all the remaining parts. Each time we apply the glue lower and lower so that the flower is not in the form of an eternal bud, but blooms.

Don't forget that the very last part should have a faint green tint.

Remove the toothpick from the chrysanthemum.

We cut very thin strips (tendrils) from apricot foamiran, stretch them, heat them on an iron. The length of the strip almost doubles. Tint red and green on both sides. Glue together approximately seven pieces, making three bunches.

Glue to the base of the leaves.

We try on the leaves on the chrysanthemum and glue them.

We cut out 4 narrow leaves from the fom, heat them and roll them between our fingers, and add thin tendrils to one of them. Make the sepals 2.5–3 cm in diameter (preferably 2 pieces).

Glue it to the chrysanthemum.

Cover the base of the leaves with a sepal.
This chrysanthemum can be placed on a headband, comb, or glued to a brooch pin. We will attach it to a hair clip. Therefore, we glue the second sepal to the clamp. And after that we plant it on top of the flower (on the sepal).

It is believed that chrysanthemum helps to gain confidence in oneself and one’s abilities, restores mutual understanding, and improves partnerships. By making yourself a decoration with a chrysanthemum, you will not only be irresistible, but also create a friendly atmosphere around you.
Foamiran flower: secrets of needlework

A foamiran flower is a novelty in the world of decor and handmade. And at the same time, it is gaining more and more popularity among craftswomen. It is used to create various decorations in the form of flowers, magnets, bookmarks, and toys.

It also acts as an element of scrapbooking. But bouquets made from this material are especially popular. They seem real, fragile and delicate, so they are an indispensable element when decorating rooms.

origin of name
This material comes to us from abroad, because it is produced in Iran and China. The name of the company “FoamIran” was taken as a basis, and its original name was ethylene vinyl acetate foam. But calling it so long and difficult; it’s easier to call it foamiran, foam, or fom. People call it artificial (plastic) suede. Based on the above, it is worth paying attention to the advantages of foam.

Features of the material
The texture is very light, it feels soft and pleasant, slightly porous. It comes in different colors and shades, so a foamiran flower will turn out colorful and original.

It can be given the desired shape, it is easy to manipulate and stretches by 10-15%. Stretching more may cause it to become deformed or torn, so don't overdo it. It is cut quite simply, the edges of the cut are not sharp, so you can do without additional processing. It is also paintable and washable.

It repels water, making it invulnerable to moisture and weather conditions. Foamiran is non-toxic and does not absorb odor. It is not difficult to work with it, the material is simply glued together, and the required shape can be easily given with your fingers. You can use other tools in your work. As you can see, the fom is universal and with its help you can make all your fantasies come true.

Note! On the other hand, the disadvantages of foam are that if it is stretched carelessly it will tear and it will be impossible to return it to its previous shape. Its surface can easily be scratched or left dents.

Area of use
Since it is used in the field of handicrafts, jewelry is most often made from it. It is good for realizing floral designs and ideas. You can get acquainted with some of them by watching a video master class about flowers from foamiran.
Their beauty is so captivating that you will definitely decide to try it. Particularly special will be full buds like roses or peonies, when the petals from the fom are glued one by one, and take the form of a perfect, blooming flower, which is picked and placed in a flowerpot. In interior decor you can create entire flower arrangements. If you have a strong desire, it is not at all difficult to succeed in this matter.
Foamiran poppy (foma) master class | DIY flowers
Dear friends, today we will make with our own hands a bright, beautiful poppy flower. Making a poppy is very simple, but it turns out very beautifully; any novice craftsman can handle it. Poppies are beautiful, bright flowers that have won love and attention. Despite their prostate, they attract attention with their appearance. Let's start the master class and look at the detailed process of creating a poppy with your own hands, the author is Polina Molodova
To make a poppy you will need:
* Foamiran.
* Scissors.
* Wire.
* Threads.
* Bead.
* PVA glue.
* Semolina.
* Alcohol.
Method for making poppy seeds from foamiran:
To make a poppy we will need stencils, you can use these...

We cut out the stencils and apply them to the foamiran. To make one poppy we need five small petals and five larger petals. We also trace and cut out the required number of leaves.

Let's make a box for poppy seeds. To make a poppy box we need a bead, wire, thread and an iron. Take a bead and insert a wire into it, align the edges of the wire and twist it.

We heat a small piece of green foamiran on an iron and wrap it around the bead. Using black threads we will make veins on the box, as shown in the photo.

Now we need to make the stamens around the box. We make the stamens like pompoms.

Next we need to paint the tips of the stamens yellow. Take dry egg dye, pour it into dry semolina and mix everything thoroughly. Next, little by little add vodka or alcohol to the semolina and mix everything again, this is so that it quickly dries and becomes colored. If you add water, it will become limp, swell and you will end up with porridge)) Dip the ends of the threads into the finished colored semolina, but first apply a little PVA glue to them.

Now let's add texture to the petals. Take the petal and fold it as shown in the photo. And then we twist it a little.

This is the poppy petal we got. If you have molds, you can use them and create texture on the petal with them.

We take a ready-made poppy box and glue the stamens around it.

This is the middle of the poppy we got.

The petals are ready, the center is ready, let's start making the poppy.

One by one, we begin to glue the finished petals to the center. First we glue the small petals, and only then the larger ones.


Foamiran poppy (foma) is ready. Cut the wire at the base.

Glue the finished leaves to the poppy. The poppy is ready, how to use it is up to you. You can make a beautiful hair decoration.

On the eve of the first of September, for a wedding or other celebration, the question of beautiful decoration of the event venue and decorations always arises. And the first thing that comes to mind in this regard is balloons and flowers. Flowers are used to decorate rooms, decorate accessories and to create individual bouquets. A self-made chrysanthemum is an excellent option for such use. These flowers can be used to make various hair decorations and jewelry.
Using the video, you can make a real masterpiece by following step-by-step instructions.
How to make chrysanthemums from foamiran with your own hands
In order to make such chrysanthemums with your own hands, a detailed master class will help. If you follow all the instructions, the flowers will turn out very lush and like real ones.
To work you will need:
- Foamiran
- Scissors
- Hot glue gun
- Toothpick and cotton swab
- Dry pastel
- Sponge
The process of making chrysanthemums from foamiran
- Circles are cut out from a segment of foamiran of the desired color. It is more convenient to draw with a compass, since a hole from the compass needle remains in the center, which will be useful in further work. The number and size of circles depends on the size and splendor of the finished flower. In this case, 6 circles are used. They all differ in size and overlap one another (8 cm, 7 cm, 6 cm, 5 cm, 4 cm, 3 cm). A circle of 3 cm is cut out in one copy, all others are cut out in 2 pieces.
- A circle of 3 cm must be divided into equal parts. To do this, fold it in half, and in order to make sure that it is folded evenly, the hole from the compass needle will be located at the fold. This circle needs to be divided into 8 parts. Using scissors, it is cut on both sides along the fold line, not reaching the hole from the compass by 3-4 mm.

- A circle of 4 cm is divided in the same way and cut into 8 parts.
- Pieces of 5 cm and 6 cm are divided and cut into 12 parts.
- Circles of 7 cm and 8 cm are divided and cut into 16 parts.
- The smallest detail of 3 cm is taken and each petal is rounded with scissors to give the shape of chrysanthemum petals. The result is a cute blank that resembles a flower. Such manipulations are done with all circles.
- At this stage, the workpiece can be left in this form and this will be enough. But for complete realism, you can tint each petal with pastel, then the finished flowers will look more natural. To do this, rub dry pastel with a regular dishwashing sponge and coat each petal of the workpiece well on only one side.

- The iron is heating up. The smallest piece is taken and the untinted side is applied to a hot iron for a few seconds. Due to the high temperature, the petals of the workpiece bend inward, and at this stage it is set aside.
- The next workpiece is taken. You need to heat one petal at a time. One petal is put forward, applied to the iron for a few seconds, under the influence of high temperatures it bends and a boat is formed with the help of your fingers, but without bending or forming fold lines. This is how all the petals are made, one on each workpiece.

- Using a toothpick, pierce the middle of each piece. This procedure is done in order to string each piece onto a cotton swab. Since the cotton swab is thick, in order to avoid tearing the foamiran, it is better to pierce it with a thinner object.
- Take a cotton swab and cut off one part of it with scissors. The second part remains to form the flower bud. The smallest piece is put on it and stretched to the cotton swab. This part is covered with the petals of the blank, forming a bud, and sealed from the inside with hot glue.
- Take a 4 cm blank. The base of the bud is well coated with hot glue and the blank is pulled tightly. It is glued and the finished part of the flower is obtained. This is done with each subsequent workpiece. The result was a beautiful flower with a stem shaped like a cotton swab.
- The leg is cut off with scissors. The flower is ready.

There are a lot of varieties of chrysanthemums, so to create each you need to take into account certain features. To make a needle-shaped chrysanthemum, the same technique is used, but the petals should be cut sharper. To give the flower a natural and natural look, you can add leaves to it. They are also made from foamiran, but a different color is used.
If such flowers are intended for festive decoration, then bright and rich colors would be quite appropriate. Chrysanthemum leaves can be made from green foamiran. But if such flowers are used to create jewelry or accessories, then it would be preferable to use olive-colored foamiran. This way it will have a more natural shade than bright green. To create leaves for a flower, it is more convenient to use ready-made cardboard templates.
Since the center of the chrysanthemum turns out to be absolutely even, such flowers can be used not only for decoration, but also to create hairpins and elastic bands, hoops and bracelets. These flowers amaze with their beauty and, thanks to this technique, they can easily be confused with natural chrysanthemums.
Video on the topic of the article