DIY garage products. Homemade machines and devices for the garage. Required tools and materials
Usually a garage is a real man's second home. This is a place to store vehicles, a storage room, a workshop and a relaxation area. The garage is equipped with various workbenches, shelves, tables and cabinets to ensure a comfortable stay for both people and vehicle. In order not to buy expensive items, you can make the necessary homemade devices for the garage, which will simplify the use of the room.
We will look at recommendations and tips on how exactly you can make accessories for your garage with your own hands. What are these devices? What needs to be done in the garage? How to arrange it correctly so that everything is close at hand? The tips in this article will help with this. In addition, we will look at visual videos to simplify the task.
There is a large list of what a man would like to see in his garage. After all, it must be quite spacious in order to set up a workshop there, clean so that nothing interferes with work, and also comfortable and properly equipped. Nobody wants to look for a screwdriver among a pile of metal and other tools.
To ensure comfortable conditions in the garage, you need to take into account the basic requirements regarding the arrangement of the space inside:
- The inside of the garage should have shelves for storing seasonal tires, as well as shelves for tools and other things. This will save space and organize it correctly.
- It is necessary to provide high-quality lighting, since usually there are no windows in the garage, or only one. Lack of lighting makes the garage gloomy and uninviting. In addition, working in the twilight is not entirely good for your health, and you can make a mistake and damage something.
- To expand the range of work inside the garage, you need to install a construction workbench, machine, inspection hole and other devices.
Comment! Experts have calculated that the list of these elements should not occupy more than 20% of the space inside.
Below is an example diagram of how you can make it and the accessories for it.
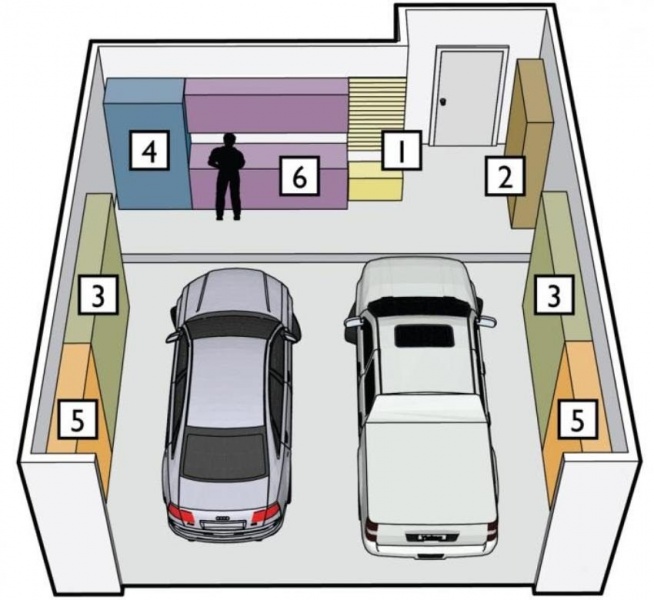
It deciphers like this:
- Space for open brackets and hooks to hold your most useful and frequently used tools.
- Shelving space for small tools and devices.
- Shelves for car parts and tires.
- Space for a rack with large tools and fixtures.
- Cabinets for other things such as gardening Tools, broom, mop, etc.
- Workbench with shelves.

Now that we have found out an example of how you can organize space, let's look at how to make homemade machines and devices for the garage.
DIY garage shelves
Almost 80% of the shelves in the garage are needed to store various devices and accessories, such as:
- tools and accessories for the garage;
- components for the vehicle;
- accessories.
Very often, do-it-yourself shelves are combined with a rack. It is also made by hand. It is the rack that is considered as the main place for storing things. And when the rack is installed, all that remains is to fill it with spacious and convenient shelves for garage accessories.

It is necessary to allocate space in the garage for storing work clothes. It is better to place it near the door so that you can immediately undress when you arrive in the garage, and then change again when leaving it. You don't need to create a whole closet or a large hanger. Sometimes one shelf with a hook is enough. However, it all depends on the needs.
It is worth considering that a garage is a room with dangerous flammable materials: gasoline, oil, paint, solvent, polish, etc. Therefore, you need to make a separate cabinet where all these materials will be stored. Place a fire extinguisher and a barrel of sand near it, which will be enough to put out the fire.
Advice! To protect the wheels from dust and dirt (since they will be on the brackets), you can use large bags or buy special tire covers.
From this video you can clearly see exactly how to make shelves for storing tools and other accessories for the garage.
Brackets and shelves for tires
The spare tire kit is bulky and takes up a lot of space. It is usually stored in the garage. And so that it doesn’t take much usable space, they can be hung. An area at a height is not needed, so brackets for storing tires are fixed at a height.
The design of the garage fixture is as follows:
- two frames made in the shape of a triangle from corners. Jumpers are installed between them. Durable metal is suitable for this purpose;
- triangular frames are made at an angle of 90° and mounted on the selected area. The wheels are installed perpendicular to the supporting structural element. The tires themselves should be slightly recessed between the jumpers. This way they will hang more securely, fixed under own weight. The photo shows how to implement this.

Advice! Place the wheel rack higher towards the ceiling. This will allow you to store them conveniently; they will not take up useful space.
To compactly store wheels in the garage, some people use a rack with four wide shelves. It is used for wheels along with rims. It is convenient to place them horizontally one above the other. The rack can be made corner and installed higher to the ceiling.
To create the device you will need:
- wooden bars;
- wooden boards;
- several sheets of chipboard.
You will learn how to make such home-made devices for the garage with your own hands from the video.
Tool Storage Ideas
To store tools, spare parts and other garage accessories, you can create an area to display them. It is enough to make a spacious rack and shelves with your own hands. There are many different options for accessories in the store, but they will cost more. And something made with your own hands is much more valuable. In addition, the dimensions of the garage fixtures will be created according to its parameters.
Important! The minimum withstand load for shelves and racks is 150 kg or more. But one section should have a maximum weight limit of 500 kg.

There are several rules if the garage fixture is made of wood:
- Suitable hardwoods such as beech, oak or hornbeam. Pine is usually used because it is cheaper and easier to process. However, hard rocks are more reliable.
- Before assembling the devices, it is necessary to treat the wood with special protective impregnations and antiseptics. This will extend their service life
- The parts that make up the frame need to be sanded or sanded. This will make operation safer.
- It is better to create shelves from sheets of chipboard, plywood or OSB. As an option, use DVL slabs, the thickness of which is at least 4 mm.
You need to choose the thickness of the tree based on the loads placed on it. There are some guidelines for making garage shelves. First you need to create a plan for placing shelves, decide on the size and make markings. Next, the material (boards, fasteners) and tools are prepared. Using a hammer drill, holes are drilled in the wall and dowels with hooks are inserted into them. This will strengthen the fixation of the devices. Suspensions are attached to the boards, after which the finished devices are fixed. It is important to use building level to make everything smooth.
Important! When making shelves, it is better to create several short structures than to make one large one. The fact is that a large one may not withstand the weight of the tool and will break in the center under the weight.
All that remains is to paint the product or cover it with a special adhesive decorative film.

Now let's look at the technology of creation. We will need a board 10 and 20 cm wide. But, everyone chooses the dimensions of the structure themselves. Instructions:
- A board 10 cm wide needs to be cut into several parts, the lengths of which are 18, 27.5 and 30 cm. These parts serve as spacers.
- A 20 cm board is cut into pieces of 36 cm. They will be used to form shelves in the rack.
- The board that serves as the basis for the structure needs marking. It is necessary to mark the places with spacers. An indent of 2.5 cm is made on each side.
- The upper spacer is glued, the upper shelf with the spacer is fixed to it. The following parts are formed using the same principle. The lower spacer is mounted at the very end.
- The device is turned over, and the spacers are tightened with screws along with the base of the structure.
- All that remains is to sand the product with sandpaper and cover it with 2 layers of varnish or other material.
- The device is fixed to the wall with anchor screws both under the top and bottom shelves.
If you need to strengthen the rack, install between the sections wooden blocks. Thanks to them, the load is evenly distributed throughout the structure.
Note! Comfort in the garage is also ensured by high-quality lighting, ventilation and heating.
Light bulbs or lamps are used for lighting, and for ventilation it is enough to make vents in brickwork. They are covered with bars. Heating can be done by stove, gas, air or water.
Creating a Workbench for a Garage
The design of the workbench includes a tabletop and a base, and several clamp-type elements. You need to choose the right height of the workbench. It depends on the height of the person who will work in the garage. You can use your own height as a guide. kitchen table. To create a workbench, it is better to use drawings, as in this photo.
Such drawings are just an example; they can be adjusted to your own dimensions. Now you can get started:
- The tabletop is being assembled. To do this, you need 20 boards, measuring 5x10x200 cm, with grooves of 2.5x2.5 cm in the fifth and sixteenth elements. Fastening with adhesive and metal ties. You need to wait until the wood dries.
- Next the legs are made. To do this, you will need a 10x10x80 cm beam with grooves for brackets on the supports in front. They are fixed using brackets.
- The base of the table stand is being assembled. Two frames are made from 5x10 cm boards. Type of fastening: tenon in groove, 2.5 cm deep, and bolts.
- The side and rear supporting walls made of chipboard slabs, 10 mm thick, are fixed. Screws are used here.
- All that remains is to fix the upper tabletop to the upper frame using bolts.
To ensure that the device lasts a long time and does not rot, wooden elements need to be treated with drying oil and varnished.
Now that the table is ready, you can make a garage press. You can buy it, but if you want, you can do it yourself. To do this, you will need 4 pieces of metal pipes from which the frame is made. Its dimensions are 178x80 cm. The parts are connected by welding. Next install:
- Latch.
- Removable stop.
- Hydraulic or bottle jack.
Above is a diagram showing the upper force platform (1), nuts (2), lower platform (3), studs with a diameter of 30 mm (4), lower threads of the studs (5), hydraulic jack(6), a base whose thickness is 20 mm (7).
Below is a video on how to make a metal workbench for your garage.
Conclusion
Making homemade garage gadgets with your own hands is not difficult if you have instructions and the right tools. But they can greatly simplify work in the garage. There are also other devices that will be useful; everyone decides for themselves what else they need in the garage.
A garage is not only a place for a car, but also a source of invaluable additional space, which can be used truly rationally if you design useful devices with your own hands.
DIY garage accessories
Since the garage, by its intended purpose, is a home for cars, you should be careful to ensure that the space for tools is well organized. Also, there will probably be several square meters in the room in order to remove some of the items from the apartment, so as not to clutter the living space.
During installation various devices indoors, it is important to consider that all available equipment is at hand. To do this, you can use the following recommendations:

Rational organization of space in the garage creates many tangible benefits:
- it becomes possible to independently carry out short-term repairs of car parts and other mechanisms, due to which you can significantly save money;
- Convenient placement of tools significantly speeds up work and saves time;
- Creation additional places for storing tools, old things, clothes, it makes it possible to unload the apartment from things that are rarely used in the household;
- finally, the well-thought-out internal logistics of the premises allow it to maintain its attractive appearance and avoid clutter.
NOTE. At the project development stage, it is important to take into account the area of the room, and also take into account several mandatory utility compartments - for storing summer and winter tires, cans, jacks, etc.

Video TOP best ideas for decorating a garage with your own hands
Garage rack: step-by-step manufacturing instructions
Since the garage always contains quite a lot of items, organizing their arrangement is a fundamental requirement for proper storage. The simplest and at the same time convenient option is to create a rack with shelves.


Preparatory stage
Before you begin installing the structure, you should consider several important requirements:
- The total weight of the rack should not be more than 4-5 centners - otherwise the structure will be very difficult to move if necessary. It will also put significant pressure on the floor, which can deteriorate the quality of the coating.
- When choosing materials, it is important to proceed from considerations of strength and durability of the structure. Metal, as well as wooden products made of beech or oak, are ideal. Plastic shelves are not suitable - they are not durable and, moreover, may not withstand temperature changes.
- Choosing between metal and wooden structure, you should proceed from your specific needs. Metal is more durable and stronger, but wood is more affordable. If you need to place a few tools, it is enough to make a small wooden rack.
- Since all the tools are very heavy, you should immediately calculate the strength of the structure so that it can withstand at least 100-150 kg on one shelf.
Installation of a wooden structure
To make such a device for a garage with your own hands, you will need ordinary working tools:
- hacksaw for wood and metal;
- hammer, nails;
- screwdriver, self-tapping screws;
- construction tape;
- construction level;
- electric drill.


Before assembly, it is important to prime and varnish all wooden parts. In the garage it can be observed high humidity or temperature changes - therefore, without treatment, the tree will not last long.
Video - Do-it-yourself wooden shelving technology
Installation of a metal structure
Metal structures are exceptionally durable and strong. In addition, they do not need to be treated with special materials to prevent rotting.

You can make both a rack and separate structures, for example, for storing rubber, from metal.

In this case, you should take into account the rules for storing tires, which are shown schematically in the figure.

At the design stage of a metal rack, you should take into account that all the necessary items can be freely placed in it. You can take this drawing as a basis.

Or this option.

The easiest option is to purchase a modular design and assemble it yourself. But you can make this device for the garage with your own hands. The sequence of actions is as follows:


It is better to place the heaviest equipment on the lower shelves for optimal load distribution throughout the rack. At the same time, the most the best option– when the lower floors are made of corrugated metal, and for the upper floors it is quite acceptable to use durable chipboard.
Hanging shelves: fast and practical
Not in all cases there is a need to create a rack, since it will take up a lot of space. On the other hand, in a garage of any size there is always unused upper space, which can easily be used for hanging shelves.

Structurally, it is quite possible to make any version of such a device for the garage with your own hands:


The tools you will need are the standard set described above. The sequence of actions is as follows:

If the shelf is mounted to the ceiling, you can strengthen its connection to the wall using metal corners - then the product will not swing and will last much longer.
The entire technology is shown schematically in the figure.

Making a shield shelf
The DIY technology for making such a device for a garage has its own differences compared to installing conventional shelves:
- The shield itself is made of durable plywood, the parameters of which are selected according to the situation. Visually, the shield should completely cover the surface of the desktop.
- Space is allocated on the board for all shelves and appropriate notes are made.
- Next, all the holes into which the dowels fit are made in the surface of the structure. It is on them that the hooks will be attached, on which all the tools will be placed.
- The shield is secured to the wall using brackets. The corresponding holes are made using a hammer drill.
All steps are shown schematically in the figure.

DIY tool panel above workbench in garage
Workbench for a garage: step-by-step instructions
Another structure that will probably be needed for repair, plumbing and other types of work is a workbench. It can be purchased in a store, but if you have a certain skill, then it is quite possible to make such a device with your own hands and put it in the garage.

Before carrying out the actual installation work It is important to clarify several important details:
- Where will the table be located?
- What kind of work will mainly be carried out on it.
- What work surface material is suitable - metal or wood?
All these questions are closely related to the purpose of the product. If work is expected to be done frequently, then it is better to choose durable metal. And for standard household tasks, durable wood will do.
It is important to understand that a workbench is not just working surface. Often it combines the function of a wardrobe, a small chest of drawers and even a metal safe - this set of parameters depends on the specific configuration of the product.

Types of workbenches
The key classification of workbenches is based on the types of work that are supposed to be carried out on it:


At the same time, these functions can be combined, so such a classification is largely arbitrary. The best option such a garage device is a design based on metal frame with wooden table top and drawers. It is more reliable than its wooden counterpart, and allows you to save on manufacturing due to the fact that some parts will be made of wood. The surface of the table can be reinforced with a metal sheet - then the workbench will last for a very long time.

Technology for making a workbench from a metal frame
To install the structure you will need a standard set of tools and materials:
- welding machine;
- grinder for metal;
- building level;
- jigsaw for wood;
- screwdriver, drill;
- self-tapping screws, anchor bolts;
- hammer and nails;
- metal corners with parameters 5*5 cm;
- square pipes 6*4 cm, total length about 24-25 m;
- steel strip 4 cm thick, up to 8-9 m long;
- paint for wood and metal processing.
These parameters are intended for the manufacture of a finished product with table parameters of 220*75 cm, as shown in the figure.

The sequence of actions is as follows:


Even at the stage of designing a workbench, it is important to decide whether the device will be collapsible or whether it will be permanently installed in the garage. In the case of a collapsible version, all parts are attached using self-tapping screws, and the principles of the technology will be different.
Wooden workbench manufacturing technology
A wooden workbench is less durable than a metal one. It is well suited for cases where the work is supposed to be done less often - several times a year.
To make this device for the garage with your own hands, you can use the same drawing given above, or take the diagram shown in the figure as a sample.

The algorithm will be something like this:

Do-it-yourself garage tipper: step-by-step video instructions
Along with creating the considered devices for the garage, you can also take care to make with your own hands the working tools that will be needed directly for Maintenance auto.
One of the most useful installations– a tipper for inspecting the bottom of the machine. The need for such a product is most relevant for Russian realities, since not in every case there is a real possibility of constructing an inspection hole.

Detailed video instructions with step by step diagram manufacturing
Before making such an installation, it is extremely important to consider the issue of safety. Even a light car can cause an accident if it falls and, at a minimum, will receive serious damage. Therefore, you can only undertake the creation of such a design if you have sufficient skill.
Making your own garage fixtures allows you to rationally organize inner space and essentially get your own workshop in which you can carry out any ongoing repair work.
Original ideas for organizing space in the garage
And finally, a photo selection of visual ideas for creating spacious structures from a variety of items that are likely to be found in any garage.

In today's story, we will introduce you to several tips and rational recommendations for arranging a garage parking space that will help cottage owners save money square meters and things.


Let's look at 10 easy DIY ideas for...
You can easily and quickly install some wire containers on the wall to store various things. The rational arrangement of balls and hoses is another simple way to organize all the items and products that easily create chaos and dust if they are not sorted into compartments and containers.

2. Signs and inscriptions
This could be stickers or completely painting doors and cabinets. unusual furniture coating for special markings. They will help family members navigate the garage space, and also store items and products in a certain place. The main advantage of this decoration method is the speed of implementation, which will only take a few hours!

3. The magic of magnets
For small tools and drill bits, you can use magnetic strips on the available wall space. You can hang them on them small details and accessories that will always be at hand. This is a simple way to practically organize a room and storage systems, and is also extremely easy to implement.

4. Original hooks
Take long unused keys and turn them into hooks for wall decor and as an original authentic accessory. On them you can hang work clothes, ropes and everything that should be within easy reach.

5. Cans and other containers
You can organize and separate your nuts and bolts by adding some plastic toolbar containers. This will make it much easier for you to find required part or element. All products will be sorted and placed in certain containers, and for additional convenience they can be attached to a wooden shelf.

6. Patch panel or board
Of course, you can always put in a perforated board where you can easily add some new hooks and organize your home decor in a new way. Plus, this organizational idea can act as a “makeover” for a garage wall! Tips and recommendations for using this multifunctional device can be found on the Internet portal Small Interiors.

7. Practical buckets
Some shelves and a large set of segments (stickers) can really come in handy. This is another one quick way forming a functional and rational area for placing things that will add characteristic style V Interior Design and help keep your work tools in order.

8. Bungee balls
Using bungee cords to store equipment for a variety of sports is a great concept for transforming a space. You can place both soccer and basketball balls in these stylized nets! They are commercially available and extremely easy to install.

With this creative idea By creating a rational layout, you will no longer have any excuses for why children do not wear helmets during classes and after school on bike rides and attractions. After all, now you need to manage not to find them in a specially equipped place! Add wall decoration small hooks on which these safety devices will be located.

Instead of throwing water bottles and cardboard boxes in the corner of the garage, build a quick and easy recycling station for the whole family. It can be built using plastic boxes and boxes with inscriptions, which allow you to sort waste into plastic and iron.

We have presented to your attention an interesting and extraordinary selection of conceptual ideas and creative solutions for organizing a garage space in an unusual house.
Did you like these rational and practical ideas? Share with us your opinion on this issue in the comments below...
Categories:Places:
And any car enthusiast can make accessories for the garage with his own hands. Such homemade products allow you to use space wisely, choose a convenient place for your tools, and not put them anywhere, and not spend money on buying expensive professional equipment.
Tool storage rack
If you have a lot of tools and other garage equipment in your garage, then a rack would be the ideal place to store them. With it, a lot of free space will be created in the garage, and the motorist will not waste a lot of time trying to find the right tool.
You can easily make a rack yourself. It is usually made of metal or wood, but the first option is too difficult to use at home, although it is more reliable, so car enthusiasts often opt for the second option.
To extend the life of the rack, you need to choose strong wood species for its manufacture, such as oak or beech. A rack made of this material can withstand a load of up to 180 kg. In practice, this weight is often exceeded. However, it must be taken into account that a rack on which tools weighing more than 300 kg are stored poses a danger to the motorist.
It’s easy to make a garage rack with your own hands using the following algorithm:
- The supports for the rack are made first. To do this, a 9 cm wide board is cut into pieces of different sizes.
- To make shelves you need a thicker board. It is cut into equal parts of the required width.
- On the board, which will be the basis of the rack, mark the points where the spacers will be located. There should be 3 cm from them to the edge of the board.
- The top support is attached with superglue, then the shelf is nailed to it. The same must be done with the remaining supports and shelves.
- Then the base of the rack is attached to the spacers using screws.
At the end, the surface of the rack is sanded with sandpaper and oil varnish is applied to it in two layers. It is attached to the wall using anchor bolts located under the top and bottom shelves.

Shelves
If it is not possible to install a rack in the garage, it can be easily replaced with shelves. They can be hung at any height and save floor space.
First of all, you need to determine where the shelves will be located. The selected area is divided into squares of equal size. At their corners there will be dowels holding the shelves. For more reliable fixation For shelves, it is better to use dowels with hooks at the ends.
Then holes for fasteners are made in the wall using a hammer drill. Hangers with eyelets are attached to a thin board. The distance between them depends on the markings made earlier. Self-tapping screws are needed to secure metal hangers.
In order to make the bottoms of the shelves, several boards are cut into equal parts. The walls are made of thicker boards. They are attached to the bottom using nails or glue. Finished shelves can be painted or varnished.
Now all that remains is to place the shelves on the wall. When installing, you need to ensure that the shelves do not warp and move easily along the guides. For convenience, wooden handles can be attached to the front walls.

The material for the shelves can also be plastic canisters. To do this, you need to cut off the side wall of the canister.
To make the work look neater, you should always cut off either only the right or only the left. Then the edges are processed with a file.
After this, the shelves are placed on the wall or used as drawers in a rack.
Tire bracket
A set of tires is the most bulky part of a car, so it makes more sense to make a separate bracket for storing them rather than trying to find a place for them on a rack with other tools.
For a garage bracket, you need two triangular frames from a corner, which will be connected to each other by jumpers made of any rolled metal. The frames are attached to the wall. Tires are perpendicular load-bearing structure, slightly falling between the jumpers.
Universal drill machine
A car enthusiast needs a lot of different equipment, but it is very difficult to fit them into one garage. To save space, mechanisms are created that perform several functions.
From an ordinary drill you can make a homemade machine that works as a grinder, lathe, sharpener, or circular saw.
For the base of the machine, choose a board 2–2.5 cm thick. The drill is fixed on the part where the handle will be attached. The location for installing the drill is selected depending on the size circular disk, cutters, sharpening stone, grinding wheel.

To secure the drill, a rigidly fixed threaded rod and nut are used. Rigidity of fixation is achieved using epoxy glue and a two-millimeter pin. Next, a moving sole is created.
Next, a saw blade with a diameter of 15 cm, which should have a protective metal casing, is placed on the drill chuck. A gap is made in the frame. If you plan to use a flat cutter rather than a disk, it will require an enlargement of the saw hole or another rectangular slot.
For creating cutting machine On a securely fixed surface, a rotating bracket, a miter box, guides and a mechanism that will fix the workpiece are placed.
The cutting mechanism is combined with circular saw based. Grinding and machine tools are made using the same method.
Inspection hole
Sooner or later, any car will need repairs. And so that its owner does not need to crawl under it, an inspection hole is dug in the floor of the garage.
The first thing you need to do is make chalk markings in the place where the car is parked. It should be taken into account that the length of the pit should be 1 meter greater than the length of the car. The width should be sufficient for comfortable work, but less than the distance between the wheels. The depth of the hole depends on the height of the garage owner. You need to add 20 cm to it.
After calculating the size of the hole and marking, you can dig a hole. The thickness of its walls depends on the material with which its walls will be lined. When using brick, this figure should be 20 cm, when pouring cement - 12 cm, when installing building blocks - 22 cm.
The walls of the pit need hydrophobic impregnation, which will protect them from moisture. Impregnation is applied to inner side material with which the walls are lined.
In the front of the pit, steps are made of cement. To make steps of the same size, you need to calculate the height of the rise and calculate their number.
Car repair is a complex and responsible activity that requires practical knowledge and the availability of special equipment. This equipment includes a whole list of tools that are not cheap. That is why even those car enthusiasts who know how to fix their four-wheeled friend send it to a car service center for repairs. If you decide to get your own accessories for the garage, but do not want to spend a lot of money on such purchases, you can make some of the list of necessary items yourself.
What equipment can you make for a car service center with your own hands?
So that your garage can become a place for car repairs. It needs to be equipped big amount various instruments. Some of them will have to be purchased in specialized stores, but others can be made with your own hands.
Having all the necessary accessories and machines for the garage, you can open your own small car service. Such a garage business will bring you good income.
Garage gadgets are easy to make with your own hands. In fact, there are many master classes on making such homemade products. Let's see which tools are most often made independently.
Which homemade instrument Suitable for garage car service:
- First of all, it is a car lift. Not a single auto repair shop can do without this equipment. The price of this finished device high, but if you wish, you can make it yourself. Today we will talk about the technique of creating such accessories.
- Also necessary for a garage auto repair shop Hydraulic Press. This device helps compress unnecessary parts. You will be pleased to know that you can make it yourself with minimal investment.
- Also important are useful accessories such as a comb for a spotter. Such equipment is easy to manufacture, but in finished form is very expensive.

These are not all the devices that you can make for your garage with your own hands. However, it is precisely the described useful homemade products, we will make today in our master classes.
Garage accessories: room arrangement
Before we begin describing how to make garage accessories, we suggest putting things in order in the auto repair shop itself. After all, each tool should have its own place, so it will be easier for you to work.
Homemade tools are very practical, but do not always look aesthetically pleasing, so it is better to keep them away from prying eyes. But, for example, such a device as drilling machine and jacks can be placed in a prominent place.
You won’t be able to make a drilling machine yourself. In this case, the main thing is to choose the right tool correctly.
Now let's talk more about organizing the workspace. If you decide to make a car repair shop in your garage and make money from it, then you will have to prepare the space accordingly.
How to organize tool storage space in the garage:
- First of all, we advise you to make several wooden boxes. In some of them you can make a shelf with holes for screwdrivers.
- It is also necessary to do mobile racks, for heavy tools. This will allow you to change the locations of these shelves, placing them in a place that is convenient for you.
- So that while you work, you don’t have to constantly run for the tool, you can use a special belt that will hold your essentials. You can buy such devices or make your own.
These homemade tool storage spaces will help you organize your garage space. Thanks to this, everything you need will always be at hand. This will significantly save your time.
DIY garage equipment: making a lift
Every auto repair shop needs a lift. This device helps keep the machine in a raised position for the amount of time you need. This allows access to all hard-to-reach areas.
Of course, you can buy a lift in specialized stores. However, the price of such products will unpleasantly surprise you.
You can make a lift for a car repair shop yourself. You don't even need to have welding skills to do this. Therefore, you can easily cope with such work.
In order to assemble the lift, you will need:
- Worm gearbox, the load capacity of which will start from 300 kg;
- Steel corners with dimensions 7.5x7.5x0.8 cm - 2-3 pcs;
- A certain number of bolts;
- You will also need a steel plate at least 1 cm thick;
- Two iron chains, at least 2 cm thick;
- Steel cable with a half centimeter section;
- Metal hook;
- Two keys in the shape of an asterisk.
It is easy to make a lift from such materials without spending a lot of effort. The main thing is to perform all actions carefully and efficiently.

How to make a car lift:
- Steel corners must be attached to opposite walls. In this case, they should be located at the same level.
- A plate is attached to the corners. This is done using eight bolts. Thanks to this connection method, the plate can be moved relative to the engine.
- A worm gearbox can be installed on the plate.
- One of the keys, the one with a larger diameter, must be secured to the drive shaft of the gearbox.
- One hole must be made on the plate. A chain is passed through it and closed into a ring.
- On the output shaft of the gearbox, you need to install a smaller key.
- You need to drill a couple of holes in the lift plate.
- Through drilled holes you need to skip the second chain. One of its ends is placed over a smaller dowel, and a hook is hung on the other.
At this point, the manufacture of the lift is completed. You just need to test it in action. Having spent on similar works In just a little time, you can save an impressive amount.
How to use a garage accessory such as a lift
Using this lift is quite simple. However, in order not to damage anything, you must follow several rules.
How to use a homemade lift:
- Unscrew the bolts that connect the car's engine to its frame;
- Loops steel cable carefully place it under the engine. Throw the ends of the cable onto the hook.
- Handle the chain carefully. Gradually the cables will tighten, which will set the engine in motion. Perform all actions slowly and smoothly.
- When the engine is raised to required height, you can stop the lift. The gearbox will hold the structure.
- In the place where the car was parked, it is necessary to place a table that can support the weight of the engine.

Using a lift will make your work in the auto repair shop much easier. Therefore, it is worth spending time and making it yourself.
Machines for the garage: making a hydraulic press
A hydraulic press is often used in auto repair shops. It is necessary for installation and repair work. This device works on the principle of a jack.
Such a device can have a very high price. Some models can cost several tens or even hundreds of thousands. It is precisely because of the cost of the factory product that a hydraulic press is often made by hand.
There are several positive aspects of making a hydraulic press yourself. Let's get to know them in more detail.
Why making a hydraulic press with your own hands is a good idea:
- A homemade hydraulic press can be made specifically for the work you need. This applies to both its size and its performance.
- You can assemble such a jack from scrap materials. Therefore, the price of such an assembly will be low.
- You can be confident in the quality of the assembled product. If necessary, it can be repaired.
The hydraulic press is made of a jack, channels, two metal angles, bolts and springs.

The structure is assembled according to the diagram. All elements are fixed using welding and bolts. It is very important to place the jack in the correct position.
Homemade garage tools: making a comb
We also want to tell you about making a comb. This spotter tool can be used to smooth out dents on doors. It can be purchased in specialized stores, or made with your own hands.
How to make a comb for a spotter with your own hands:
- Take a metal strip and make three holes in it. The first should be at a distance of 1.5 cm from the edge, the second at a distance of 2.5 cm, and the third - 3.
- Now between the two holes (which are closer to the edge), you need to cut a jumper with a file. After finishing this work, instead of two round holes It should be one oval.
- From the third hole we make a cut towards the edge. There should be a recess for the washer.
- Now we cut out a kind of semicircle above the hole we made. As a result, you should have a hook with an oval hole and a rounded notch. Make four more of these pieces.
- Take a tube with a diameter of 1.5 cm. At a distance of 2 cm, drill a hole with a diameter of 8 mm. After two cm, cut off the tube.
- On the other tube, make a semicircular recess; our workpiece should ideally fit into it.
- We weld the tube with the recess to the workpiece so that the hole is on top. A nut must be welded to this hole.
- We take another tube, weld a washer on one side and put our hooks and blank on the other. The comb is ready.
This comb is no worse than a store-bought one. It does its job well and is inexpensive.
DIY garage gadgets (video)
Garage accessories are not difficult to make yourself. To do this, you just need to put in effort and ingenuity. Go for it!


