How to make a soldering station from a building hair dryer. How to make a blow dryer - a simple diagram for assembling an air hot air gun with your own hands. Making a building hair dryer with your own hands
A soldering iron visually resembles an ordinary household appliance. The difference lies in the temperature produced. So, thanks to the maximum power using the device, you can solder various parts. In this case, it will be possible to assemble the structure using an old soldering iron or a household hair dryer.
What do you need to know about this technique?
The soldering iron is a modern electrical appliance, allowing for a short period of time to heat up metal branches. Due to the high-quality assembly and ease of operation, the device is suitable for professional and even novice welders.
A soldering iron is almost never used on its own, because precise direction is important in the process of working. Therefore, experienced craftsmen often use entire soldering stations. We are talking about a semi-professional heating device, represented by a soldering iron and a welding heater. Such equipment is suitable for working with components of electrical networks and circuits. Also, thanks to the device, it will be possible to perform heat treatment of small parts.
It should be noted that any soldering guns differ in their characteristics:
- diameter within 2–5 mm;
- power about 450 W;
- fan capacity up to 30 liters per minute;
- reaching a temperature of about 500°C.
Design features of the equipment
Such a device is often used to soften or melt plastic, thin metal and tin. Such processing occurs due to the blowing of a heated spiral. The air heats up and transfers heat energy to the material.
To make such a functional device with your own hands, you need understand its design. This includes:
- a heater, that is, a body represented by a tube;
- a supercharger, the function of which is performed by a pump or a fan;
- pen;
- switch.
In some cases, a temperature sensor and various nozzles are additionally installed.
Self-creation of a soldering dryer
People who want to make a soldering iron with their own hands should remember that any used apparatus will work to create such a product. You can also use a steel tube. Elements made of aluminum or copper will not work.
Naturally, one must take into account the fact that during the heating process the element will become too hot and weigh the soldering iron, and this will make its use inconvenient for a long time. Accordingly, some masters choose special heat-resistant fabric.
The soldering irons themselves are stationary. In this case, it is necessary to fix the device on a fixed stand and move the board in the process of performing work. Naturally, this design has a number of disadvantages.
When creating such a unit with your own hands, old hair dryers are often used, because there are mica plates that can withstand elevated temperatures. For this element, it is necessary to prepare a base that easily transfers significant loads.
If we talk about heating coils, then they must be created exclusively soft nichrome. But fechral will not work, because it is too hard.
Particular attention should be paid to the power of the device, since the flux will not melt under the condition of insufficient heating. However, it must be remembered that due to excessive heat, the microcircuit may be damaged.
Making a structure from an old soldering iron
 Often, instead of a household hair dryer, a traditional soldering iron is used, namely its body. All internal filling must be carefully removed, leaving the metal clip and handle intact. You will also need a halogen lamp with a power of 1.5–2.2 kW. It is needed to organize a quartz insulator, and even a burned-out lamp is suitable for this purpose.
Using a diamond machine, it is necessary to carefully cut off the flattened ends, resulting in a quartz tube, on one side of which there is a technological nipple. Here you need to prepare a hole for the output of the heater.
Nichrome acts as a heating element. Its thickness should vary between 0.3–0.7 mm. If the diameter is larger, the wire will take too long to cool down. Additionally, you will need a regulator to properly configure the operation of the equipment.
- The quartz tube is carefully placed in a spiral, previously created by one's own hands. Its end is extended with a wire.
- To reduce the heating temperature, the tube is carefully wrapped with foil.
- After that, the element is placed in a metal holder of the housing and the wire is fixed from the side of the handle.
- Then the prepared structure is inserted here, and the tube is carefully wrapped with an asbestos cord, so that the product is located in the central part of the clip.
- The front outlet is carefully clamped, and then the hose is placed in the air supply handle. In this case, an ordinary compressor used in aquariums acts as an air source.
Mistakes made during the build process
 Some inexperienced people believe that it is possible to assemble a structure with your own hands if you have only heater and fan. For this reason, they use a traditional household hair dryer, but you need to understand that even a powerful device will not be able to melt the tin.
Raising the temperature will help reduce the engine speed and reduce the caliber of the hole. However, in the first variant, the spiral will overheat, and then turn off or break. In the second case, the temperature will rise significantly, as a result of which the structure may melt.
Features of soldering stations
A similar design is represented by the main unit, as well as a manipulator-thermohair gun, which is responsible for heating the air. Such units are used to repair various household appliances.
All stations are divided into two groups:
- turbine, where a small vane electric motor is responsible for the air supply;
- compressor, in which air is supplied due to the presence of a compressor.
The first option is distinguished by the ability to generate a significant air flow, and the second one helps it pass through really narrow nozzles.
In general, the principle of operation of the soldering station is very simple. So, the air passes through the heater located in the tube, and then it heats up and exits the part through the appropriate nozzle.
Naturally, at hot air stations there are several disadvantages:
- the ability to blow off a small part;
- uneven heating of the surface;
- the need for various additional nozzles.
Self-creation of the station
This design can be done by hand. For these purposes, a hair dryer and a spiral, which is a heating element, are suitable. Any will act as a supercharger small fan. For example, it can be a cooler from the power supply. It is located on the handle of the hot air gun. An air heating tube is also connected here. The cooler itself is tightly closed on one side, and on the other, a small hole is prepared.
Assembling the heater can cause certain difficulties, because work is done very carefully.

Finished product externally looks like a gun. To make it convenient for them to work, it is allowed to fix various holders or nozzles.
There are 4 wires coming out of the back of such a station, which are recommended to be insulated. It is also worth taking care of the presence of a pair of rheostats, thanks to which it will be possible to adjust the power of the air flow and the heating element. Then it remains to install the switch and prepare the outlet for the outlet.
It is very simple to make a soldering dryer for doing various DIY jobs. For these purposes, you can use any old soldering iron or hair dryer. The main thing is to correctly assemble all the components so that the device does not overheat and provides the necessary power.
A variety of jobs related to soldering or heating various materials require the use of special tools. A hot air gun, a device that uses hot air under pressure as a heating, copes with such matters perfectly. There are many similar devices on the market at different prices. But it’s really possible to make a hair dryer for soldering microcircuits with your own hands. This will not take much time and money.
Choosing a hair dryer for soldering plastic and microcircuits
Such devices are rarely used in everyday life. Some people have not heard of them and have no idea how a hot air gun can help to cope with many everyday and specific problems.
And yet the main task of such devices is to assist craftsmen in soldering radio components and repairing products made of PVC and other meltable materials.
The appearance of such equipment is similar to construction equipment, there are differences in dimensions and special interchangeable equipment.
 Such devices are able to melt plastic products and even fusible metals. The soldering process is provided by a stream of hot air, which is supplied through the nozzle of the hair dryer.
At home, such an apparatus, in addition to its direct purpose, is used for minor repairs plastic products, removing the colored layer on various infusible surfaces, heating small objects.
For such equipment, there are a number of mandatory requirements:
- Equipment designed for soldering electronic circuits and plastics must be equipped with thermocouples and an electric fan that provides an air flow heated to eight hundred degrees.
- The presence of tips of various shapes and sizes is necessary. They can be monolithic or composite.
- Due to the elevated temperature, the materials for making the body of the hair dryer must be heat resistant.
- It requires the presence of a special thermal relay that controls the heating temperature of the spirals.
The principle of operation of any hair dryer, building or household, is the same, and consists in forcing heated air onto the workpiece or surface. A homemade hot air soldering dryer must meet such requirements.
Criterias of choice
In the presence of Money a soldering device can be purchased at a special outlet, since the offered range will amaze you with the presence of a variety of models with a different set of features. Such equipment is produced by many well-known companies, which should be preferred.
Before you buy a hair dryer, you need to determine the requirements for it, which are necessary for use, and focus on them when evaluating the modifications available for sale:

All these requirements must be aimed at long, safe, high-quality operation of the hair dryer.
Features of making a hot air gun with your own hands
The key criteria for a homemade soldering iron must meet the following conditions:
- The blower jet must warm up to approximately 850 degrees Celsius.
- Two and a half kilowatts is the minimum power of the device spiral.
- The components of the device should be inexpensive or made from suitable parts of other equipment.
Hair dryers made by one's own efforts are hand-held or stationary.
The device of a non-movable design is easier to manufacture due to the fact that its dimensions are not limited. However, with constant fixing of the location, you will have to move the glued elements, which is not very convenient.
An alternative manufacturing method is mobile, but it must provide good thermal insulation of the device to avoid burns.
Basics of making a radio assembly hair dryer
The main condition for is its safe operation and compliance with the tasks of both the entire apparatus and its constituent components. You can mount such a device from all kinds of outdated or faulty soldering irons, hair dryers, computer components.
Selection of the heating component
This crucial component will have to be made independently, because heaters from home heated appliances are rather weak in power. The only device is an electric stove with an open spiral, but this is difficult to find.
In order to make a spiral of the required power, you will need a nichrome wire with a cross section of up to 0.8 square millimeters. The size of its rings should be no more than 7-8 millimeters, which is required by the compact design of the device.
The electrospiral is wound on a tubular or cone-shaped core. It must be made heat-resistant and provide electrical insulation. These requirements are met by porcelain or textolite tubes from broken hair dryers. But it would be ideal to find a halogen lamp for tubular lamps and borrow an insulator from there.
Fan Options
For use as a supercharger, any small but powerful fan is suitable. It will become, perhaps, the most expensive component in an impromptu hair dryer. Primary requirements for its manufacture:
- Operating voltage 220 volts.
- Force of the blown out stream from 20 liters a minute.
- Power from 400 watts.
An aquarium compressor or a small household fan will do. But you can also use a computer cooler.
Body part selection
There are several ways to make a case for a hair dryer:
- Use a ceramic or porcelain base. This will provide reliable isolation from thermal and electrical energy. True, it is difficult to find such a case, it is expensive to purchase. Another disadvantage is fragility.
- You can use heat-resistant material to protect the case from the inside. Then it will be possible to avoid its heating.
 As the main part of the device, body parts from broken hair dryers are used. Their size and design are ideally suited for these purposes. All that is needed is additional isolation of the bow, where the nozzle of the device will be located, and the temperature will reach a maximum.
Housing insulation can be made from asbestos plates, quartz mica or fiberglass. The nose of the nozzle is made of metal.
Additional details
The design of the soldering device should provide such systems:
- Switching device. It will make it possible to turn off the soldering iron in an emergency and during a long break in work. For control, a push-button or key switch is suitable.
- The ability to set the optimal temperature and blowing performance. This is solved by setting variable resistances. They are dismantled from the same household hair dryers.
Assembly Features
 First of all, a spiral is wound. Since its length and thickness of nichrome is small, this operation can be carried out manually. Nichrome or fechral is evenly wound onto a metal bar or wire of the required diameter. The length of the spiral is calculated from its resistance, which is approximately 100 ohms.
The finished product is carefully placed on a selected non-combustible core so that the turns do not close. On top is a thermally insulating layer of prepared material. You can fix it with special hot glue or pieces of wire that were used in the manufacture of the spiral. It is advisable to place the resulting heater in a kind of flask made of heat-shielded materials. The ends of the spiral are left outside. The end surfaces must also be covered with hot glue.
Before placing the heating element in the housing, it must be separated with the same insulating materials. A power cord is connected to the terminals of the spiral with screws. Its ends must be carefully cleaned of oxide and tinned with a special flux. This will ensure reliable contact between the conductors.
The wire is used special heat-resistant. One of its cores is broken by a switch and a rheostat.
The back side of the case is equipped with a fan. Close attention is paid to its exact alignment with the outlet. Such an arrangement will allow you to obtain the optimal force of the “exhalation” of the instrument. If it is impossible to fit the fan inside, it is placed outside the case in compliance with the above requirements. With this option, a transition element will be required to deliver the air flow to the heater.
 The fan power is connected in parallel. Thus, both heating and blowing systems are controlled by one button. A rheostat is included in the blower circuit to control the airflow.
Further, the entire assembled system is placed in the case, securely fixed with screws, brackets, nichrome wire. The case is closed and fastened. A prepared nozzle in the form of a metal cone is attached to it. Before turning on the hair dryer, you need to ring the operability of the switch, rheostats, check the integrity of the spiral.
The manufacture of such a device will require basic knowledge of electrical engineering, and the ability to use simple tools like electric drills and a soldering iron. And it is within the power of almost every man. But such a device will become an assistant in solving many household problems without requiring large cash outlays.
Sometimes it is simply indispensable in the economy. With the help of a hot air gun, you can perform a number of necessary works in various branches of human activity. It allows you to solder films, linoleum; solder microcircuits; turns out to be indispensable in other works.
A hot air gun can come in handy in circumstances that require hot air to change the structure of the material.
Many models are currently offered to meet high requirements. Such professional devices are capable of much. However, their cost is significant, and therefore a do-it-yourself hot air gun for soldering looks preferable for many.
Features of hot air guns
The hot air gun can be attributed to devices for soldering fusible materials using a heated air jet. In addition to the main function of soldering materials, such an apparatus can be used for heat treatment of the surface of materials for another purpose, for example, to remove paint or warm up a product, for example, a pipe during bending.

The hot air gun consists of a body with increased heat resistance, a heating element and a device for blowing air flow. The air in the device is heated up to 650-700ºС. To ensure such heating, the power of the heating element must be more than 1.6 kW. An important element of industrial hair dryers is temperature control, usually stepwise, 300 and 500ºС. The temperature that is reached on the surface of the materials to be soldered is also regulated by the distance from the apparatus nozzle to the workpiece. Most hot air guns are adjusted so that when the nozzle is 7-8 cm away from the workpiece, the air flow reduces the temperature by half.
Hot air guns are widely used for removing old paint from the surface of materials, especially wooden surfaces. In this case, a maximum air flow temperature of at least 500ºС is required. With this warming up, the paint softens and peels off the wood. IN Lately finds demand artificial aging wooden coverings. A thermal hair dryer perfectly copes with this task at a temperature of 500ºС and the removal of the nozzle of the apparatus by 1 cm or more from the surface. Hot air(at the lower control stage) is used for drying coatings.
Back to index
Design features of a homemade hot air gun
The main initial requirement for a hot air gun for do-it-yourself soldering can be formulated as follows: the device must create a stream of hot air with a temperature of up to 800ºС with a heating element power of at least 2.5 kW. In addition, all the details of such a hair dryer should be affordable and inexpensive. Ordinary household hair dryers do not meet this requirement both in terms of temperature and power.

The heating coil for the hot air gun should not be too long, otherwise it will heat up slowly.
The design, as a rule, can be of two types: stationary and manual. It is easier to make a stationary hot air gun, since the dimensions of the device are not limited and you do not have to think about the temperature on the handle. However, in this case, the hair dryer (in this case, as a kind of soldering iron) is fixed motionless, and the part needs to be moved. This circumstance greatly complicates the work. More promising, although more difficult, is a hand-held portable design, which should be small and be able to hold it with unprotected hands.
One of the main problems is the heating element. Heaters in household appliances (hair dryers, soldering iron) are not suitable in terms of power. The necessary heating element will have to be made independently from nichrome wire with a diameter of 0.3-0.7 mm. A larger diameter wire can provide more power, but it will be much more difficult to achieve the desired temperature. For compact laying of a heating element made of wire, it will have to be wound in the form of a spiral with a diameter of 5-7 mm.
The spiral of the heating element should be located on some kind of cylindrical base (in the form of a tube or a hollow cone) made of a material with high thermal resistance. It is difficult to do without porcelain or quartz elements. Such a base can be removed from inactive household hair dryers, but it is recommended to use a quartz insulator of a tubular halogen lamp for spotlights with a power of 2.2-2.5 kW. If you take such a burnt out lamp, then this part of a home-made hot air gun can be free.

A standard small-sized fan is needed as a blowing element. When making a hot air gun with your own hands, this element will cost the most. The blower can be taken from any powerful household hair dryer. From standard fans we can recommend the BAKU8032 model with a capacity of 30 l/min. Such a fan operates on a 220 V network and has a power of about 400 watts. The simplest and cheapest option that can meet the requirements is a small aquarium compressor. It must be installed with the receiver, i.e. with air storage. Any small plastic bottle is suitable for this, since there is no heating at the place of its installation, and the flow of hot air is directed in the opposite direction. And the air blower itself is not thermally affected.
In the design of the body of the hot air gun, two options are possible. You can use a material with very high thermal insulation, such as porcelain or ceramics, but this will complicate the design and significantly increase the cost. The most rational is the second option, which consists in reliable thermal insulation of the hot flow distribution channel and the heating element. In this case, the body material is not exposed to thermal effects, except for the area adjacent to the apparatus nozzle.

For the handle of the tool, you can use the body of any old household hair dryer.
As the main part of the body (including the handle), you can use the body from any old household hair dryer of large sizes (the older the year of production, the better). The nose of the case, i.e. section of the nozzle must be made of thermally insulating material, which itself can withstand temperatures up to 800ºС and at the same time isolates the rest of the body from the effects of such temperatures. Directly, the nozzle of the hot air gun must be made of metal in order to take into account possible contact with the melt during soldering. Thermal insulation is well provided by quartz elements (plates, tubes), mica, glass or fiberglass, ceramics, porcelain, etc. When assembling the device, you will need a special heat-resistant glue.
In the design of a home-made hot air gun for soldering, it is necessary to provide, firstly, a starting switch, and secondly, a mechanism for regulating the power (temperature) of the heating element and the air flow rate. For this, smooth regulators - rheostats should be provided. The adjustment system can be used from old household appliances if these elements are in good condition. As a starting switch, you can use a push-button or keyboard mechanism.
Back to index
Self-assembly of a hot air gun
The main purpose of the hot air gun is the soldering of materials. Materials such as PVC film, linoleum, rubber are welded by filling the welded seam with a filler rope melt, which is achieved by a hot air stream. Melting of the bundle is carried out by heating up to 350ºС. This method is considered the main one when connecting linoleum during laying on the floor. The hot air gun greatly facilitates the task of bending plastic pipes, profiles, sheets. Heating during bending of the plastic is provided within the limits of 300-400ºС at a reduced speed (power) of the air flow. Warming up the plastic should be done slowly, gradually.

The manufacture of a hot air gun begins with the winding of the heating element spiral. The spiral is wound on a steel wire with a diameter of 5-6 mm with an interference fit. It is better to wind it with nichrome or fechral wire with a diameter of 0.4-0.5 mm. The length of the spiral is determined from the condition that its electrical resistance should be 70-90 ohms.
The spiral is wound on a tubular base from a soldering iron (for example, type EPSN-100) or a halogen lamp for a spotlight. The spiral turns are superimposed evenly over the area of the cylinder with a gap (turns touching each other is unacceptable). On top of the laid spiral, a layer of fiberglass is wound with force or a layer of asbestos is fixed. It is advisable to fasten this layer with a heat-resistant adhesive composition. Then a heat-insulating tube (porcelain, ceramics, quartz glass, etc.) is put on the adhesive layer. The ends of the spiral are brought out.
It is advisable to smear the output points and ends of the heating element with heat-resistant glue.
The manufactured heating element is inserted into the inner channel of the housing. Previously, the place of its installation must be laid with asbestos, mica or quartz plates, as additional thermal insulation. The terminals of the spiral, with the help of a screw connection, are joined to the power supply wire. This wire must have heat-resistant insulation - fluoroplastic or fibrous insulation. The wire must pass through a start switch and a rheostat to regulate the current supplied to the coil.
In the rear part of the housing, the air blower is fixed strictly coaxially with the channel of the heating element. If the discharge element (compressor) does not fit into the housing, then it can be fixed from the end of the housing to the outside. In this case, an airflow guide tube must be attached to it. This tube must fit the heating element inside the housing and be aligned with its channel. From the blower, wires for power supply are taken off, which are connected to the wire for the heater so that the switch controls the power supply of both elements at the same time. The air flow control rheostat must be inserted into the wire circuit for the blower - its operation is independent of the operation of the heater.
The power wire is brought out from the bottom of the handle of the case, and the button (key) of the switch and the levers of the rheostats are fixed in a convenient place on the outside of the case. Then the halves of the body are combined and connected to each other. An end element made of thermally insulating material is installed in the form of a cylinder or cone. The metal nozzle is screwed on. In the design, it is advisable to provide a set of nozzles with different diameters of the outlet.
A hot air gun is a device for softening, heating and melting materials such as, for example:
- plastic;
- tin;
- thin sheet of metal (up to 0.5 mm).
The process consists in blowing a heated spiral with a stream of air. The mass of air, passing by the spiral, heats up, and a hot stream of molecules is obtained, which, bombarding the material at high speed, transfer to it thermal energy even a little more than that which is formed at the outlet of the hot air gun. Of course, if the end of the tube is located very close to the material being processed. As the distance increases, the heating temperature decreases.
In order to assemble a hot air gun with your own hands, it is important to know what it consists of:
- heater (the body is usually a tube);
- supercharger (it can be a fan or a pump);
- pen;
- switch cord.
At the end of the device, if, for example, it is made for soldering, various nozzles and a temperature sensor are installed. Nozzles are optional for desoldering elements. If the supercharger is made separately, then a hose is provided between it and the housing.
Advice: it is best to use purchased nozzles, but you can turn them on a lathe.
Popular misconceptions when assembling a hot air gun for soldering
Many are sure that if there is a fan and a heater, then making a device for soldering plastic materials is a piece of cake. Therefore, they decide to use a regular household hair dryer, because it just has all the necessary components:
- heater - a spiral on a mica or fluoroplastic frame;
- fan - on the motor shaft;
- cord, handle, switch.
But even if you take a powerful hair dryer, it still will not heat the tin until it melts, but in order to raise the temperature, you will have to:
- reduce engine speed;
- reduce the outlet gauge.
Let's consider these options.
The first option will cause the coil to overheat and break or turn off due to overheating.
The second will cause the temperature inside the case to rise, causing the case to melt.
There is another option - a decrease in the spiral, but it is hardly worth talking about it. The result will be the same.
Homemade hot air gun for soldering
The lightest and most working device can be assembled from a vacuum cleaner and a ready-made heater, which can be bought at any flea market, and is a spiral wound on a wooden boss with an attached cord.
Details for assembling a hot air gun:
- heater - spiral on the boss;
- case - a tin can with a lid;
- adapter;
- adapter for a vacuum cleaner.
The structure goes like this:
- A hole with a diameter of 10–20 mm is made in the lid.
- A boss with an attached adapter is attached to the lid of the jar on one side, in which holes for air supply must be drilled.
- On the other side of the cover, an adapter for a vacuum cleaner pipe or hose is strengthened.
- A hole is cut in the bottom of the jar.
- A nozzle is fixed on the bottom - a hollow thick-walled copper cone.
Advice: on the hose or pipe of the vacuum cleaner, fix the tap to adjust the pressure and air speed.
When assembling, you should choose the optimal length of the spiral experimentally. For this:
- gradually reducing the air supply with a tap, they check the heating by touching the rosin and solder with a sting;
- if the heating is insufficient, reduce the spiral and check again.
Hot air gun for soldering chips
- heater:
- a tube from an old heater (for example, Soviet-made, there were such - with two or three spirals enclosed in quartz glass tubes),
- 600 watt tile coil (can be bought at any store or flea market),
- a handle from a child's pistol or a damaged electric drill,
- insulation (heat-shrinkable tube and varnished cloth),
- clamps (you can use homemade, or you can buy);
- supercharger:
- an ordinary cooler from a computer or a snail fan (the second option is better, you can use a separate compressor, but this will cause inconvenience - you will be tied to a hose),
- neck off plastic bottle or a bottle with a cap;
- nutrition.
For a fan, it is best to use a transformer power supply for 5–22 volts (adjustable). It is easy to build it yourself, for example, if you know the impulse technique, you can use an old computer unit, having finished it a little.
It is very simple to assemble a circuit that regulates the heating of the spiral. It needs 4 diodes KD-202 and one thyristor, for example, KU-202, controlled by variable resistance.
Construction and assembly
To assemble a hot air gun for soldering, use our recommendations.
Making a heater with a handle
- Cut the coil to about 12 cm, after measuring its resistance. It should be in the range of 40-45 ohms.
- Insert the spiral into the tube that needs to be cut on the grinder so that approximately 5-7 cm remains unoccupied. This is necessary to create a temperature difference between the heated part and the place of attachment to the cooler, as well as to strengthen the handle on a place free from the spiral.
- Saw a handle out of wood or take a ready-made one, for example, from a damaged drill or a children's gun.
- On the top of the handle, fasten two clamps coaxially, which will serve to secure the tube and as contacts.
- Straighten and bend the ends of the spiral so that they can be screwed to the clamps. The front should be a straight long piece.
- At the attachment points, wrap the spiral with mica and varnished cloth.
- Fix the tube in the clamps by connecting the installation wire to them.
- Melt or glue the end of the tube into the vial cap.
Supercharger manufacturing
There are two manufacturing methods.
- If you have a snail fan, then everything is done very simply. A suitable part is cut off from the neck of the bottle and glued to the fan.
- If you have a simple fan or cooler, then you need to close one of the sides of the cooler with a plastic cover, and cut an air hole at the end. And also glue the neck of the bottle.
The ends of the fan wires are lengthened, strengthened, passed through the handle, in which the switch for the spiral or the switch with the temperature controller is located.
It remains to screw the resulting supercharger onto the heater (the lid and neck of the bottle used are very suitable as a connector) and connect the wires to the cord with a plug. For greater convenience, it is better to assemble the electrical part of the device in one case, and weave the power cords of the cooler and coils together or wrap them with tape in several places.
When heat treating at home, it is not always possible to use professional welding equipment. A soldering iron is a special device that allows you to quickly connect various metal parts and schema elements.
How to choose
The soldering iron is a modern electrical device, which allows you to heat up metal bends to a certain temperature in a relatively short period of time. Thanks to the simple principle of operation and high-quality assembly, this device can be used by both beginners and professional welders. It is worth noting that it is rarely used as an independent device, because in addition to heating the part, precise direction is required. Therefore, most craftsmen prefer to use soldering stations in practice.
A soldering station with a hot air gun is a semi-professional heating device, which is a welding heater with a soldering iron. It is designed to work with various circuit elements, components electrical networks or minor heat treatments of parts.
In order to choose a soldering dryer, you need to decide on the type of work performed. There are different diameters of the soldering iron, they can vary from 2 millimeters to 5. Many manufacturers offer to purchase a set of nozzles for a heating device.
Consider the characteristics of well-known soldering guns to make the right choice:
Lead-free soldering station AOYUE 2703A (you can solder both radioelements and small tubular parts):
Soldering hot air dryer Element 858D (Element):
Station KADA 852D:
Hand block Yaxun YX8032 (УХ-8032). This is the best option for home use:
Infrared soldering iron ACHI IR-6500. This is a universal repair complex, designed both for working with various boards and electronic circuits, and for connecting metal components with respect to large diameter. Characteristics:
Digital heat gun Lukey 852D with built-in soldering iron:
The manufacturer, complete with this soldering gun, also offers 4 nozzles for convenient operation on various objects.
How to DIY
If you don’t want to buy an expensive device or, on the contrary, order a blow dryer from China, then you can make this device yourself.
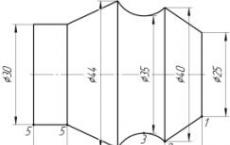
In order to make a simple soldering dryer yourself, you will need drawings and some details. A diagram of a small device is shown below:

Details that may be needed in the implementation of the project are in almost every home. You can also buy them at your nearest electronics store. A fan from a personal computer will be used to pump air. To prevent the wire from coming off the part during work, it must be attached to the block. The heating element spiral is recommended to be made of nichrome wire. To do this, simply wind the wire around the cylinder of the desired size. Please note that one lead must pass through the tube.

For the case you will need a 10 watt resistor. Its size allows you to equip a small heating device, you just need to free the tube from the internal elements. Be sure to isolate the metal case from heating and conductive elements. You can use any available insulation for this, but mica has proven itself the best.
Video instruction on how to make a soldering iron with your own hands.
The air duct will require a simple tin can, it is cut out of the container. The edges need to be trimmed so that when working they do not harm with sharp ends. To prevent heating of the air duct, it is recommended to wrap it with fiberglass - for this you need to make 3 layers. The handle can be made from a syringe tube. Terminal blocks are used to connect the cable and the heater, they are selected according to the size of the wire.
Considering that the air duct is the most complex part of the structure, its development must be specified step by step:
- The location of this part of the device must be such that the fan tube is connected to the heating coil;
- In order to choose the dimensions, you need to use the duct sweep drawing. Figure duct sweep
- For accurate execution, it is desirable to print this drawing and use it to make a template according to a pre-prepared jar. You can cut with simple scissors for metal, slight deviations are allowed;
- Further, the assembly resembles a constructor. You need to make holes in the tin, and then stretch the power wire through it. It will later be connected to the heater coil;
- After that, it remains only to assemble a home-made soldering iron according to the drawing and check its performance.
Such a hot air gun is a cheap and simple option that even a novice radio amateur can make. You can also simply assemble the finished circuit on the Atmega board according to a similar drawing. Instead of a body, you can use a blank from a regular hair dryer to dry your hair.
Price overview
You can buy a soldering iron at any electrical shop, its price depends on the brand and type of device. Consider how much the LUKEY 852D+ station costs:
Payment, depending on the manufacturer and seller, can be cash on delivery, cashless or installment.
Prologue
When testing the predecessor hair dryer, it turned out that its 100-watt power is not enough to quickly dismantle large radio components. Then it was decided to make a soldering dryer with a power of 300 watts.
The main difference between the new hair dryer and the previous one is the use of one power source instead of two, as well as a more complex design of the heating element.
Video for those who have no time to read.
The 10-minute video shows the process of assembling and testing the hair dryer and pays attention to some of the locksmith techniques.
Soldering iron power supply diagram
Unlike the previous one, this hair dryer is powered by a single power source, which makes it easier to operate the hair dryer. However, it must be admitted that such catering somewhat reduces the functionality of the product and significantly complicates the design.
The basis of the circuit is a parametric voltage regulator, assembled on the elements: VT1, D5, D6, D7 and R1. It provides voltage stabilization for the hair dryer fan, while the voltage of the main power supply can be changed to adjust the temperature of the airflow.
To change the air flow rate, switch SA1 is used, which has two positions of 8 and 12 Volts.
From exceeding the maximum allowable voltage, the fan is protected by fuse FU1 and a protective diode D8 (Suppressor). If for some reason the fan supply voltage reaches 13-14 Volts, the suppressor will open, and the fuse will blow and break the fan power circuit.
Anticipating questions about the use of a parametric stabilizer, instead of a linear or pulsed one, I will immediately clarify. If use to power hair dryer alternating current, then the peak voltage of the power supply may exceed the maximum allowable voltage for most low-cost microcircuits. For example, at a voltage of 30 volts, the peak will be:
I note that the PP was developed for the long-forgotten technology for manufacturing boards based on hollow rivets - caps. Therefore, all tracks look like straight lines.

And this is the assembled hair dryer fan power board.

Since the regulator transistor can dissipate up to 24 watts of power, it is mounted on a heatsink. The heatsink can be made from an aluminum alloy sheet, such as an aluminum can. The total thickness of the set of radiator fins must be at least 1.5mm. A layer of thermally conductive paste must be applied between the transistor and individual plates.
To connect the leads of the heater spirals, brass inserts of electrical terminal blocks were used.
Assembly drawing of a homemade hair dryer

This is an assembly drawing of a homemade hair dryer.
How to calculate the heating element of a hair dryer?
We calculate the heating element for a hair dryer with a power of 300 watts and a supply voltage of 24 volts. I chose such a supply voltage so that if you need to get more power, you can stay within 36 volts - a conditionally safe voltage for life.
The resistance of the heater of such a hair dryer will be equal to:
R = U²/P, where:
R - resistance in ohms,
U - supply voltage in Volts,
P is the power of the heater in Watts.
R = 24²/300 = 1.92(ohm)
When using five spirals connected in parallel, the resistance of each spiral will be five times greater:
R = 1.91 * 5 ≈ 9.6(ohm)
You can determine the required length of the nichrome wire using an ohmmeter. I got about 1100mm. You can measure the pieces of wire and simply wind them on the mandrel, or you can calculate the length of the winding.
Since one of the conclusions of the spiral can be formed already during winding, I subtracted 50mm from the length obtained experimentally:
1100 – 50 = 1050 (mm)
The length of the winding of the wire on the mandrel can be determined as follows:
H = L / π / (D+d) * D, where:
H - winding length (turn to turn),
L is the length of the wire,
π - Pi number (3.14),
D is the diameter of the mandrel,
d is the wire diameter.
H \u003d 1050 / 3.14 / (4 + 0.4) * 0.4 ≈ 30(mm)
Heating element of soldering iron

The heating element of the soldering iron consists of five spirals and a ceramic insulating tube.

To prevent arcing, the internal leads of the coils were placed in a ceramic tube borrowed from the delay line of an old Soviet TV. You can release the ceramic tube from the compound, leads and wires using a gas burner. But, it is better to do it outside or in a well-ventilated area.

Another source of ceramic insulators can be tubular ceramic capacitors,

If you've ever dismantled burnt soldering irons, then you could have such mica tubes lying around. They can also be used to insulate the center leads of the heater.

A nichrome wire with a diameter of 0.4 mm was purchased at the market for $ 1.1 in the ranks of pieces of iron, from a seller selling heating elements.
Same spools from sewing machine the seller was filled with a wire of a different diameter.

Spirals were wound using a hand drill and a shaft with a diameter of 4 mm. In order not to measure the wire, a stop was fixed on the shaft.
Heating element housing

The most complex assembly unit of a soldering iron is the body of the heating element. It was assembled from three parts: a glass, a tube and a washer.

A glass with an outer diameter of 16.5 mm was obtained by disassembling a lithium-ion battery from a laptop. The fact is that a very aggressive filling of lithium-ion batteries and batteries is enclosed in stainless steel cases.
Used batteries can be purchased at the radio market, and faulty ones can be asked for at a computer workshop. If somewhere in the radio market or flea market a whole battery from a laptop comes across, then here

Attention! Before disassembling the battery can, it must be discharged. This can be done with a powerful, low-resistance resistor. I used a 10 ohm PEV resistor with a power of 10 watts, which I usually discharge electrolytic capacitors with.
Although, if you are not so scrupulous, you can rivet the heater case from tin from a can, after making sure with a magnet that the can is steel. Of all the metals that a do-it-yourselfer may have on hand, only aluminum alloys have low temperature melting. At the same time, steel, brass and copper are suitable for the manufacture of such parts. 
Thin-walled tubes of various diameters can be obtained by disassembling a broken telescopic antenna from a radio or radio. How to cut the antenna section and flare the end of the tube is shown in the video.

The flange that secures the thin-walled tube is made of a 1mm thick steel washer. M1.6 screws were chosen as fasteners, although rivets made of copper wire can also be used.
Hair dryer body

A one-liter PET soda bottle was used as the body of the hair dryer. The size of the bottle was chosen based on the perimeter of the fan used.

The body of the heating element is fastened to the body of the hair dryer using a four-leaf collet clamp. To do this, the screw part of the neck of the bottle was cut into four parts with a hacksaw, and a hole was made in the cap with a scalpel.
Hair dryer handle

The hair dryer handle was made from the barrel of a 40 gram disposable syringe. A rectangular window was cut into it with a sharp knife for installing a fan power switch.
Fan assembly

For a high-powered hair dryer, a more efficient fan is also required. I bought a used server fan Brushless FFB0612EHE 12V/1.2A on the radio market for only $1.35.

To fasten the fan to a PET bottle, a clamp was made of 0.5 mm thick sheet metal.
In order for the body of the bottle to be pressed tightly against the side surfaces of the fan, the edge of the bottle was notched in four places.
Mounting unit for heater body

In order to protect the neck of the PET bottle from overheating, the heater body was insulated with several dozen layers of fiberglass. For additional protection of the body of the hair dryer from overheating, an aluminum heat shield 0.5 mm thick was used. The screen petals bent inside the case are blown by an air stream. This design reduces the transfer of heat from the heater body to the hair dryer body.
Drawing of thin-walled parts

This is a pattern drawing with which you can make all the thin-walled parts needed to assemble a hair dryer. Below the preview is an image for printing in A4 format, 300dpi.
Hair dryer assembled

And this is a homemade soldering iron assembled.
The difference between a soldering iron and a conventional hygienic one is limited by its rough, heavy construction. Temperatures inside reach 800 degrees Celsius, but 250 is enough for soldering. A hair dryer won't do that. The idea is to copy the design. Do-it-yourself soldering dryer is assembled from a hygienic one designed for drying hair. The heating element undergoes the greatest modernization. Get ready to add a couple of functional elements. The idea remains the same: the air blown by the fan passes through the heating element (coil), acquiring a considerable temperature that can melt the flux when soldering and desoldering board elements. A novice radio amateur who is passionate about processor technology will come in handy.
The design of the blow dryer
A used hair dryer would be useful to the design business. Stores sell for a maximum of 200 rubles, perhaps there is a free one at home. For comparison, the construction costs 800 rubles, God knows whether it is suitable for soldering. Try. Whether it is worth saving pennies, decide for yourself. The review is considered an experiment, for fun. Winning $15, wasting a lot of time, losing in terms of security is a dubious benefit. The experience is interesting, if there is nothing to do, let's get started.
Construction and hygiene hair dryers
In the commercials, craftsmen created hair dryers, took a steel tube. Beware of aluminum, copper is too heavy (relative to steel). The disadvantage is the same: it is not possible to hold a massive device. They wrote about induction heating machines. It was said: high temperatures spoil the copper inductor. Caused by secondary heat given off by the melted part by infrared, convection. A ceramic heat-resistant fabric was mentioned that can withstand temperatures in excess of 1000 degrees Celsius without damage. In parallel, a list of materials used that are not afraid of heating was given.
With a soldering gun, the situation is similar. The metal will become red hot - how to hold it with one hand? In amateur videos, the soldering iron lay motionless on the rack, the board with attachments moved relative to it. Anyone familiar with amateur radio will guess the inconvenience of the technique. It is clear that I wanted to feel something better at hand ... If readers are lucky enough to get heat-resistant fabric - the most useless specimens keep the temperature of 800 degrees Celsius - the problem will be largely solved. Recall: in induction melting installations, the fabric covers the spiral, protecting it from a red-hot billet. The material is laid outside, it will not carry a large load. A few layers are enough to fit a homemade oven mitt on top to hold the appliance.
![]()
What is good for designing an old hair dryer? In simple cheap models we find mica plates that easily keep the temperature. The spirals of the soldering dryer are red-hot, therefore, a solid base is sought that is not afraid of the load. Suitable standing under a high-resistance wire. The spirals are connected by a cross - great. A few words about spirals: we use soft nichrome (hard fechral), which we need to purchase. Not a problem - the network is full of shops. Fechral is tougher, out of place for the occasion.
There was a question of definition of power. Too much heat will melt the flux and may burn the chips. A radio amateur knows: an overly powerful soldering iron is the worst enemy of electronic components, competing with static electricity. With inept hands, the sting becomes a real tool for killing microcircuits, attachments. Complex components have an incredible number of legs, melting the flux takes time.
The question was inspired by a YouTube video: a novice radio amateur describes the first experience of making a soldering iron unsuccessful, there was not enough power, he had to wait a minute for the flux to melt. It is clear that a rare individual is ready to pass the test, you have to hold the circuit with your bare hands near a stationary soldering gun. We invite readers to study the market, determine what power is characteristic of the designed class of devices, find the resistivity of nichrome, calculate the Joule-Lenz effect in order to avoid boredom, we will partially do the work.

Measuring the temperature of the hair dryer with a tester
Choosing the characteristics of a homemade soldering dryer
We tend to think: a home-made soldering dryer should look more like a purchased one. We stumbled upon BAKU 8032, which costs 900 rubles, although it is more expensive on average in the markets of the capital. Technical characteristics are laid out by a resource where the price is increased. That's right - market competition requires a competent approach. The soldering iron has the following characteristics:
- The power consumed by the 230 volt (50 Hz) network is 450 watts.
- Fan capacity - 30 liters per minute (maximum).
- Temperature range 100-500 degrees.
The lion's share of the power is consumed by the spiral. They are deprived of the opportunity to measure the resistance themselves, let's say from experience - about 97 ohms will come out.
Left:
- find nichrome wire suitable for winding spirals;
- find out the characteristics (resistivity per meter);
- calculate the length necessary to get 97 ohms;
- make sure that the estimate is correct by measuring the resistance of the spiral of the future soldering dryer with a tester.
As far as performance is concerned, nothing is easier than measuring. You will need a large package. Take and inflate with the original hair dryer at maximum speed a plastic container from which air has been released. You can estimate in advance how much cellophane. At home, buckets, tubs, tubs, basins will serve as the standard of measure - compare. Now we can relatively easily measure the performance of the future soldering iron in terms of hot air production. Discussed is enough to obtain a workable soldering dryer, issuing a jet at a temperature of 450 degrees Celsius.

Let us explain the device of the soldering dryer in addition. Many are interested in how we quickly determined how many ohms to take the spiral. Just really. A typical storage water heater spiral is produced with a capacity of 2 kW. In this case, the resistance is in the region of 25 ohms. If you take four times the large spiral, you get a power of about 500 watts, the resistance will reach 97 ohms. The calculation is made on the fingers, if you wish, substitute the value into the Joule-Lenz law. Paradoxically: the more we wind the wires, the less the thermal effect. This follows from the law. Power is found by dividing the square of the voltage by the resistance.
It is easy to verify that the conclusions are correct. What to do if the spiral is too long. Put up with a lot of soldering iron consumption, as well as the danger of damaging parts. The temperature will rise too quickly, and the designers of a professional company have calculated safe modes in advance (isn't it better to buy ready-made?). It is not recommended to exceed. And one more option. Try to find an alloy whose resistivity is higher than nichrome. It’s a difficult path, for sure, the creators of household appliances are not so stupid, they stubbornly continue to use nichrome and fechral in products, therefore, you won’t get much benefit from this.
You see that it is difficult to make a soldering iron with your own hands. And vice versa, it is easy to ruin microcircuits with an incorrect design. We frankly believe that 1000 rubles is not the money that you need to fight for for the sake of an idea. It is clear that professional stations cost more than 3,000 rubles, but at home, creating such a miracle is beyond the power of the next hundred years. That is why, we emphasize, the review is rather introductory.
Concluding remarks on the design of the soldering iron
Perhaps someone will say, we have not indicated exactly how to make a blow dryer. We just think everything is clear:
- We remove the spiral from the original hair dryer along with the quartz carrier.
- We cut off the pipe, leaving a small branch for attaching new elements.
- Inside the steel tube we insert the base with a spiral. The wires go inside, wrapped in fireproof cloth, which you will find in household heating appliances.
- The body of the hair dryer is made of plastic and will not withstand the high temperatures of a steel tube ... we put it on heat-resistant glue through a ceramic adapter. You can cut off the grinder from the pole insulators of high-voltage lines (sold in the store).
- We glue ceramics on the same composition to the body.
Actually, the principle of operation of the soldering iron is fully implemented. Start working. We believe that few really need a soldering dryer. The weapon of professional craftsmen and repairmen, which has been gathering dust on the shelf for years for the life of an ordinary citizen. We add that the soldering of planar microcircuits requires strict adherence to temperature conditions.
A building hair dryer can be attributed to the category of tools that are not among the essential tools, for sure. Just think, a hair dryer is like a hair dryer, what is the use of it - it is expensive, but all it does is heat the air. Some girly fun. But let's not jump to conclusions.
What can a building hair dryer do?
Most likely, each of us has already encountered a situation where the best device that could solve the problem would be a hair dryer. Out of ignorance, we sometimes do a whole bunch of extra gestures, and a hair dryer would help solve everything in a matter of minutes. After reading the article, we hope that many will change their attitude towards the device. It may well be that they will even think about how to make a building hair dryer with their own hands. Our task is to provide an evidence base that every decent owner should have a building hair dryer at hand.
Having learned about its capabilities and areas of application, it is impossible not to change your mind about a hair dryer as an essential household appliance. Let's start with the practical scope, but it will be very difficult to form a complete list. So, a hair dryer will help:

And fire up the grill. Earnestly? That's the same. These are far from all areas and ways of using a building hair dryer - only when repairing a car can it be used in almost all operations, from decorating to soldering plastic bumpers and body kits.
The theoretical choice of building hair dryer
If we managed to convince you of the need to buy or make a building hair dryer with your own hands, then you should know some features of choosing this useful device in terms of parameters, characteristics and design.
In addition to the power and the generated temperature, it is no different from a household hair dryer. Its main working bodies are the fan, the heating element and the nozzle itself, which must be equipped with a large number of interchangeable nozzles. The more, the wider will be its scope.
The hair dryer should also have several temperature settings for different types of surfaces and different jobs. It is desirable to have smooth temperature change modes, since each material requires its own temperature at which it is processed. Many models have overheating protection systems, they are quite simple and consist of a temperature sensor that turns off the heating element when the set heating temperature is exceeded.
Nozzles are the main working body of the hair dryer and an indicator of its functionality. Special nozzles are used for
- simple distribution of air in a given plane;
- protection of glass from overheating;
- reflections of warm air;
- decrease in air temperature.
This is the minimum universal set of nozzles, but there are many more, as you can see from the photos that we have selected for you. Now about the main thing.


We disassemble the household hair dryer and carry out its modernization. We remove all plastic parts that can undergo melting, replacing them with ebonite or textolite. We remove the old heating element and wind a new nichrome spiral - the more turns, the higher the temperature will be.
Nichrome is not soldered, so we fasten the ends of the spiral to the transformer wire and isolate them well. In this case, it is necessary to make sure that the airflow is turned on first, and then the heating element. We collect all this in a case and be sure to put a heat insulator on the handle of the device. Now you can take construction gloves and bench test the hair dryer.

Of course, we will not succeed in such a hair dryer as Makita, Bosch or Skil sell, but our home-made device will definitely have minimal functions.
Today, many are faced with such a problem when radio equipment fails for various reasons. To perform complex work on the repair of electronic equipment, a conventional soldering iron, as a rule, is not enough, and special equipment is required. That is why electronics lovers are thinking about how a do-it-yourself soldering station with a hairdryer can be made from available parts at home. There is nothing complicated in this, but, which will be described below, will help you with this.
Soldering gun: what is it?
A soldering station is a special equipment capable of heating up to very high temperatures and allowing metal bends to be heated very quickly. This device has a very primitive design, so not only a professional, but also a beginner radio amateur can deal with it.
At the same time, soldering guns are used in conjunction with other equipment, since when working with the device it must be directed with millimeter accuracy. In this case, a soldering station with a hairdryer will be an excellent solution, which you can do with your own hands without any problems. Such devices are considered semi-professional and can be used to perform a large number tasks of various levels of complexity.
Main differences between soldering guns
Before figuring out how to make professional grade soldering equipment at home, you need to understand what differences a soldering station can have. It is not difficult to make a soldering iron from a hair dryer with your own hands. According to its technical characteristics, it will be absolutely identical to the factory counterparts, among which the main ones are:
- tip diameter;
- power;
- performance of the active air cooling system;
- maximum operating temperature.

These characteristics determine how well a home-made soldering station with a hairdryer will work, so they should be given special attention.
Design features
Soldering dryers allow you to melt plastic and various metals with a low melting point. Softening of alloys is carried out by blowing hot air, which is heated by a special spiral. What can a do-it-yourself soldering station with a hairdryer be created from? Atmega328, for example, like any other similar device, consists of the following elements:
- frame;
- a heating element;
- air blower;
- pen;
- switch.

Some devices can also be equipped with a sensor and a heating level regulator, as well as special nozzles that allow you to perform soldering jobs of various levels of complexity.
Making a soldering station from improvised means
Every person with even a little knowledge in the field of electronics will be able to make such a device as a homemade soldering station with a hairdryer. It is not difficult to create it with your own hands from improvised means. Any old or non-working devices, as well as a steel tube, are suitable for the role of the case. In the process of working with the equipment, the case will heat up to critical temperatures, therefore, in order to be able to work with it, the tube should be wrapped with a special material that is resistant to high temperatures.
Stationary device
Soldering stations can also be stationary. In this case, they are fixed in the workplace to increase stability and ease of use. Such equipment can be equipped with a special movable mechanism that allows you not to move the board during soldering.
A do-it-yourself soldering station with a hair dryer can be made from an old hair dryer. Arduino is an open source platform that allows you to quickly and easily create any electronic device. This device uses mica plates as heating elements. The melting point of this metal is very high, so it can withstand any load perfectly. As for the heating coils, any that are made of soft metal will do. The best option would be nichrome.

When manufacturing a soldering station, great attention should be paid to the power of the heating elements. It must be calculated in such a way that the device quickly melts the metal and does not damage the microcircuit. Also, the power regulator of the soldering station hair dryer will help solve the problem. With your own hands, it will be possible to manually adjust the temperature regime of the equipment.
Soldering station from a soldering iron
An excellent alternative for the body of the device will be an old soldering iron, or rather its body, and all the insides should be completely removed. This must be done very carefully so as not to damage anything. In addition to the body, you will also need halogen lamp for 2 kW. It is necessary to make a quartz insulator from it. To do this, using a diamond cutter, the ends are cut off on the glass, resulting in a tube, on one end of which a technological nipple is put on, and a hole for the heater is already made in it. A nichrome plate will act as a heating element in the equipment. Its thickness should be no more than 0.7 mm, otherwise the soldering station with a hair dryer will cool down for a very long time.

Do-it-yourself device is cheaper to make, but you need to follow a certain sequence of actions:
- The quartz insulator is carefully placed in the spiral.
- To prevent the device from getting too hot during operation, the insulator is wrapped with foil.
- Next, the heating element is placed in the body of the soldering iron and fixed with a wire from the side of the handle.
- A previously prepared structure is also placed here, which is pre-wound with an asbestos cord, which provides it with a better fit in the case.
- The handle contains a hose responsible for supplying air, which is connected to the compressor.
That, in fact, is all - an analog soldering station with a do-it-yourself hairdryer is completely ready for use.
What mistakes should be avoided in the build process?
Many beginners mistakenly believe that only a heating element and a fan are enough to make a soldering gun. Therefore, most often they make this equipment from an ordinary hair dryer. However, in this case it will be impossible to melt even tin, let alone harder metals.

There is a way to increase the heating temperature by reducing the fan speed and hole diameter, however, in this case, the heating element will heat up too much and may fail, and the case will completely melt.
Varieties of soldering stations
All devices are divided into two types:
- A do-it-yourself turbine soldering station with a hairdryer is created quickly enough. In it, an electric motor is responsible for the movement of air.
- Compressor devices are assembled on the basis of compressors.
In the first case, a powerful air flow is created, and in the second, the air moves in a more directed direction, which makes it possible to use various nozzles. According to their principle of operation, both types of stations are no different and are completely identical.
How to make a device?
A do-it-yourself soldering station with a hairdryer can be made at home from improvised materials that can only be found in the garage. The basis for the equipment will be a household hair dryer, from which we will need a case. The role of the heating element will be performed by a spiral, and to ensure a constant flow of air, you will need a small fan, which is fixed on the handle of the hair dryer.
For the manufacture of a spiral, a nichrome wire is taken, which is twisted into a spiral with a small distance between the turns. For the base, it is better to take any metal that does not conduct heat well. When winding the spiral, it is necessary to leave a few centimeters free on the base. This place will need to be wrapped with a heat-resistant cloth so that you can take the soldering station in your hands while working with it. It is best to choose a ceramic or porcelain nozzle, and thermal protection is created to increase efficiency.
 After the assembly is completed, the soldering iron will be somewhat reminiscent of a gun. To increase the convenience of using the device, it can be attached to a special holder. In order for a homemade soldering iron to comply with all safety rules, all bare wires must be insulated. At the very end, a switch is installed and a network wire is connected, after which you can start testing the equipment. As it turned out, making a soldering station at home is easy. The most important thing is to follow the instructions and observe safety precautions.