DIY plywood tool case. How to make a quality tool box with your own hands. Tools and materials
There is always something that needs to be fixed in the house. It could be a leaky faucet, a loose shelf, or a broken chair. Of course, for each of these actions a man needs a special tool. As a result, this leads to the accumulation of a large number of screws, hammers, wrenches, etc.
Where to put all the tools so that they are in one place and do not attract attention? Certainly, the best option will be the presence of a box for tools, which can be purchased in a store or made with your own hands.

What types of boxes are there?
Construction stores offer not only materials for repairs, but also special boxes in which it is convenient to store tools in a compact form. If you don’t have the time or desire to make such a box yourself, you can easily purchase it ready-made. However, it would be much better to do it yourself.
A homemade box will be direct proof that a man is a jack of all trades and can easily cope with any task.

Before purchasing or making one at home, you should clearly determine the type of box that will be most useful. For this purpose, its purpose is determined.

Irregular use does not imply the presence of a sophisticated design. In this case, a simple box-box with one section is much better suited. There is another type - an organizer box. It is more suitable for men who constantly exercise repair work, whether at home or in the workplace.

To do right choice, you need to proceed from personal preferences. The choice of box depends on the man himself and his ability and desire to make something.

How to make a box with your own hands step by step?
If you decide to make a box yourself, then you need to have step-by-step instructions, including a sequence of actions. It will allow you to accurately understand how to make a tool box without any special financial and labor costs. Let's define the main stages of work:
Defining a plan
This stage is very important, since the calculations obtained and the diagrams made will allow us to draw up a prototype of the structure. If a mistake or inaccuracy is made somewhere, the final product may differ greatly from what was intended.

To depict a box in the form of a drawing, use paper and pencil or a special program on a computer.

Materials for work
You should clearly understand what materials will be used to create the future tool box. They are divided into mandatory and optional.

The latter depend on specific case, and the mandatory group includes measuring devices, fasteners, hammer, hacksaw, etc.

Manufacturing process
The main work that will determine the outcome occurs precisely at this stage.

Manufacturing work
To understand the specifics of how to make a structure yourself, we will give a simple example, which is shown in the photo of a tool box. The design is a box-box, which has a special handle for moving.
What is this box made of? Plywood, plastic or metal materials. Their choice again depends on the personal preferences of the master. As a rule, most use coniferous trees for production. It's all about their availability, high quality and ease of processing.

Let's look at the process of making a box box step by step:
- After a drawing is made on paper or a computer, it is transferred to the material that will serve as the basis for the design. That is, details are drawn on wood, plastic or metal with a pencil and then cut out with a hacksaw.
- The main elements of the box: walls (4 pcs.), bottom. The simplest tool box may not contain a lid.
- Once all the parts are cut out, they are connected with glue and wait for drying.
- After a few hours, when the glue has completely dried, the joints are additionally fastened with nails or self-tapping screws.
- Installation of the handle. A wooden slats are suitable for this.
Having completed these simple steps, you can get a great DIY toolbox.


The finished structure is additionally coated with a layer of varnish to give it a beautiful shine. appearance and protect the material from liquid ingress.

The presented box-box is considered the simplest, but at the same time very convenient. Following step by step instructions, even a beginner can make such a box with his own hands.

Of course, later you can make a more improved and complex model, but for the first experiment a simple box-box is the best choice.

DIY tool box photo


This article is about how to make a wooden tool box. If you have a lot of tools and want to keep them organized, the best thing you can do is create a simple toolbox out of wood. From our experience, we find them very useful as they are lightweight, durable and provide plenty of space for storing tools. Don't forget that you can adjust the size and design to suit your needs.
The main components of the tool box are made from 20mm boards, as they have a beautiful appearance and are very durable. In addition, we recommend that you glue the joints and fasten everything with cuts. Try to screw in the screws as symmetrically as possible.
Once assembly is complete, you will need to sand the entire surface of the box. Make sure all edges are smooth. Otherwise, you may hurt your hands on the sharp edges. Also, be sure to check that all screw heads are flush with the wood surface. Get rid of dust and shavings before painting.
What you need to make a wooden tool box
To make a wooden tool box, you will need the following:
Materials
Tools
- protective gloves, glasses;
- ruler, ;
- chalk, tape measure, level, carpenter's pencil;
- and drills.
Adviсe
- Pre-drill holes in wood components before installing screws.
- Make a handle from a cylindrical stick.
Time
- 1 hour
Box decoration
Making a simple wooden tool box is one of those projects that can be done in less than an hour. But it can make your life easier, especially if you work with tools a lot.
Smart Tip: Before joining the parts, add a little glue to the joints. Immediately remove excess adhesive with a dry cloth, otherwise it will be difficult to remove once it dries.
The first step of the project is marking. As you'll see in the next step of the project, we'll be using 1x8 boards to make a toolbox. Therefore, you should use a carpenter's pencil and a straight edge to mark the lines on the wooden boards.

In order to get precise cuts, we recommend using a jigsaw or a good circular saw. Make sure the saw has smooth teeth, otherwise it may tear off the edges.
Smart Tip: Also, make sure the blade will fit exactly along the cut line before sawing.

The picture shows all the components needed for the box. A circular saw can make the job easier since many of the cuts need to be made at an angle.

You should use this drawing when making components for the box. Make sure you double check all measurements, otherwise the components may not fit correctly.

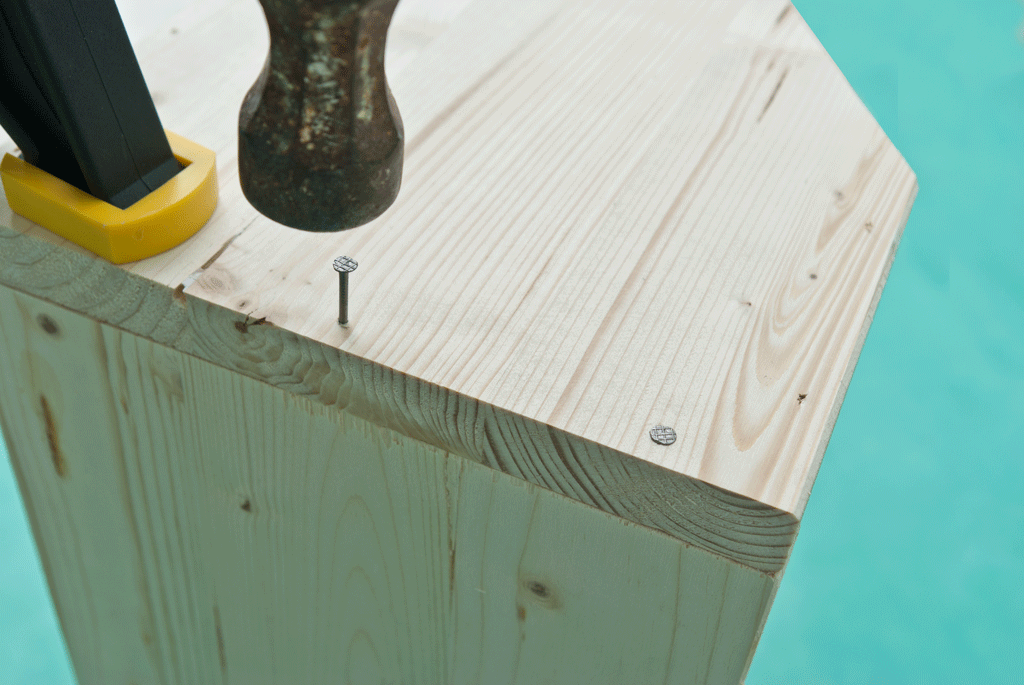
After creating the wooden pieces, you need to drill holes along the edges. As you can see in the picture, you need planks on wooden block to prevent surface damage. Drill three holes in the bottom and two holes in the sides.
Smart Tip: If you are not experienced in woodworking, you should draw guidelines for pilot lines. Allow some space from the edges to prevent the wood from splitting.

If the edges of the bottom are not smooth, you should sand them thoroughly with 120-grit sandpaper before assembly.
Coat the bottom ends with wood glue to strengthen the connection. Remove excess glue with a dry cloth, otherwise you will waste time cleaning it.

Press the ingredients firmly and leave for half an hour. If you use good glue, it will hold the joints together well.
However, still screw the screws into the drilled holes.

In order to receive robust construction, we recommend using self-tapping screws. Work carefully to prevent damage to wood components.
Smart Tip: Align all parts before twisting. As you can see in the picture, the edges should be smooth.
After installing all the components together, the toolbox should look similar to the one shown in the photo below.

Make a handle from a cylindrical wooden rod. The diameter of the handle is approximately 20 -25 mm.
Smart Tip: Use a ruler to cut the rod to the desired length.

Add a little wood glue to both ends of the rod before installing it in place. Then drill a hole and tighten the screw. Hold the handle while screwing, otherwise it may move out of place.
Smart Tip: Leave about 15mm from the top edge to the wooden handle.

Remember to smooth the edges of the wooden components with sandpaper.
Smart Tip: Clean the box of dust and shavings before painting.

Then completely sand the entire surface of the box with sandpaper.
Smart Tip: Apply several coats of paint, varnish or stain to improve the appearance of the wood and protect the materials from rotting.

If you want your drawer to have the same dimensions as in our article, we clarify that 1 inch equals 2.54 cm.
A large and convenient toolbox is the dream of any craftsman. This is understandable, because in such storage you can compactly put all your tools. Today they are not so expensive, so one of the options is to purchase them in a store or create such a masterpiece yourself. Which option will be acceptable for you? Of course, the purchased one has certain dimensions, but there may be many more tools than can fit in it. But one way or another, you will have to put up with it or run to the store again and buy a new one. It’s a completely different matter to do it yourself: pick up required material and calculated for all available tools and even with the future. Comfortable? Most likely, you will agree with this argument. Therefore, in this article we will talk about how to make such a box yourself at home.
What should HE be like?
If this is a home box, then it can be a regular box with a handle. Well, if you, for example, are a plumber, then it is clear that you will need a box that is more functional, spacious and durable. The organizer will successfully fulfill this role. However, in this article, as an example, we will consider a simple home option- box with handle. So, we will assume that we have decided on the type of box where we will keep all the tools we need, or almost all.
Where do we start? First, let's select the material. It could be plywood, wood or even metal, then we will make the calculations. Only after this can you begin to draw up a detailed drawing. This can be done in the classic way, that is, on whatman paper using a well-sharpened pencil, ruler, compass, square, etc.


The non-classical method is using a special computer program. “Autocad” and “Compass” are precisely “sharpened” to make a professional, accurate drawing. The advantage of such programs is that they will help you avoid errors in calculations and, moreover, you have the opportunity to see in advance what you will get from all this.
These programs will only serve you well if you have certain skills in working with them.
The material has been selected, and now for manufacturing it remains to assemble all the tools that we will need. Of course, the types of tools are individual. It all depends on what kind of box you want. They are also different. But, one way or another, there are universal tools. They are always needed. This is the measuring tool:
- fasteners;
- hammer;
- screwdriver.
Let's start production

We take traditional material - edged board coniferous species. As for processing, this is the simplest and available material, which also has good strength properties.
As planned, it will be a wooden box, and our task now is to materialize the drawing itself into material. For this task we will need a ruler and a pencil. After this, we mark the material and use a hacksaw or jigsaw to cut out the component parts of the product. If we planned a regular non-closing option, then we need to make five planes: four walls and a bottom.

When assembling, it is usually better to use wood glue. The joints must be cleaned, and only then glue must be applied, after which we firmly press the parts together. Be sure to let the glue dry completely.
After this operation, we can further strengthen the box with fasteners - self-tapping screws. Secured. Now you need to make a handle. This could be an ordinary wooden strip, which we need to nail or screw to the upper edges of the side elements.


Organizer
Following the principle “from simple to complex,” let’s now talk about the organizer. It is clear that in the open-top box, which was described above, you can put large tools: a hand saw, a hammer, a mallet and much, much more.
Where do you put the little things? There are all sorts of screws, bolts, nuts, etc. These small fasteners tend to get lost or not be there exactly at the moment when they are especially needed. This is where we need an organizer.

As already noted, this type of box by its design is the most functional in operation. What is he? This is kind of like a box on a box, or rather, many drawers in one section for storing not only medium-sized tools, but also all sorts of small things. Of course, at first glance, it may seem that making such a structure would not be easy. But it only seems. Difficulties mainly arise in the manufacture of the sliding mechanism. Everything else is much easier to do. Now in more detail about the manufacturing technology.
- We start by making the main body. It must be open and deep so that we can place various medium-sized tools (hammers, wrenches, etc.) in it. We can say that the design of this main body is quite simple, but in essence it is an ordinary box that can be divided into several sections using vertical planes.
- The next stage is the production of 4 smaller boxes. You probably noticed that the number of these sections is even, and we mentally divide them into pairs, trying to adhere to the dimensions of their lower large brother when manufacturing. They will be installed on top of each other. One pair of boxes (top) will have lids. They will either be folding on piano hinges, or retractable like a Soviet school pencil case.
- Now all that remains is to connect these boxes together. We will do this using metal connecting strips. We will need 6 pieces. On one side, as well as on the other side, we hook one plate at a time (short) to connect the two lower boxes - small and large. Two more plates (long) will connect all the boxes together. And finally, the longest bar will serve as a handle, and at the same time connect the two upper floors of the organizer. As you can see, there is nothing complicated here, and the sliding mechanism is extremely simplified, as is shown in the example of a metal organizer - the principle is the same.
Making a metal case for tools

Let's talk now about the metal case homemade. Don't immediately conclude that this is impossible. Of course, only an experienced mechanic can make an organizer out of metal on his own if he has special tools and the appropriate material. Factory-made metal boxes are usually made of lightweight metals such as aluminum so that the box itself is not heavy. Working with aluminum at home is difficult.

In principle, a metal box is a strong word. Rather, an ordinary box will be made of metal. The material needed to make such a box is ordinary soft galvanized steel (about 0.3 mm thick). The tools we need are:
- square;
- caliper (marking);
- sharpened small core or marker;
- ruler;
- hammer;
- anvil (wide metal bar);
- file;
- pliers.
Then everything follows the same scenario: drawing, marking. The most interesting thing is that all this can be done directly on a galvanized sheet using a sharply sharpened core (or marker), however you like. We then mark with a marker on the metal those places that we will have to remove.

After this, we proceed to trimming using metal scissors.

After cutting off all the excess, we get this complex geometric figure (“winged rectangle”).

Now let's work a little as blacksmiths. For this task, we have an anvil, and, tapping with a hammer, we carefully bend the edges of our workpiece. It is better to do this not chaotically, but in a certain order.

First we bend one side, and then we bend the other.

Now the side panels take turns.

After this, we will start bending the protruding petals. They will make the structure itself more rigid, and it will not “play”.

We can use pliers to wrap the protruding parts on the top of the box.
After such manipulations, you should carefully go over the entire product with a hammer, straightening it.
IN in this case it turned out to be a small box. But using this principle, you can make a similar one - larger, and in the end you will get a metal tool box like this.

So, if you want, everything is possible.
We hope that this article will be useful to you, dear readers. If your tools are organized, then complement it by making a regular tool box. If your tools do not have a permanent “place of residence,” then think about building a two- or even three-story “transformable house” for it. Try to do this, and your tool will always be in place, and you yourself will be pleased to use a product you made yourself in your household.
Video
This video shows how you can make a toolbox from scrap materials:
See how you can make tool organizer cases yourself:
There are many professions that use different kinds tools. Most often, tool boxes are purchased to store them, but sometimes it’s easier to make high-quality storage with your own hands
 If you are interested in this or that type of craft, and you don’t sit at home with your hands folded, naturally, you collect a fairly large number of tools. To ensure that your tools are always at hand and securely stored, they need to be provided with a safety system in the form of a separate closed space called a box for storing tools. In addition to safety, using such a box will greatly help in your work, since the contents will be neatly sorted into compartments and can be found later necessary equipment"blindly". This device is also needed by car owners, or rather by owners trucks and gazelles. The box must be well secured in the car. This means that when making it with your own hands, you need to think carefully about where it will be located in the car and how to secure it there.
Decide on two criteria:
- Will you only store tools in it, or do you also need it for ease of transportation?
- What sizes of tools do you plan to store in it?
Classification of boxes
Based on body material:
- plastic – light in weight, convenient to use and for transportation;
- metal - much heavier than plastic, but at the same time much stronger, more stable, have a more rigid structure, cannot be large in size due to the heaviness of the metal;
- metal-plastic galvanized - light, durable and spacious, suitable for both storage and transportation professional tools. But all these advantages also determine the corresponding price - it can range from $150 to $500 and above.
- wooden - the most affordable material for making a tool box. Moreover, it is easier to make with your own hands from this material, or rather from plywood 10 16 or 18 mm.
By type of stored instruments:
- hand tools - as a rule, they are represented by one large compartment for large tools (screwdrivers, hammers, keys) and 2-3 small ones for smaller tools;

- An electric tool is a case that is functionally designed to store and move a specific power tool. Most often it has one main compartment for the device itself and several recesses for equipment.
- organizers - boxes designed to accommodate large quantity instruments of various sizes. They have many compartments; models with modular partitions, which can be rearranged from one place to another for the convenience of the owner, deserve attention.
- professional tools are a special type of case with specific mounting locations for specific tools that are more resistant to falls and adverse environmental conditions.
- non-professional tools - are boxes of both small and quite large sizes with many compartments and niches for various kinds of tools, often these are cases in the form of bags.
There are many tool box manufacturing companies such as stanley,fit– American companies, keter– no less popular Israeli company, Spanish company tayg, German Croft and many others, differing in quality and price of products.
As an alternative to all these companies, there is the opportunity to make a tool box with your own hands. This way you can save on cost and get a very competitive option that meets your exact requirements.
Types of boxes
DIY tool boxes are mostly made from wood and come in a variety of shapes. Popular and easy to make boxes are the classic “basket” shape. in second and third place - a box in the shape of a chest - a container, and in the form of a case.
 |
 |
 |
Materials for making a tool box
- wooden boards 15-25 mm thick
- round wooden rod of the required length
- self-tapping screws, wood glue, sandpaper for cleaning surfaces
- set of tools - Sander, electric drill, jigsaw, screwdriver
- measuring tools - ruler
- screwdriver, hammer
Manufacturing stages

Using this technology, it is possible to produce boxes of more complex designs, creating the required number of compartments and niches using partitions.
Using the same technology, it is possible to produce a closed box, which is more reliable and convenient for transporting tools.
Additional steps in making a box with a lid
For self-made currently popular transformable boxes You'll have to rack your brains more, but it's quite possible to implement this idea.
To do this using computer programs you need to develop the design you want, and a set of necessary elements that can be purchased in special stores will help you bring it into reality. The number and complexity of the selected elements depends on your requirements for the box. Assembly can be done at wooden base using aluminum strips and angles. Fastening is done using rivets.
If you are a purposeful and creative person, then the process making a tool box will not be difficult, but when you see the fruits of this labor, you will increase your self-esteem and save budget funds.