The blind area around the house is made of concrete. Pouring a concrete blind area around a private house. Creating blind area protection
No building can do without a reliable foundation to support its weight and ensure the integrity of the entire structure, but it also needs additional protection. If necessary, each person can make a concrete blind area around the house with their own hands, without using the services of professional builders. This process It is not very complicated, but it requires careful fulfillment of a number of requirements.
Requirements for the blind area, arrangement rules
 This design serves as additional protection for the foundation of the building, preventing the destructive influence of groundwater and the environment. In addition to protection, it also performs an aesthetic function - a building with a blind area becomes complete appearance. Before concreting a blind area with your own hands, you need to familiarize yourself with a number of requirements:

 To successfully create a blind area, you should draw up a drawing. You can compile it yourself, based on standard projects, or contact specialists. If necessary, it can be limited using. Being decorative element, it also increases the integrity of the structure and protects against penetration of tree or shrub roots.
Borders are mandatory if you create a blind area around the house from screenings or crushed stone, and if poplar, plane tree, raspberries and blackberries grow nearby.
Materials for creating a concrete blind area around the house with your own hands
 Before you start work, you need to prepare everything necessary materials and a diagram. The foundation should be strengthened sequentially, but the entire process should take a minimum of time. In most cases, when drawing up a project, you can use standard concrete blind area units, making adjustments to the design in accordance with the characteristics of your region. You will need the following materials:
- Concrete. The resulting mixture must correspond to class characteristics from B3.5 to B8. When creating it, the best cement will be grade M 400.
- Sand. You can use river or quarry sand as a pillow. The material used when mixing the mixture must be soft; the presence of large impurities is not allowed.
- Crushed stone or gravel. The fraction of crushed stone for the blind area of a house is 10-20. Used as a filler for concrete mix, or as a base material.
- Clay or geotextile. This material is used in the arrangement concrete blind area with your own hands for additional protection from moisture, which is important for regions with high humidity.
It is determined by the brand of cement used and its specific gravity as a percentage of the elements of the solution. Good decision The material will be M400 Portland cement. The cement used must be fresh. If the powder forms lumps when squeezed in your hand, it will soon become unusable. The grade of cement selected depends on the planned thickness of the concrete blind area. Recommended proportions for mixing 1 m 3 solution:
- water – 190 l;
- filler (screenings or crushed stone) – 0.8 m3;
- sand – 0.5 m 3
- plasticizers ( liquid glass and similar) – 2.4 l;
- cement – 320 kg.
When calculating the size of the blind area around the house, you should prepare the required amount of building materials in advance. It is also important to follow the order in which the materials are presented, which is necessary to ensure the required consistency. Compliance with technology will allow you to achieve the required result and create reliable design. If all the requirements are met, you can effectively build a concrete blind area around the house with your own hands.
The amount of water supplied is of great importance. Excess will reduce the strength of the resulting concrete. Not enough water will prevent it from hardening properly.
How to make a blind area for a foundation with your own hands - step-by-step instructions
 The required amount of cement is poured into a concrete mixer or other mixing container, and then it is filled with water. When mixed, a “cement laitance” is formed into which other components are added. Next, sand is added in small portions, while the mixture must be constantly stirred. Next, filler is poured (crushed stone or screenings). If you find out in advance which crushed stone is best for the blind area and select the material of the correct fraction, mixing will not be difficult.
To ensure more efficient mixing, wait 5 minutes after adding each ingredient.
Once the materials are prepared, you can begin to work. The installation of a blind area around the house includes the following steps:

Also, before pouring, an expansion joint is installed between the blind area and the plinth using boards or sheets of plywood - this measure will protect the concrete from destruction when the temperature changes.
Installation of a blind area made of crushed stone
 More economical option will be the use of crushed stone as the main filling material. Its arrangement is subject to the same requirements as for a concrete blind area, however, reinforcement and the creation of an expansion joint are not required. An additional layer of waterproofing (geotextile) is installed between the crushed stone and the sand “cushion”. This will prevent mixing of crushed stone and sand, and will not allow plants to grow from seeds that may have remained in the “cushion”.
You can make a blind area from crushed stone with your own hands without much effort. Large grade material can be used to fill the lower part of the trench. On top, to give a decorative effect, fine crushed stone is used. Such a blind area also successfully protects the foundation from the destructive effects of groundwater and the environment. At the right approach you can give it a neat and attractive appearance.
Concrete blind area from A to Z with your own hands - video
The blind area surrounding the house plays very important role in ensuring long and comfortable use of the home. It protects the foundation structure and the soil around it from water ingress. The accumulation of moisture near the house when snow melts or during precipitation can erode the top layer of soil and reach the foundation. If it manages to seep to the base of the foundation and damage it, then it load bearing capacity and strength will be reduced, which may result in the destruction of the house. It is especially important to do it correctly when using a shallow base, in which the sole is close to the surface, so moisture can easily reach its depth.
The width of the blind area should be as wide as possible, since it should protect the base.
As a result of getting wet, the strength of the sole decreases, and it begins to sag unevenly, destroying the foundation. However, even if buried foundations are used, it is also necessary. It must always be done, regardless of the foundation design, soil type and other conditions.
Preparing to create a blind area around the house
How to properly make a high-quality one so that it lasts as long as possible and becomes reliable protection for the foundation? To do this you need to select suitable material good quality and strictly follow technology.
First of all, you need to choose the width. Since it must protect the base, its width should be as wide as possible.

Scheme of the blind area around the house.
In addition to its protective function, the blind area around the house is also erected as a path along the perimeter of the building. This also needs to be taken into account when choosing its width, so that in the future you do not have to walk on it sideways. Based on the above, we can conclude that the most optimal width of a properly made blind area around the house that meets all standards and requirements is within the range of about 1-2.5 m.
The blind area around the house must be made with a certain slope, which will ensure that water flows away from the walls of the building. Building codes determine the slope to be 50-100 mm per 1 m of width. This means that the edge of the blind area around the house, the width of which is 1 m, will have a height of 50-100 mm near the wall of the house, and its other edge will be located flush with the ground. The resulting slope is good for draining water from the building: water will flow down it quickly enough, but it is difficult to walk on such a blind area. However, if you make the angle of inclination smaller, then the water will flow much more slowly or even linger on the surface, but walking will be much more comfortable. A compromise between efficiency and comfort is considered to be a slope of 15 mm per 1 m of width. When walking, such a slope is almost unnoticeable, and the water completely flows down and does not linger on the surface.
Return to contents
Materials and covering for the blind area around the house

Scheme of the blind area.
In order to properly make a blind area around the house yourself, you need to prepare the appropriate materials. There are several popular options for its manufacture, which use various materials, but the most common is a blind area made of concrete.
The manufacturing technology is quite simple. First of all, the area for the blind area is cleaned, after which reinforcement bars with a diameter of 6 mm or more are laid in the form of a mesh. The rods are connected to each other using binding wire. Next, formwork made from wooden boards. At the end, the formwork is filled with concrete mortar.
To make a blind area around the house yourself, prepare the following tools and materials:
- Shovel;
- Hydraulic level;
- Wheelbarrow for transporting crushed stone and removing soil;
- Manual tamping;
- Waterproofing materials;
- Insulation;
- Sand;
- Crushed stone;
- Clay;
- Reinforced mesh with 10x10 cells or reinforcement bars.
Before starting work, it is advisable to carry out the necessary preparatory actions, for which you should organize free access to the house from all sides, as well as prepare the previously listed tools and materials.
The next stage is carrying out marking work. It is most convenient to carry out this procedure using wooden or metal pegs (driven in around the perimeter of the future) and a cord stretched between them. In this case, you need to ensure that the blind area has the same width at all points (usually around private houses with a width of 1 m).
Return to contents
Concrete blind area around the house with your own hands: step-by-step instructions

Scheme of the construction of a concrete blind area.
The durability of the foundation, as well as the amount of money and time spent on constructing the structure itself, depends on the blind area, made in accordance with all rules and regulations. It is better to take care of creating a blind area immediately after completing the construction of the house.
The blind area around the house consists of 2 structural layers. The first of these is the underlying layer. The main task of this layer is to create a compacted, even base for the coating. Material used: sand, clay or small crushed stone. Layer thickness – up to 20 mm. The choice of material for the underlying layer depends entirely on the material of the second layer, i.e. coverings. The main purpose of the coating is resistance to the destructive effects of moisture and water resistance. Material used: clay (it can be used both as a base layer and to create a coating), asphalt mixture, concrete, small cobblestones. Layer thickness – up to 100 mm.

Diagram of a concrete blind area.
This is true for any type of blind area around the house. The following will provide instructions for constructing a blind area using the example of the most popular option – concrete.
To prepare a concrete mixture, you need to take M400 cement, crushed stone and sand in proportions 1:4:2.
Make markings for the future blind area around the house. The minimum width of the structure was discussed earlier. Remove and compact the soil around the perimeter of the building. Usually the soil is removed during the zero cycle construction work. When constructing a blind area, it is necessary to prepare the ground specifically for the width of the future structure in accordance with the markings made. It is necessary to take into account what material will be used during construction. To do this, you need to remove the soil to a depth of about 25 cm (“on the bayonet of a shovel”).
The next step is making formwork from boards. 20 mm thick boards are used for formwork. A small layer of clay is placed on the compacted soil. The clay is leveled and compacted. A layer of sand about 10 cm thick is laid. The sand must be thoroughly compacted, for which it should be additionally spilled with water. Try not to overdo it. Remember that there is clay below. Sand near the foundation must be compacted especially carefully. Now you need to lay crushed stone in a layer of 60-70 mm.
For any building, regardless of its purpose, it is necessary to make a blind area. This will allow surface water to be drained away from the foundation of the house, and it will not be destroyed by the negative effects of moisture.
The blind area around the house can be made by any home craftsman with your own hands; its width should be in the range of 0.6-1.2 meters, and in order to improve water drainage, it is recommended to make a slight slope, up to 10 degrees.
Before you make a blind area around the house with your own hands, you need to research and take into account the geological features of the site, the design of the drainage system, and depending on this, its width is determined. Any material can be used as an external covering; in this case, it all depends on the imagination and capabilities of the owner.
The cheapest and most accessible option for constructing a blind area is to use clay.

It is laid around the house, the layer thickness is 10-15 cm, after which it is covered with a hard coating. Clay is a good waterproofing agent and does not allow moisture to penetrate to the foundation of the building; various materials can be used as a top covering.
A cheap and affordable option is to use crushed stone, which must be compacted during installation. A more reliable option is to lay a layer of crushed stone on top cement mortar. Thus, the protection of the foundation from excess moisture is significantly improved, and it is much easier to care for such a coating.

The most expensive, but also the highest quality option is to use a monolithic slab, the thickness of which is about 6-8 cm. But this method cannot be used on clay soil and soil that is saturated with water, since very often you will have to patch holes and repair the blind area with your own hands.
Another option for a blind area, which you can also do yourself, is to use reinforced slabs.
What happens if the blind area is not made?
In the presence of frequent and heavy precipitation groundwater rise, and together with surface water will freely penetrate into the foundation of the building. Because of this, the foundation will begin to collapse, which leads to the appearance of cracks not only in it, but also in the walls of the building.

If the house is built on heaving soils, then the consequences will be even more serious. After drinking the soil with water, during frosts it begins to expand unevenly and put pressure on the building structure. To prevent this from happening, in such cases, you must not only make the blind area with your own hands, but also insulate it.
When deciding what the width of the blind area should be, it must be taken into account that it should extend beyond the overhang of the cornice by approximately 20-25 cm. Its width is usually about 80 cm, but it can be less or more than this value.
Along the edge of the blind area, it is necessary to make a storm drain through which water will be drained, and in order for it to be drained more efficiently, the slope of the blind area should be 5-10 degrees.

If you carry out all the work yourself, then you need to take into account the fact that some experts recommend doing the blind area along with the construction of the foundation, but you must strictly follow the work technology.
Main functions
This structure performs several functions.


If you look at the functions of the blind area, it becomes clear that it must be solid, without cracks and must fit tightly to the building. Its depth should not be more than half the freezing depth of the soil in your region, otherwise it will not fulfill its functions, but will simply turn into a continuation of the foundation.
How to do it yourself?
In order for the blind area to effectively perform its functions, it must protrude beyond the roof overhang by at least 25 cm. If the roof covering protrudes beyond the wall by 50 cm, then the width of the blind area must be no less than 75 cm.
In order to do everything yourself, you will need:
- cement, crushed stone, sand;
- boards for formwork;
- polyurethane sealant;
- trowel or spatula;
- rule;
- solution container;
- shovel.

Fig.1. Types of blind areas on a sand and gravel bed.
Step-by-step instruction:

- First, markings are made and the location of the blind area is marked along the entire perimeter of the house. After this, using a bayonet shovel, remove the top layer of soil so that the roots of the plants do not have a negative effect on the structure.
- Boards are installed along the perimeter; they will not allow the solution to spread; the boards are secured in the required position using pegs and screws.
- To ensure normal water drainage, it is necessary that the blind area has a small angle; this must be remembered during the work.
- The cavity that has been cleared of the top layer of soil is filled with sand. It needs to be filled with a little water and compacted. A layer of crushed stone or broken brick is poured on top.
- Now you need to make a solution, after which it is poured; a rule is used to level the concrete. To prevent concrete from cracking, it is recommended to make expansion joints every 1.5-2 meters, which are filled with polyurethane sealant.
- Within 2 days after the concrete was poured, you can safely walk on it.
15-20 minutes after you have poured the concrete, you need to start ironing it. This is done using dry cement, which is sprinkled over the entire surface, and then it is smoothed using a spatula or trowel.
Ironing not only allows you to strengthen the top layer of concrete, but also makes it smoother and more beautiful. If you plan to lay on top paving slabs, then ironing is not necessary.
This is a very simple, but nevertheless reliable design. Sequence of work:
- Clay 10-15 cm thick is placed at the bottom of the trench, it is compacted well and a slope is made;
- PVC film is laid on top; it is necessary to ensure waterproofing;
- lay 10-15 cm of coarse sand on top of the film;
- We cover everything on top with a layer of crushed stone so that the crushed stone does not sink into the sand; between them you can put geotextiles or similar material.
- To make everything look beautiful, crushed stone is poured slightly below the soil level, and rolled grass is laid on top.
If the blind area around the house is made of tiles or paving stones, in this case the sequence of work is the same, but there are some peculiarities. Since there is a slope, so that the tiles do not move, it is necessary to install curbstone.

The blind area of a house compared to its foundation has an incomparably lower cost. Making a good blind area is much easier than building a foundation. But all of the above does not mean that attention to this important detail it should also be much less, which, alas, often happens. The blind area may seem like a small cog compared to the entire structure of the house, but the “health” and long life of the entire structure greatly depend on it.
In the article we are going to look in detail at how to make a blind area around the house, and how to do it correctly, and we will also look at different variants and indicate in what cases it is advisable to use them. Recommended Construction Materials, which should be used to create a good blind area at home.
What is a blind area and why is it needed?
A blind area is usually called a strip of waterproof covering that encircles the entire perimeter of the house. Most often, we are accustomed to seeing blind areas made of concrete or asphalt, however, everything is not limited to these two materials. The main task of the classic blind area is to prevent atmospheric water from entering the foundation structure and the soils located near it. Why is this being done?
- Firstly, water that gets to the structure of the foundation base can saturate the soil near it and, if it is shallow, this can lead to freezing and the appearance of heaving forces. The so-called heaving soils, which include clayey and loamy soils. The forces of frost heaving are simply enormous, they are trying to squeeze the house out of the ground. If they are distributed unevenly across the foundation, this can lead to cracks and even destruction of the house.

- Secondly, the forces of frost heaving act not only on the sole, but also on the side structures of the foundation. In construction science, such forces are called tangential heaving. According to experts, 1 m² of wall can carry a load of 5-7 tons. Not every structure can withstand this. The blind area is designed to minimize the ingress of water from above.
- Thirdly, waterlogged soil with poor waterproofing of the foundation can cause water to enter the basement premises. Even good waterproofing does not always save from leaks or high humidity. Everyone knows the proverb: “Water will always find a hole.” And here the blind area also plays its role, reducing the moisture content of the soil adjacent to the foundation.
- And finally, a poorly made blind area will provoke its own destruction, which will have a bad effect on its protective and decorative qualities.

Creating a high-quality blind area for a house is part of a set of measures for waterproofing the foundation and its drainage - wall or ring. By itself, it is “not a warrior in the field” and will be able to fulfill its main protective purpose only together with other elements. Why do you need a blind area at home?
- As noted earlier, the blind area prevents the penetration of atmospheric water to the foundation of the building. Water that gets onto the blind area must drain from it and enter the surface drainage system.
- The blind area, provided it is insulated, prevents the freezing of the soil underneath it and therefore reduces or eliminates the occurrence of frost heaving forces. This function works best in conjunction with foundation insulation. In countries northern Europe Insulation of foundations and blind areas have long been mandatory measures in the construction of houses.
- The blind area can serve as a sidewalk along which people move.
- The blind area performs a decorative function. thanks to it, any house in combination with the decoration of the walls and basement has a harmonious and complete look. We can say that the blind area is one of the important elements of landscape design.

Almost all houses and buildings require a blind area. For strip, slab, monolithic strip foundations, it is simply necessary. If the house is built on a pile or, then the blind area will serve only a decorative function.
What types of blind areas are there?
Let's consider what types of blind areas exist so that there is an “opportunity” to try one or another option to suit your conditions and choose the most suitable one.
Clay blind areas
This type of blind area has roots in the distant past. It was this material that our distant ancestors used to protect the foundation of their house from moisture. And, despite the fact that this method of creating a blind area may seem archaic, which is high time to be sent “to the dustbin of history,” it may well be used on modern buildings. Everyone knows the properties of clay - its plasticity, fire resistance and the main quality - water resistance. This material is the best natural waterproofing material. Almost all underground sources of artesian water are located between clay layers. Another useful property clay – it is impossible for any plants to grow on it. Of course, if the clay has a certain degree of purity.

This blind area is very easy to make. The fertile layer of soil is removed to a given width and depth, and then clay is poured and compacted. It is better to use clean quarry clay. The profile of the blind area is given a slope in the direction from the wall to its edge, and then the clay is reinforced with gravel or crushed stone, which must be pressed into its layer. An interesting composite coating is formed. Clay provides reliable waterproofing and plasticity, and crushed stone or gravel provide the necessary rigidity of the blind area and prevents erosion by water. A clay blind area together with crushed stone or gravel looks good and can even become an element of home decor, especially a wooden one. The clay blind area will never crack and can be easily repaired. It can serve for decades. Surely many have come across unpaved roads in clay soils ah, which are fortified with stones. They have served for a long time and will continue to serve for a long time. Even trucks in rainy weather, the ruts on such roads are not trampled.
A significant limitation to the widespread use of clay blind areas is their main drawback - with direct, prolonged and strong exposure to water, the clay will still be gradually washed out. Therefore, in most cases, more modern materials are used.
Sand prices
Concrete blind areas
This type of blind area is the most common. And this is absolutely not in vain. one of the most common materials and blind areas made from it have a number of advantages:
- Properly prepared and laid concrete has high mechanical strength
- Concrete is not afraid of exposure to water and practically does not allow it to pass through, and treated with various hydrophobic coatings becomes an ideal waterproofing barrier.
- Concrete blind areas have a long service life - at least 25 years, provided that technology is followed.
- Concrete blind areas can be made independently; this does not require the services of special construction equipment.
- Concrete blind areas can be decorated with pebbles, gravel, and various natural stones.

Concrete blind areas, however, are not without disadvantages:
- Along with high mechanical strength, concrete blind areas are fragile. When heaving forces of different magnitudes occur in different areas of the blind area, cracks may appear. This problem is solved by reinforcement, which makes the blind area significantly more expensive.
- Bare concrete has an unpresentable appearance, beautiful house In a harmonious natural landscape, a concrete blind area will only spoil it.
- The concrete blind area is very difficult to dismantle; it is difficult to local repairs, the need for which sooner or later arises.

The thickness of the concrete blind area in its thinnest part should be at least 5 cm, but given that it is constantly under the influence of natural forces, it is better to make it at least 7 cm. Naturally, the concrete blind area is given a slope of 3-10° in the direction from walls to its edge. The width should be at least 20-30 cm greater than the overhang of the roof eaves, but in no case less than 60 cm.
Cement prices

The blind area should encircle the entire perimeter of the house and not have a rigid connection with the walls. The fact is that during seasonal soil movements, the structure of the house and the blind area will behave differently and the presence of a rigid connection will lead to the appearance of cracks. Besides, different materials have different coefficients of thermal expansion. That's why they do the so-called expansion or expansion joint , which, on the one hand, provides the necessary seal to prevent water penetration, and on the other hand, allows mutual movements of the house and the blind area. Expansion joints have been made from tarred boards since ancient times, but now various types can be used synthetic materials. Very often, expansion joints are made from roofing felt or polyethylene foam folded in half. There are also special damper tapes for screeds or heated floors, which can also be used for an expansion joint between the blind area and the base of the house.

Expansion joints must also be installed in the concrete blind area. They are made in the corners, and then every 1.5-2.5 meters. Oiled or tarred edged boards 20 mm thick, strips of laminated plywood or OSB are used as seams. When pouring a blind area, they serve as beacons for leveling it and later, after setting, they can be removed and filled with polyurethane-based sealants or left in place.
Blind areas made of asphalt and asphalt concrete
Such blind areas are also quite widespread, but mainly not in residential construction, but in industrial or commercial facilities. Asphalt is more plastic than concrete, and the likelihood of cracks appearing on it is negligible. Asphalt blind areas are less material-intensive, since 3-4 cm is enough to create a durable and water-resistant coating. They are quite durable and can last for decades.

However, asphalt blind areas have been widely used only in the construction of non-residential buildings. When heated sun rays asphalt can soften and the hydrocarbons that make up the bitumen, which is the binder for this type of coating, begin to evaporate from it. In addition, laying asphalt requires the use of special road equipment.
Blind areas made of paving stones or paving slabs
This type of blind area will be most preferable if the house is planned to fit harmoniously into the surrounding landscape. Cozy and beautiful garden with paths made of paving stones, a plinth finished with natural stone or its imitation will be in perfect harmony with blind areas made of paving stones or paving slabs. Natural stone can also be included in the same category, since from the point of view of technology for preparing the base and laying it there are no big differences. Natural stone, however, requires a highly qualified craftsman.
What are the advantages of blind areas made of paving stones or paving slabs?
- As noted earlier, this is an attractive appearance.

- Properly laid high-quality paving stones or paving slabs have a long service life. According to the manufacturers, at least 20 years.
- High-quality paving stones have good frost resistance.
- Coatings made of paving stones or paving slabs made by vibropressing (namely, these are recommended for blind areas or paths) are not as slippery in wet weather or in the cold season as concrete, asphalt or made from vibrating tiles.
 Vibropressed paving stones are an excellent material for blind areas
 - Each paving stone is laid separately on the base, so this type of coating is not prone to cracking.
- Coatings made of paving stones or paving slabs are distinguished by their environmental friendliness.
- A blind area made of paving stones can also serve as a path along which people can walk.
- High strength and wear resistance.
- Blind areas made of paving stones can be repaired locally; complete dismantling is not required.
- or you can lay paving slabs yourself. This does not require the use of special construction equipment.

The main disadvantage of blind areas made of paving stones is its relatively high cost compared to “classic” concrete ones. There is a good way out of this situation - if the blind area will only be walked on, then it can be paved with paving slabs, which are both thinner and cheaper than paving stones. Areas and paths that will be subject to increased loads can already be paved with paving stones that harmonize with the blind area. Most manufacturers of vibropressed paving slabs or paving stones offer products of different thicknesses. Once laid, it is no longer possible to distinguish where the stones are thicker and where they are thinner. The construction of a blind area made of paving stones or paving slabs is shown in the figure.
Prices for paving stones
paving stones

Paving stones or paving slabs also have one important feature, which can appear as in in good shape, and vice versa. Such coatings are laid on a sandy base and have gaps between adjacent elements. When water gets onto the paving area, most of it will be received by storm water inlets, taking into account the required slope, and flow down the gutters and surface into the water intake trays of the surface drainage system. But some part will still be able to seep between the paving stone elements into the underlying layers. Now let's look at how this feature can manifest itself in good and bad ways.
- Let's talk about the good stuff first. If water seeps through the seams, then such a coating will be dry and puddles will not stagnate on it. Of course, this is very useful for paths where the surface is horizontal, but the blind area has a slope and most of it will still flow into the water intake trays. But some of it will still end up in the underlying preparation.
- Now about the not so good ones possible manifestations. Let's say the house is built on heavy clay soils and the blind area of paving stones or paving slabs is made correctly. Underneath it there are both crushed stone and sand layers that can accept a certain amount of water. When the snow melts, a situation may arise when the water completely saturates both sand and crushed stone and there is simply nowhere for it to go, since on one side there is a foundation wall with good waterproofing, and on the bottom and sides there are heavy clay soils. If a thaw is replaced by severe frosts, which often happens in the climatic zones of Russia, then the water in the crushed stone and sand layer will freeze and accordingly expand in volume. The blind area can collapse in such conditions very quickly. Even after one season of use.

On thematic forums dedicated to construction, a lot of questions are raised about paving stones and paving slabs in general and blind areas made from them in particular. Developers are sometimes simply perplexed because a good and impeccably laid paving area begins to swell after the first winter. And this most often happens due to the fact that when the snow melts, crushed stone and sand become saturated with water, which simply has nowhere to go due to the clay soils around. This problem can be solved very simply, but not free:
- The first solution to the problem is drainage. In the case of blind areas, this is high-quality wall-mounted deep drainage, as well as surface point and linear drainage. You can read more about drainage on our portal. Preference should be given to drainage with a wall-mounted relief geomembrane. Then water, having got into the gravel and sand, will not linger in them, but will flow down, where it will be “picked up” and removed by the drainage system.
- The second solution to the problem is insulating the foundation. This measure will avoid freezing of the soil in the area of the foundation and blind area. Materials and technology are described in our portal.
The blind area around the house, in addition to vibro-pressed concrete paving stones, can also be made from more expensive natural materials.
- It may be a natural “wild” stone, which owes its name to its irregular shape.

- Natural chipped, split-sawn or full-sawn granite paving stones are also used as the top layer of the blind area. This is a very worthy option, but the cost is very immodest.
- A blind area made of clinker paving stones in combination with finishing the base with clinker tiles not only looks rich, but also has a very long service life. This option is no less modest than a blind area made of granite paving stones.
We will look in detail at how to make a blind area from paving stones or paving slabs in one of the following sections of our article.
Soft blind areas
It may seem that there is some kind of catch hidden in the name itself. We are subconsciously accustomed to perceiving blind areas as a rigid and reliable structure, and the word “soft” seems inappropriate. However, this is far from the case. Such blind areas have been used for a very long time and successfully. For many decades, soft blind areas have served without repair, and in climate zones where they are exposed to water, snow, severe frosts and heat in different seasons.
Some types of soft blind areas are also called Finnish, thanks to the country where they are widespread. It is difficult to convict the inhabitants of Finland of stupidity and impracticality; they live in harsher climatic conditions than most regions of Russia, and build a lot of good and comfortable houses for living. It is not for nothing that Finnish builders are considered one of the best in the world. It is possible that it makes sense for us to learn some experience from the Finns.
As noted earlier, the blind area must solve two main problems. The first is to prevent water from entering the foundation structure and the soil near it, and the second is to preserve the integrity of the blind area itself in order to maintain its presentable appearance and solve the first problem. That is, the integrity of the blind area is one of the main tasks and a person is forced to constantly fight for this through reinforcement, creation of expansion joints, drainage and other measures. The wise Finns decided to stop fighting and make the area soft. One of the options for implementing this approach is shown in the figure.

The main thing in the construction of soft blind areas is a very interesting approach - you don’t need to worry too much about the integrity, solidity and waterproofness of the structure of the top decorative layer, but it is better to focus on how to remove water that has already penetrated through it. That is, the “most interesting”, those elements that have a protective function, in these types of blind areas are out of sight. If water penetrates through the top layer, then it is better not to interfere with it - let it seep in to its health, and the faster, the better. But then the water is already “waiting” for the drainage pipe, which also “gladly” accepts it and carries it away from the foundation into the wells.
The permeable layer on which the blind area and the drainage pipe are located are securely cut off from other soils by some kind of waterproofing material. It can be roofing felt or other materials, for example, PVC films for swimming pools.
The best results for waterproofing are provided by so-called PVP membranes (profiled waterproof polyethylene). They are made of high-density polyethylene (HPDE), which is completely inert to all substances that may be found in the soil. According to official documents - test reports, the service life of the PVP membrane declared by the manufacturers is at least 60 years, but in reality it will be longer if installed correctly. This means that you won’t have to do waterproofing again during your entire long and happy life. In principle, the durability of the membrane is approximately equal to the average lifespan of a house.

PVP membranes have irregularities on their surface in the form of truncated cones, 8 mm high. Thanks to these protrusions, water easily collects on the surface and flows off under the influence of gravity. Therefore, the membrane in a soft blind area is always laid at a slope in the direction of the drainage pipe. For laying in the ground, it is better to use a composite geomembrane consisting of two bonded layers. The first layer is the PVP membrane itself, and the second is a geotextile fabric that freely allows water to pass through and does not allow the surrounding soil to fill the entire space between the relief protrusions.
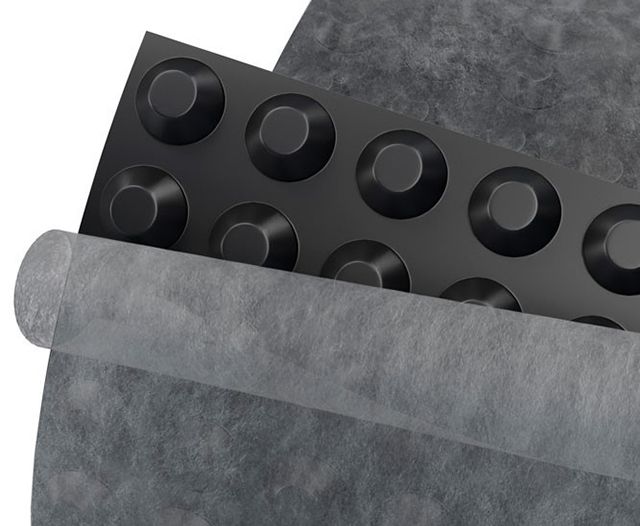 For waterproofing a blind area, a profiled geomembrane bonded with geotextile is best suited
 Soft blind areas may have different finishing layers, that is, those that are visible from the outside.
- The blind area can be covered with crushed stone or gravel, which will give it a natural look. Such blind areas will always be in harmony with the surrounding landscape.
- Colored decorative or gravel is currently widely used. With their help, you can realize the most daring design ideas. These blind areas and other landscape elements look very good.

- The outer layer of the soft blind area can generally be made from fertile soil on which to plant a lawn. It will seem that there is no blind area, although we already know that the main thing is underground. Houses made of logs or standing in the middle of emerald green lawns look simply amazing.

Soft blind areas are increasingly used in individual housing construction in Russia. And this is quite justified, because their advantages are obvious:
- The soft blind area is not afraid of seasonal soil movements, which have always been, are and will be in any, even impeccable structure. After freezing and thawing, and, accordingly, movement, the blind area returns to its place. Accordingly, there is no need to equip expansion joints.
- The soft blind area does not have to be made on a slope, since water drainage occurs under it. This allows them to be used as a pedestrian area. Even a blind area with a top layer of lawn can be a pedestrian zone if it is well drained and reinforced, for example, with geogrids.
 Lawn reinforced with geogrid
 - The soft blind area is easy to repair in case of local damage, and also easy to completely dismantle.
- The soft blind area has an attractive appearance that is in harmony with nature. The use of colored decorative crushed stone or gravel allows you to create unique compositions. You can also plant various plants on such a blind area: lawn grass or various flowers and small shrubs. For this, however, special measures will have to be taken.
- A soft blind area is cheaper than concrete or paving stones, and the process of creating it is less labor-intensive.
The disadvantages of soft blind areas include:
- When constructing a soft blind area, special attention should be paid to preparing the base, waterproofing the foundation and the drainage system. If a concrete blind area is guaranteed to “throw” water away from the foundation across its width even with a poor drainage system, then a soft one under the same conditions may not be able to cope with the incoming water.
- Crushed stone or gravel covering of a soft blind area is more difficult to clean from dust and debris than concrete or paving stones.
- Various weeds can grow through the gravel and will require periodic removal.

- Lawn blind areas also require constant maintenance.
In some sources, blind areas made of paving stones or paving slabs are classified as soft, arguing for this choice by the fact that such structures do not have a rigid base. We deliberately do not do this for two reasons:
- A blind area made of or paving slabs can hardly be called soft even by tactile sensations.
- Very often, to increase the reliability of a blind area made of paving stones or paving slabs, it is made on a concrete base, on which a thin (5-7 cm) layer of cement-sand mixture is poured. Clinker tiles or paving stones are laid only on a concrete base using special adhesive mixtures. Such blind areas simply cannot be called soft anymore.
In order to avoid unnecessary disputes about whether a particular type of structure belongs to soft or hard, in this article we consider blind areas made of paving stones or paving slabs in a separate category. It will be much easier this way.
Is it necessary to insulate the blind area?
In the recent past, some 20-30 years ago, such issues did not arise at all during the construction of houses in our country. The foundation could be insulated with expanded clay poured into the sinuses, but the blind area was not separately insulated at all. The foundation was always laid below the soil freezing level. And this was one of the few measures to protect the foundation from seasonal ground movements on heaving soils. However, construction science and technology did not stand still; new materials appeared along with them. As a result, in global construction practice they came to one conclusion in order to reduce Negative influence forces of frost heaving on the foundation, especially on heaving soils - it must be insulated. In addition, this makes it possible to reduce the depth of the foundation base in the ground, which significantly reduces its costs. And if the foundation itself is insulated, then the blind area must also be insulated. Only this way and no other way! Here are the main reasons why it is necessary to insulate the foundation and blind areas.
- If the house has a heated ground floor, then insulation of the foundation and blind area is mandatory. This, firstly, will reduce heat loss, and secondly, it will prevent soil freezing, which will reduce heaving forces. With a properly calculated foundation and its insulation, soil freezing can be avoided.
- If the house has shallow foundation, then insulation of both the foundation and the blind area is mandatory. Shallow slab foundations of the USHP type (insulated Swedish slab), which are now gaining popularity, must be insulated on all sides, including from below.
- Insulating the blind area still makes sense so that melt water that gets into the crushed stone and sand layers of the substrate does not freeze when the temperature drops, but calmly goes into the drainage pipes.

Insulation of the blind area does not need to be done only in two cases:
- When a house is built on pile foundation. But then, in principle, no blind area is needed.
- When the house has a submerged uninsulated foundation and does not have a basement floor. In this case, insulating the blind area is simply a pointless burying of insulation in the ground.
Completely different materials are offered as insulation, but in order to save readers from the agony of choice, we offer only the best in terms of price and quality ratio. This is extruded (extruded) polystyrene foam - EPS. Why is it recommended to use this particular material?
- Firstly, EPS has low thermal conductivity (0.029-0.032 W/(m*K°), which in principle explains its use as insulation.
- Secondly, EPS has high mechanical strength. Compressive strength with deformation of no more than 10% is no less than 0.25-0.5 N/mm². That's quite a lot. The foundations of houses are built on this insulation.
- Thirdly, XPS has a low density. One cubic meter of this material has a mass of 38 to 45 kg.
- Fourthly, EPPS has extremely low water absorption (no more than 0.2-0.4%) and vapor permeability (0.013 Mg/(m*h*Pa)), which is very useful when located in the ground.
- Fifthly, EPS is very easy to process and install. A minimum set of tools is required.
- Sixth, EPS is durable. Its service life in the ground is at least 30-50 years.
- Seventh, EPS in normal conditions operation does not highlight any harmful substances, does not harm either living beings or nature.
- And finally, XPS has a reasonable cost. Availability on the market large number this insulation different manufacturers benefits us, the consumers.
 The world's most popular insulation material is extruded polystyrene foam.
 The thickness of the insulation of the blind area is calculated, but in no case should it be less than 5 cm.
As an example, we will consider in detail the processes of creating three types of blind areas: reinforced concrete, paving stones and soft ones.
DIY concrete blind area
Let's consider the process of creating a concrete insulated blind area around the house. At the end of this section, a calculator will be offered that, based on the perimeter of the house, its configuration and the size of the blind area, will help calculate the volume of concrete required for laying.
Let’s say right away that the number of options for implementing a concrete blind area using various materials and technologies are endless. It is simply impossible to describe them all not only in one article, but even in a multi-volume publication. We will describe one of many, but the one that is implemented in large quantities objects and has been successfully operated for quite a long time to say that such a design justifies itself. For ease of perception, let us present the main stages of the process of creating a concrete blind area in the form of a table.
| Image | Process description |
|---|---|
 | Work should be carried out only in the warm season. First, the blind area is marked. It should be no less than 20-30 cm wide than the overhang of the roof eaves. The smallest height is 7 cm, slope 3-10°. First, the outer edge of the blind area is marked using a cord stretched level between stakes driven into the ground. If a curb stone will be installed and drainage trays surface drainage systems, then their width is also taken into account, since the soil must be developed for them. The horizontalness of the cord is checked with a spirit level or laser level. |
 | The upper level of the blind area junction is marked on the plinth wall. To do this, marks are made in one place at a convenient height (1-1.5 m), and then they are transferred to other places using a laser level or spirit level. Next, using a plumb line and a tape measure, the horizontal is transferred down. The junction line can be drawn with a pencil or marker, but it is most convenient to “beat it off” with a paint cord. |
 | On the marked base, soil is removed to a depth of at least 30 cm. The main thing is to remove the entire fertile layer and “get” to a solid, reliable foundation on which the blind area will lie. If necessary, the soil is removed to greater depths. It is imperative to get rid of the roots of all plants and to prevent their growth in the future, you can treat the soil with herbicides. The profile of the bottom of the trench is given a slope towards the outer edge of the blind area. |
 | An underlying layer of quarry “fat” clay can be poured onto the bottom of the trench, which is then compacted. This layer is also given a slope. If the site has clay or loamy soils, then they can only do so by compacting the bottom of the trench. |
 | Formwork made of edged boards, which are secured using wooden pegs or pieces of reinforcement driven into the ground. The upper edge of the formwork is aligned along the previously tensioned cord and checked with a level. |
 | The bottom of the trench is lined with a non-woven geotextile thermally bonded fabric with a density of at least 150 g/m², which must completely cover the bottom and have at least 30 cm of overlap with the plinth wall and the edge of the trench. Geotextiles are needed to separate dissimilar soils. |
 | Layers of coarse construction sand at least 20 cm thick are poured onto the geotextile layer. The sand is leveled with a rake, spilled with water and compacted for the first time. It is preferable to use a mechanized tamping method using a vibrating plate. |
 | In hard-to-reach places where a vibrating plate cannot pass, a manual tamper is used. After the first tamping, pour into in the right places sand and compact it again. The process of pouring water and compacting is continued until there is a smooth and dense sand base on which there are practically no traces left when walking. |
 | If elements of the surface drainage system are installed - rainwater inlets and sewer discharge pipes from them, then holes and trenches are dug for them in the already compacted sand. In this case, it is necessary to take into account the level of the future blind area - the rainwater inlet must be installed at its level, taking into account the slope. It must be installed on a concrete solution with a layer of at least 5 cm. Sewer pipes must also be laid with a slope of at least 2 cm per 1 linear meter of pipe. |
 | Trenches with pipes and installation pits for rainwater inlets are sprinkled with sand, which is then compacted. In places where sewer pipes pass and near storm water inlets, this can only be done carefully and manually. |
 | 5 cm thick EPS insulation is laid on a layer of compacted sand. If the upper part of the base has not been insulated, then this can be done simultaneously with the blind area. Insulation boards are laid on a compacted sand base. If necessary, they can be easily trimmed with a construction knife. The slabs must lie tightly on the base. If necessary, when laying them, sand is added in the right places. |
 | After installation, the seams between the slabs are filled with polyurethane foam. |
 | An expansion joint is formed at the junction of the blind area and the base. This can be done by doubling roofing felt, polyethylene foam, and special self-adhesive tape for heated floor seams and glued to the wall. The seam should protrude beyond the upper edge of the future blind area by 5-10 cm. If the blind area is adjacent to polystyrene foam insulating the base, then it will be necessary to additional materials No. |
 | A metal reinforcing mesh made of wire with a diameter of 4 mm and a cell size of 100*100 mm is laid on the insulation layer. The mesh is trimmed in the right places. The edge of the mesh should be 5 cm from the end of the blind area. If it is necessary to lay more than one mesh, then an overlap is made by one cell, and then the meshes are fastened with knitting wire. |
 | The reinforcing mesh should be located in the concrete layer in its lower part at a distance of 3-4 cm from the insulation. To install the mesh at the desired height, it is best to use special reinforcement clamps, which have different heights and are designed for different surfaces. To install reinforcing mesh, it is better to use clamps for loose surfaces. Before laying concrete, all parts of the surface drainage system are covered with plastic film. |
 | Beacons are made from edged boards 20 mm thick, strips of OSB boards or thin laminated plywood, which will simultaneously serve as expansion (compensation) joints in the blind area. From these, pieces of the required size are cut, which are attached at one end to the base at a previously designated level, and at the other to the formwork. The upper edge of the beacons should coincide with the surface of the future blind area, and the lower edge should be tightly pressed against the insulation slabs. Beacons are placed in the corners, as well as every 1.5-2.5 m along the entire length of the blind area. A distance of 2 m is considered optimal. |
 | To fill the blind area, use concrete grade M250-M300, but not lower. Read more about the recipe and preparation of concrete of the desired grade in the right quantity can be read on our portal. The volume required for the blind area can be calculated in the calculator at the end of this chapter. |
 | To improve the properties of concrete when preparing it, it is recommended to use plasticizers, as well as add polypropylene or basalt fiber. |
 | It is better to mix concrete using a concrete mixer or mixer - such mixtures have best quality than those kneaded by hand. |
 | Concrete is laid gradually, in sections between the beacons. The concrete is first laid on the surface, then spread with a trowel or shovel, and then leveled with an aluminum rule along the beacons. After laying in one area between the beacons, they move on to another. |
 | 1-2 hours after installation, it is necessary to iron the blind area. To do this, pour a thin layer of dry cement - about 2 mm - through a sieve onto the upper surface of the concrete. Then, using a polyurethane hand float, dry cement is rubbed into the surface of the blind area. Walking on the blind area is possible only after 48 hours. |
 | For high-quality maturation of concrete, it is necessary to moisten its surface daily with water, and then cover it with plastic film or a damp thick cloth. This operation should be done within 10-14 days. |
 | After the concrete has completely hardened - after 28 days, the formwork is dismantled. The blind area is ready. |
In the future, the blind area can be equipped with curb stones, made along the edges storm drainage– install drainage trays and sand traps. How to do this is described in detail in an article on this topic on our portal.
Video: Construction of a concrete blind area
Calculator for calculating the required volume of concrete for a blind area
We provide readers of our portal with the opportunity to independently calculate the volume of concrete required for the blind area. The initial data for the calculation are the geometric dimensions of the blind area: its height at the wall, height at the end, width. And also for calculations you need to know the perimeter of the house: the sum of the lengths of all its sides. This calculator calculates the volume only for houses with a rectangular configuration; if there are any roundings in the foundation, then this calculator cannot be used or it will be possible to calculate the volume only on straight sections.
The calculations also take into account the configuration of the house, namely how many external or internal corners. If you need to calculate the volume of concrete for any straight section, then you must indicate that the number of external and internal corners is zero.
How to make a blind area around the house with your own hands in short time? The blind area is carried out in two layers - the underlying layer and the ceiling. The underlying part is required to obtain a compacted, level base for laying the covering. This layer is made of crushed stone, sand, grit or clay. The last option is considered the best.
Material for the underlying part selected depending on the coverage. Thickness – from 20 to 30 centimeters.
The coating must be waterproof. It is made from paving slabs, concrete, clay, small cobblestones and asphalt. It happens that the blind area is made from a mixture of clay and sand, or clay with crushed stone. Thickness – from 5 to 15 centimeters.
Types of blind area
There are several types of blind area, depending on the material used in manufacturing:
- concrete;
- cobblestone;
- from concrete slabs;
- ground;
- brick;
- asphalt.
Work execution technology
How to properly make a blind area around the house with your own hands? You should start by excavating the soil. A trench is dug around the perimeter of the building; its depth should be approximately 30 cm.
The integrity of the blind area can be damaged by plant roots, so the soil should be treated with herbicides first. Then along the width of the blind area it is placed removable formwork or curb stone. The underlying layer is laid down into the trench at a slope.
Laying a concrete blind area
Concrete construction is the most common type of coating.
It is worth noting, that in case of severe frosts the blind area may fail. To prevent this from happening, slats are mounted across the blind area on the edge every 3 meters; they must be treated with bitumen in advance. Next, the solution is poured using concrete and leveled.
Concrete reinforcement helps to increase the service life of the blind area. In this case, concrete produces work in compression, and metal in tension. A metal sheathing is installed in increments of 100 by 100 millimeters. Further along the level, cement mortar is poured.
The finished surface is covered with dry concrete and leveled. Then it is covered with a dark film and left for a week, periodically watered with water.
How to inexpensively make a blind area around the house? If you want to reduce costs, you should give preference to a blind area made of reinforced slabs. Their shape is selected depending on the structural features of the roof and the characteristics of the site. The best option– slabs 60x60 centimeters.
When using ready-made slabs as a coating, the work becomes much easier. After laying them on a previously prepared surface, the seams are filled with mortar. If there is a need for this, the blind area is insulated with heat-insulating materials.
The structure made of insulation and slab is placed in such a way that there is an air cushion underneath it. The base for it is impregnated with bitumen and carefully compacted crushed stone.
Slope and width
When constructing a blind area, it is necessary to maintain the required slope and width.
In subsidence soil width can be more than 1 meter, on average it is 80 centimeters. Moreover, it should be 20 centimeters larger compared to the overhang of the cornice.
Slope from the wall buildings and to storm drainage should reach approximately 5°. A storm drain is a groove along the perimeter of the blind area necessary for drainage. Instead, you can build a canal that collects water into a storm well.
Waterproofing and insulation
If your house has a basement or ground floor, it is necessary to waterproof and insulate the blind area. Waterproofing materials suitable for this purpose are bitumen mixtures, PVC and polyethylene films, roofing felt.
Under the waterproofing layer insulation is installed on the ground.
It can be polystyrene foam, foam glass and other materials.
Main functions of the blind area

- Practical function. If the blind area will act as a pedestrian zone, then it should be done taking into account the characteristics of the object and the design loads.
- Protective function. A high-quality blind area reliably protects the foundation of a building from melt water, precipitation, and deformation. It transports water a sufficient distance from the foundation.
- Decorative function. The blind area is a logical continuation of the building. The finishing layer is selected taking into account the style of the house and landscape design.
- Insulation. The thermal insulation properties of a building, if there is a blind area with an insulation structure, increase.
In order for the blind area to fully fulfill its purpose, It's worth following some rules:
- The slope is formed both during laying of the coating and when installing the underlying layer.
- Pay attention to the junction of the house wall and the blind area. An expansion joint must remain. The best result is obtained with two layers of special sealant or roofing felt and sealant.
- The blind area should be carried out continuously around the entire house. Only in this case will the base be reliably protected.
- The cheapest option for covering is crushed stone laid with compaction. The most reliable is pouring compacted crushed stone with cement mortar.
So, construction correct blind area around the house with my own hands everyone can do it.
However, before starting work, you should decide on the type of blind area, this determines what materials you will need. Do not forget about maintaining the width and slope. If the building has a ground floor or basement, insulation and waterproofing will be required.


