Cellar for cottages - basic views, the right selection of space and stages of construction (115 photos). Cellar in the country with their own hands (56 photos): materials, stages The cheapest cellar with their own hands
Lovers in their business gardeners with great pleasure grow vegetables on and reserved for the winter fruits of their works. Numerous orders and neatly folded vegetables are needed in special storage conditions. To ensure them, you need high quality: dry and cool. In this material from the site, let's talk about how to organize a cellar on the site so that it meets all the requirements.
Advantages of the device of a separate cellar for storage of vegetables and types of structures
The repository located outside the house has its undoubted advantages. The main thing - temperature mode. In the home basement is always much warmer, which means there will be a higher moisture. In such conditions, carrots and potatoes begin to shoot shoots, and apples are withering. In addition, mice and rats are aspireing a warm home cellar. Another thing is separate design. If she is properly done, it is cool all year round.

There are also cons of such designs. In winter, you will have to go out to get a jar. If the entrance to the cellar hurts the snow, you will have to wave.

The question is naturally facing: how to organize the easiest cellar with your own hands so that he has a convenient entrance and optimal storage conditions in the form of vegetables and glass cans with homemade canned foods?
There are three main varieties of designs that can often be found on dumart sites: cellar on a drainage pillow, classic underground cellar, semi-breastned storages.
How to make a ground cellar if groundwater is nearly arranged
Such structures are relevant for sites with high levels Groundwater. To avoid moisture penetration, the base of the cellar is made on a high drainage pillow. To do this, in a shallow pit (40-70 cm) fall asleep sand, crumples or crushed stone. Such a pillow guarantees dry storage. On top of the pillow lifted, the reinforcing frame is put and the concrete base is poured. After the cellar itself is built of brick or blocks. For reliable specialists recommend masonry. Perfectly proven itself in this regard mineral wool. But it is possible to replace it with sawdust, fine clay or other flowing material.
Important! If you use as a heaters of sawdust, they need to be processed copper vitriol or lime.
Outside the cellar wall is protected by moisture insulating, and the roof is coated with metal or others. The underpantial space is also important. Perfect option The devices of the cellar with their own hands with a private house - to fall asleep then all this design by the earthy hill. In this case, the repository will be the ideal conditions, of course, if the ventilation system is arranged.

For your information! For waterproofing cellars, any types of materials can be used: rolled, membrane, loose-ass.
How to make a traditional underground cellar
Underground storages are built quickly and, due to the special thermal insulating properties of the soil, never supply their owners. If there are no problems with the level of groundwater in the area, then this the best choice For storage of vegetables.
For the earthy cellar, you need to dug the pit with a small block of the walls to the outer edges. Such an extension is necessary so that the soil does not face with time. Additionally, it is necessary to strengthen the walls of the boardwheel.
Tip! If you are trimming the walls of the cellar with a tree, make a folding folding. In this case, you can drip the boards in the sun in the summer. So they will not be mold and rot.
To preserve dryness in the underground storage, you also need to arrange a floor on a sandy-gravel pillow.

The ceiling is sewn and arrange a layer of rambling clay and the ground with a thickness of no less than half a meter. Around the cellage make a ditch with a depth of at least 40 cm for water removal.
Semi-breed cellar of brick or blocks
Another model of the country storage is semi-breeded. As you already understood the name - this is a cross between an earthen and above-ground construction. The walls of such structures make out of or blocks, the repository itself at about half the height is taken to the ground.

How to choose a suitable storage
The main criterion for choosing a type of construction -. If the site is regularly flooded in spring or located on the swampy terrain - without thinking, choose ground construction.

If there are no problems with flooding, and the site is located on the plain - build a semi-breeding structure. And the boobs do not have to deeply dig, and the cellar will use it convenient.
How quickly and high quality make the cellar in the ground do it yourself
The main thing in the construction of the storage facility is to choose the right place of its location. It should be not too far away from home so as not to have to carry banks and bags with vegetables. It is important for digging that the ground is not stony. Undesirable to put the repository near garden trees - You damage the roots during construction, and then the same roots will be in retaining to destroy the walls of your cellar.
Step-by-step instructions for the arrangement of the underground cellar in the country
Now consider the cellar arrangement process in more detail.
| Illustration | Description of action |
 | Make markup for the future cellar, based on the size of concrete slabs (if you are going to use them). In addition, the storage cameras actually need to be placed and the place to descend into it. |
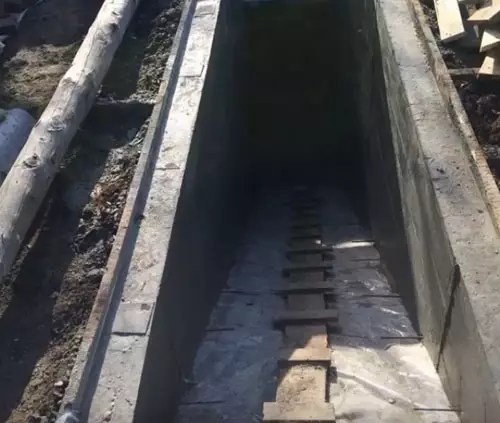
 | Drop the pit, making an easy wall slope, as we recommended above. |
 | The inclined input should be approximately 1.2 M wide and 4.5 long. A bias for convenient descent - 30-35 ºС. |
 | Put the sand-gravel pillow, put it on it, the reinforcement grid and fill the concrete floor. |
 | In the process of arrangement of formwork for walls, immediately lay the pipes for ventilation. Pipes should be placed on opposite walls at different heights. |
 | Install the reinforcement, strengthening walls, and formwork throughout the perimeter of the storage facility, including the input zone. |
 | Lay in advance and in places where the steps will be located. |
 | Fill the concrete throughout the perimeter of the repository. Wait until it becomes and remove the formwork. In this process, the hurry is not needed, to withstand the period. |
 | It is time to decide than to block the cellar. Place concrete slabs on the roof and cover them with waterproofing mastic. If you do not plan to use the plates - make a formwork and fittings under the fill. |
 | Warm the ceiling of storage facility or other reliable heat insulator. |
 | To preserve the heat insulator, cover it and plump the soil layer from above. The cellar cover made by its own hands is extremely reliable. |
 | As a result, you will get such a warm and convenient cellar, in which your products will be in complete preservation. |
Some nuances in the improvement of the faning system of the cellar
An important factor in the normal functioning of the repository is ventilation. Without her in the cellar there will always be a damp, a wooden trim and shelves will be covered with mold, covers cans - rust, and vegetables will rot.
It consists of a pipe of the inflow of fresh air and the channel, along which the air will leave this room. The easiest way to take two plastic pipes big diameter (approximately 15 cm) and place them as follows: The entrance to the supply pipe should be located in a half-meter from the floor, and on the opposite side under the ceiling there are exhaust hole.
Important! Pipes of hood and tributary should not be placed on one height.

The upper edge of the ventilation pipes should be protected from rain. We will not be able to install mesh barriers from rodents in the pipes.
Building an overhead storage construction technology
In order to build an overhead structure, you will need construction material - It may be optional brick or blocks. The walls of the storage can be made from a mixture of clay, saman, or by software, using several layers of high-quality insulation.
How to make a ground cellar in the country with your own hands: step by step
The thicker the wall of the ground cellar - the better it will maintain the optimal temperature. Step-by-step construction of the cellar will look like this.
| Illustration | Description of action |
 | As in the first case, you need to mark. Dock a shallow pit, make a gravel pillow for waterproofing. |
 | Place the bottom of the waterproofing material and the reinforcement grid. Fill the concrete base. |
 | After becoming the foundation, start brickwork. |
 | As the walls are built, protect them outside the waterproofing film. Use the roll material. |
 | When the height of the cellar is sufficient, put a metal-plastic or flat slate as a base for fill. |
 | To overlap the cellars, install the reinforcement grid and fill the roof of the cellar concrete. |
 | Make the input zone and steps, cover it all the roof. |
 | Fall off the structure of the earth for better thermal insulation. A bulk cellar made with their own hands will be a reliable assistant. |
How to make comfortable shelves with your own hands in the cellar: Photo Examples
The storage system in the cellar should have shelves for setting cans and storage boxes for vegetables. From which it is possible to make shelves and boxes in the cellar - the question that becomes key at the time of the arrangement of the finished structure.
The easiest and most fiscal option for storing vegetables - plastic perforated boxes. They have special grooves, thanks to which you can put them one on another. Shallow, they provide good ventilationSo necessary for vegetables and fruits. If desired, the fruits in such boxes can be suspended with chip or sawdust, having previously paving the newspaper so that the backfall does not wake up into the holes of the boxes.

You can store vegetables and in large wooden boxes. But so you have to periodically sort out the entire box to remove the retained fruits, and get them when the box will almost empty, it will not be very convenient.
Salted cucumbers, sauer cabbage and other frkasks better place in hermetic plastic barrels.

And finally, shelves. You can make them from a tree or. In any case, they must be stable, attached to the walls and is strong enough to withstand the big weight. Keep in mind: a three-liter bank with home preservation weighs approximately 4.5-5 kg. So count if you put on the rack in 10 cans in 2 rows - then it is already 100 kg.

Metal carcass Ensure the strength of the structure, you do not risk accidentally break the jar, installing it on a wooden surface. Boards can be put in summer to the sun so that they can dry
Important! The material for shelves in the cellar must be carefully processed in order to protect against rot and corrosion. The tree needs to proliferate, and the metal is painted.

What are the ready-made cellars for the cottage and the features of their installation
You can use as a finished design for the cellar. Volumes of such structures are thousands of liters. They are made of durable plastic, have rigid rigid. Such cellars are with a side or vertical entrance. Here you can install the ventilation system. Such caissons can be boiled into the ground, even if the level of occurrence is very high.

The disadvantage of plastic cellars is their more than a decent cost. The bunker itself will cost about 65 thousand rubles. And if you put it, attracting employees, then this is another 40 top. Why so expensive? The fact is that with a high groundwater running, caissons squeezes out of the ground. Correct installation Provides the installation of a concrete substrate. In addition, installation ventilation system In the plastic box - the task is not simple, you will have to invite a professional. Another difficult point is to install shelves for storage. Fasten them to walls or semi without disrupting the tightness of the caisson is difficult. We will have to prepare special struts, and at the same time the design of the racks will not be particularly reliable. So it turns out that only drawers with potatoes can be stored in such a cellar. 100-120 thousand - expensive for such purposes, agree.
You may also be interested in:
After the harvest fee is complete, a problem arises before the dachnik, where to store its stocks. In the apartment or garage, vegetables will not last long.
Well, if the cottage was already bought with the cellar. But if it is not, you will have to either hire a brigade or do it yourself. There is nothing difficult in work, you can cope with yourself. The main thing is to do it in advance before the harvest fee. Otherwise, then in a hurry you can make a lot of errors.
Types
Three types of cellars distinguish:
- ground;
- betented;
- semi-breed.

 First you need to determine the depth of groundwater. This is especially true when building a swallowed and half-breed cellar.
One method requires the presence of fresh eggs, a shred of wool and a glass cap. This is a very old technique that, however, is quite accurate. It is necessary on the place where the cellar is planned to build, put on the ground the shreds of wool, and on the wool - an egg. From above, all this is covered with a cap. The cap leaves the night. In the morning you should see the results.
It is believed that if the egg and wool contain dew, then the groundwater is very close. It is not recommended to build in such a place. If the egg is dry, and dew only on wool, then the water is deep enough. And if the wool, and the egg is dry, then the place is simply great for construction, because water on such a plot may not be completely.
There are several types of soil:
- soup;
- sandy;
- loam;
- clay;
- peat;
- quicksand.
Peat - one of best species Soil for embankment. It prevents product damage, especially when it comes to potatoes and other vegetables.
Floating is a very poured soil who can deliver a lot of trouble. It consists of a squeeza, a soglinka or fine-grained sand. Usually, for construction in places with such soil, the soil is replaced by adding sand.
Sand soil is great for the construction of the base. Often this soil is used to reduce humidity and bunchiness.
Construction of Labaza

Labaz - ground construction, it can be built anywhere, including in lowlands. Although, of course, it would be just perfectly made it in a dry terrain.
Labaz does not require bunting, although some designs of this type are made slightly bellped. The logs for such a cellar should be treated, for example, liquid bitumen. The main thing is that the coating protects wood from moisture and mold. From the bottom you can carry out waterproofing, if there is a need for this.
- First, the foundation of Labaz is made.
- After the base is ready, it is necessary to build the design itself, which should not be too high. By appearance She is more like a tent or shala.
- Labase logs are processed.
- To make the defense of the cellar, you need to install the crate.
- It's time to figure out how to make the waterproofing of the cellar from above. To do this, it is necessary to store the roof on the roof. This material will perfectly protect products.
- Out of the roof is the embankment. The material is used as a peat. This is the best type of soil for such a goal.
Interestingly, Labaz can be merged at all. After all, it is enough to plant an embankment of grass seeds or other plants to leave.
How to make ventilation in a cellar of this type? To do this, there are special cores in which ventilation can be regulated using a special mechanism - valves. Labase sizes Each owner installs its own. They usually do not exceed 3.5 m.
Half-breed

The advantage of the semi-breed cellar is that it is less demanding of the soil than the blurred. For its arrangement, it is enough to unscrew the pitual depth of about 1 meter. In some cases, enough and 70-80 cm.
- The base is made from concrete or brick. Less often use slag concrete for such purposes. The slag concrete can be harmful, so it is applied only after processing.
- Much attention should be paid to the waterproofing of the bottom and the walls of the cellar. To do this, it is possible to use runneroid, as well as clay and other coating materials.
- Semi-brewed cellar requires overlap. It is usually made from a porch.
Other species

There are many other varieties, despite the fact that the main species are three. For example, the usual ground cellar can become a little different if on top of it make an embankment with a peat. The same can be said about blunt structures.
Under the garage house, it is necessary to conduct the soil studies so that there are no problems later. However, given the fact that during the construction of the garage, they were most likely already conducted, it would not take much time. Even if there were no research, the owner of the construction is still more or less aware of the depth of groundwater.

Special attention should be paid to the ventilation of the structure. Usually it is done with special pipes. Such tubes are served by channels. One of them comes fresh air, but otherwise it goes out.
Since the cellar under the garage is an underground construction, then more serious walls and waterproofing will be required. In some cases, such structures are made in wet soils. At the same time, the walls are made from cement and covered with a thick layer of insulating material. Do not forget that the soil should be "dried" with sand. This will make it possible to separate the area from groundwater at least partially.
By the way, during construction it is necessary to make drainage systems. Moisture, one way or another, is still present in the plots. It can penetrate the construction in the form of precipitation, so ditch and drainage system are necessary.
Video: Features of the design of the cellar
Photo


Schemes


The cellar is a room that is useful to any owner. It is in the cellar that products can be maintained a very long time, thanks to a special microclimate. Maintaining such a microclimate contributes constant temperature and humidity. The main thing in the construction of the cellar is to comply with certain conditions for waterproofing and ventilation. Video on how to build a cellar with your own hands will help you in your work.
From this plot you will handle useful informationconcerning the construction of the cellar.
Pamroe ventilation schemes
Ventilation of the cellar - very important momentwho needs careful overlap. This video will help you correctly arrange ventilation.
Construction of the entrance cellar
And in this plot is shown the construction process of the input cellar.
Emailing and design cellar
Construction of the cellar completed? It's time to think about his interior decoration. The cellar may also differ exquisite design Interior!
The cellar is a place where you can store almost any products. The main advantage of this building, if compared with the usual storage room, is obvious - in it you can keep salty or fresh vegetables and fruits, and a variety of conservation. Round year In the cellar, the temperature does not exceed 7 ° C, and this is almost the temperature of the refrigerator.
There are several types of cellars. The easiest is earthen. You can also build a cellar in the garage. There are also such cellars as ground, with a truster, a blocked cellar, etc.
To do this, you need: Water, clay and chopped straw. Solution knead to a plastic and viscous state.
Apply a solution into several layers, each time I expect a complete drying of the previous layer. After that, you can shelter the walls with a hill board.
You can also lay out the walls of the old brick, or just pour them with concrete.
For better storage Vegetables and different products contribute to the earthlading floor of the cellar. The basis of the pit is a good rammed crushed stone, filled from above bitumen. Next, on top it follows global floor. Good option It is a cement screed. 
For a more convenient cellar, you will have to build and steps. Initially, it is necessary to dug a future staircase, and at the place of the steps to make the land. Next, you need to make a formwork from plywood on the side surfaces of the steps above the horizontal plane. Further fill cement mortar Plates of steps. About the steps it is necessary to put the brick, and lay out the stones from the stone.
Roof construction and cellar doors
 Independent construction The cellar implies the protection of its upper part. You can build a standard standard, more in size than a 50 cm cellar itself on each side.
Such measures will help to prevent water flowing inside the cellar during the rain. The door will surely insulate several layers of foam rubber, and then hide it from top of Dermantine.
This is a fairly important process. Everything waterproofing materials can be divided into two types: non-free and anti-blood pressure. The second type of material is used if the groundwater reaches the floor level from the water pressure. The first type of materials is used if the level of groundwater will not reach the floor.
 For best protection Use the drain layer during the construction of the water. Typically combine with a special well located near the cellar. The drainage alternate layers with the soil, and when laying layers, it is oblivious to ram.
To reduce groundwater, build - i.e. Special container with a specific inclination for water removal.
If the cellar is protected from groundwater, the waterproofing can be preheated by bitumen. Before coating the walls by bitumen, be sure to treat them with cement mortar. Waterproofing by bitumen is usually put in two layers. During the drying of the wall bitumen, they usually sprinkle with sand.
 Correct is the key to successful storage of products. In the cellar of the extractor can be two types.
The first option is natural ventilation. It is performed using two pipes: exhaust and supply. This extractor is based on the temperature difference between the room and the street, due to this, and continuous air circulation occurs.
Usually, the exhaust pipe is mounted at the ceiling, and the end of it is above half a meter of the cellar level. So Heated air comes out. And at the bottom of the cellar, the supply pipe is installed 10 cm above the floor line. It must be protected by a metal grid from pests and insects.
The second type of ventilation is forced. It is created using special fans. The device is also as in the first case. This ventilation is necessary in the summer, because The air exchange is not due to an increase in the street temperature.
Observing all technological conditions, you build a high-quality and reliable cellar that will delight you not one decade.
Send the material to you on E-mail
In the territory country plot It will not hurt to build a cool storage room for storing solutions, fruits, vegetables and other foods. In this regard, it is worth considering how to make a cellar in the country with their own hands. Step by step by performing all operations, you can create a reliable and durable storage.
Even small design allows you to store a lot of products
The cellar is usually located in a separate location on the street or under the residential structure. Its main purpose is to storing edible supplies. Due to the device, shelves and other devices, it is possible to improve the functionality of the room.
Classification of cellars in the level of reeling:
- underground structures are arranged in dry places;
- semi-bedains are built in wet places with an average groundwater occurrence;
- overhead structures are made when groundwater is too close.

Note! On a plot with too high humidity, a special pillow made of sandy-gravel mixture should be arranged. It will allow separating the design from groundwater.
The construction of the cellar does not require the receipt of permits of any supervisory authorities, however, the developer must in any case determine the location of its location, given some nuances. Select the maximum dry area removed from the trees.

The cellar at the cottage with their own hands step by step: basic works
After selecting a suitable place for the country's storage, you can start basic work. The listed steps are relevant for underground and semi-breastned structures. As for the above-ground structures, they have a slightly different construction technology.

Preparation of catlovana
When digging, the items below must be taken into account without fail:
- the depth of the pit is determined by the construction of the construction;
- the area of \u200b\u200bthe dumped pit should be somewhat larger, since a certain part of the space will take walls and gears;
- avoid squeezing of the earth from the side walls by the formwork device;
- separated soil should be left for ripping and design of the structure.

Important! Separate attention deserves the cellar device with their own hands under the house. In this case, the need for laying overlaps completely disappears, since this function is successfully performed by the first floor floors.
Floor base device
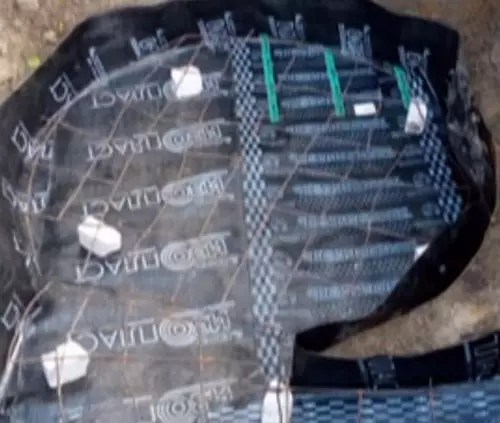
Most suitable option It is the fill of the lower plane by concrete solution. For this, the garbage is removed from the pit. The surface is aligned and tamped, after which the layer of sand 15-20 cm is falling asleep. The waterproofing membrane and the reinforcing mesh are stacked on top, then concrete is poured.

Thus, asking how the floor in the cellar is better to arrange, first of all, attention should be paid to the base of concrete.
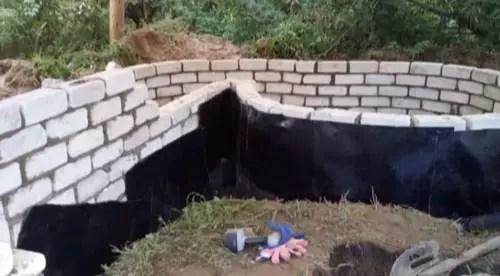
Erecting the walls of the facility
Side parts of the design must withstand the soil pressure. Basically, when they are erected:
- concrete mix;
- building blocks;
- brick;
- wood.

Laying overlaps
First overlap option - wooden beams. The bearing elements are stacked by the edges on opposite walls, after which the boards are trimmed. The waterproofing membrane is spread from above. The second option is the use of finished reinforced concrete plates. They differ in durability, so enjoy popular. They are placed on the end parts of the walls, after which they fall asleep the earth.

Creation of high-quality ventilation
Permanent air exchange will provide an opportunity to avoid the appearance of mold and rotten indoors, and will also allow the optimal temperature regime. For the ventilation device, you must install two pipes. One of them will be inlets, and the other is exhaust.

For ventilation, plastic pipes of medium diameter are suitable. However, their dimensions depend on the volume of the room. The supply elements are usually located on one side of 20 cm from the floor, and the exhaust to the other at 30-40 cm from the ceiling.

The problem with a high level of groundwater: cellar with their own hands
A certain category of developers may have the following dilemma: if the groundwater is close - how to make a cellar? Immediately it is necessary to make a reservation that it is quite possible. For this, first of all it is necessary to make a ring drainage platform on which construction is planned.

Perforated elements are located below the ground depth around the perimeter of the pit. Their bias should be about 2 cm on the temporon meter towards the well or waste hole. Pipes must be covered with rubble and wrapped with geotextiles.

If the floor and walls are arranged from reinforced concrete, then high-quality waterproofing from the inside and outside.

As a hermetic room, you can use plastic container Large sizes. It completely bursts into the ground. Having arranged a plastic cellar in the country with their own hands step by step, you can avoid errors associated with the waterproofing of the structure.

Article on the topic:
Works after the construction of the cellars do it yourself: photo + additional recommendations
Ensuring unobstructed lifting and descent is carried out by means. Its width should not be less than 40 cm, otherwise the movement can be very difficult. It is allowed to make a slope of up to 75 degrees. Wood, metal or concrete can be used as a material.

Special shelves or racks should be built for storage. Usually, a timber 100x100 is used for their manufacture. The height of the structure depends on the height of the room itself.