Assembly drawings of sliding wardrobes. How to make a comfortable sliding wardrobe with your own hands at home - instructions with photos and drawings How to make your own sliding wardrobe
Modern furniture, made from high-quality and environmentally friendly materials, is expensive, so not everyone has the opportunity to purchase it. Often a unique and original interior, which requires exclusive furnishings. In these cases, the owner of the premises can independently create a wardrobe as a project, according to which furniture will be manufactured in the future. The project can be created independently using specialized computer programs or with the appropriate design organization.
If you figure out how to design a sliding wardrobe, then creating a project that includes drawings, diagrams, estimates and detailing will not be difficult. Initially, you need to take your own measurements of the room in which you plan to install the future cabinet.
Often people have to deal with the fact that the floors and walls of the room are uneven, but the furniture is created as standard level, so during measurements all existing distortions and other imperfections on the surfaces are taken into account.
To take correct measurements, follow simple steps:
- using a standard tape measure or laser level, the height and width of the walls are determined, and this process must be carried out from different areas rooms;
- height is measured at least at three points;
- the width is measured relative to the ceiling and floor, and at the depth where you plan to install the wardrobe with your own hands;
- determined where on different surfaces there are protrusions, recesses, heating radiators, window or door openings, as well as sockets and other objects that are located near the intended installation site of the furniture;
- It is important to make sure that the installation of the item will not be interfered with by foreign objects, and that it will not block sockets or other important elements.
If during measurements significant distortions or unevenness of the wall or floor are detected, then it is advisable to level them, since otherwise a well-made cabinet will stand unstable. Based on the information obtained from the measurements, you can create projects for future furniture, taking into account the intended installation locations.

It is advisable to take a photo of the room and draw its diagram on a sheet of paper or in a computer program.
Correct room measurements
Designing a cabinet is quite simple, especially with the help of modern computer programs in which all calculations are done automatically. Having the necessary skills, you can make drawings and diagrams with your own hands. You can also use examples with photos, on the basis of which parts are made, and then connected to each other into a single structure.
It is advisable to think through the design of future furniture simultaneously with the formation of the project.
The project itself consists of parts:
- a general view of the future cabinet, represented by a photo or a regular drawing, and it can be drawn by hand or using a computer;
- drawings, and one of them must contain the entire product, and separate drawings are also created for important parts of the cabinet, which are the most significant and difficult to create;
- cutting map of materials presented in the form of sheets;
- if the sliding system itself is made by hand, then the profile detailing will be formed;
- list of required fasteners and accessories.
All these documents have their own purpose, and are jointly presented by the corresponding project. They must be created taking into account numerous requirements, since errors in them lead to the fact that the resulting cabinet will have distortions or other defects.

Follow the drawings very carefully and carefully, because then you will have to assemble the wardrobe exactly according to them

Decide what specific items you plan to make a closet for. Take their measurements and plan a place for them in the closet

A project is drawn up in which all the elements of the wardrobe are outlined
Frame
The design of a sliding wardrobe certainly includes a drawing of the body, which is the most significant element of this furniture. Photos of sample drawings can be viewed below. When creating a diagram, the main parameters that the cabinet must have are taken into account:
- width - it is calculated depending on the space allocated for installing the structure. If it is mounted in a special niche, then when taking measurements it is necessary to obtain information about its width, and the cabinet should have a slightly smaller indicator so that there are no obstacles when installing it in this recess. Usually, for this, 5 cm is subtracted from the width of the niche. This allows you to obtain a special technological gap that simplifies the installation or dismantling of furniture;
- depth - this indicator of the body also depends on measurements taken in the first stages of work. The optimal value is considered to be a depth ranging from 60 to 70 mm, but if there is too much narrow room, then the figure can drop to 35 cm. This value is optimal for children's closets. If the user is an adult, then for rational use of the internal space it is advisable to make sliding wardrobes with a depth of 55 cm or more;
- height - the Pythagorean theorem is used to calculate it, since cabinets are bulky structures, so they are usually assembled on the floor, after which they are raised ready-made, so that during this process the furniture did not rest against the ceiling, the diagonal of the side wall must be calculated correctly. Also, when choosing a height, the user’s height and his preferences regarding this indicator are taken into account. It can vary from 1.5 to 2.4 m.
The above parameters are basic for the cabinet body. In this case, you need to decide what kind of design will be created, as well as what materials will be used during work.

How to correctly measure a niche for a wardrobe

Correct measurements for corner cabinet coupe

Usually a list of parts with dimensions is enough for you to make a cut.


Sliding system
To obtain a properly designed wardrobe, much attention is paid to calculations and selection of the sliding system. There are several such systems, differing in cost, creation rules, nuances of use and other parameters.
When designing such a system, its main characteristics are taken into account:
- profile strength, which depends on the material used, since wood or iron, as well as aluminum can be used for this, and the strength is additionally affected by the thickness of the walls, so this parameter is calculated depending on the planned loads on the system;
- coating available on the profile, on which it is not allowed to have any stains, swelling or other defects; its design may be different, but it must fit well color scheme rooms and the chosen design direction in the room;
- the reliability of the roller, which is the weakest point in the entire system, is considered an important parameter, so you need to buy only high-quality elements, as well as correctly calculate their installation locations along with the guides, since distortions lead to a decrease in their service life.
Most sliding systems consist of two guides along which rollers move. The most popular systems are:
- roller - a special suspension is attached to the top of the doors, which is additionally fixed with a roller runner. This mechanism can be suspended or supported. Due to this design of the system, its quiet use is ensured;
- frameless - you don’t have to spend a lot of money on their creation. Represented by laminated chipboard, not framed by steel profiles. Rollers are attached to the doors at the bottom and top. Due to constant exposure, the chipboard sheet quickly deforms, so the system is considered short-lived;
- frame - made of steel or aluminum, the latter option having a high cost. Aluminum structures can easily withstand high loads or other impacts;
- systems specifically designed for radius sliding wardrobes. They are presented with a curved profile, relevant for interiors that use non-standard and curved shapes and interior items.
Photos of different sliding systems can be viewed below, and the choice of this design depends on the financial capabilities and desires of the users.

Wardrobe door assembly

Door options

Calculation of door panels
Filling
How to design a wardrobe, taking into account all the nuances? It is important to understand not only the body with the sliding system, but also the contents of the structure. There are many different systems storage that can be used for this furniture, and the following nuances are taken into account during the design:
- a distance of at least 30 cm is left between the shelves, but when creating a cabinet on their own, the users themselves determine this parameter, which depends on what exactly will be located on a particular shelf;
- if there is a compartment for hangers, then its depth should not be less than 55 cm;
- it is decided how many drawers are needed, their location is marked on the diagram, as well as their size and depth;
- different ones are selected additional elements for filling the closet, which include various pull-out grids, baskets, hangers for ties, a pantograph or narrow compartments for shoes, as well as built-in ironing boards or other similar items.
Filling is considered an important stage in the design of the future cabinet, although if necessary it can always be slightly changed.


Creating an Assembly Drawing
When the diagrams regarding the main parts of the future cabinet are ready, a direct assembly drawing is generated, from which you can obtain information:
- dimensions, appearance and parameters of the frame itself;
- type and features of the sliding system design;
- the number of shelves and other items filling the cabinet;
- materials used to manufacture the structure;
- approximate cost estimate for the process.
It is advisable to develop such a project using appropriate computer program, for which only the main parameters of the future design are entered and calculations are automatically made, a drawing is made. If you have experience and skills, you can make a drawing or diagram on paper with your own hands, for which you use a pencil and other office supplies.


Sliding wardrobes are popular regardless of the size of the apartment and the income of the owners. They are attracted by their ease of use and the ability to adapt them to room conditions. It is quite possible to make them yourself if you know the features of design, calculations and installation.
Types of sliding wardrobes - from what material, where to install
It’s easier to make a rectangular wardrobe with your own hands; professionals can do radius ones with a curved surface. The most convenient place for installation is a niche. The attractiveness of this location is that an inconvenient place becomes useful, with virtually no impact on the living space.
Installation in the opening between rooms saves the cost of a partition and its decoration, and a built-in wardrobe separates the rooms. The compartment can be installed in the corridor against the wall, which is especially beneficial for small apartments: Doesn't take up much space, which is not enough.
Cabinet sliding wardrobes are also used for zoning rooms. They do not have a back side, they have two front sides, with access to the wardrobe on both sides. A small room should not be overloaded with furniture; use standard furniture. In a large hallway you can install a spacious wardrobe. If the space allows, then you can easily realize the dream of every woman - the closet turns into a dressing room. Costs increase as sizes increase. Below is a diagram of a large wardrobe for the hallway.
Many materials are suitable for coupes, including laminate, lining, MDF. Only in this case will you have to make frames for door leaf made of wood. They use chipboard, which is convenient for installation due to its large size. Using drywall is possible, but the material is fragile, cannot withstand heavy loads, and sag noticeably without reliable fastening. A simple option is to use old wardrobe with the replacement of swing doors with sliding ones.
Room measurements - how to avoid installation difficulties
Making furniture requires right angles, and room walls with such precision are rare. Deviations from the rectangular shape can be centimeters, but even a few millimeters can cause installation difficulties. This is especially true for niches, where builders very rarely maintain a right angle.
We take measurements at several points and record the results. We retreat 20 cm from the back wall and mark measurement points on parallel walls. We calculate the height from the floor: the first points are at a distance of 0.8 m, the second - 1.4 m and the third - 2.2 m. Next, we retreat from the first measurements by 30 cm and take another one at the same height. Deviations will have to be corrected with plaster. The walls in the niche can be primed with water-based emulsion, and then painted with acrylic enamel and forget about dust on the surface for many years.

We check the horizontality of the floor and ceiling with a level, but problems may arise with the squareness of the opening. You won’t be able to measure it yourself using a cord, and the accuracy is too low. We use a simple device of two slats with pointed ends. We fasten them in the middle with rubber rings, insert them into the opening diagonally, and at the point of convergence, make a solid mark with a pencil on the surface of both slats. We check another angle and look at the marks: the discrepancy in the thickness of the mark is 0.3–0.4 mm.
Sizing calculations - impact on cabinet design
Before installing the cabinet in a niche, we determine its width, which furniture makers understand as length. It should not be made as close as possible; it is better to deviate from the minimum length of the niche of 6 cm, then the cabinet is guaranteed to fit into the opening. If the structure is located autonomously against the wall, we reduce the tolerance.
When determining the length, we also take into account the dimensions of the material, which you need to know in advance. Using chipboard, we mean that the size of the plate is 1830 mm × 2750 mm. Drywall 2.5 or 3.0 m long, 1 m wide. We try to ensure that the width of the cabinet is equal to the width of the slab or less. Then there will be no difficulties with installation. As for lining and MDF, we try to ensure that the length of the cabinet is a multiple of the width of the strips.

Sometimes it is necessary to make furniture that is wider than standard sheet material. The easiest way is to increase the missing length with a segment. At the joints of the bottom and the ceiling we get weakness, which can deform under load. To avoid this, we place supports at the joints. You can make two cabinets, and then combine them into a single whole. The only drawback is the excessive consumption of materials for the extra wall.
When calculating the depth, we take into account the useful space used for storing things, then add 100 mm to it for the sliding system. We choose the height of the cabinet to be 10 cm less than the distance from floor to ceiling, excluding the height of the roof. This will allow you to assemble a massive product in a horizontal position, then lift it without touching the ceiling.
A rigid frame and a strong base are the conditions for furniture stability
If the frame is insufficiently rigid, the cabinets sway, and the main reason for this is the lack of stiffeners. A fiberboard sheet for the back walls cannot provide it. We add transverse 25 cm wide chipboard ties to each section at different levels and fasten them with confirmations. This arrangement will provide maximum rigidity.
For a cabinet frame made of plasterboard, only a metal profile with purchased fasteners is acceptable.
Incorrect placement and insufficient number of supports will lead to deformation of the bottom under load. To avoid this, we install supports 30–40 mm from each bulkhead. The sliding wardrobe can be installed on through supports 25 mm high with the possibility of adjustment through holes in the bottom. The only inconvenience is the gap between the bottom and the floor, which will serve as a garbage container. The second option is to use kitchen legs with a height of 100 mm.

Filling – installation of shelves, drawers and clothes rails
If the shelves are located in separate sections at different levels, there are no problems: using confirmations is suitable. Where it is impossible to screw them in, corner furniture ties are installed. When installation on the same centerline is required, a "helicopter" can be used for confirmat mounting. In the middle of one of the shelves we screw in the confirmation and turn it along the axis. We screw two confirmations into the shelf opposite and return it to its place. On opposite sides we also fasten each shelf with two confirmations.

When calculating the installation of drawers, do not forget about the height of the bottom rail so that the drawer does not rest against it.
To store clothes on hangers in the closet, install a rod in a longitudinal or transverse arrangement. The classic longitudinal rod requires a minimum depth of 60 cm. The transverse version uses a retractable rod. It is fastened with four screws, which is unreliable. Instead of a lift rod, it is better to install a regular one. We screw two longitudinal chipboard boards vertically to the top shelf, and attach a shortened rod to them in the usual way.
Calculating the width of doors - the principle “so as not to interfere”
When the door slides to the side, it should completely open access to the section and not interfere with pulling out the drawer or lowering the pantograph lift. Let's look at an example with a three-section coupe with a width of 2100 mm:
- 1. Measure the width of the internal opening. In our example using chipboard, it will be 2068 mm.
- 2. Take away the double width of the buffer tape glued to the outer doors of the cabinet. The thickness of each is 6 mm, so we get a total of 2068 minus 12 – 2056 mm.
- 3. We take into account the overlap of the doors, which in a three-section cabinet is 26 mm on both sides, which in total is 52 mm. The total width of all doors is: 2056 mm plus 52 mm, resulting in 2108 mm. We divide the total width by three, and it comes out to 703 mm.
Such a simple calculation will provide free access to the sections.

Door suspension - features of different systems
There are suspension systems with two guides and with a monorail. The system based on the bottom rail is most widespread. The top rail only serves to support the doors. The system does not jam, touching the sashes is excluded. Installation is simple: insert the top into the groove, lift it, and put the bottom in place.
The system based on the top rail is simple, the fittings are cheap, and installation is simple. The movement of the shutters is quiet and smooth. It has significant drawbacks, so it is rarely used. If you press the door carelessly, the rollers may come out of the grooves and the door will go inside the cabinet. The upper guide is not very rigid; a perfectly flat ceiling and reliable fastening are required.
In a monorail system, each door runs on pairs of rollers on separate rails. They keep the doors from wobbling to a certain extent; the bottom guide is not used. The suspension is precise, rigid, and well adjustable. But the monorail is installed mainly in the bedroom, where only adults will use the closet, since handling such a system requires care.
Door structures - step-by-step assembly guide
- 1. Calculate the length of the profiles and cut them. The height of the sashes depends on the clearances required for normal operation; they are indicated in the instructions for the suspension elements.
- 2. Drill holes for attaching the vertical handle profile: outer 10 mm, inner 5.5 mm. We drill 5.5 mm holes in the inner and outer walls, then drill out up to 10 mm in the outer wall. Fastening and adjusting parts pass freely through the outer hole and are attached to the inner one.
- 3. Install the profiles on the filler: first horizontal, then vertical. It happens that the profile finds it tight, then we use a rubber mallet, with which we apply gentle blows, but not directly on the profile, but through a piece of wood.
- 4. Connecting profiles. In the upper part we screw a self-tapping screw into the profile, but not completely, so that there is some space left, install the roller and tighten the self-tapping screw. We tighten the profiles from below, insert the lower rollers into the horizontal profile, and screw the adjusting screw through the hole in the vertical profile.
- 5. Install the upper guide. There are no nuances here, the only thing that should be observed is the absence of gaps with the side walls.
- 6. Before installing the bottom rail, we lay it from below, installing stoppers, and hang one sash. We move the bottom rail 20 mm inside the cabinet and screw it on. Built-in wardrobes diagrams and drawings
The most popular compartment designs are built-in and separate. They can be assembled from ready-made kits or ordered cut to their own sizes. To make calculations easier, we offer universal drawings of sliding wardrobes. All you have to do is take them as a basis and adapt them to the required sizes.
Having decided to update the interior of your home, you should think about changing furniture pieces.
Every home should have roomy clothing.
It can be bought ready-made or ordered custom production or do it yourself.
The distinctive features of such an item will be that it perfectly matches the style of your home and expresses your taste.
 The variety of available materials on the market opens up endless possibilities for consumers. You can assemble furniture with your own hands from:
- natural wood;
- linings;
- drywall;
- laminate;
- MDF or chipboard;
- Chipboard.
The appearance of the product and its durability will depend on the material chosen.
Wood or lining are the most popular materials. They differ:
- naturalness;
- aesthetics;
- ease of use;
- long service life;
- reliability.
Important. In wet areas, furniture pieces made from wood may peel or warp. Therefore, they must be impregnated with a water-polymer emulsion or hot drying oil.
Drywall lightweight and easy to use. It is easy to cut, saw and process with various available tools. But plasterboard structures are not very durable.
Laminate, chipboard, MDF– resistant to sudden temperature changes. They cut perfectly, do not crack and have an impeccable appearance. The color palette of these materials is striking in a variety of shades. Thanks to this, the furniture fits into different stylistic directions.
Width and depth
Before you begin, you must carefully calculate the dimensions of the product. Based on these calculations, a drawing is created. Standard sizes are:
- optimal depth The length of the product is 60 cm. This closet will accommodate clothes hangers, drawers, and laundry baskets. For sliding wardrobes with sliding doors, the depth should be increased by 10 cm;
- minimum width products are calculated individually. Most often it is 40 cm. Here it is worth starting from the size of the room and personal preferences;
- height wardrobe should be 240 cm. But if desired, it can be increased or decreased.
Drawing
The main feature of any piece of furniture should be its ergonomics and good spaciousness. To make it much easier to assemble the cabinet and calculate the required quantity Supplies, it is necessary to draw its preliminary sketch and diagram.
For cabinet furniture it is necessary to build the back, side and top walls. And for built-in– side walls and top cover are not needed. The cabinet is mounted directly into a niche, and shelves and other elements are attached directly to the walls in the room.
A drawing of a wardrobe for outerwear is drawn up using a ruler, pencil and a sheet of paper. If you draw it by hand, it will take a decent amount of time.
Advice. To create a drawing it is easier to use special programs on a computer.

Tools and materials
 To make a cabinet you need to prepare the following tools:
- jigsaw and drill with hammer drill;
- screwdriver;
- miter saw;
- building level;
- hammer, tape measure, square;
- hacksaw for metal;
- construction knife.
As for materials, you can cut it yourself or order it from a furniture company. The second option is more convenient.
Advice. By ordering LSDP cutting, you get the design and quality of material you need in one place, and receive sawn and trimmed parts completely ready for assembly.
All that remains for you is to mark the locations for the holes, for attaching fittings and fasteners.
How to do it at home?
After all the preparatory work, you can begin to manufacture and assemble the frame. If we are talking about built-in furniture, then its assembly begins on one side and proceeds in order:
- First, the shelves are attached to the side and rear walls using corners.
- Next, a stand is mounted, which is attached to the wall and to the installed elements.
- After this, the remaining shelves are mounted to the walls and the counter.
Important. When assembling the cabinet frame, you must strictly follow the drawing to avoid inconsistencies. Make sure there are no distortions during the assembly process.
 To assemble a built-in wardrobe you will need confirmations and dowels. With the help of confirmations, individual elements are attached to each other. And dowels are used to give the structure special strength and reliability.
To drill holes for confirmations, a drill with a diameter of 5 mm is used. The back wall can be attached with small nails or a construction stapler.
Internal shelves and walls can be fixed furniture corners. The corners are fastened with self-tapping screws. To give the structure increased strength, confirmats are used.
Advice. It is better to assemble the cabinet at the place of its installation.
The final stage after assembling the frame is the internal arrangement of shelves, drawers, and clothes rails. It is also worth taking care of proper interior lighting.
Finishing
 The final finishing of hand-made furniture directly depends on the selected materials.
A product made of MDF, laminated chipboard or natural solid wood, in additional finishing does not need. But plasterboard products should be decorated to add aesthetics.
Cabinet interior surfaces painted to match the walls. This visually enlarges the room. And to make a piece of furniture a bright spot, you can use a rich paint color. Plasterboard shelves are pre-primed and glued vinyl wallpaper or self-adhesive tape.
As for doors, they are most often ordered ready-made from laminated chipboard sheets or mirrors and do not require additional finishing. And the side walls can be primed, puttied, covered with film, wallpaper or painted with permanent paint.
Photo
After finishing the work, you may end up with something like the following photos:


Useful video
The main manufacturing stages can be seen in the following video:
Conclusion
In conclusion, it is worth noting that building and assembling a wardrobe with your own hands is quite easy. The main thing is to choose the right consumables, create competent diagrams and drawings, and stock up on free time.
In contact with
A built-in wardrobe with your own hands can be modeled in online programs that are available in the resources of large furniture manufacturers. The most popular materials for self-made built-in furniture are:
- plasterboard - a budget option, facilitates the creation of curved wall surfaces, easy integration into the interior;
- solid wood is an elite option that requires the basics of mastering a variety of tools and having them available to a home craftsman;
- wood-containing boards - an economical option, a wide range of colors, textures, additional materials, consumables, fittings, individual parts.
The built-in wardrobe is very spacious and visually expands the space of the room.
The cabinet is often built from furniture panels that do not require cladding, OSB covered with kraft paper. For the complex architecture of the cabinet configuration, only plasterboard is suitable, which is bent according to templates to any shape (Fig. 1).
Example of calculation of a wardrobe

Figure 1. Drywall for the cabinet is bent to any shape using templates.
Internet resources will not only tell you how to make a built-in wardrobe with your own hands, but will also help you calculate the quantity and cost of materials, fittings, and consumables. For example, for furniture of this type 0.6 m deep, 1.9 m wide, built into a corner standard apartment(ceiling 2.5 m), you will need:
- doors - taking into account the height adjustment gap of 45 mm, the overlap of the panels for the wardrobe is 20 mm, the thickness of the materials is 16 mm, we get the size of the plates 2439x952 mm;
- two-way guides – a set of two pieces, 95 cm each;
- side panel – sheet 2484x600 mm;
- partition – part 2484x500 mm;
- shelves – dimensions 934x500 mm;
- roof – slab 1900x600 mm.

The design of the built-in wardrobe allows you to accommodate a sufficient number of things.
The front edge of all parts is treated with decorative PVC tape. In addition, you will need a hanger rod of 934 mm, a shoe net of the same length, and fasteners (32 corners, 64 hardware).
After assembly, positioners and anti-dust brushes are installed. If ready-made parts are used, the cabinet costs half as much. When designing original designs The sizes are individual, so sheet material is purchased - furniture board, chipboard, OSB, plywood, there are cutting waste.
Furniture requires decoration, but even in this case it turns out much cheaper than ready-made analogues.
Return to contents
Cabinet making operations

Figure 2. Diagram of furniture panel dimensions.
The peculiarity of built-in furniture is the rationalization of space. Savings and increased strength are achieved by replacing several cabinet parts with planes load-bearing structures building:
- bottom – floor covering;
- roof - floor slab;
- side wall - wall;
- back wall – the plane of the wall.
A wardrobe without two side walls is rare, since niches are not present in all apartments. However, the savings are already significant, and in addition, the absence of these parts frees up additional work space.
The technology for self-manufacturing built-in structures consists of the following sequence of operations:
- sketching/designing – a drawing, sketch, outline or a full-fledged project with visualization of the cabinet allows you to avoid errors in cutting, installation, defects, and waste of materials;
- transferring the drawing to the wall is the most critical stage on which the resource and cost of the furniture depend;
- installation of side walls, partitions: if the cabinet has a height from slab to slab, the panels are attached to the floor, ceiling, back wall; if the structure is lower, the upper part is fastened with a roof;
- shelves, drawers, rods: shelves are usually attached to special fittings (removable version) or corners (rigid fixation, adding rigidity to the structure);
- doors – traditional hinged designs and sliding modifications of sliding wardrobes are used.

Example 1. Drawing of a sliding wardrobe.
Independent installation of swing doors in built-in furniture is much more difficult than hanging sliding doors on guides:
- if a wall is used as the side wall of the cabinet, it is impossible or very difficult to make a selection for fittings for furniture hinges;
- not every House master has in its arsenal a milling cutter for making a blind hole of large diameter;
- The sliding door guides are attached with self-tapping screws, rollers are screwed to the leaves, and the structure is easy to assemble.
When designing, it is important to consider the type of construction material, as most of them require cladding. For example, gypsum board will have to be treated with putty, painted or covered with kraft paper or self-adhesive. For furniture panels, it is sufficient to treat the front ends of the parts with PVC tape; OSB boards in most cases are completely decorated or covered with colorless varnish (Fig. 2).
For cutting materials, in most cases, a jigsaw is used, since the tool is universal for gypsum boards, wood-containing boards, and natural wood with the usual replacement of attachments.
Return to contents
Wood panel product

A traditional closet has solid vertical partitions that add rigidity to the structure. In modern modifications, these partitions are replaced with profile racks, adding work space. To support the shelves, brackets are used that are fixed to the racks. The manufacturing technology of a traditional cabinet is as follows:
- transferring the drawing to the walls - the thickness of the slabs used is taken into account;
- fastening the profile - the industry produces a galvanized profile, which ideally includes furniture panels (each size has its own profile), so all that remains is to fix it according to the markings, measuring the horizontal and vertical;
- assembly power frame– parts are inserted into the profile, attached to it, to each other;
- door installation - when installing doors, a pair of guides (aluminum or steel) and side decorative strips into which the panels fit are used;
- decoration - if untreated materials are used, after assembly they are covered with roll cladding, painted, and varnished.
The built-in closet may have its own panel floor or use existing flooring as it. In the first case, aesthetics improve, the second option is more practical, since there is more work space behind the ennobled doors.
Return to contents
Installation of the structure
When choosing an oval, semicircular cabinet, the structure is difficult to make from rigid, inflexible sheets of wood-containing boards. For this purpose, gypsum board is optimally suited; it is enough to roll it on one side with a needle roller, saturate it with water through a rag, and place it in the template until completely dry. The frame of the structure is a load-bearing galvanized profile, to which sheets of plasterboard are attached on both sides.
The profile is easily attached to the surfaces of walls, ceilings, floors, and connected into rigid spatial structures, resting only on the floor.

Figure 3. The thickness of the drywall results in a massive built-in closet structure.
It easily takes on curved shapes, so the cabinet will always be exclusive. The price of plasterboard is significantly lower than wood-containing analogues, but high-quality finishing is required, strengthening the interfaces of planes with perforated corners.
Unlike wood-containing boards, gypsum board is not a self-supporting material, therefore, after marking the walls, a metal frame for racks, shelves, and ceilings is installed. After this, it is sheathed with 12 mm plasterboard - sheets and pieces are fastened with self-tapping screws every 15-30 cm in a checkerboard pattern. In large rooms, the length of the sheets is not sufficient in height. When installing gypsum boards on a metal frame horizontal seams are necessarily displaced. Sliding door guides are attached where the profile passes through the plasterboard. If the profile in these places is not used when creating the structure, it is additionally laid under the gypsum board sheets.
Each seam requires a technological gap; a new chamfer is made at the edges of the cut sheets. After installation, all seams are covered with sickle tape, putty, and the heads of the screws are covered with putty. Then the entire structure is covered with the finishing composition; after drying, you can glue wallpaper, textiles, kraft paper, self-adhesive film, tiles, or stretch PVC film onto it. Due to the thickness of the profile, combined with the thickness of the double-sided sheathing with sheets of plasterboard, the structures turn out to be massive. However, their artistic value compensates for this shortcoming (Fig. 3).
Return to contents
Making a three-leaf cabinet

Example 2. Drawing of a built-in wardrobe.
Three sashes are usually used for partitioning small room, creating designs for hallways. The technology for calculating the width of the sashes in this case is preserved - an overlap of 20 mm from each edge of each leaf. In a three-leaf design, the following scheme is usually used:
- the middle door moves on the nearby guides;
- Two side flaps move in the far guides.
- plywood – easy to process, any thickness, high strength, presentable appearance when varnished, but produced in sheets small size(1.5x1.5 m), it is necessary to decorate unpresentable ends;
- Chipboard - limited thickness with unlimited sheet sizes, difficult to decorate edges, emits formaldehyde, difficult to process;
- furniture board – processed ends, any size, thickness, high strength, high expansion coefficient.

Example 3. Scheme of a built-in wardrobe.
- the optimal height of linen shelves is 0.3 m, in high stacks it crumbles;
- shoe boxes are too different among famous brands, so it is better to take arbitrary compartment sizes and place them in place;
- It is better to set the bar for hangers at an individual height; for many tall users, long outerwear does not fit into standard wardrobes;
- There are no universal pieces of furniture, so it’s worth designing inner space for your own needs in accordance with the layout.

Figure 4. Professionals leave a gap on one side, decorating it with a strip.
Make a built-in wardrobe typical apartment With minimal costs– a rather difficult task, since there are often no parallel planes (wall/wall, ceiling/floor). The resulting cracks require masking; the supporting surfaces of the valves must be maintained horizontally and vertically. It is not recommended to make gaps between the planes of supporting structures and guides: a decorative strip at the top level will help disguise the lack of horizontal lines in both the ceiling and the floor. With side planks the situation is more complicated, so professionals can leave a gap on one side and decorate it with a plank (Fig. 4).
If there are significant unevenness of the walls, the parts are divided into several parts to simplify the fit:
- two borders are adjusted to the planes of the floor, ceiling, and attached to them;
- a large-format part with an overlap of 10 cm on each border is adjusted to the wall surface;
- all parts are fixed to each other along a vertical plumb line.

A sliding wardrobe can be made from plywood, furniture panels, chipboards.
The characteristics of floor coverings are not the same, which must be taken into account when resting door leaves on them. When using the upper support of the sashes, there is no need to worry about deformations of the laminate or linoleum. Glass shelves and mirror elements on the plane of the sliding doors dramatically increase the aesthetics of the perception of the structure. Modern furniture mirrors and glass are safe to use: even with mechanical destruction, they form small fragments that are very difficult to cut yourself with.
Inside the structure, the mirrors are secured with simple brackets, from which they are separated by felt, rubber, or polymer gaskets.
Glass shelves are also installed using spacers; there is special fittings for translucent doors.
Accessories and decorative elements add originality to designs only when combined in a reasonable manner.
Layout of parts on sheets standard sizes manually or in any of the graphic editors will significantly reduce the cost of cutting.
In this case, it is necessary to take into account the width of the cut and the radii of rotation of the jigsaw blades. For assembly you will need long and short self-tapping screws; in the first case, the hardware should not protrude from the materials when connecting two sheets, in the second - when twisting into one sheet (short self-tapping screws are used to secure the corners).
In any business, the sequence of actions is important. The final result depends on how clearly and clearly the whole process is presented. Understanding this, awareness of all the upcoming difficulties allows you not to abandon the assembly in the middle due to the lack of some components, spare parts, tools, etc. Instructions on how to make a cabinet with your own hands step by step will allow you not to miss a single detail.
dimensions
- Initially, you need to decide where the cabinet will be located. This will allow you to decide what dimensions it will be. Height.
- Technically, only built-in structures can be implemented under the ceiling. If the cabinet is a cabinet, with side walls and a roof, the distance from the ceiling should be at least 15-20 cm. Otherwise, you simply will not lift it due to the diagonal of the sidewalls - after all, any cabinet is assembled “lying down”. The removable mezzanine greatly facilitates assembly and allows you to reduce the gap between the cabinet roof and the ceiling to 10 cm. Depth. For a wardrobe with hinged doors, the optimal depth is 50-55 cm, with a longitudinal rod for hangers. In the compartment sliding doors “eat up” about 10 cm, so the depth increases to 60-65 cm. For bookcases
- and pencil cases with shelves usually set a depth of 35-40 cm. Narrower cabinets, 20-30 cm, must be attached to the wall, since they will be unstable. Width
. An arbitrary parameter, limited only by the length of the wall. For cabinets with hinged fronts, two-door, three-door and four-door options will be easier to assemble.
The first step - measurements - is especially important at the design stage of built-in and partially built-in wardrobes. Wardrobes
, as a rule, are installed from wall to wall, the entire length of the room or in a niche. Here it is important to take into account the curvature of the walls and blockages horizontally and vertically. The smaller size is used as a basis. Wardrobe on the balcony also requires extreme thoughtfulness and accuracy when taking measurements. In conditions of limited space, any design flaws are fraught complete rework
Balcony cabinets are always prefabricated! The sides are divided by height in at least two places - for the mezzanine or lower cabinet. Otherwise, you simply won’t be able to assemble a wardrobe on a narrow balcony.
Design and content
After accurate measurements of the placement location, the internal filling of the cabinet is considered. It must comply with the functional purpose and basic rules of storage ergonomics.
When planning, it is important not to lose attention to the ratio of sections to the façade.
- Wardrobe doors are always the same width. Behind each of them there should be a full-fledged storage space, without overlaps or “dead” zones. The moving mechanisms used (pantographs, baskets, drawers, trousers, etc.) must move freely.
- Hinged fronts can be of different widths and heights, combined with pull-out chest of drawers and open niches with shelves. But in terms of design, symmetrical compositions and alternation of identical elements look better.


Based on the drawing, the details of chipboard blanks (detailing) are calculated, cutting maps and a list of accessories are drawn up. Based on these data, you can already judge the upcoming ones with your own hands.


What hand tools will you need?
It all depends on what you decide to do yourself and what to delegate.
- Cutting parts. To cut chipboard and align the ends for gluing the edges, you will need a jigsaw with a wood file, a sander or router, sandpaper, a tape measure, a metal ruler and a pencil.
- Edging. The melamine edge is glued on with an iron, the excess is cut off with a stationery knife and sanded off with sandpaper. It is difficult to glue PVC edges at home; you will need special glue and a router.
- Drilling parts. Before assembly, the workpieces are drilled for fasteners using a drill or hammer drill. You will need drills with a diameter of 5.7 mm, a confirmation drill. And also drills 10, 15, 20 mm, if eccentrics (minifixes) are used, 26/35 mm for installing hinges on swing doors. Thin awl for marking.
- Assembly. A screwdriver with Phillips and hex bits, a screwdriver or a ratchet for tightening fasteners in tight spaces.
- Auxiliary tool. The most common one, available to any craftsman: a set of screwdrivers and wrenches, a vice, pliers, wire cutters, a chisel, a hacksaw, a shoe knife, a square, a marker, a sharpener.
Purchase of fastening accessories
You can view the list of structural fittings. Furniture fasteners are calculated by the number of holes and purchased in excess. But functional and facial fittings are purchased in strict accordance with the right amount.
Cutting the body parts and rolling the ends
At home, cutting sheet material to the size of blanks professionally and accurately is unlikely to be possible. How to process the ends: gluing the melamine edge with an iron is a better option for country, budget furniture.
Usually, cutting and gluing of PVC edges is ordered from the relevant companies. Typically, these services are offered in the same place where chipboard, fiberboard, and edge materials are sold.
The price for cutting can be calculated in different ways:
- Along the length of all cuts, per m.p.. The more small parts in the cabinet design in the form of shelves, strips and drawers, the more expensive the cutting will be.
- For cutting the sheet. It doesn’t matter how many details there are, it’s important to fit it into the sheet. Therefore, it is more profitable to cut large items (for example, wardrobes) according to moldings, and small ones (chests of drawers, bedside tables, etc.) according to sheets.
The rolling of visible ends is calculated per linear meter. PVC with a thickness of 0.4-1 mm is cheaper, and PVC with a thickness of 2 mm is more expensive. Therefore, it is more profitable to roll the internal parts of the cabinet with thinner PVC.
Facade part
The design of the furniture determines the design of the façade. In addition to the doors and the method of attaching them to the body, the following can be designed:
- Visor. Baguette (cornice), built-in lamps, arched structures.
- Base. Interesting base, decorative legs, adjustable thrust bearings.
- Sidewalls. Overlays in the form of carved columns, as well as open corner shelves various designs.
Hinged doors
In budget options, cabinet fronts are sawn together with the body, made from laminated chipboard and rolled with PVC 2 mm thick. Sometimes furniture design involves a contrasting combination, for example, a dark body and a light facade. Then a separate sheet of chipboard of the desired color is purchased for the facades.
Also, cabinet doors can be made of MDF, lined with PVC film, plastic, veneer, and painted with enamel. Or order from an array.
The hinged façade can be overhead or internal, depending on which furniture hinges are selected. Glass and corner facades also have their own hinges.
Coupe doors
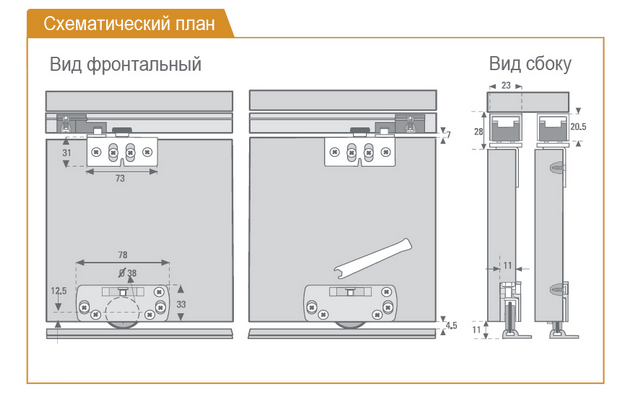
Sliding systems for compartment doors can be supported or suspended. But, as a rule, they consist of:
- Track, top and bottom guide.
- Set of rollers.
- Door leaves.
Preparing parts for assembly, drilling
Using special furniture programs, you can create specifications for drilling parts for subsequent assembly.

This greatly simplifies the process, making it more accurate and accurate. You can also make markings for fasteners manually. The main thing is to have a spatial understanding.
The process of drilling parts is also called “additive”.
For confirmation you need a hole “into the mouth” with a diameter of 8 mm from the front part of the part and a hole “into the end” with a diameter of 5 mm. Under the dowel, like a hidden fastener, drilling “into the mouth” is done with inside and a diameter of 5 mm. The eccentric coupler also has its own nuances in the markings.
The attachment points for hinges, drawer guides and other mechanisms are also marked, and holes for the shelf supports are drilled.
Cabinet assembly
If the addition of parts was done correctly, the cabinet will be assembled simply and quickly, like a construction set.
- The process begins with preparing parts for assembly. The thrust bearings are screwed in, the shelf supports are driven in, and the guides are attached. The boxes are assembled separately.
- The cabinet assembly itself begins with attaching the bottom and roof of the cabinet to the sides.
- Next, the base, bearings to the base or legs are screwed.
- Stiffening ribs and non-removable shelves are installed.
- The back wall is attached.
- The cabinet rises and moves to Right place.
- Drawers, clothes rails and other internal elements are installed.
- The final stage is installing the doors and adjusting them.
The larger the cabinet, the harder it is to assemble it alone. Therefore, it is better to involve a partner - he will support the parts and components so that you can screw them on smoothly.

Left section, assembly

Center, assembly

Right section, assembly
Here, in general terms, is the entire description of the process of making a cabinet with your own hands, step by step. We recommend that you familiarize yourself with other materials on our website - they will help you in developing a furniture design project, calculating parts and final assembly with on-site installation.