Scheme of a 12v switching power supply for LEDs. How to connect an LED strip to a power source recommendations for choosing a wire and installation. volt blocks are of two main types
Diodes are the simplest modern way organize cheap lighting. We suggest considering how to make and connect a power supply for an LED strip with your own hands, as well as calculating power and selecting a device.
Purpose of the power supply
LED strips are a great alternative to powerful lighting, such as incandescent or energy-saving lamps. Picking up LEDs is not difficult, most of all problems are caused by their connection to the network. In order to organize a convenient and beautiful LED backlight, you will need a special power supply.
Photo - Power supply for LED stripThe power supply, also known as small transformer or conductor, is one of the most important components of an LED system and is designed to power LEDs. Its dimensions are small, so you can easily mount the device under false ceiling or in furniture. Using the wrong type of power supply device can not only harm the LED strip, but also cause a fire in the home. It is also important to know what input voltage alternating current You need to be sure that the selected device meets these parameters. For the construction of the case, plastic is mainly used, which resists many external destructive factors (it can be used outdoors, in wet rooms). Consider how to choose the right power supply:
- Determine the correct voltage.
The constant voltage required by LED products before operation is key value when choosing a transformer model and its power level. Basically, stores offer an unregulated controller, i.e. it always outputs the same voltage. This does not mean that the brightness of the lamps will not be controlled, on the contrary, this indicator is controlled by a special PWM dimmer, which greatly simplifies the operation of the power supply. The most popular models with a built-in dimmer are Feron (for RGB strip LB005 30W 12V), Led Lamp, 450W GEMBIRD ATX (120mm fan) CCC-PSU, Arlight, ARPV LV-35-12, NS-LV-50-12(12V, 4A, 50W), HTS-100, YGY-121000, ZC-BSPS 12V3,3A=40W jaZZway.
- Determine the total length of the lighting strip.
Once you have determined the voltage of the LED product you want to use, you need to calculate the distance of the entire LED strip.
- Select power supply side.
The selection of power for any LED strip power supply is made according to a special table, we recommend that you read the instructions of the selected company. It is very important not to save on a fixture with the right power.
- Instrument calculation.
Before you install a low-power or multi-channel transformer, you need to calculate some parameters. If you know the length of the LED strip and the power, then you need to multiply these figures and add 10-5 percent of the error to them. The resulting number will be an indicator heat flow W / m2, and depending on it you need to select a power supply. This will help protect yourself and your family from short circuits and cable burnouts.
- Block installation.
Now it remains only to assemble the power supply and the tape into one working system. If you are not using a computer transformer, then you need:
Take a small piece of wire and a short green and black wire. This is how we mark the phase and ground cables. Connect the electricity to the yellow and black wires. Assume Yellow = 12 + Red = 5V + Black = Ground. For a clean installation, you may need to completely disassemble the transformer. Cut out all the wires, leaving a couple of black cords, a green cable, and some yellow ones.
 Photo - Connecting the power supply
 Remove the green and black cords, twist them together and set aside. Check the correct connection of black and yellow wires, then connect the device to the network. Make sure that the device is sealed, the output cable is well soldered, and other contact points do not touch.
 Photo - Compact power supply for LED strip
 After finishing work, put the case back in place, turn on the voltage, check the correct sequence of LEDs burning. As you can see, connecting a transformer with your own hands is a fairly simple task.
Video: connecting LED strip to power supplies
How to make a power supply
It is quite simple to make a power supply for LEDs on your own. For a tape with 20 cells you will need:
- A 12 volt transformer that can transmit current at 1 A;
- Diode bridge with capacitor;
- Chip KR142EN8B (or 7812), which will be needed for the radiator (if the power supply is buzzing, then this is the problem of this particular part).
We connect all the devices according to the standard scheme and connect the home-made conductor to the tape. You can assemble the block in an old case from a conventional mini-transformer, and the wire is hidden in it. For convenience, below is a diagram of the power supply circuit for the LED strip:
 Photo - Power supply circuit diagram for LED strip
  Photo - Scheme of an LED strip with a block
  Photo - Connecting the LED strip to the network
 Price overview
Not everyone can connect all parts of the circuit correctly, so it is often more profitable to purchase a ready-made transformer. You can buy a compact and sealed power supply at any electrical goods store.
The cost of devices may vary depending on the manufacturer (China will be cheaper), or additional functionality (with remote control, motion sensors, etc.). If necessary, it is quite possible to independently alter the device to suit your taste and needs.
It is one of the most popular LED lighting sources. structurally consists of a set that are located on a flexible base. This base also serves as a conductor of electrical energy. How is the LED strip connected to the household network? In this article, we will consider the question of how LED strip power supply.
As a rule, LED strips are rated for nominal. Each element of the tape is rated for 4 volts, respectively, in the LED strip, every three LEDs are connected in series, because when connected in series, the supply voltage of several elements is equal to the sum of the voltages of each of the elements. In a parallel connection, the voltage is equal across all connected elements. Therefore, all elements of the LED strip are connected in parallel in three pieces. That is, every three elements of the tape receive 12 volts.
Based on this principle, marks are displayed on the LED strip, according to which the strip can be cut. If the tape is cut in another area, that is, where there is no special designation, the tape will not work, since it will not receive power.
There are also cases when there are no marks on the purchased tape indicating the possibility of a cut in one place or another. In this case, guided by the above principle of powering the tape LEDs, cut off a part of the tape, the number of elements on which is a multiple of three.
For example, you can cut off a section of an LED strip that has 24 elements. In this case, there are eight parallel connected groups on the tape, each of which consists of three elements.

There are times when LED strips use LEDs that are rated for 3 volts. In this case, the principle of feeding the elements of the tape differs from the above method by the number of elements connected in series. That is, several groups of four elements are connected in parallel in this tape.
The LED strip is powered by special power supplies. There are a huge number of different types of power supplies that differ in rated power and design. That is, when choosing a power supply for powering an LED strip, it is necessary to take into account the rated power consumption of the strip.
Depending on the power of the power supply, several LED strips can be connected to it. You can also use multiple power supplies for each tape. It all depends on the power consumption of the tapes.
To power a single-color LED strip, a power supply is enough. If you have purchased RGB tape, then to power it you will need not only a power supply, but also controller. In this case, the controller performs the functions of adjusting the degree of illumination, as well as controlling the colors of the tape.
If it becomes necessary to connect several LED strips, then the power of one power supply and controller is not enough, since RGB strips are equipped with fairly powerful LEDs. You can use a more powerful power supply or put the two in parallel, but the controller may not be able to withstand the high load current. Therefore, it is recommended to connect no more than one LED strip per controller.

How to connect multiple RGB LED strips?
For this purpose, there is such a device as RGB Signal Amplifier. This amplifier is powered by a separate power supply. It is also possible to connect the amplifier and the controller to the same power supply, but in this case it is necessary to use a power supply of a rather impressive size. The RGB amplifier takes the signal from one tape and sends it to another tape. At the same time, the synchronism of the change in colors and brightness of both LED strips is maintained.
The modern lighting market allows you to make any type of lighting for your home. At the same time, many craftsmen assemble some elements of lighting fixtures with their own hands.
The most common type of lighting today is LED strip. Self-collection in this situation is possible as individual diodes, as well as the entire power supply to the tape.
This article will tell you how to make a power supply for an LED strip with your own hands.
Product Features
There are some features inherent in the LED strip, due to which it is most popular among consumers. These include:
- the ability to create hidden lighting;
- high-quality luminous flux;
- the presence of diversity in color scheme glow;
- affordable cost of the product;
- simple installation, which can be easily done by hand.
The only drawback of the LED strip is the need to connect it to a power source only through an "intermediary" - a power supply. There is no direct connection.
In addition, the LEDs themselves have a special current-voltage characteristic, due to which they can heat up during operation. Therefore, it is very important to choose the right power supply for the LED strip.
A little about the mediator
different models
Any kind of LED strip always comes with a power supply, through which the light source is connected to the mains. The power supply for the LED strip can be 5V, 12V, 19V. different types blocks are suitable for various purposes:
- 5V - for charging mobile devices;
- 12V - to power the computer, as well as some types of tablet;
- 19V - used to power monitors, laptops, etc.
Each of us in the house has at least a couple of such blocks that remained after the equipment corresponding to them failed.
Note! Any of the listed types of power supply can be adapted by hand for LED strip. Although many argue that 5V chargers cannot be used in this situation. Of these, using 3-6 LEDs, you can make a simple night light for a child's room.
Let us consider in more detail the features of the 12V power supply. Such a power supply is from 6 to 36 watts. Usually, for normal illumination working surface 10 watts is enough. This block is divided into two subtypes:
- old ones based on transformers. They are characterized by greater weight;
- modern impulse. In another way, it is also called an electronic transformer. They are characterized by small weight and size, but high power.
Device for 19V

Model for 19V
Such a PSU can also be converted under led strip. This type of blocks is widely applicable for computer and office equipment. Often they have a power of 16 to 32 V.
A 19V PSU will allow you to power a 6000 Lumen LED strip and make it possible to create lighting for a room with dimensions of 20 squares. In this situation, you will not have to climb inside the case itself. Can be used over simple ways, using a small reducer with a stabilizer.
Let's look at two main methods.
Method number 1. In this situation, we need a stabilizer for 7812. It must be on a KREN 7812 microcircuit. During its installation on a cooling radiator, this stabilizer will withstand a current of 1 Ampere. The assembly diagram is shown below.

This method is now considered cumbersome and outdated. This is due to the fact that for a power supply unit, for example, from a laptop, such stabilizers will need 5-6 pieces, as well as a large aluminum radiator for cooling.
Method number 2. Switching stabilizer of a modern type. It is more practical and small-sized, while it does not heat up and is quite simple to organize. It is also worth noting that the efficiency of a switching stabilizer is above 80-90%.

impulse stabilizer
Using one method or another, you can use a modified PSU to connect an LED strip and create the required level of room lighting.
Self assembly
PSUs are based on transformers. At the same time, the greater the power characteristic of the product, the greater its dimensions and weight. As a result, part of the efficiency is spent on heating and "humming". In addition, it is not always possible to find the product that is suitable for the LED strip. You can make it with your own hands. This requires a soldering scheme. An example soldering pattern is shown below.

Scheme for self-assembly
In this situation, you will need quite a large number of details and time. All necessary details can be found on the radio market or in specialized stores. Consider the assembly process using the LM2596 as an example. In this situation, you only need four radio elements. Analogs that are similar in functionality are L5973D, ST1S10, ST1S14.
To date, there are
- adjustable version LM2596ADJ;
- fixed 12V, LM2596-12;
- assembled Chinese device.
In this case, the characteristics of the product will be as follows:
- input voltage - does not exceed 40V;
- at the output - 3-37V;
- output current is 3A;
- protection is triggered at a current of 3A;
- the conversion frequency is 150 kHz.
It is better to use outputs from 3 to 37 V for the tape block. The advantage of using this design is the ability to change its brightness when connected to an LED strip without using a dimeter. To do this, the assembly takes place according to the following scheme:

Circuit for 3 to 37V output
It is also possible to use a fixed 12B assembly scheme. In this situation, it is necessary to use a stabilizer assembled on the LM2596-12 chip.
Such a scheme would be somewhat simpler.

Circuit for fixed 12V
In addition, the application with three regulators will be a universal option. In this situation, you can power not only the diode strip, but also the LEDs. As a result, the resulting device here can act as an electronic transformer and driver.
Any homemade version, which is given above, will allow you to connect the LED strip to a power source without fear that it will deteriorate or work incorrectly.
Many experts recommend using Chinese products. They are the simplest and most accessible representative of intermediaries that are allowed to connect such a lighting fixture as an LED strip.
Conclusion
It is quite possible to assemble such a device as a power supply for connecting an LED strip to the mains with your own hands. In this case, you can get by with "little blood" by simply redoing the device left after the computer for powering 19V. To do this, you only need to decide on the type of modification and strictly follow the scheme for soldering the parts together.
If you do not have a suitable “candidate” for rework, you can always buy the necessary model on the radio market or in a specialized store.
 Details about the switch with motion sensor
 Choosing a street motion sensor to turn on the light
LED lighting is widely used in everyday life. It is relevant for individual surfaces either as an additional or. In order for the lighting to be stable and the installed products last as long as possible, you should choose the right 12 V power supply for the LED strip. A competent choice will avoid a premature decrease in the quality of the glow and will protect the product from drops.
Before choosing LED strips for the purpose of interior design, you should familiarize yourself with the features of the operation of such products. For example, a direct connection to 220 V is impossible, since they were originally designed for 12 V. Violation of this rule will lead to the failure of the tape.

In order to prevent the lamps from burning out, it is required to lower the voltage in the power source from 220 V to the desired value. This can be done using a 12 V power supply. For a 12 V LED strip, it is a necessary element, without which it is impossible to connect the product to.
Attention! 12 V LED strips are most widely used, but 24 V models can be found on sale.

Advantages and disadvantages of 12 V power supplies
The power supply has a number of undeniable advantages:
- Increases electrical safety during the operation of the LED strip;
- Increases the service life of the product;
- Reduce the consumed voltage to the required level;
- Allows you to stabilize the load on.

The disadvantages of such devices include the cost of their purchase, as well as the need for decoration in the process. installation work. We have to consider various options for the location of the power supply relative to the tape, allowing the device from others.

Types of power supplies 12 V
Manufacturers offer ready-made devices with various options execution. Depending on the level of protection against atmospheric precipitation, devices can be:
- sealed that allow operation in elevated conditions, including open air. It is able to remove heat well and is not afraid of adverse natural factors;
- Semi-hermetic. A versatile option that can be used inside and outside the building. Has a degree of protection IP54;
- Leaky that can be used in dry rooms.

Wide the lineup allows you to choose a power supply with a power consumption of 12-800 W, rated for a current of 1-66 A. There are products with active and passive cooling. In the first case, the device is equipped with a built-in fan, which, providing the necessary level of heat dissipation, is capable of creating some noise during operation.
Power supplies for 12 volt LED strips can be in a sealed case made of:
- Plastic. Such models are characterized by compactness, tightness, light weight and compact size. At the same time, they are characterized by poor heat transfer and a limited choice of power. The maximum power does not exceed 100 W;

- aluminum. The most expensive type, differing high level reliability, tightness and strength. Due to its features, it has good heat transfer, is not afraid of the effects of most negative factors: temperature fluctuations, direct sunlight, humidity. not only in everyday life, but also in installation;

- other metals. Devices are made with perforation and contact pads. They can be installed in dry rooms, allocating enclosed spaces to reduce the amount of dust entering inside.

How to calculate the power supply for the LED strip with your own hands
In order for the power supply to work stably, it is necessary to correctly calculate its power in advance. The calculation will require knowledge of the rated voltage and power that one meter of LED strip Pm will consume. These indicators are individual and depend on what are included in the LED strip, and their number per linear meter, as well as the length of the product itself (L).
- We find the total load by multiplying the power per meter of the LED strip by its length: Ptot = L × Pm . For example, if the power of a linear meter is 15 watts, then five meters of tape will consume 5 × 15 = 75 watts;
- We multiply the obtained value by the safety factor kz, which is numerically equal to 1.2 ... 1.3: Pbp = kz × Ptot = 1.2 × 75 = 90 W. The safety factor will avoid overheating of the power supply during operation. We select the device with a power that is greater than the calculated value.
Attention! When calculating the power of the power supply, you should take into account the power of the RGB controller included in the connection diagram. This value, as a rule, does not exceed 5 W.

If the power per meter of the LED strip is unknown, you can calculate it yourself. To do this, you need to know exactly how many and which LEDs are contained in one running meter. Let it be 30 pieces of SMD 5050, each of which is designed for a current of 0.02 A. In this case, the total value of the current consumed will be 30 × 0.02 A = 0.6 A. Hence, the power per meter of the LED strip is 0, 6 A × 12 V = 7.2 W.
Connecting the power supply to the LED strip with your own hands

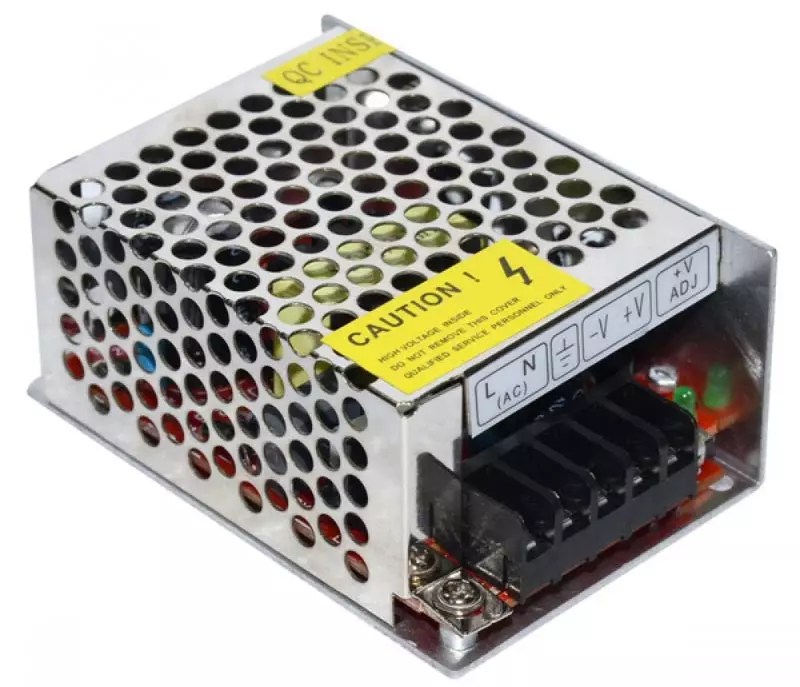
Before you figure out how to connect the power supply, we suggest that you familiarize yourself with the symbol on the device and the LED strip:
| A photo | Description of works |
 | , designed to connect the power supply to the network, are marked L and N. The order of connection ("+" / "-") does not matter. You can connect the device to the power source in any order. |
 | If available, you can connect to a terminal that has the appropriate designation. |
 | Terminals for connecting LED strip. Designated as +/– V, depending on the polarity. When connecting, this requirement must be taken into account. |

| On an LED strip, the positive polarity wire is usually red, and the negative wire is black. On the tape itself, the contact points are signed as follows: positive - 12 V, negative GRND, or there may be no inscription at all. Some manufacturers use V+ / V- markings. |

Parallel connection
This scheme is relevant if the required lighting exceeds 5 meters. A serial connection is impossible, since the load on the current-carrying tracks will exceed the allowable value, and will fail. Also, during operation, an uneven glow will occur. In this case, the products are connected in parallel:
| A photo | Description of works |
 | Each piece of tape is connected to a busbar, with a suitable cross section (1.5 cm²). To connect the LED strip to the bus, you can use wires of a smaller cross section (0.75 cm²). |
 | Not LED strips, but tires will be connected to the power source. |
 | After checking the correct connection, the wires should be connected to the appropriate terminals on the power source. |
Serial connection
If the length of the connected product is less than 5 meters, it is not necessary to resort to a parallel connection scheme. In this case, you can connect the power supply to the LED strip as follows:
- We connect the power cord to the corresponding terminals on the device. As a rule, "phase" and "zero" correspond to blue and Brown, and to ground - yellow-green. In the absence of "ground", this terminal remains unoccupied;
- We connect the tape to the corresponding circuits;
- We check the performance of the system.
Attention! The absence of a ground wire violates the requirement for the safety level of the installed lighting system.

How to make a do-it-yourself power supply for a 12 V LED strip
Not always available to buy suitable model 12 V power supply. In this case, the device can be made by hand:
| A photo | Description of works |

| Cooking necessary materials and tools:
|
 | Using a multimeter, check the polarity of the charger. |
 | We solder the DC-DC converter to the charger, observing the polarity. |
 | We connect the tape to the output contacts of the DC-DC converter, observing the polarity. |
 | We check the performance of the created 12 V power supply. |

Attention! A homemade power supply for LEDs has current limits. In the given example, 1 A. It is forbidden to exceed this value.
Instead of a power supply from a phone, you can use a converter from a computer or other equipment. A transformer for a 12 volt LED strip may not be the best choice, since their parameters often exceed those required by two or more times. This will lead to the fact that during operation such a device will constantly overheat. Additional cooling will not help to cope with the problem. That is why, if you have a choice, it is better to give preference to a switching power supply.
12 V power supply repair
After a certain period of operation, the lighting may stop working. Not always the cause of the failure can be the burnout of the LED strip: the power supply may fail. There are many reasons that can cause a converter to fail:
- Prolonged stay in conditions high humidity if initially the device was not designed for such operating conditions;
- Accumulation of dust and dirt inside the device;
- Poor-quality assembly of the device or the use of low-quality parts when assembling the product;
- Violation of operating conditions due to non-compliance with the requirements of the manufacturer;
- Initially incorrect calculation of indicators. Often, after preliminary calculations of the power value, some users do not add 20-30% to the required value, and therefore the unit operates at its limit.
Attention! Before proceeding to repair work, you should determine the exact cause of the failure of the power supply.
The following symptoms indicate a device burnout:
- A characteristic burnt smell, which intensifies after opening the case;
- The presence of blackened, swollen or burnt parts. Most often, capacitors swell;
- There is a break in the tracks and contacts between the elements of the electrical circuit.
Attention! If you find a hole in a burned-out board or significant damage to individual parts, refuse to repair: it will be unprofitable.
If there are several damaged parts for the device, it will be enough to replace them. This will require a converter operation diagram, although most often such devices typical scheme, and the cause of the failure may be the burnout of transistors, capacitors or a dual diode. The rest of the parts rarely burn out.

Troubleshooting can be performed in the following sequence:
- Having opened the case, we check the operation of the fuse. If it works, we control the voltage on the capacitors (C22, C23). They should be energized at this time. Its performance is evidenced by a value of about 310 V;
- We carry out PWM diagnostics;
- We control the output voltage and check the performance of the microcircuit using an oscilloscope.
Article
Content
Tape with LEDs - a lighting device designed for lighting-decor in a house, cafe, on billboards. The LED device is made of plastic, on which LEDs are attached. The voltage of the power supplies for the LED strip is 12V or 24V. Sometimes they use a transformer designed for a computer. The power supply unit is produced with built-in automatic protection, which saves from network overload and short circuit.
Types of power supplies
The source, which allows you to adjust the mains voltage for LED backlighting, is divided into several types:
- Compact PSU. This device is small in size, weighs a little, so it is often used for decoration in residential premises. Produced in a waterproof case. The main disadvantage of a compact transformer is its low power.
- Block in a sealed aluminum box. It is a large-sized device with a large mass. Its power can be more than 100 watts. Given the size of the PSU, it is often used for outdoor decoration (resistant to moisture, temperature changes).
- Open conductor. May have different power. This transformer wins by low cost. Cons: BP open type very bulky, heavy.
Power supplies for LED strip are transformer and pulse:
- The transformer PSU reduces the voltage to 12 V from the standard 220 V. Using a special filter, the ripple voltage is smoothed. The main advantage of this transformer is its elementary design and decoupling from electrical network alternating current. Cons: large size, does not cope with voltage drops.
- The pulse unit also works on a transformer. It differs in that it operates at a high frequency, is characterized by small dimensions and weight. A PSU of this type is connected to a 220 volt power supply, like a transformer device. Disadvantages: very badly tolerates idle work, overloads. Plus, his circuit is hard to repair.
How to choose a power supply for LED strip

If you choose the wrong transformer for an LED design, it can damage the lighting equipment and even cause a fire. Often you can find controllers that produce stable voltage readings that cannot be changed. This does not affect the brightness of the LEDs, but on the contrary, it makes the work of the conductor easier. The mini-transformer must be set to the value of the selected LED strip - in order to avoid voltage problems.
It is very important to purchase or make yourself such a conductor that will match all the conditions of a particular circuit and be used correctly. How to choose a power supply for LED strip? For a competent choice, you need to calculate:
- operating voltage;
- input and output power.
How to calculate power
When calculating the power, the length of the LED device must be taken into account. To select a device with the desired performance, you need information about the consumption of one meter of tape. Let's look at an example of how to calculate the power of a power supply. You have chosen a light source of type SMD 5050 with 30 diodes, its length is 5 m. Calculation:
- Power indicators for one meter of tape are multiplied by the length of lighting equipment (5x7.2 = 36).
- It turns out that 5 meters will "eat" 36 watts.
- It should be remembered that the power of the transformer must be chosen with a margin. In the above example, it is better to buy a 40 watt PSU.
How to connect
Connecting the block is easy. If decorative lighting will be installed during the construction of the building, then it is better to bring the electrical wiring as close as possible to the place where the tape will be placed. Install an outlet there. When this is not possible, it is worth purchasing a cable of the required length in advance. The PSU must be equipped with a plug that will connect to the network (if there is none, then it is made by hand).
Mounting diagram

Connection steps:
- We take the cable of the required length. The cross-section core is at least 1.5 mm.
- On one side of the cable, wires are installed that are stripped of insulation by 3 mm, on the other - a plug for connecting to the mains.
- The brown wire is connected to the phase (socket L), blue - to zero (socket N).
- The ends of the cable must be secured with screws.
- Connect the conductor. If you plan to connect several tapes at once, then it should have good power.
How to make a 12 volt power supply with your own hands

Anyone who wants to make their own conductor, which is useful for the operation of the device with LEDs. To design a power supply unit for 20 links you will need:
- 12 Volt unit capable of transmitting electricity for 1 ampere.
- Chip 7812 for the radiator.
- Diode bridge with a capacitor.
- Prepared devices are connected according to the classical scheme. It remains only to connect a homemade conductor. PSU parts, if desired, are placed in a case from a standard small transformer.
Video: connecting LED strip to power supplies
Anyone can join the PSU. The main thing is to follow the instructions exactly. Thanks to the video, you will understand how to properly power the lighting equipment, what actions are performed for the correct and safe operation of lighting. The video shows in detail the process of connecting the block for the LED strip. The video instruction will clearly explain the features of each stage of work.
Did you find an error in the text? Select it, press Ctrl + Enter and we'll fix it!