Arrangement and installation of the truss system of a half-hip roof. Semi-hinged Dutch roof - one of the best modern types of roofing Semi-hinged gable roof rafter system and structure
To better understand what a semi-hip roof represents, you can imagine a structure that looks like something intermediate between the hip version and a simple gable.
Distinguishes the half-hip design from the rest of the trapezoidal pediment.
There are a lot of characteristics of such a design that are worth paying attention to and understanding them before proceeding with the installation.
Basically, they construct a half-hip structure for attics. The roof can be gable and hipped, in which there is an appropriate number of cut triangular edges. The location of such cuts is above the end walls.
This is what distinguishes a half hip from a similar hip design. Roof ramps are symmetrically positioned in relation to the axial beams and have equal angles of inclination.
If we consider such a design from the positive side, then the following points can be distinguished:
- High water resistance ensured due to the fact that the structure contains slopes located on all sides;
- Increased level of protection against atmospheric precipitation created due to the presence of eaves hip overhangs;
- The space of the attic floor is increased, thanks to the half-hip design;
- A half-hip can be installed in a climatic zone that is characterized by extreme weather conditions. She is very durable;
- The appearance of the half-hip structure is very effective and beautiful... Designed to fit frame houses located both within the city limits and outside the city;
- Design well resists vibrations due to the presence of a low profile in the roof system.
Regarding the shortcomings, we can say the following:
- The large equipment of the rafter system and the entire roof structure with various structural elements creates many difficulties in the process of construction and installation roofs;
- Half-hip construction requires a lot of material costs that a sufficiently large number is required;
- Roofing also it is quite difficult to equip;
It is not easy to independently design such a variety, everything depends on the construction of the rafter system. This system characterized by a lot of differences compared to conventional gable and pitched roofs.
Semi-hip roof: photo below.

House with a half-hipped roof

Frame house with a semi-hipped roof
Half-hip roof: rafter system
The rafter system is much more complicated than the hip type of the roof, it is represented by trapezoids and various polygons, in addition to this, the hips themselves are also of a different shape.
Of the species diversity, half-hips are presented:
- Dutch variety- represented by a hip cut off from the bottom, and from the point of the cornice there is a pediment, which has a trapezoidal shape;
- Danish variety- designed in the reverse order, a trapezoidal hip is located from the cornice, above which small triangular pediments are mounted.
There are two types of rafter system for such a roof, it depends on which rafters are used for the construction of the structure:
- Sliding type... This type of rafter legs is supported not only on the ridge and Mauerlat, but also on intermediate supporting elements. Such supports can be walls or racks, which are located during installation on floor beams.
- Hanging type... This type of rafter does not have intermediate support elements.
The listed elements create a rafter system:
- Ordinary rafters... They are supported on the Mauerlat bar and the ridge located perpendicular to them. The design is similar to that of a conventional gable roof variety.... Their length is the distance from the ridge beam to the wall of the structure.
- Diagonal rafters... Such elements form a half-hip, otherwise they are called corner rafters. They can be schematically represented as the faces of an isosceles triangle in a roof structure. In other rafter systems, for example, in a hip or hip a similar element has the longest length, in this case, the diagonally located rafter legs can be shorter than half the total length of the ramp.
- Narodniks... Otherwise called half-legs or short rafters. Required to connect the diagonal rafters to the Mauerlat.
- Support... Positioned on each roof beam in the rafter system layered type.
- Skate (bar)... The place where all rafter legs of both slopes converge at their top. A solid-type lathing is attached along this element, to strengthen the strength of this part of the structure.
- Auxiliary elements... Any items that serve to increase the strength and reliability of the entire system... They can be presented with struts, crossbars, planks, braces, etc.
ATTENTION!
To increase the strength of the rafter system, special ties are mounted in it, connecting the elements located on opposite sides. Installation of additional screeds is carried out flush with the ceilings or at the level of the middle of the rafter beams.

Truss system diagram
Roofing cake
 K any roof, regardless of its type there is not one layer of material, but several.
This solution allows the roof to be provided with all the necessary characteristics and properties for a comfortable life.
The composition and structure of a roof owl may vary depending on its purpose and variety.
With regards to the half-hip, such a roofing cake is represented by the following layers:
- Interior finishing materials;
- Lathing;
- Vapor barrier material;
- Counter grill;
- Insulation material;
- Waterproofing;
- Ventilation system;
- Material roofing.
Each material in the "pie" of the roof is designed to perform certain functions, much depends on the correct installation of such a system.
All materials must be correctly selected in accordance with the individual characteristics and parameters of the structure.
The roofing cake is laid in the same way in all types of roofs, the lathing is installed first, on which materials are subsequently attached alternately.

Roofing cake
The process of building a half-hipped roof
It is better to break the entire construction process into several separate stages, understanding the essence of which construction will take place easily and without errors.
Process steps:
- Mauerlat construction... The process of constructing this part of the system may or may not be similar to the process of constructing a traditional frame. In the second case, the installation is carried out in such a way that the timber was located flush with the outer walls(their inner part), in the center of the bearing walls and at the same level with the pediment walls (also their inner surface).
- Placing floor beams... Beam positioned perpendicular to the Mauerlat beams of the main load-bearing walls... If there is a weak point in such a structure when they are connected, then it is placed above the load-bearing wall.
- Installation of supports... Racks located on the edge, are decisive in the length of the main roof sections... Ordinary racks are placed at the same distance to evenly distribute the load on the roof. Before proceeding with the fastening, their vertical position is checked using a plumb line or a more accurate laser device. After the fastening is done, racks supplement for a period of time with the help of auxiliary cuttings.
- Installation of rafters... This stage is carried out in a standard way, using the technology for layered and hanging rafters. This stage is not particularly difficult.
- Installation of diagonal rafters... To manufacture and install diagonal rafters, a number of specific actions are carried out that ensure high accuracy of the process performed.

Rafters

Installing Mauerlat
Diagonal rafters installation diagram:
- Initially, the installation is carried out trimming the board, which is located flush with the pediment Mauerlat (its outer side). The board size parameters are generally 50x150 mm. Temporarily it is nailed in order to fix its position and not to drop it. This part of the structure is necessary for accurate measurements of the notch position..
- Further using a board of arbitrary sizes, which is laid on 3-4 ordinary rafters parallel to the run of the skate. The accuracy of the horizontal position is checked using a level or tape measure. After that, pull the board up to the segment that was nailed earlier. At the intersection there will be a point at which the future horizontal cut should take place.
- A board, 50x200mm in size, is sawn off in such a way that a diagonal element is obtained. To do this, first apply it to the upper edge. roof truss ... This process is best done with two people in order to be able to simultaneously hold the board and apply the markings. On the outer part, which is turned towards the half-hip, mark a line that runs along the axis in the center.
- Further measure the value of the upper cut, which is necessary for accuracy when calculating the lower node. The measured distance is plotted in the upper direction along the Mauerlat at four points that follow the outline of the rafter in 3D.
- The last stage in manufacturing is carrying out cuts in the marked places... If in the process there were no errors and there were no errors, then you can immediately make the remaining diagonal rafters.
- Before installing the side rafters it is necessary to remove the auxiliary board trim from the pediment Mauerlat... The manufactured rafters are installed on the right places and fixed with metal staples, corners or nails. From the bottom, it is best to fasten with corners..
Manufacturing and installation of hip legs... The distance that the rafter leg should rise relative to its lower part be sure to measure and the result is set aside from the top of the skate and also make a note. From this point, a lace is pulled, along which they are guided in the further process of installing the rafters in the central part of the structure.
To mount a leg of a half-hip structure, you must:
- Measure the angle b, which is between the lace and the support stand... It is better to measure with the help of a protractor or a bevel.
- Measure the angle f between the diagonal elements... Such a measurement will allow you to correctly determine the value of the angle at which the heels are washed down from above, grinding off two edges. Thus, the rafter will fit snugly in the assembly after installation.
- Using a board with parameters 50x150 mm, make a cut at an angle b, after which the board is sharpened until a protrusion is obtained, the parameters of which will be equal to the angle f.
- Very important every time try on the received elements to avoid mistakes and errors.
- The installation of this element is carried out on top of the laces to be able to measure the amount by which the workpiece rises above the ridge assembly.
- The resulting parameter is moved down in order to determine the depth of the bottom cutting. This value is measured only in the vertical plane, after which a horizontal line is drawn. This is the line where the lower part of the knot will be cut.
- After that, mark the line for the gash from the bottom.... To determine this point, using a tape measure, the parameter of the width of the cornice is set aside and a vertical is lowered from this point, which intersects the blank of the hip rafter.
- After all the specified measurements have been taken, do not rush to start installing the rafter leg... The resulting element is a template for making handcuffs.
- The man is made in the same way., but sawing the bar only from one side by an angle value equal to f / 2. In the lower node, everything is also simple - all passing lines are arranged symmetrically... After the completion of the manufacture of handcuffs, all available elements are fixed in a standard way.
Completion of construction... When ready rafter system roofs, the last step is filing the eaves and the construction of the sheathing for laying the materials for the roof pie. After completing the laying of all the necessary layers, relative to the individual roof structure, the roofing is installed.

Conclusion
Despite the complexity of the construction of a half-hip, having understood the essence of the process, you can easily cope with the task of erecting such a roof. The most difficult thing in the installation process is to equip the end parts of the roof system, therefore, it is worth starting to understand the process from these stages.
In contact with
Experienced craftsmen and designers of roof frames and coverings can confirm that of all existing structures, the rafter system of a half-hip roof is considered the most perfect and at the same time difficult to manufacture. Its basis was invented and implemented three hundred years ago in the very humid and snowy climate of the Baltic Sea coast, which left a certain imprint on the structure of the half-hip roof frame.
Semi-hip roof device
A half-hip is a small slope or roof sector located between short inclined rafters from the side of the pediment.
V modern designs half-hip type use two layout options:

In the latter case, a vertical section of the pediment remains between the ridge and the upper edge of the half-hip, which is almost always equipped with a ventilation or dormer window for the attic.

Advantages and disadvantages of a half-hip roof
Most people find appearance and the design of this type of roof is quite attractive. The roof with a half-hip, photo, looks more elegant and modern than the old rectangular gable and even hipped roofs.

What are the advantages of a half-hipped roof
Unusual and a little strange, at first glance, the roof with half-hip slopes originally appeared in Denmark and Holland, as the most the best option able to withstand a climate with a lot of fog, rain and snow, frequent frosts and regular icing of the roof and fronts.
Therefore, in the half-hip roof, some design features were initially laid down to deal with moisture:
- Additional slopes perfectly protected the upper part of the pediment, adjacent to the ridge, from water infiltration, condensing fog and heavy rains with wind;
- The use of half-hips made it possible to reduce the pressure of the air flow on the gables in strong wind conditions;
- The use of a half-hip design instead of a full-fledged one hipped roof made it possible to reduce the longitudinal dimensions of the building.
At first glance, this is not too important for modern realities, but until recently, a shortened half-hip roof slope was the solution to the problem in a very dense urban development. The design of the house with the shortened roof turned out to be quite attractive, therefore the Danish roof with tiles or the half-hipped sloping roof have become classics of architecture for a long time.
Important! Half-hips effectively reflect wind pressure.
If you try to replace the half-gable roof with a gable, with flat gables, then the latter will experience a load of several hundred kilograms, which can lead to squeezing out the wall cladding in a strong wind.
Disadvantages of a roof with half-hips
In addition to the sleek design and good adaptation to bad weather conditions, this type of construction also has certain disadvantages. First of all, the high roof profile. Initially, half-hip roof frames were very high. In modern designs, the ridge height is determined by the customer. But even with a low installation height of the ridge girder, the installation of a half-hip roof is much more difficult than in the case of two-slope rafter frames of the classical scheme.
The second significant drawback is the increase in the number of seams and joining lines of conjugated slopes. In a half-hipped roof, there are fewer of them than in hipped roofs or in classic four-slope schemes, but still the list of places for potential water leakage is greater than in a dual-slope system.
Therefore, additional canopies are often installed on the upper half-hips of the roofs, reflecting part of the rainwater flows and protecting the gables and walls under them from getting wet.
For hipped roofs, the designers found a different solution. Instead of visors, they extended two side sloping planes, as a result, the window and the upper edge with the abutment bar were under their protection.

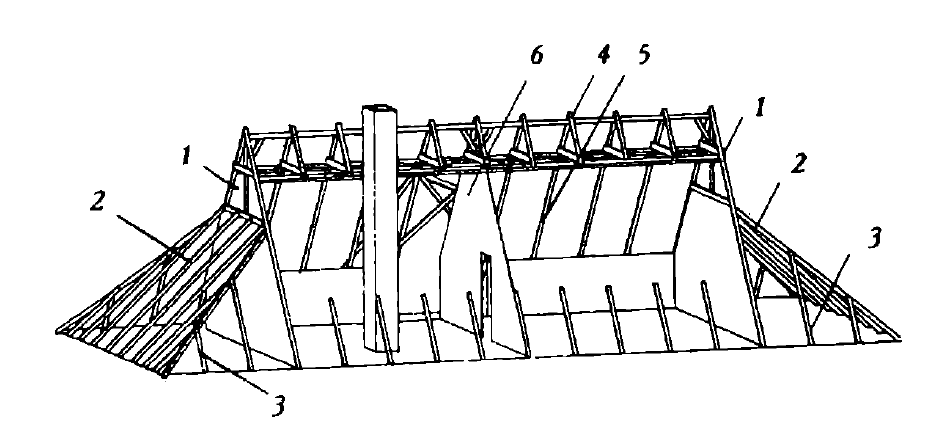
Diagram of the truss system of a half-hip roof
In the very simple version the structure of the roof with halves of the hips attached to the rafter frame resembles a four-pitched scheme.

For example, if you look at the drawing of a half-hip roof with a lower arrangement of half-hips, it becomes clear how the support system of rafter beams is formed:
- The half-hip roof rafters are divided into two groups - ordinary and hip. The first ones fit on the side slopes of the roof, from the second they form the halves of the hips;
- The central part of the rafter frame is made in the same way as in the case of a conventional gable roof, the length of the ridge is approximately 2/3 of the distance between the side walls;
- The shape and height of the slope of the future half-hip slope is formed by hip rafters;
- Half-hips are recruited from layered rafters, which abut against the Mauerlat at the base, and with the upper shelf on a crossbar with an insert.
For schemes with an upper half-hip arrangement, the rafter system is formed by hip beams installed between the ridge and the horizontal transom beam.

In this case, the pediment overhangs are lengthened by a distance equal to the step of ordinary rafters.
Varieties of a semi-hipped hipped roof
In modern building design, you can find enough a large number of various modifications of the half-hip roof, they are actively used for various schemes of attics and residential attics, one and a half and two-story buildings with balconies and open areas for recreation. All of them are based on two classic types - the Danish and the Dutch scheme with a half-hip rafter frame construction.
Dutch semi-hip roof
This type of roof on the device completely coincides with the previously considered structure with the upper position of the half-hip.

Usually, the Dutch version of the construction of half-hip slopes is used for one and a half-story houses, the rafter systems of which are made with long slopes located at a large angle of inclination.
The use of a half-hip allows to reduce the wind load on the rafter system and at the same time protect the balcony or windows built on the gable of the building from rain.

The Dutch method of arranging a half-hip roof makes it possible to reliably isolate the upper part of the attic from the attic or living under-roof space. One of the options for the Dutch half-hip roof scheme is shown in the video

Dutch roof truss systems are ideal for equipping attics with sloping roofs, country houses and country cottages.

Danish half-hip roof
it classic version rafter system with a lower arrangement of half-hips. Dutch models, despite all the simplicity and availability of manufacturing a gable roof, are less widespread than Danish ones, since they are designed for large enough rafter frames. Only in the last 10-15 years, with the active construction of two and three-storey estates, the Dutch systems have become equally popular.
Danish half-hip truss frames can be used on almost any type of building, from three-story mansions to small one-story buildings. In the conditions of a very humid and cold climate in Denmark, half-hip systems were necessarily built with broken slopes, as in the diagram.

The upper part of the rafter frame was built at a very large angle - up to 70 °, the lower overhangs and half-hip slopes were located at an inclination of only 20 °. The result was a roof that was shaped very much like a pointed medieval hat, equally comfortable in snow and rain. In such a house, the owners lived mainly on the second floor, on the first there was a stove and a kitchen, utensils and supplies were stored in the attic and in the under-roof space.
For a long time, Danish roofs with broken slopes remained the hallmark of Copenhagen. Modern half-hip rafter systems only vaguely resemble roof structures two hundred years ago.

Important! In modern conditions, the Danish half-hip rafter system is chosen only as an alternative to a hipped or conventional hipped roof.
This design makes it possible to equip a couple of attic windows without resorting to more complex auditory and mortise systems.
How to calculate the area of a half-hinged roof structure
The surface area calculation is based on the school planimetry course. Conventionally, the roof covering can be considered as two pairs of geometric shapes. For the Danish system, these will be two large and two small trapezoids of the main slopes and a half-hip, respectively.
To find the area of the main slope, it is necessary to multiply the longitudinal length of the slope by half the sum of the horizontal lengths of the ridge and the distance between the extreme points along the eaves line. The same formula is used to calculate the area of half-hips. The distance from the crossbar to the cornice is multiplied by the half-sum of the lengths of the crossbar and the pediment line. All that remains is to add two squares and multiply by two.

How to make a half-hip roof with your own hands
The main difficulty in performing this kind of work is that even the most accurate calculations of the lengths and sizes of parts of rafter systems rarely coincide with what is required at the construction site. All the same, in the place you have to customize all the details of the rafter system with your own hands.
Advice! When calculating blanks for the assembly and installation of a half-hip roof, the dimensions of all parts are taken with a positive tolerance of 5%.
More or less exact dimensions are achieved on specialized lines industrial production rafter frames. In this case, all the details of the half-hip roof frame are obtained almost exactly according to the drawing, and the supporting system can be assembled like a designer.
Beginning the installation of the rafter system
Installation of a half-hip frame begins with a ridge run. In the center of the ceiling, exactly along the centerline of the roof, two vertical posts are installed on which the ridge bar is attached. So that the frame does not deform and does not deviate from the initial position, the system is fixed with temporary struts and struts.
The next step is to install two pairs of rafter beams on the assembled ridge frame, two at each end of the horizontal ridge cross member. The base of the frame is fixed and reinforced with braces and spacers.
Assembling half-hip ramps
In order to form the plane of the half-hip, it is necessary to install a support cross member or crossbar. It is attached to a vertical post that holds the ridge beam, and is temporarily stitched with ordinary rafters. The next step is to cut and install the hip rafters. This is the most difficult stage in assembling the rafter system of a half-hip roof, since you need to try to mark and cut the supporting planes of the beams as accurately as possible. After leveling the plane, you can overhaul the transom.

The rest of the rafters of the half-hip slope are cut out and placed according to the results of measuring the dimensions for each beam. At the last stage, ordinary rafters are laid, the crate is sewn, vapor barrier and roofing are laid.
One of the "narrowest" places of half-hip roofs is associated with the arrangement of the zone of abutment of the upper edge of the roof covering to the vertical surface of the pediment. It is in this place that it most often goes numb rainwater, therefore, even at the stage of assembling the rafter system, a metal apron made of thin sheet galvanized steel is laid under the crate. This makes it possible to increase the rigidity of the joint line and prevent the abutment bar from detaching from the wall.
Semi-hipped roofs are one of the most interesting options borrowed from northern European architecture. Their streamlined shape is extremely adaptable to gusty winds. The shortened triangular slopes allow you to significantly expand the boundaries of the useful attic space without placing a massive roof structure on the walls.
They look stylish on buildings of any number of storeys and purposes. The only drawback is the complicated construction technology. However, those who know how the half-hip roof truss system is constructed will cope with the work without any problems.
The semi-hip "family" cannot be unconditionally attributed to the four-slope class. Moreover, it clearly served as the mother base for the development. Rather, it is a community of structures with two and four slopes, the construction of which predetermines the use of both construction methods.
The half-hip category differs from hipped-roof parents in that the characteristic triangular element of hipped roofs is shortened. It is adjoined by a part of the vertical pediment of a stone house or a similar gable of a wooden structure. The shortened hip is naturally located at an angle to the indicated gable walls. The angle between them can be convex or concave, and the half hip is located above or below.
According to the shape and location of structural components, half-hip roofs are divided into two main types:
- Dutch. Roof with a trapezoidal semi-hip, which occupies the lower part of the gable slope. The upper base of the trapezium adjoins a vertical triangle, together with which they most often form a concave angle, less often a convex one. The triangle can be solid or fitted with a dormer.
- Danish. A roof with a triangular half-hip, occupying the upper part of the end segment. The base of the triangle rests on a vertical trapezoidal pediment, together they create a convex angle. The Danish version is very similar to the usual hip roof, only its end slopes are shorter.
On the basis of two basic varieties, many variations have been developed with a half-hip theme. Among them are not only structures that differ in height, size of slopes, angle of inclination, shape of elements. There are hipped roofs, all sides of which are built according to the Danish or Dutch principle, there are buildings with a shortened hip on only one end or one side.

In all constructive combinations, part of the rafter legs are mounted according to the rules for constructing frames for gable roofs, i.e. hanging or layered method. Hanging rafters are installed if the box to be equipped does not have an internal load-bearing wall or it is not possible to install supports for the ridge run. The slanting technique, on the other hand, is implemented when reliable support exists or can be provided for the upper heels of the rafter legs of the gable roof segment. The lower heels of both types of rafters are supposed to rest on the Mauerlat, on the upper crown of the frame that replaces it, or on the floor beams.
Regardless of the number of project versions, the construction of a rafter system is based on one of the main half-hip methods or on their combined use. Having dealt with them, you can understand how Danish or Dutch technology can be applied in arranging your own home and how to combine the usual sloping part of the roof with shortened hips.
Dutch roof rafter system
The construction of a structure with a trapezoidal short hip and a triangular pediment above it differs little from the structure of the traditional four-slope type. True, in terms of the scheme of the truss system of a half-hip roof of the Dutch type, it does not resemble a sealed mail envelope. It looks more like a rectangle divided in two with trapezoids along the edges of the end sides. True, before the stage of construction of short slopes, all work is carried out in the same way.

Base case construction process
First, the supports are installed for laying the ridge run. Instead of separate support posts, a frame can be used, the upper side of which will serve as a purlin for the future roof. Then ordinary rafter legs are installed. Technological differences begin with the installation of the diagonal legs and cuffs of the Dutch half hip. After all, they are obliged to form the plane of a shortened pentagonal slope, and not a full-fledged triangular hip, as in standard hipped roofs.
The goal is achieved by installing a horizontal bridging bar, to the corners of which diagonal rafters are connected by a cut. Some of the knuckles, located in the center of the future slope, are fixed astride the tide with nails or corners. The rest of the beams are mounted in the usual way: to the diagonal rafter on top, to the Mauerlat or the floor beam at the bottom.

To ensure rigidity in the half-hip area, the sections where the lintel is connected to ordinary rafters are reinforced with struts. The extreme trusses on both sides are doubled. The places for fixing the lintel to the rack and to the rafters are additionally reinforced with short stubs - pieces of board nailed from below. They will prevent deformation of the structure when the load is exceeded.
The triangular part of the pediment that rises above the shortened hip is sheathed with a board or sheet material. However, intelligent hosts arrange in a vertical triangle small windows to provide natural light and ventilation.
The photo selection will acquaint you with the common types of Dutch roofs of the half-hip variety and the forms of rafter systems:

Mix of Holland with Denmark
As usual, the basic Dutch version became the basis for the development of a lot of modifications. According to one of them, the place of the pediment triangle is occupied by a half-hip of a similar configuration. With a pentagonal, shortened slope, it forms a convex rather than a concave angle. It is worth noting that concave corners also occur in a number of architectural solutions. In plan, the scheme is similar to the usual envelope, but the projection of the hip components is different.
The difference is in the construction algorithm. At the stages of the construction of the gable part of the roof, the work is carried out as dictated by the layered or hanging technology. Then, in order to create a characteristic break, first of all, in front of the extreme ordinary truss, its shortened analogue is mounted, and diagonals are already attached to its corners. Then everything is done according to the above plan and according to the drawings of the Dutch rafter system for a half-hip roof. Only the upper hip triangle is constructed according to the Danish method.

Danish type roof truss
The Danish variety is no less interesting than its Dutch "friend", but at the head of the rafter system is a slightly different way. In fact, both types of roofs can be arranged from two tiers stacked on top of each other. It is being built in this way, which is quite suitable if an attic is to be placed in the attic space. However, the broken method is significantly more expensive and more troublesome than the half-hip method, which should be read with due attention.
Building a Danish roof step by step
We have already found out that the short Danish hip has a triangular shape, while the adjacent pediment is trapezoidal. In plan, the roof is very similar to the hip structure, but the shortened hips are much smaller and their corners do not match the corners of the roof.
Before construction, it is highly desirable to acquire a worthy project and make calculations of the elements of the rafter frame. To be bothered with calculating the sizes of each element is too dreary. According to the assurances of experienced roofers, it is enough to calculate the longest part of the system. Other elements are allowed to be of equal or slightly smaller section.

The device of the ridge part of the frame
The construction of a half-hip frame begins according to the rules common to all roofs with the installation of a Mauerlat. The lower heels of the private and hip rafter legs are to be supported on it. It should be noted that the support will be carried out at different levels, because the upper planes of the bearing walls and gables are at unequal heights.
The construction of the first stage of the rafter system is carried out in four stages:
- Mauerlat construction. In the described example, it will not be similar to the traditional wooden frame... The beam for the Mauerlat device is laid in separate strips: 1 - flush with the inner surface of the outer walls, 2 - in the center of the inner bearing wall and 3 - flush with the inner plane of the pediment walls.
- Laying floor beams. It is performed perpendicular to the beams of the Mauerlat of the main load-bearing walls. If it is necessary to dock two beams, the weak connection point must be located above the load-bearing inner wall.
- Installation of supports for the ridge run on inner wall... The outermost support pillars determine the length of the main part of the roof. The distance between the row posts must be equal so that the load from the roof is distributed evenly. Before fastening, the verticality of the supports is checked with a plumb line or a more serious laser instrument. After fastening, the position of the struts is temporarily supplemented with auxiliary jibs.
- Installation of ordinary rafter legs of the main part of the slopes, for which the traditional one is used.
The images of the floor beams are not shown in the examples in the figures, because it would interfere with the principle of the process. In reality, there must be overlap.

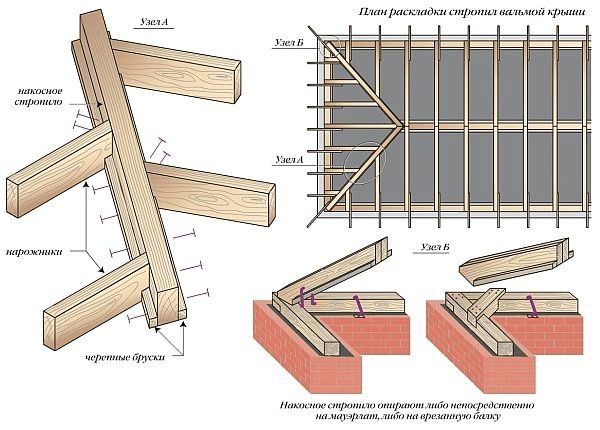
Installation of diagonal rafters
Diagonal Danish roof rafters connect the edge of the ridge to the corners of the gables. For their manufacture and installation, a number of specific actions are carried out that allow you to perform work with sufficient accuracy:
- Flush with the outer plane of the pediment Mauerlat, a piece of board with dimensions of 50 × 150 mm is installed. It should be temporarily nailed with a couple of nails so as not to move or drop during the subsequent fitting. Trimming is needed to mark the position of the cut in one fell swoop without unnecessary manipulations during fitting.
- A board of arbitrary sizes is laid on 3-4 ordinary rafters so that it is clearly parallel to the ridge run. The horizontality of a kind of reference point is controlled by measuring with a tape measure or a laser level gauge. Next, you need to pull the board up to the previously nailed segment. The intersection of the board and the segment will indicate the point along which the horizontal line of the upcoming cut is drawn.
- A diagonal element of the rafter system is made from a 50 × 200mm board. By tradition, the fitting is done first. The plank should be applied to the top of the outer truss and the trim to the corner. It is better to work together: one holds the workpiece, the second marks it out.
- On the outside, i.e. turned to the half-hip, a horizontal line is drawn clearly along the central axis on the side of the workpiece.
- Taking into account the fact that a mirror element will tightly adjoin the rafter being made, with inside a line is marked in the plane. It is possible, of course, not to take into account the plane cut at once, but to correct both diagonal blanks later in fact. It is more convenient for the master to decide on the spot.
- The value of the upper cut is measured. She needs it to put it at the bottom of the measured distance for accurate drawing of the bottom node. In the example, it is equal to 26cm.
- The 26 cm obtained by measurements are laid up from the pediment Mauerlat at four points, repeating the imaginary 3D contour of the rafter board.
- On firm ground, all the marked cuts are made - the diagonal leg is ready. If there were no special flaws in the construction of the box and the laying of the Mauerlat, you can immediately make a second rafter of the same half-hip.
Before installing the diagonal rafters, the pediment Mauerlat is freed from the auxiliary trimming of the board. The finished rafter legs move to their place and are securely fixed. For attaching the upper heel, nails are suitable, at the bottom it is better to use the corners.


Manufacturing and installation of hip legs
The lower heel of the diagonal rafter leg rises above the Mauerlat to a distance that requires a mandatory measurement. The result should be set aside from the top of the ridge and noted. From the point found in this way, a lace is pulled to the middle of the pediment. It will serve as a guide for the manufacture and installation of central hip rafters.

In order to install the central leg of a half-hip, you need to:
- Measure the angle β between the lace and the support stand with a small construction goniometer. It will help you to accurately trace the line of the upper cut.
- Measure the angle φ between the diagonal elements. It is needed to grind off two edges in the form of a chamfer on the upper heel for a snug fit into the knot.
- A board of a suitable length with a section of 50 × 150 mm is first sawn at an angle β, then the sawn down is sharpened on both sides so that an angular protrusion with a value of φ is obtained at the end.
- The workpiece must be tried on again. It is installed directly over the stretched lace to measure the height of the workpiece above the ridge knot.
- The result is carried down to determine the depth of the lower cut. In the example shown, this is 6cm. They are laid strictly vertically, a horizontal line is drawn from the resulting point. The lines for sawing down the cuts of the lower unit are ready.
- Immediately following the marking of the cut, the lower cut line is marked. To do this, it is necessary to set aside the width of the cornice with a tape measure and draw a vertical from an imaginary point that intersects the blank of the hip rafters.
- After completing all the planned cuts, the hip leg is not attached immediately, but is used as a template for the production of wipers.
Narodniks to fill the hip slopes are done without deviating from the studied technique, but taking into account the actual size and specifics of the installation. The upper cut is undercut only on one side at an angle equal to φ / 2. With the bottom node, everything is simple - all lines, if laid out correctly, should be symmetrical. Upon completion of the processing of blanks, all hip elements are installed and fastened like ordinary brothers.
Similar actions are carried out in the manufacture and installation of the main stingrays. To form the bottom cuts, one of the hip elements is used. For the upper cut, first a line is drawn at an angle β, then it is sharpened from the required side at an angle obtained by calculating using the formula 90º-φ / 2.
Among the stages of preparation:
- Installation of gable filly, forming the end overhang. They are fastened with galvanized metal corners to the extreme wedges of the main slopes, supported by cuttings on the inclined sectors of the shortened pediment. The step of installing the fillies is approximately 1m. Between brick or concrete wall and wooden elements there must be a waterproofing pad. There is no reason to use expensive polymer or bitumen-polymer material. Under the filly, you can put pieces of roofing material or several layers of glassine.
- Installation of a wind board around the perimeter of the roof. Work begins by attaching a 50 × 150mm board to the gable and main overhangs. The length of the board for the design of the pediment cornices is determined according to the project, corrected after the fact. With a tape measure or a lace from the diagonal rafter leg, you need to draw a straight line to the wind board of the pediment. Then it is necessary to check the future position of the diagonal rafters in relation to the angle of the wind sheathing with the indications of the project. Wind boards located at an angle, adjacent to the filly, are first tried on and filed, then attached.
- The build-up of diagonal elements is made with a board of equal size. Trite segments are spliced with an inch segment.
The Danish-type rafter frame is ready. It remains to hem the cornices and build the crate according to technical features roof covering.

The principle of constructing truss systems for roofs with shortened hips is not simple, but understandable. The difficulty lies only in the device of the end parts, and we have described the rules and specifics of their construction in as much detail as possible. Now it is necessary to apply the information received in practice: to practice the construction yourself or to control the hired team.
When choosing a project for the construction of a private house with their own hands, they take into account not only the practical side of the issue, but also the aesthetic one, because it will become the "face" of the site. More often than not, future homeowners choose, as they say, with their hearts, making decisions based on what they find attractive and what not. Perhaps that is why the original, unusual half-hip roof has become so popular.
By responding to customer requests, architects and designers create everything more projects with a half-hipped roof, which is also called Dutch. Having extensive experience in private housing construction, they explain their choice not only by its aesthetics, but also by its high functionality, which will be appreciated by residents of regions with a harsh, windy climate. Under what conditions to opt for such a structure and how the process of its construction with your own hands goes, read in a specially prepared material.


Design features
The construction of a half-hip roof cannot be called simple either in design or in installation with your own hands, since it is a cocktail of the positive qualities of a simple gable and hip,. If we talk about the appearance, then in the shape of the gables it resembles a trapezoid, which is formed due to the hip elements, cutting off the apex of the triangle. Due to its structure, a semi-gable gable roof has a number of advantages:

- Streamlined shape. Due to the absence of sharp corners, the half-hip roof has excellent resistance to wind load, which is a significant plus in regions with constant strong winds, when building in open areas, in mountainous regions.
- Rational use of attic space. The half-hip roof frame allows you to equip a spacious utility room for seasonal storage of things or even a living room that is not inferior in comfort to the first floor.
- High variability. By changing the angle of inclination of the slopes, the architects create roofs with a unique design, adapted to the conditions of almost any region of our country.
- The original look. Where mainly triangular gabled roofs prevail, the half-hip roof looks like a new word in private construction against their background.
Possible difficulties
The interest in building a half-hipped roof with your own hands is very commendable, but you must understand that only professional roofers can do it. You can take part in it personally, with your own hands, if you work under the guidance of an experienced master who will draw up a drawing. During preparation and installation, you may encounter the following difficulties:
- High consumption building materials... Due to the complex geometry of the slopes weighted with hip elements, more roofing material and wood for the truss system, which will affect the cost of work.
- High level of complexity of work. Many additional structural elements, ribs, ends make installation difficult for low-skilled workers. This means that it will not be possible to save money on hiring a professional team. To start work, you will need calculations and drawings.
- Great weight. The complex roof frame, which includes a massive rafter system and a large area of roofing material, requires a reinforced foundation that can withstand such loads.

Nevertheless, we assure that the information received about the half-gable gable roof will be useful. After reading this article, you can easily "read" the drawings, learn how the installation process should take place and be able to flaunt the knowledge of the terms in front of the masters.
As already mentioned, the roof truss system with hips is difficult to assemble with your own hands, it includes both the elements available in gable roof and new ones. It is characterized by the following scheme:

- Mauerlat. This is a square support bar that serves as the base for the roof slopes. It distributes the weight of the roof over the top surface of the load-bearing wall and transfers it to the foundation. Unlike a gable roof, in a hip Mauerlat they are installed not on two partitions, but on four. They are also equipped with the ends of the gables that carry the load from the hip elements.
- Racks. Vertical supports from a bar that support rafter legs or a ridge, eliminating their deflection under their own weight. The racks are installed on a bed or a tie, depending on the type of rafter system.
- Sill. This is essentially the same Mauerlat installed on an internal load-bearing wall. Drains and struts are installed on it.
- Ridge run. The beam on which the ordinary rafter legs are connected, the highest point, the peak of the roof.
- Slant rafters. A diagonal rafter leg that extends from the ridge to the corner of the building. They are longer than privates and have to withstand a lot of stress, since the wives are leaning on them. Therefore, for their manufacture, the cross-section of the timber is doubled or two boards used for an ordinary rafter are fastened.
- Ordinary rafters. Rafters made of boards 100x150 mm, with one side resting on the ridge girder, and the other on the Mauerlat, laid on the outer load-bearing walls... They are installed in a row with a pitch of 60-120 cm, depending on the width of the insulation, and look exactly like a gable triangular roof.
- Half-legged. Shortened rafters, attached to the diagonal at the top, and to the Mauerlat at the bottom.
- Filly. The construction of boards smaller than the rafter legs of the section, which serve to form them overhang of the roof and cornice, which protects the walls from precipitation and wind.
Types of truss systems
Depending on the layout of the future building, the rafter system may differ significantly. There are two types:


Roofing masters advise using a layered type of rafter system for DIY assembly, if possible. So the roof structure comes out more resistant to external loads, there is more room for arranging the attic.
Installation sequence
The construction of a semi-hip roof is a complex, painstaking process that can only be entrusted to professionals. They install the roof in the following sequence:

After the completion of the external work, they move on to the internal ones. For. In order for the attic room to be used as a residential one, the half-hipped roof must be insulated, its frame is sheathed decorative material... When the work is completed, you will only need to regularly inspect the roof, monitor its condition, and carry out preventive repairs with your own hands.
Video instruction
A semi-hip roof, the rafter system of which is complex, belongs to the category of hip structures. In it, the hips are not installed to the full height of the slope. Today this roofing option is often used, as it has a beautiful appearance and an interesting shape.
The semi-hip roof is an excellent protection against strong winds and excess moisture.
Such a roof is original due to the use of additional parts (towers and other elements).
In most cases, such a roof is installed on houses with a small area, since the space under it is often used as an attic. Under this roof, you can easily arrange an additional room, and in some cases more than one. The semi-hinged roof is an excellent protection against strong winds and excess moisture.
The disadvantage of this type of structure is the high cost and the complexity of calculating materials. The roof has a large surface, so there will be considerable labor costs.
How to calculate such a roof?

Determining the roof area is very simple. To do this, you need to divide the roof into several shapes.
When calculating the Dutch design, you need to break the slopes into rectangles and trapezoids. The area of the first figure can be calculated by multiplying its sides. To determine the area of the second figure, you need to multiply the sums of the bases by the height and divide the product by 2. Next, you need to add the obtained values and multiply them by 2. As a result, you can get the area of the slopes.
To calculate the Danish roof, you need to divide the ramp into a rectangle and several triangles. The area of the first figure should be calculated as described above. The area of a triangle is equal to the product of its legs, which will need to be divided by 2. Next, you need to add the area values of the first figure and several triangles. As a result, it will be possible to obtain the area of the ramp. The resulting value must be multiplied by 2.
Back to the table of contents
Existing types of systems of rafters of semi-hipped roofs

The scheme of a half-hip roof is shown in Fig. 1. This product has a complex structure. Trapezoids in this case will be replaced by polygons.
By the type of hips, roofs can be divided into:
- Dutch. In the lower part, the hip is trimmed, and a pediment in the form of a trapezoid goes to the cornice overhang.
- Danish. They are carried out in the reverse order. A hip in the form of a trapezoid comes from the eaves, and small triangular gables are installed above it.
Back to the table of contents
Dutch roof structure
There is an attic under the attic ceiling, in which ventilation will be provided by windows. These elements must be mounted on gables.
To build this roof, you will need to prepare a lot of materials. In the process of erecting a half-hipped hipped roof, various elements will be used, the main of which are the following: rafter legs different types, stops, struts and sprengels.
Installation is not easy, so the first step is to draw up a roof project and perform calculations. The rafter system of a half-hip roof should be erected as follows:

Figure 1. Scheme of a half-hip roof.
- Before laying the Mauerlat, you will need to make a reinforced concrete belt around the perimeter of a private house with the installation of fasteners under the bar. As fasteners, you can use studs, which are placed in increments of 10-12 cm. To simplify installation, it is recommended to insert the studs in places that do not coincide with the fixing of the rafter legs to the bar.
- Next, you need to lay a layer of insulation material and mount the Mauerlat. This is the block that is used to tie the walls to the roof of the building. He will distribute the load from the rafter legs to the top of the private house. The Mauerlat is fastened using nuts that are screwed onto studs. In this version of the design, the Mauerlat should be laid on the side slopes. On hip slopes, it is installed on the upper part of the gables and secured with anchors. The element can be made from a bar of 150x50 mm.
- The next step is to install a ridge rail. it important detail rafter systems. It is a horizontal bar that is installed at the top of the roof. It should be placed between the slopes. The element is needed to fasten the rafters.
- In a Dutch roof, the rafter system provides for the installation of hip slopes using various rafter legs, the length of which can vary according to the design. Slant rafter legs are mounted from the corners of the building to the end of the ridge run. They will bear the maximum load.
- The attachment elements are mounted in one part on the Mauerlat gables, placed under the hip, and with the other they are fixed to the end part of the ridge bar.
- Ordinary rafter legs of the side slopes are fastened to the main Mauerlat and the ridge run.
- Folk rafter legs are fixed with nipple legs.

The most suitable type of wood for the truss system of a half-hip roof is pine.
If it was decided to build a half-hip roof yourself, then you should take responsibility for the choice of material for the manufacture of parts of the rafter system. It is recommended to use slats with a section of 150x50 mm. The most suitable wood species is pine. If you have to choose from hardwood, then larch should be preferred. The material must be dry to prevent deformation of the device during further use. Additionally, it will be necessary to process the wood with an anti-microbial composition.
If there are large spans, you will need to strengthen the system with stops. Rafter legs are reinforced in most cases with trusses.
The braces and supports are additional bars that support the elements of the main structure. A sprengel is a beam or fixture that reinforces the main building. All these parts will be supported on slabs or floor beams. In the latter case, you will need to use puffs.