Sponge pattern for walls. How to stylishly paint walls without spending extra money, using an ordinary sponge, rag and broom. Stages of coating walls
But what to do if you don’t want to introduce a variety of colors, and the walls in their original painted form do not bring satisfaction? Various textures and textures created when painting with simple and cheap tools come to the rescue.
Stripes and “flax” with a broom
To create this effect you will need texture paint, a roller and a broom or broom. Texture paint differs from regular paint in having a denser structure, so it is good for such experiments. It will be great if you choose contrasting shades for two layers, as in the photo, for example. Apply the first coat of paint to the wall using a roller and let dry for 20 minutes. Then re-cover a strip about a meter wide, and after waiting 5 minutes, sweep the broom from the ceiling to the floor without stopping. Clean the broom of excess paint before each new strip. When you're done with this strip, move on to the next one.
To create a similar effect, you can use a shoe brush or a large hard brush. And if you run the tool first vertically and then horizontally, you get a texture similar to linen.

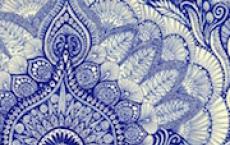
Porous sponge coating
You will need not just a dish sponge, but a large natural sponge. There are several ways to apply paint:
Option 1. Paint the wall in a basic tone and let dry. Dip the sponge into paint of a different color poured into the paint tray, and wipe off the excess on the textured part of the tray. Then apply the sponge to something paper until the excess paint is completely gone and only a light imprint remains. Now you can apply the sponge to the wall - you need the paint to lie loosely and the bottom layer to show through. Change the position of the sponge often so that the pattern is not monotonous.

Option 2. Work with the top layer of paint that has not dried: dip the sponge in water and squeeze until almost dry. Then apply or roll it on the wall - try different movements until you find the texture you want. Be prepared for the fact that the water will remove the color saturation and the effect will turn out to be watercolor, especially if the sponge is not fully wrung out and the lower tone is light.


Fabric stains
For this technique you will also need texture paint. After the first coat of paint has dried, apply a second coat using a rolled piece of fabric. There are two options here: wrap a cloth around a roller or paint with your hands, then the effect can be more controlled. If you apply the second layer of paint a tone darker or lighter, you will get an interesting shimmer.


Plain smooth surfaces can easily be given a wonderful shimmering effect by treating them with a sponge. This technique is very simple to perform and ideal for finishing large surfaces. However, it can also be used to decorate individual pieces of furniture or other items. So, let's begin to master the technique of applying paint using a sponge.
Materials and tools:
- water-dispersion paint (preferably latex, so that the surface can be washed later)
- roller
- paint tray
- sponge
- paper
- gloves
Why did we choose emulsion latex paint? It is easy to use, does not smell and is not too expensive. Please note that the result finishing works The choice of sponge also influences; it is best to do the work with a natural sea sponge.
Preparation:
Before you start painting, it's best to check if the colors you choose go well together. To do this, apply paint to a sheet of paper or a piece of wallpaper and apply samples to the wall.
The walls to be painted must be smooth, free from dirt and dust. Be sure to thoroughly prepare surfaces for painting.
Process
- Pour some paint into the tray.
- Blot the roller in the paint and squeeze it well so that it does not drip or flow.
- Apply a base coat of paint to the wall.
- Let the surfaces dry for a couple of hours.
- Prepare the sponge for work by soaking it in water and squeezing it out.
- Pour paint into a clean tray for the second coat.
- Lightly dab the sponge into the paint. To ensure that the paint does not drip and uniform prints are obtained, the sponge should be almost dry.
- Press the sponge against the edge of the tray or blot with paper to remove excess paint.
- Start finishing from the top of the wall, lightly pressing the sponge onto the surface.
- Let the second layer dry.
- Rinse the sponge well and prepare the paint for the third coat.
- After this, we apply a third layer of paint with a sponge, and try to fill the gaps between the prints of the first layer. The base layer should also show through a little.
- If you are using one color, it is better to place the prints closer together so that the layer is even. If there are several colors, then, on the contrary, slightly shift the prints in relation to each other. Avoid overlapping prints, especially in corners and near doors. Rotate the sponge periodically to change the pattern.
Important! To prevent adjacent areas from getting dirty, the sponge can only be used at the third stage of work. At the second stage, apply paint on top of the base layer with a brush. Then remove excess fresh paint: simply blot it with a clean sponge.
As you know, there is nothing easier than covering something with a sponge. This technique is ideal for flat surfaces such as furniture and walls. Want to give your coating a shimmery effect? A good sponge application of paint will help with this.In order to successfully cope with such a task, you do not need any specific skills. It's not difficult at all. The main thing that is required of you is to follow certain rules, use a natural sponge and paint. Ideal option will become latex paint on a water-dispersion basis.
A sponge can be used to treat any surface: concrete, metal, plastic and even wood. To verify this, you can read the information on the website of a company that builds wooden houses.
Required tools:
- Gloves;
- Dye;
- Paint container;
- Roller;
- Sponge.
Application technique.
The first step is to prepare the surface you want to paint. This will help to carry out Painting works high quality and fast. To do this, the surface should be cleaned of dirt and dust.
Choose paint colors that suit you. After this, take a container and pour some paint into it and dip the roller in it. Wring it out, let it dry a little and apply the first layer to the wall. This is done so that the paint does not flow and lies flat. Now let this layer dry.
Then take a sponge. First, wet it with water and squeeze thoroughly. After this, dip the sponge into the prepared paint and squeeze it out again. The paint should not run off. In addition, to make accurate prints, the sponge must be semi-dry.
Paint is applied with a sponge from top to bottom, slightly pressing it onto the surface. After the next layer is applied, you also need to let it dry a little. Meanwhile, prepare a sponge for applying the last layer. It needs to be wetted again and squeezed out well.
Now we apply the final layer. Please note that the paint must be applied so that the first and subsequent layers are visible underneath. If only one color was taken, then the prints are superimposed one to one.
If there are several colors, cover the surface by moving the prints relative to each other. They should not be applied exactly on top of the previous ones. To create a slight shimmer pattern, twist the sponge in different directions when applying.
For your information, if you need to speed up the process, you can apply the first two layers with a brush, and apply the paint with a sponge only on the third layer. This option is possible; it will help you reduce the amount of paint you use.

For most people, the problem of choosing a painting technique is not as pressing as the question of which paint to choose. In this case, you should consider the type of room. For the outside of a house or apartment, you need to take certain paints - silicate, cement or oil, which are weather-resistant.
For the pantry, kitchen, bathroom and corridor use water-based or oil paints. Enamels are also an option. For living rooms, which include an office, a living room, bedrooms and children's rooms, adhesive paint is best suited. It is able to maintain an optimal level of humidity in rooms.
To understand how to properly apply lipstick to your lips, you need to determine their type, shape and choose high-quality cosmetics.
Several attempts in front of the mirror will show an unsurpassed result.
Which lipstick color to choose
Following the correct technique for applying lipstick is only part of the success. After all, if the color is chosen incorrectly, the face can visually age. Insufficient whiteness of teeth can also occur due to lipstick that is not suitable for the girl.
A variety of shades allows you to experiment and add solemnity to your image even after a working day. The main thing is that the lipstick tone goes well with your skin color. For example, fair-skinned girls are recommended to choose cool tones. The range from light pink to plum is perfect.
Dark-skinned young ladies are better off paying attention to bright specimens. Shades of peach and brown are suitable. Girls of average type will look good with red and golden tones of lipstick.
The following lipsticks are suitable for girls depending on their hair color:
- coral, berry, soft peach and mauve are intended for fair-haired girls;
- brown and terracotta shades make-up artists recommend for red-haired beasts;
- bright shades are amazing for girls with dark hair.
You can also choose lipstick based on your eye color. For example, brown and scarlet shades are suitable for brown-eyed beauties. Cherry and beige colors harmonize perfectly with the pupils blue color. Terracotta and orange lipstick are recommended for green-eyed representatives of the fair sex. Light beige and cherry shades highlight the depth of gray eyes.
Makeup artists recommend taking age into account when choosing lipstick. For young girls, it is best to give preference to light pearlescent glosses. Thick and matte ones add solidity to the image, which looks out of place in this case.

For women who are about thirty years old, it is appropriate to wear bright makeup. Satin and satin texture will emphasize youth and freshness of the skin. Women over forty do not need to choose pearlescent glosses. Bright shades also inappropriate because they highlight wrinkles around the mouth. Cherry and plum shades are ideal for mature women.
Advice! If you choose the wrong shade of lipstick, do not rush to throw it away. Perhaps if you mix it with another shade, you can get the perfect tone for you.
How to apply lip pencil correctly
Lipstick adds shine and beauty to makeup, but from a functional point of view, you can’t do without a pencil. It can be found in any cosmetics store. When choosing, you need to pay attention to the fact that the pencil is waterproof.

Lip liner is also used as a base for lipstick to make it last longer. In this case, you need to mark the outline and shade the line inward, gradually shading the surface. Do not apply the pencil under the glitter, because there is a risk of the color pigment peeling off, which collects in the folds and looks ridiculous.
You can use a pencil instead of lipstick to get a matte effect. The main thing is to apply cosmetics in a thin layer. The shade doesn't matter.
Most often, the pencil is used to enlarge and reduce lips. It is especially appropriate to use it if the surface is flat.


Advice! Lip pencil can be used as a base for eye shadow and as blush. The main rule is to choose a quality product. The color is selected individually in accordance with the application area and color type.
Technique for shaping lips without pencil
You can diversify your usual makeup using different techniques for applying lipstick:
- Ombre involves treating the visible part of the mucous membrane with matte, preferably red lipstick. The color is applied with strokes to the center of the lips. The torn border looks harmonious. You can experiment and apply a gradient not only from the corners to the middle, but also from upper lip to the bottom.
- In 2017, piercing is again fashionable, the imitation of which on the lips can be done with gold lipstick. To do this, you need to apply a vertical golden or metallic stripe in the center of your previously painted lips.

- Matte lipstick does not always give the desired effect, so to create texture, it is better to choose a glossy one, which is nailed on top with crumbly shadows matched to the tone. To avoid monotony, you can experiment with different shades of decorative cosmetics. When doing this type of makeup, choose a flat brush made of natural bristles. Before applying eyeshadow, shake lightly.
- Colored shadows stick worse to lipstick than fine glitter. If the entire surface is covered in glitter, watch the container you drink from. There is a risk of getting it dirty. This option is possible, but it is more appropriate when used in combination with gloss rather than lipstick.

- It is important to apply the effect of chapped lips. To create it, you need to apply lipstick with patting movements, without highlighting the contour. Carelessness is back in fashion.
Advice! Don't be afraid to make bold decisions and use original lipstick application techniques. The effect on your lips will look different than in the photo on the Internet. You just have to try to find the perfect look for yourself.
Red lipstick suits everyone, the main thing is to know how to apply it
Red lipstick is considered universal, although because of its brightness, not every girl will risk purchasing it. It is suitable for any color type, the main thing is to choose the right shade.
Scarlet lipstick ideally hides small cracks, wounds and even colds on the lips. Also used to change the contour.
If a girl doesn't risk using red lipstick, she simply doesn't know how to use it. It is believed that bright makeup indicates the vulgarity of the owner. But in fact, a new image will eliminate indecision and give confidence and sexuality.


How to properly apply red lipstick? Makeup artists distinguish three main methods:
- When applying makeup to your face, you need to lightly powder your lips. Then, from the stick with a thin pointed brush, draw a large number of lipstick. With bold movements, the contour is drawn starting from the upper lip. Then a thin layer of powder is applied again and the contour is drawn. After this stage, the inside of the lips is painted over. It is recommended to use a brush to apply the color perfectly. Once your lips are complete, apply powder around the area to highlight the edges of the color.
- After completing the basic makeup, apply a thick layer of base to the lips. It is advisable that it contains cosmetic silicone to smooth the surface. In addition to smoothness, the base increases the durability of the lipstick. The outline is drawn with a pencil, and the entire surface is filled with a brush and lipstick. The lipstick should be layered using tapping movements until the desired shade is achieved.
- You can do without a contour pencil if, before applying lipstick, you treat the edges with a colorless wax pencil. The color is then applied to the entire surface. Use a paper towel to dry your lips to prolong the color's longevity. After which cosmetics are applied again in a thick layer.
Don't be afraid to wear red lipstick. It reveals femininity, sexuality and speaks of the courage of the individual.
Advice! When choosing scarlet lipstick with a bluish tint, be careful, as the lamps in the store emit a cold light and the cosmetics look paler than they really are.
Features of applying dark lipstick
Dark lipstick becomes bright accent in makeup. When choosing a shade, you need to consider your skin color. Fair-skinned blondes are recommended to choose purple tones, and dark-skinned brown-haired women should choose plum tones.
Before treating your lips, you need to perfectly even out your complexion tone. To accentuate the lower part, use the sculpting method. That is, correction powder is applied to the cheekbones and side areas of the forehead. The center of the face is highlighted in a light tone.

Basic requirements and approaches to makeup under dark lipstick:
- one color scheme for eyes and lips;
- eyeliner for brown-haired women should be black, for blondes – brown;
you need to exclude blue eyeliner, since in combination with rich - a shade of lipstick, naturalness disappears;
- “Smoky eye” is combined with dark lipstick if the shadows are not too bright (brown-haired women can use the classic technique with jet-black makeup, and brown colors suit blondes).
- Also hides all lip imperfections, including dry crust.
Advice! Remember that brightly painted lips are in harmony only with discreet eye makeup.
How to add matteness to your lips with lipstick?
IN Lately matte lips are a real trend of the season. However, choosing a lipstick with the right texture is not so easy. That's why makeup artists offer original ways creating perfect lip makeup.
The main advice is to combine matte with rich dark shades. Pale color schemes are lost and do not look seductive.
To pre-treat your lips, you can use a scrub that removes dead skin particles. It contains a mixture of honey, granulated sugar and olive oil.


To ensure that matte lipstick stays on your lips for a long time, you should moisturize your lips with any vegetable oil before applying it.
Unlike glossy lipstick, matte lipstick does not need to be rubbed with your lips. Use a special synthetic brush to paint the corners.
At home, you can do without special matte lipstick. Makeup artists recommend using a regular lipstick without glitter to apply lipstick. Then a regular dry napkin is applied on top and sprinkled with powder or blush. The napkin removes shine, but maintains color saturation.
Advice! To deepen the color of matte lipstick, you need to apply a concealer to your lips as a base.
Change the shape of your lips with lipstick? Just!
You can change the shape of your lips yourself using cosmetics if you know the secrets of applying makeup.
- You can increase the volume using a pencil. The corners are carefully painted, and coral or pink lipstick is applied on top. The lips are made plump by a shimmering gloss that is applied to the already painted surface.

- Foundation will help reduce volume. With its help, they hide their own lip contour, and draw a new border below with a pencil.
 Perfect bright lips - step by step
 The main thing is not to forget that even thin lips They look seductive if you do the right makeup. Therefore, do not try to increase the volume so as not to look funny.
Painting walls is a trend that has not lost popularity for several years. Such repairs are less expensive, non-allergenic, and refreshing them over time will not be difficult. In addition to the usual painting, there are dozens original solutions How to give walls an original texture.
To bring them to life, you don’t have to turn to designers, just stock up on simple materials at hand and... give free rein to your imagination!

How much effort does it take to re-stick wallpaper? Remove the old ones, prepare the walls, remove a bunch of construction waste from the house. With painting, everything is simpler: a new layer of paint can be applied on top of the existing one. No problems with pattern selection, unraveling seams, or peeling stripes. In addition, the paint can be cleaned detergents, so for apartments with small children or pets this is an ideal solution.

What is needed to create an original texture? Tools that are already at your fingertips. Next in the review are the tricks of using ordinary cellophane, a dish sponge, a broom, a shoe brush and a simple rag.
Cellophane

To make the wall surface look like crumpled paper, you need to use regular cellophane for decoration. Take a larger bag and cut it in the middle so that you have one layer left in your hands. Paint the wall with a roller, apply the cellophane without smoothing out the folds, go over the top with a roller to leave imprints, and remove the cellophane by pulling the upper right corner. Simple, but the effect is magnificent!
Rag

An ordinary rag will also be an excellent help in creating a textured surface. The wall must first be painted in the desired color, then soak a rag in the paint, crumple it well and, pressing, walk over the entire wall. It is best to place the prints close to each other, then the painting will look uniform.

You can use a white rag without soaking it in paint, then the color of the walls will be less saturated as a result.
The fabric can be rolled onto a roller. For variety, you can also add all kinds of threads and knots. Using such a roller will be faster than manually, and the result will be no worse.


Broom

Using a broom or broom, you can create a structure with barely noticeable vertical stripes. To make the painting look more interesting, you can apply light paint as the first layer and dark paint as the second. It is best to use texture paint; it is denser and the pattern on it is more pronounced.

The second layer should be applied after about half an hour to avoid smudging. Once you have applied the contrasting paint, start texturing: move the broom with pressure from the ceiling to the floor, without stopping.
If you want to get a decor that resembles linen fabric, use a stiff shoe brush. It is more convenient and easier to hold in your hand than a broom. First make vertical stripes, and then horizontal ones. To keep the stripes clear and even, constantly clean the broom or brush from excess paint.
Sponge for washing dishes

Want a grainy texture? Then use a regular foam sponge. The main secret to even painting using a sponge: before starting work, you need to dip the sponge in the paint, and then clean it of excess. To dry the sponge, you can wipe it on paper. Afterwards, apply prints to the freshly painted wall, using movements as if you were blotting wet spots. To avoid monotony, it is useful to change the position of your hand.