How to plaster walls in a private house. How to plaster a wall. Plastering with cement-sand mortar. Spray, soil and cover. Plastering technology with dry gypsum mixtures. Required tools and supplies
Starting repairs in an apartment, it should be understood that you cannot do without plastering the walls, since they are never even. This is not a simple matter and requires certain skills, so you must first familiarize yourself with the rules and technology for carrying out this type of work.
Why plaster the walls
Plastering is an important process that is necessary not only for leveling walls, but also has a number of other functions:
- reliably protects against moisture and air blocking;
- increases sound and heat insulation;
- gives strength to brickwork;
- serves as a decorative coating.
With the correct plastering, the walls will look aesthetically pleasing and neat.

Material preparation: what you need for work
Before starting plastering, it is worth preparing the necessary tools and material. It is necessary to decide on the type of plaster mixture, since today they a large number of, it happens:
- cement-sand;
- plaster;
- cement-lime.
When choosing, it is necessary to build on the type of wall, durability and when decorating an apartment, do not forget about environmental safety (it is better to take on water based). In the presence of concrete, aerated concrete or brick walls, a cement-lime mixture is suitable. There is a universal type - cement-sand, it is applicable for plastering different walls... The most popular at the present time is considered to be a gypsum mixture. It is easy to work with and the quality of the walls is excellent. But it is expensive and cannot be used in a room with high humidity.

To work, you should stock up on:
- dowels, paint beacons, screws;
- screwdriver, hammer, grinder, scissors for cutting metal;
- building level, plumb line, tape measure;
- thread and pencil;
- spatulas - narrow and wide;
- brush, roller, ironing;
- mortar, putty, primer;
- aluminum rule;
- a hammer drill with a set of drills and a mixer attachment;
- a container for mixing the solution;
- work clothes and gloves.
After preparing everything you need, you can get to work.

Plastering walls with cement-sand mortar
Cement-sand mixture - universal and can be used for walls different types(concrete, brick, wooden). It has been used as a repair material for a long time. This mixture is cheap, and the process itself is quite simple and you can do it yourself. In addition, only this solution is suitable for damp rooms. Consists of cement, sand and various additives for strength.
Despite its simplicity, it is heavy and not easy to work with. In addition, when using this mixture, it is impossible to make a perfectly flat surface, therefore it is not suitable for painting. Most often it is used when it is planned to finish with ceramic tiles in the future.
If you decide to make the mortar yourself, then the proportions are as follows: 3-4 parts of sand are added to 1 part of cement (depending on the brand of cement). Pour water little by little until you get a homogeneous mass.

Splashing walls
Spray is the first coat. It is applied with a thickness of 5-10 mm. The thickness depends on the smoothness of the wall, the smoother it is, the thinner the layer. If the plastering takes place along the mesh, then the thickness is 1 cm.
The mixture is applied with two spatulas, wide and narrow. The mortar is applied to a wide spatula, from which we take the mixture with a narrow one and apply to the wall using pressing movements. Spray is applied from bottom to top. Since the layer is considered preparatory, it is not leveled and should be immediately laid without large irregularities.

Priming
The primer is a plaster coating that is covered with a second layer. Its composition is denser and has a pasty consistency. Application thickness - 1 cm, this layer must be well leveled. If this does not work out in one layer, a second one is applied. It is imperative that the first coat must dry completely before applying the next one.
The soil can be poured with a trowel or smeared with a spatula. After application, it should be leveled plastering rule... It should be noted that without the use of guide beacons, it is difficult to perfectly level the plaster.

Nakryvka
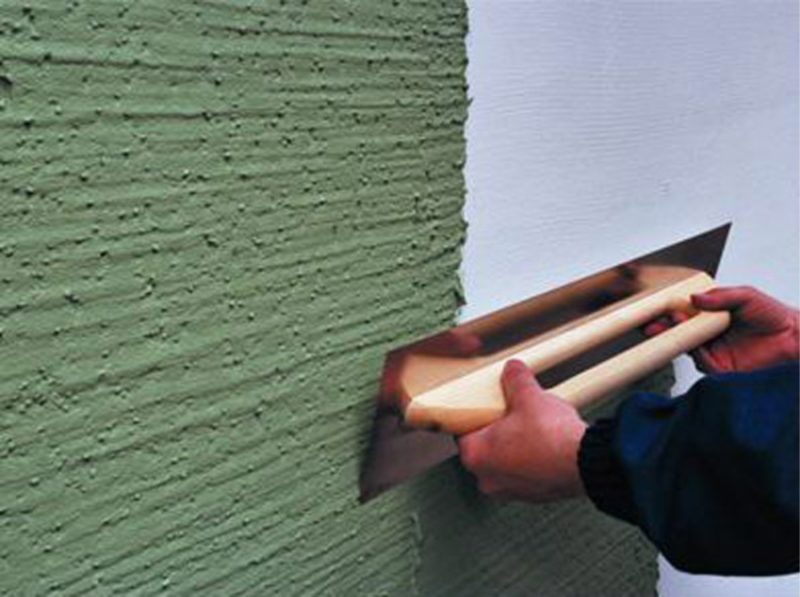
The last layer is a cover. The mortar for this layer must be semi-liquid, it is applied 5 mm thick with a wide spatula, the surface must be leveled in advance.
When applying the mixture and smoothing it, plaster collects on the tool, it must be removed in time and mixed with fresh composition.

Technology for plastering walls with dry gypsum mixtures
Dry gypsum mix is simple and easy to apply. Unlike cement mortars, gypsum has some advantages:
- even a thick layer dries out quickly;
- plastic, therefore it cracks less;
- has good adhesion, suitable for use on any surface;
- easy to prepare and easy to use.

Plastering walls with a gypsum mixture includes several stages:
- Surface preparation - cleaning the walls from dust and dirt, removing irregularities. Then cover with a primer, preferably acrylic. If the wall is new, one layer of primer is enough, with an old surface - two. The primer should dry within 24 hours.
- Installation of beacons - they are attached to a plaster mix perpendicular to the horizon with a distance of 1 m. Using a stretched cord (from one edge of the wall to the other), it is determined how far the beacon extends forward and its position is adjusted. After that, the gap between the lighthouse and the wall is filled with mortar.
- Preparation of the mixture according to the instructions. The mixture is poured cold water and stir until smooth. The solution will set faster if diluted with hot water... It should be mixed in small volumes (10-15 kg) in order to have time to use the solution before it sets.
- Application of the mixture - it should be applied at a time up to a meter in height. The solution is smoothed from bottom to top, if uneven areas are found, the mixture is reported on them and smoothed again.
- The final layer - after plastering the wall completely, the last layer of mortar is applied. This is done with a spatula, a mass is applied and the next movement is removed the excess solution.
- Grinding - done when all layers of the solution are dry.
Now you can start finishing works.

Sequence of work
In order for the plaster to lay down better and last longer, you should prepare the wall. The surface is cleaned to the ground - old wallpaper and trim are removed. If cracks are found on the walls, they need to be covered, since the plaster applied to them will also crack.

Sealing cracks
Cracks can be closed in several ways, which one to choose depends on its thickness and their number:
- If the crack is not wide, then most likely it is deep. Therefore, it is necessary to expand it to free up access to the inside. The resulting gap is cleaned of dust and treated with a primer. After drying, it is covered with putty, you can use cement or plaster.
- If there is a very narrow crack that does not go deep, it is sealed with a sealant.
- Polyurethane foam can be used to close up a wide gap.
Now, everything is ready for the next stage of work.

Brick wall preparation
If the brick wall has old plaster, it should be moistened with water with a sponge, then it will fall behind more easily. Use a spatula and hammer to carefully remove the old finish. After that, using an iron brush or a grinding machine, it is necessary to process the wall.
In the next step, grooves are made between the bricks up to 7 mm. They are necessary because the plaster will fit into them and will be stronger. The indentations are cleaned with a brush and a damp sponge. The process ends with the treatment of the wall with a primer, it should be applied in 2 layers.

How a concrete wall is prepared
It is easier to clean a concrete wall of old finish than a brick one, because it is smooth. You can use the following methods:
- in the presence of whitewash, it is moistened with a sponge and cleaned with an iron brush, after which the wall is well washed;
- there is another, dry method - a thick layer of paste is applied to the whitewash and when it dries, it is cleaned off along with the plaster with a spatula.
When the surface is cleaned, you need to make small notches on it, this is quite difficult, but necessary. If you do not want to make notches, you can use another method - priming the walls with a composition with deep penetration, to which a fine quartz sand... If you feel roughness after running along the wall, then the plaster will hold on tightly.

Wooden walls
Old plaster can be removed very easily from wood surfaces. The wall is tapped with a hammer and the finish is crumbled. Therefore, to make it easier to clean up the garbage, place an oilcloth under the wall.
In order for the plaster solution to hold better, you should fill the slats of wood (shingles). They are stuffed diagonally. In addition, they act as beacons when leveling the surface.
If there are old slats on the wall, they must be removed, as they could rot or contain insects. Therefore, before filling a new shingle, the wooden surface should be treated with an antiseptic, this will protect against mold and insects. Having stuffed the slats, you need to do the processing with this composition again. Instead of shingles, you can use a mesh-netting, which is attached not to the wall itself, but to the slats. The solution can only be applied to dry walls.

Foam concrete walls
The work associated with the preparation of this type of walls is quite long. At the first stage, the wall is cleaned; this requires a metal brush. Cleaning should be done thoroughly and pay attention to the presence of greasy spots on the surface. Greasy stains be sure to remove, for this clay is taken. It is applied to the oily area and then removed. If this does not help and the stain remains, it is cut out, and the hole is sealed with a solution.
The cleaned surface is primed in several stages. After applying the first layer, it is leveled with a spatula and allowed to dry. Then, the second layer is laid. Regardless of the unevenness of the wall, the primer should not exceed 2 mm. In the presence of large differences, they must be eliminated by mounting drywall in these areas.
The next step is to install a reinforcing mesh, it is fixed with dowels. Now you can start plastering.

Wall alignment methods
Plaster is a material that lends itself well to leveling. There are two ways to level walls when plastering.

Leveling without beacons
This method is more economical as the solution consumption is reduced. When leveling without beacons:
- a putty 3-5 cm thick with a spatula is applied to the cleaned and primed surface, and then, using the rule, it is partially leveled;
- when this layer has dried, the skipped areas are equal to the rule.

Exposure by beacons: metal, plaster, plastic
Leveling in this way ensures even application of the mortar. Lighthouses are set apart from each other at a distance slightly less than the length of the rule. To begin to make the first two markings, step back from the corner of 15-20 cm. A vertical line is drawn and holes for dowels are made on it. They are installed on self-tapping screws in the same plane. On the line between the fasteners is applied small amount solution, beacons are fixed on it. This is done by pressing the rule, the beacons are attached to the caps of the screws. The excess solution that has come out is removed. After placing the beacons, you should check the evenness of the installation and, if necessary, adjust their location.
Lighthouses are of several types:
- Metallic - galvanized iron with holes that serve as a limiter during plastering. The excess solution is removed by the rule. Their usual length is 300 cm, and the depth is 3.6 and 10 mm. They are attached to screws.
- Gypsum - using them saves time and plaster, because there will be no need to pull out the beacons and fill up the holes. The installation process is as follows: dowels are attached, using a level, they are set to the desired height, metal profiles or a block of wood are applied to the caps. A plaster mix is placed under the profile. After removing the excess solution, the profile is removed. The resulting strip of gypsum is a beacon; such stripes must be made over the entire surface.
- Plastic - they are similar to metal ones, but they are made of durable plastic. Fixed to the wall with screws. Their only drawback is that they can break when strong blow rule.

Plastering technique
After installing the beacons, you can start plastering.
It should be taken into account that when applying a thick layer, the solution must be thick. If the surface strongly absorbs moisture, then it must be moistened.
Plaster is applied by covering it on the wall. It is aligned from bottom to top. Then, by driving the rule from below and holding it at an angle, the excess mixture is removed. If bubbles appear on the surface, then these areas need to be redone. This should be done until the ceiling is reached. Areas near the floor and ceiling are made after the wall has dried.
To check the result, the rule is applied from different angles. If there are metal beacons, they are removed, and the holes from them are sealed.
If the wall has large irregularities, then the plaster is done in two layers. First, rough, without leveling, and after 2 days the second, finishing.
After applying the plaster, grout is done. At the same time, the plaster is used more liquid and it is better if the wall is not completely dry. The solution is applied to the bevel and smeared with a thin layer. When the wall is dry, you should walk with a wooden grater and finally sand the surface by attaching felt to the grater.
How to plaster walls yourself
If you decide to plaster the walls yourself, then you should familiarize yourself with the technology and sequence of work. Study the available formulations and choose the best one. When preparing the solution, you must follow the instructions exactly.
In addition, when starting work, it is necessary to provide appropriate conditions, there should be no: drafts, high temperatures. To avoid cracking, do not apply the solution to the poorly dried previous layer. Do not dilute too much solution, it dries quickly, and you will work slowly, because you do not have experience.

Who is better to entrust the work
The services of a qualified master for finishing are quite expensive, although with the availability of funds, the quality will be better, and in time renovation work complete faster.
However, if you want to save money and test your strength in this field, then go for it. Of course, the process will take a lot of time and effort, but this type of work can really be done by ourselves. In addition, you will gain new skills and be proud of the results of your work.
In any case, you cannot do without plastering the walls when renovating an apartment. And it is important to do it right so that the money and labor invested are not in vain. And the result did not disappoint, but made you happy with a new interior.

In this article, we will tell you how to independently plaster walls and consider all the important stages of this process.
To complete the work, you will need the following tools:
- Plastering spatula (for mixing and dosing the material, for throwing in the solution and its subsequent leveling).
- Bucket (with a capacity of about 1 liter, used for applying mortar to the wall).
- A scraper (for leveling mortar, also used for grouting).
- Construction and water levels.
- Square and plumb line.
- Grater (used for grouting plaster. Canvas dimensions: width 10‒12 cm, length 14‒16 cm, thickness 2‒2.5 cm).
- Scrapers (used to scrape off dirt from surfaces).
- Steel brushes (hard and soft, for cleaning dirt on surfaces of stone, concrete, brick).
- Paint brushes (for moistening the surface with water before plastering or during grouting).
You will also need rules - aluminum slats of various sections and lengths. The rules are used to level the solution along the slopes, cornices. The alignment is carried out on the so-called beacons.
Beacons are a type of rule (reiki rule). The level of the future wall is set along the lighthouses and it is leveled during the plastering process.
Preparing the walls

Before starting the plastering, the surface must be leveled. After that, it is cleaned and moisturized. In order for the mixture to hold firmly, the walls are prepared by creating an artificial roughness.
If the surface is not properly prepared, it can lead to the solution sticking off.
If the plaster will be applied to brick walls, it is advisable to embroider the seams to a depth of 1 cm.When processing wooden surfaces or cinder blocks, you need to make frequent notches so that there are about 1000 strokes on 1 m 2 of the surface, or cover it with a netting or reinforced mesh (mesh size no more than 5 cm). The mesh will also need to be painted to avoid corrosion.
Stages of work

The so-called marks are thrown onto the surface - small areas of solution, the thickness of the future layer of plaster, on which the beacons are fastened. After the installation of one lighthouse, the installation of the next one takes place at an interval of 1 meter. It is necessary to constantly check the level indicators so that the beacons are installed perfectly level. Now it is necessary to allow the solution to set (4-5 hours).
Usually, a solution is used to treat walls in a ratio of 1 part of cement to 3 parts of sand or 1 part of cement, and 4 parts of sand (due to low plasticity, the latter is more laborious). For the manufacture of cement mortar, first of all, sand and cement are mixed in dry form, and then the mixture is mixed with the required amount of water until the solution acquires the desired density. It should be applied no later than 60 minutes from the moment it was prepared. Plaster is applied in two ways: spreading and spraying.

The plaster is applied in 3 layers:
- Spatter is the first layer applied, the thickness of which is not more than 5 mm. It is a liquid layer that better penetrates the pores, providing good adhesion.
- Soil - a thicker layer of mortar applied in the second place. This layer is the main one and forms the required thickness.
- Covering is a final layer of plaster that serves as a leveling layer. It is prepared on sifted sand. It is applied to the already hardened layer of "soil" and is about 2 mm thick.
For spraying, the prepared solution is spread on the falcon with a trowel. To make it convenient, one end of the falcon is placed on the container, the other end is lifted and the required portion of the solution is carefully and quickly applied with a trowel. Then they remove the excess from the edges of the falcon shield with a trowel to avoid loss of the solution when we carry it to the plastering site.
When throwing the mortar on the wall, the falcon must be tilted to the surface to be treated, this will protect the hand holding the falcon from getting the mortar on it.

The solution from the falcon is taken with an edge or a sharp end of a trowel. Then the trowel with the solution is brought to the wall and then the solution is thrown off with a sharp movement of the hand. You should not wave your hand too much and throw it with force, so you can spray the solution and yourself and the whole room. The solution is applied at different levels, they try not to leave voids and not throw everything into one place, the solution should be evenly distributed over the entire plane.
Correct and comfortable position of the body during work reduces fatigue and increases productivity.
When plastering ceilings is done, the solution is thrown in three different ways- over your shoulder, above yourself and away from yourself. When spreading the solution with a falcon, it is taken in one hand, and in the other with a trowel, the solution is applied and then the falcon is placed against the plane of the wall so that the upper row of the shield surface is 5‒10 cm away from it, and the lower one should be pressed to the desired thickness layer. Move the falcon up the wall and press the edge of the falcon with a trowel.
The solution is applied to the surface following the movement of the falcon, and the edge of the shield, which has been raised, will be pressed against the plane of the wall. When working with a trowel, a row of mortar is applied to it in a "bed" and spread from bottom to top (when plastering the ceiling - in any direction). When the layer of the mixture is leveled with a falcon or a scraper, the same movements are performed as when applying the solution, with the only difference that it is not necessary to collect the solution.

Beacons serve as guides along which the rule moves when leveling the mortar. They must be installed strictly vertically and be in the same plane. The most convenient distance between the lighthouses is 1.5‒2 m. Of course, it can be increased to 3 m, but then it will take two people to move the rule. Usually, the plastering of the room starts from the ceiling, and then the walls are processed.
The solution, which stands for the level of the lighthouses, is cut off with a rule or it is removed with a trowel and used to seal cavities. After the mixture has set, the beacons are removed, the formed grooves are filled with a solution and leveled. Removing the lighthouses is optional, you can leave them, but if you plan to hang furniture on this wall, then it is better to remove it, otherwise, when drilling holes for fastening, you can get into a metal lighthouse, and this is not very good for a drill on concrete.

The final step is grouting. Its goal is to make the surface of the wall afterwards flat and smooth, without any shells, sagging and bumps. After the cover has been grabbed, wipe it off. Grouting is usually done with a wooden float, but now there are plastic and metal ones. Grouting is carried out when the solution has not yet completely hardened and the layer is still wet and it can be leveled without being wetted with water.
When grouting, the float is pressed by hand against the surface of the plaster and begins to move the float in a circular motion, which allows you to evenly level the surface of the wall. With this movement of the grater, the tubercles will be cut off, and the depressions are gradually filled with a solution. If the depressions are deep, then they can be sealed with a solution taken from the edge of the grater, it accumulates there when cutting off the bumps.
The grouting process not only flattens the plaster, but also compacts it.
When moving the grater, you need to adjust the pressure, if there are protrusions, then press the grater harder, if there are depressions, then you need to loosen the pressure. If you work slowly and the mixture has dried up and began to rub hard, then it should be slightly moistened with a paint brush with water - it will soften and it will be easy to rub again.
It should be borne in mind that after circular grouting, circular traces will remain on the surface, but there is no need to worry about this. In order to eliminate them, you need to additionally wipe the surface with a ramp, but be sure to immediately, on fresh plaster. If you want to make decorative plaster, then we advise you to read the article, from which you will receive comprehensive information on how to properly perform such work.


Video
The process of installing lighthouses and plastering on them:
Plaster leveling process without using beacons:
Hello dear friends. Why buy the services of a professional plasterer if their cost is twice or even three times more than consumables? You can do the renovation yourself, even if you are new to the field.
Quick plastering of walls is many times easier than it seems - you just need to start. Plastering the walls takes about 2-3 days (for 14 m2). The leveling time also depends on the thickness of the applied layer, the experience of the master and the area of the room. Here you will get a clear step by step instructions with practical advice and recommendations for each stage.
There are many ways to apply decorative plaster
Before starting work, a method of application is selected that corresponds to further plans. For now existing ways wall plasters fall into two categories:
1. Dry - plasterboard cladding;
"Dry plaster" is used if in future plans there is no wall cladding with heavy materials (stone, porcelain stoneware, tiles). The cost is two times cheaper than wet.
2. Wet plaster - for leveling it is necessary to apply mixtures based on cement or gypsum.
The dry plaster method is conditional - in practice, the wall cladding with plasterboard is done, therefore, we will consider the classic second method and how it is performed.
Required tools and materials
- Plaster bags.
- Beacons 6 mm.
- Impact drill or hammer drill.
- Hammer.
- Grinder or scissors for metal.
- Crosshead screwdriver.
- Plastic dowels.
- Adapter from SDS + to ½, and for the hammer drill also a keyless chuck for mixing mortar without a nozzle.
- Drills for a hammer drill (6 mm is more often used).
- Self-tapping screws for wood (rare pitch, black).

Dowels, drills, self-tapping screws are selected depending on how you need to plaster the surface - they should not be short
- Level 2 m.
- Plumb line.
- Rule made of aluminum (2.5 m - for placing beacons / checking, 2 m - for applying plaster).
- Putty knife.
- Steel trowel.
- Mixer attachment.
- Wide brush / roller and tray.
- Bucket.
- Roulette.
- Primer.
- Cotton gloves.
Room preparation
Now that the necessary tools are available, your premises are being prepared. If it was residential, you need to take things out, the furniture is placed in the center of the room and covered with a film. The floor is also covered with a layer of sawdust or foil. To prevent water from accidentally getting on the wires, they are insulated.
During the cleaning process, the old coating is removed to the base. The whitewash can be smeared with paste, and after drying, remove with a spatula. Wallpaper is moistened and removed with a metal brush or scraper. The cracks found are repaired with a repair mixture. A tape "serpyanka" or is attached to the cracks.
The walls are tapped with a hammer for hidden defects. A dull sound is determined by the poor quality of adhesion of the old plaster. It beats off, the voids are filled with nails or reinforcing mesh. If there is a fungus, the wall is treated with a special antifungal agent, then a primer is applied.
The process of applying plaster to a brick, stone or concrete wall with a chisel or an old ax is performed by beating with a depth of 1 cm by applying notches. A wooden wall needs preliminary upholstery with painted and dried metal mesh. You can use a shingle upholstery in the form of a mesh, which is fastened with half-hammered and then bent nails.
Surface priming
Before you start plastering the walls, you need to prime them. This is necessary to increase the adhesion or, in other words, the adhesion of the wall surface with the mortar. As you can imagine, we will use a primer for this.
It can be ordinary and deep penetration. Deep penetration primer is used when the wall has a highly absorbent base. This can be, for example, a wall made of aerated concrete, sand-lime bricks.
Do not forget to mix the primer thoroughly before starting work, and those surfaces that are highly absorbent should be treated twice.
Walls, surfaces of which do not absorb well and are smooth, are usually primed with such a mixture as Betonkontakt. A direct example of such a wall is a concrete wall.
Before starting work on priming, the surface of the wall must be cleaned of old plaster, if any, from saws, stains, in short, from any dirt. The walls in front of the primer must be hit clean. Plastering the walls with your own hands can be carried out only after the soil on the surface is completely dry.
Wet plastering technology
The technology includes the following stages of wall plastering:
- Spatter is the initial layer required for adhesion of the finish to the surface. The solution for application must have a thick consistency. The applied layer will be 9 mm thick for wood surfaces and 5 mm for brick walls.
- Soil - after the spray has hardened, a layer of thicker consistency is applied, the surface is leveled and rubbed.
- Covering - after the soil has dried, it is moistened and a finishing layer is applied from a solution with sifted sand.
If this technology is violated, after 6-8 months, the plaster will begin to flake and crack.
Basic techniques for preparing a plaster mixture
The most popular hand-made solutions are:
- cement: 1/3 cement / sand;
- limestone: 3/1 sand / lime;
- cement-lime: 1/5/1 cement / sand / lime;
- gypsum-limestone: 1/3 alabaster / lime paste.

Stages of preparing a mixture for plaster
When doing plastering work with your own hands, you must remember that the prepared solution must be used within 30-60 minutes, otherwise it will disappear. The proportions for preparing the ready-mixed mixture are taken from the manufacturer's packaging. First, water is poured into the container, then up to 1 kg of plaster mixture is put, everything is mixed. Then the whole mass of the mixture is added and mixed with a mixer until the lumps disappear. After 5 minutes, mix again. The consistency is brought to the desired level of density immediately, because during finishing work it is strictly forbidden to stir the plaster mixture or water.
Using cement mortar
If the mortar is being prepared on its own, you must remember that if you put more cement than necessary, the plaster will harden faster and you may not have time to level it. The solution is applied with a spatula or trowel, leveled with a rule or a half-trowel, smoothed with a grater. For beginners, a spatula and a grater are fine. Throwing the plaster mixture onto the wall is done with a spatula to create perfect adhesion of the mortar particles to the upper surface. Professionals use the "falcon" - a platform tool with a handle at the bottom.
We plaster the surface of the wall gradually - after finishing a small area (1 m), it is leveled with a grater, using circular movements counterclockwise. Excess material is removed into the container, on the contrary, the voids are filled with a solution from it. After 7-8 hours the next layer can be applied. If, after 12 hours after application, the excess is not removed, it will be difficult to level the hardened layer. The corners are made by fastening edged boards on self-tapping screws.
Using gypsum mortar
So, let's take a quick look at how to plaster walls with gypsum plaster with our own hands. Alabaster compounds, or gypsum mixtures, are less durable, but they are applied as easily as cement ones. You need to be careful when diluting and applying such a solution - any dirt particles trapped in the container or on the tool will reduce the setting time.
Prepared according to the instructions of the manufacturer of the mixture, applied with a spatula. Drying time 2-3 hours. The excess is removed within an hour. The corners are made with reinforced corners. Solutions of this type do not interact well with paint.
Lighthouse plaster
Beacon decoration is done under tiles, non-woven linen, wallpaper. For plastering walls with your own hands, you need to have certain skills and knowledge, otherwise you will not pull out the wall exactly. The technique of performance is better mastered by observing the work of an experienced master (you can on the video). The instruction "how to properly plaster walls with your own hands" will serve as a kind of "cheat sheet" for the first time.
To level the walls with metal profiles, first, at a distance of 20 cm from the end of the wall,.
- Further, using the level, the curvature of the surface is recognized.
- Along the rule, plaster bumps are applied to the walls at intervals of 20-30 cm.
- The desired level is formed by being crushed by the rule.
- The solution fixes the position of the beacons.
- If the area is large, ropes are pulled to determine the location of the beacons.
- When the solution that fixes the beacons hardens, the gaps are slapped.
- The plaster is leveled by following the lighthouse rule.
Now you know how to plaster walls with your own hands and it will not be difficult for you to do all the listed work yourself. And now a few final secrets:
After a careful assessment of the condition, a decision is made - is it necessary overhaul and plaster the walls or you can trim the corners and the most noticeable irregularities.
If the ceiling tiles are laid flat, a plaster ceiling can be made. Before work, it is cleaned of old material, primed and plastered. Otherwise, it will be more profitable to create a suspended or stretch ceiling.
Plastering walls is the most popular method for decorating a room's interior. Durability and reasonable prices for leveling wall surfaces leave this finishing method still in demand among customers and professionals.
The number of types of dry and ready-made plasters available on the market makes their choice difficult. So how can you plaster the walls? The following selection criteria will help you choose the right type of plaster mix.
1. Application area. Plaster is used for leveling walls inside and out, in dry and wet rooms, as well as for facade insulation. Indoors, you can use dry and ready-made plaster on any basis: cement, gypsum, various polymers.
Outside, for the facades of private houses and the balcony in the apartment, cement-sand plasters are used. In places with high humidity (bathroom, kitchen), a cement-lime plaster mortar is used.
Insulation of external walls is carried out with cement mortar with perlite. Improving the quality of the plaster can be achieved with the help of fiber - a reinforcing fiber. You can add it yourself (how to do it is described in the work "") or buy ready-made reinforced mixtures.
2. Temperature conditions. This criterion is important for giving. Internal plaster based on gypsum in winter, when the room is not heated, it collapses under the influence of frost. Therefore, it is necessary to use cement, sand and water.
3. The size of the sand fractions. A larger size of grains of sand is allowed under tiles and wallpaper, medium grains for painting, and under decorative plaster- the smallest. A fine fraction of sand is also needed if there are chips and potholes on the wall. Therefore, when buying dry mortars, you need to look at the packaging for the size of the sand or the area of application. If there is no clarity, be sure to check these nuances with the seller.
4. Master's experience. Before purchasing materials, check with the contractor for his skills in working with various plasters... It is believed that a professional should be able to work with all types of plaster mixes. But this is not so - there are a lot of highly specialized plasterers.
If you plan to do the work yourself, it is better to stop at cement mortars. In this case, you can small area walls to work out correct movements pouring solution. Such a training course will not be expensive, unlike gypsum plasters.
5. Application method. Machine plastering on the outside is possible only with cement mortar, inside the building - with dry gypsum mixtures.
6. Material cost factor. The end result - a smooth wall surface - is achieved with both cheap cement mortars and expensive polymer plasters. But here it is also necessary to take into account both the speed of work and their cost. Therefore, it is necessary to consider all factors in combination.
Choose types of plaster for interior decoration it is necessary taking into account the method of application, the area of application, the skills of the master and the price factor.
Choice of plaster by rating
Almost constantly, in the building materials market or in a specialized store, an unprepared buyer is faced with a problem: most dry mixes fall under the above criteria. How to be in this case? What is the best plaster for walls if only the name is known? There are two approaches here:
- focus on popularity among the population;
- buy based on the conditions of its operation and technical characteristics.
- Knauf;
- Volma;
- "Ceresit";
- "Unis";
- "Foundation";
- Glims;
- "Prospectors";
- Caparol;
- "Mapei";
- "Concrete".
The choice according to the conditions of application, area of operation and price (assessment of professional builders) gives a slightly different rating result:
| Name | Consumption kg / m 2 with a layer thickness of 1 mm | Region application | Bag, kg | Composition | Price from, rub. |
|---|---|---|---|---|---|
| Ceresit CT 29 | 1.8 | Concrete, brick walls | 25 | Cement, sand, mineral additives | 470 |
| Volma Canvas | 0,9-1,0 | Concrete, brick, aerated concrete, foam concrete walls | 30 | Gypsum | 320 |
| Prospectors | 1,2-1,3 | Wet rooms, concrete, brick | 50 | Cement, sand, mineral plasticizers | 420 |
| Knauf rotband | 0.8 | Concrete, brick, cement plaster, CBPB | 30 (5, 10, 16,) | Gypsum | 410 |
| Caparol Capatect Leichtgrundputz | 1.2 | Light brick, expanded clay, pumice, porous concrete | 25 | Mineral | 750 |
For reference: the higher consumption of Ceresit CT 29 plaster in kg / m 2 is due to the higher specific gravity of cement in relation to gypsum.
What kind of plaster to choose for the walls, based on the information provided, is up to the customer to decide.
Reliable manufacturers
Choosing the best way to plaster the walls inside the house, you should first of all pay attention to the well-known companies: "Knauf", "Caparol", "Ceresit". They are of high quality, but also, accordingly, a high price.
However, why overpay for quality if the Russian manufacturer's plasters can withstand the same service life and have the same level of wall surface finish? After the finishing operation - painting or wallpapering - the difference in quality plastering works cannot be detected.
Among domestic manufacturers, one can note the trade marks Volma, Betonit, Glims, Kreps and others.
- "Knauf" - a German company that produces the best gypsum plaster "Rotband" in Russia, which does not require a primer;
- Volma is a Russian brand with an optimal combination of quality and price (canvas plaster mix);
- Ceresit is a Belarusian manufacturer (Henkel company) of the most popular universal dry plaster Ceresit CT 35.
The best brands of dry cement-sand plaster:
- "Ceresit" - the supplier of the best plaster "Ceresit CT 29" to the markets of the CIS countries;
- "Prospectors" - a manufacturer from Belarus with acceptable quality and budget price;
- Glims is a Podolsk company (Russia) that produces the most light plaster of this class.
The best dry mineral plaster based on synthetic resins is produced by the Mapei concern. His product "Nivoplan" is an absolutely universal building material:
- it is used for all types of walls (gas block, gas silicate, foam concrete, brick, wood);
- used for leveling walls indoors and outdoors;
- can be used for decorative plaster.
Analysis of the requirements for plaster and the given data on different types dry mortars will help you figure out how to plaster the walls inside the house.
The choice of plaster by wall material
What is the best way to plaster the walls in an apartment with brick or concrete walls? For these purposes, you can use any type of plaster mortar:
- cement;
- cement with lime;
- plaster;
- lime;
- mineral.
In the bathroom, in the kitchen and in the bathroom, where the humidity is higher, plaster mixes are used, where cement, lime and sand are mixed in a ratio of 1: 2: 8.
Modern priming materials do not necessarily require the use of reinforcing nets on the walls for better adhesion of the plaster layer to them. So, the primer "Knauf Adhesive" provides good adhesion (adhesion) for all types of plaster on brick, concrete, rubble etc. walls and without metal mesh.
How to plaster wooden walls inside the house? Walls of timber it is recommended to plaster with mortars based on cement, gypsum, lime, clay or their combination with the addition of sand, plasticizers and fiberglass.
Since there is no adhesion between the wood and the plaster, they are nailed onto even walls reinforced mesh made of metal, on uneven ones - shingles are fastened in the form of a 4x4 cm lattice. In case of a strong blockage, removable beacons are mounted vertically.
Walls of aerated concrete on plaster grid planted on glue, plaster with mortars based on cement and gypsum. And how to plaster the walls from foam blocks inside the house, if you can't use a mesh with glue? In this case, you should immediately abandon the rough plaster. cement mixtures- they have practically no adhesion to the foam block wall. Light gypsum plasters "Glims Velur" and "Aegis XIS-42" of the Pobedit trademark are better suited for these purposes.
Commercially available plaster mixes can close any leveling problem for any type of wall.
During the decoration of any room, the plastering process plays an important role. By giving it the attention it needs, you can avoid unpleasant consequences in future. Next, we will talk about how to properly plaster the walls and avoid the most common mistakes when mixing the mortar.
Structure and stages of mortar application

If you are wondering how to plaster walls correctly, the answer directly depends on what materials you choose, and what type of room you need to plaster.
For finishing work on concrete or brick, it is best to use a lime or complex mortar, which is intended for work on surfaces with a moisture content of less than 60%.
If the surface is made of plaster or wood, give preference to lime-gypsum plaster.
For the processing of foam blocks and aerated concrete, it is better to use cement and mixtures of complex composition, which are designed specifically for exterior finishes of gas silicate materials.

How to plaster correctly? The answer is quite simple and consists in applying the solution in 3 stages:
- Splashing
The density of this layer must be made from 3 to 9 mm for better adhesion. The density of the mortar should be such that it falls on the walls in a smooth layer and does not crumble, and for better fixation, notches can be made.
- Primer application
This solution is used to level structures, and in its consistency it should be thicker than sprayed. The solution can be applied in several layers, allowing each to dry well, but the total thickness should not exceed 20 mm.
- Nakryvka
This layer is necessary to smooth out small irregularities. It is customary to apply it with a thickness of 2-4mm, after which it is enough to simply wipe it.
Remember that plastering foam blocks and aerated concrete consists in the thinnest application of all layers of the coating.
Beacon attachment technique

In the form of beacons, you can use both gypsum solution and slats made of wood or metal.
Pay special attention to the fact that when fixing the lighthouses, it is forbidden to attach the guides for them to the nail heads. It is in this case that you need to make special areas of gypsum mixture around the fastener itself in this way:
- apply a plaster mix with an area of 50-70mm 5mm above the cap itself;
- wait for the solution to dry and remove excess material to the level of the cap;
- cut it so that you get a square of 30x30 or 40x40 mm.
Once you set the restriction bar, you can begin to knead the dough-like solution and fill the indentations with it. It is necessary to apply the solution in sharp strokes, pressing it under the rail with a spatula. If the result is a surplus, cut it off.
After the plaster mass is well fixed, go around the stopper with a hammer along its entire length and remove it with a sliding motion. If there are empty gaps in the beacons, fill them with mortar and iron them. After that, you can remove all the nails that were used to fix the guides.
Practical enough to use clamps for fixing. In this case, a piece of bar is laid under the slats, which is removed upon completion of the work, and a wedge is driven into the formed recess. With light shock movements, you can easily move the bar without damaging the beacon itself.
You can also use special flat boards for direction, the size of which can be selected depending on the height of the walls. To do this, they are covered with heated linseed oil or painted with paint in 2 layers. Then you need to insert 2 bolts into them with a thread of at least 70 mm. The board is fastened with 2 clamps or steel crutches, which are driven along a plumb line or level, adjusting the correct fixation with bolts. When you are convinced of correct location slats, they can be finally fixed with wedges. Further, the beacons are also filled with a solution, allowed to dry and the strips are removed, pulling the cords from below and above from the beacons.
Wooden beacons are much easier to use, the only problem with them is that when moisture gets from the plaster solution, they can deform. That is why experts still recommend using metal beacons.
It is customary to install beacons from the corners, driving pins into the walls. Adjustment can be done with a nut that can be easily turned with a wrench along the axis of the pin.
The gaps between the wall and the beacons formed as a result of the work can be filled with diluted mortars. This will allow the profiles to not bend during plastering.
That's all, you can proceed to the plastering process.
Subtleties and rules for applying plaster

Often, during finishing, the plaster falls on the beacons. Do not be lazy and be sure to remove the trapped mixture, otherwise you will violate the accuracy of subsequent work. If you used the guides made of wood or metal, it will not be difficult to remove dirt from their surface. But with gypsum solutions it will not be easy, because giving off moisture, it quickly fixes, and scraping off the solution damages the beacons, which causes a violation of all subsequent work.
Do not be discouraged, you can get used to work so that such troubles do not happen.
By and large, there are no specific rules as to where and with which blocks to start plastering. But, more experienced craftsmen in the field of construction are advised to start work from below, moving in the direction of the ceiling.

During spraying, clots of solution thicker than the plane of the beacons sometimes form on the walls. Be sure to level them in a timely manner with a rule, a grater or a spatula. Take this process very seriously if you are working with a thin layer of plaster.
After completing all the above work, you can start removing the beacons. All the resulting gaps and irregularities must be filled with a plaster mass, well leveled and rubbed.
When all the finishing work is completed on the surface, it needs to be checked using a rule, setting it in different directions. If, as a result of the check, you notice any irregularities or defects, immediately correct them by applying an additional layer of solution, or vice versa, remove all excess material.

And here's another, no less important point! After the plaster solution is applied to the wall, the gypsum beacons will need to be completely removed, otherwise the plaster in the area of the joint between the gypsum and the solution will simply burst.
Beacons from a mixture of sand and cement can be taken out in half, and the voids can be filled with plaster and a final covering layer can be applied.
All finishing works are completed by the most dusty stage - grouting of the plastered surfaces. It is done using an aluminum or wood float with a piece of styrofoam glued to it.
Features of wall decoration from foam blocks and gas silicate blocks

The use of gas silicate blocks and foam blocks is by far the most popular in construction. These materials have proven themselves well not only in finishing works, but also in the construction of entire residential buildings.
That is why the use of gas silicate blocks and foam blocks has certain requirements for finishing work, because such structures must remove excess moisture from the room.
The table shows the parameters that should be adhered to when working with aerated concrete and foam blocks.
| Name block parameter |
Aerated concrete | Foam block |
| Thermal conductivity (W / (m * 0 С) | 0,1-0,14 | 0,09-0,38 |
| Block density (kg / m 3) | 400-800 | 400-1200 |
| Compressive strength of concrete | class B2.5 at D500 | class B2.5 at D750 |
| Vapor permeability (mg / mhPa) | 0,2 | 0,2 |
| Moisture absorption (% by weight) | 20-25 | 10-16 |
| Resistance of blocks to low temperatures | 50 cycles | 25 cycles |
| Allowable thickness of the masonry joint (mm) | for glue 2-3 | for glue 10 |
| — | for solution 10 | |
| Possible shrinkage (mm / m) | 0,3 | 2-3 |
| Probability of masonry reinforcement | + | — |
| Soundproofing blocks | — | + |
| Porosity of the block structure | closed | open |
| Appearance | + | — |
| Price category (rub / m 3) | 3100 | 2500 |
Despite the capriciousness of foam blocks and aerated concrete blocks, finishing with their use bears good fruit and an absolutely flat surface. Be prepared for the fact that the plastering of foam blocks and aerated concrete will be lengthy due to the laborious preparatory process.