Flower pot made from a plastic bottle. We make flower pots from plastic bottles with our own hands How to make a flower pot with your own hands from plastic bottles
Decorate your home interior or garden with an original flowerpot made from plastic bottles it can be quite simple! You don’t have to make any special efforts, and this option is also quite economical. The only thing you need here is your imagination, non-standard solutions and an ordinary plastic bottle!
This master class describes in detail the process of making an original flowerpot in the shape of a cute owlet.
To do this you need:
- plastic bottle;
- scissors;
- marker;
- an owl template, you can find it on the Internet or draw it yourself;
- acrylic paints;
— synthetic or kolinsky brush;
- a piece of foam sponge;
- rope;
- acrylic paint for facade works(water emulsion),
— transparent acrylic varnish (required).
So, let's get started...
A plastic bottle can be taken in any color and size. For the master class, I took a two-liter bottle. Next, I cut the bottle in half. The lower part of the bottle will be the main one; if desired, it can be made higher. This is what happened.

We put the pre-prepared template inside the flowerpot and transfer its outline onto the plastic using an ordinary black marker.

The picture should look like this.

You can use other animal patterns to make flowerpots.
We determine how far below the owlet’s face the rim of the product will go, while marking the place of the cut.

After this, carefully cut off the excess material.

If the flowerpot is hanging, then leave small loops; if not, cut off exactly part of the rim. This is what the workpiece looks like.

We make holes in the loops for the rope. Since this is a flowerpot, special holes in the bottom are not required.
Before painting, the craft should be coated with white water-based emulsion so that the colored paints adhere well to the plastic.

I use a foam sponge for a dense, uniform coating, since when applied with a brush the surface will be bald.

I carefully cover the entire outer part of the product, without touching the contour lines of the face.

You will get a surface like this, it is a little textured due to the thick consistency of the paint.

The result is something like this.

After applying the layer, the surface of the pots should be completely dry. If desired, the procedure can be repeated.
Gradually drawing wings, eyes, feathers, etc.


Experiment with texture.

For better contrast of some details, you can use a marker.


This is what happened in the end.


After the painting has dried, we apply acrylic facade varnish to the entire surface of the outer walls of the flowerpot.
Such products have different effects after drying (matte, silky-matte or glossy), you can choose at your discretion. This procedure is mandatory, because when spraying or watering, water will often get on the pots, and water is the main destroyer of these paints. The product should be coated with it in several layers, I cover it in two. Each subsequent layer will take longer to dry, keep this nuance in mind!
Once the cover of the plant pot has completely dried, it is time to thread the rope through the loops.

WITH inside It is necessary to make large knots so that the rope does not slip back.


This is what the craft will look like without a flowerpot.


We insert a small flowerpot with flowers into the flowerpot.
That's all, the original flower pot made from plastic bottles is ready!

The final look of the craft. Photo 1.

The final look of the craft. Photo 2.

The final look of the craft. Photo 3.
Gardeners and hobbyists indoor plants You should definitely know how to make flower pots with your own hands. Tubs and pots will transform the interior and add a “zest” to each plant. In addition, homemade pots will help you save money and get rid of unnecessary items and materials.
Decorative pots provide great opportunities for creativity. They can be painted, decorated with decoupage, ribbons, fabric, accessories, made from different materials and give it the most unusual shape.
We do it ourselves
It's not hard to think of what you can make pots out of.
For flower pots Any material is suitable, including waste material that does not allow moisture to pass through and holds its shape well.
Undoubtedly, the most beautiful and comfortable pots are ceramic. If it is possible to make a pot at potter's wheel, then you should confidently use it. Clay is the optimal material for planting domestic and ornamental plants. It retains moisture and allows air to pass through, does not overheat and holds its shape well.

If it is not possible to make a pot yourself, then you can purchase a ready-made one and figure out what and how to decorate it. There are many ideas for decorating pots. It is not necessary to paint the pot with paints; you can use your imagination and come up with the most unusual “outfits” for it.

Thrifty gardeners can save money on a ceramic pot and make it from scrap materials. The simplest pots and tubs are made from plastic bottles. It is enough just to cut off the top part, add soil and start planting the plant. However, you can get a little creative and make elegant flower pots from such an unattractive material as plastic.

For making two versions of pots You will need the following materials and tools:
- 1.5-2 liter bottle;
- CD;
- glue gun;
- stationery knife;
- marker;
- hole puncher;
- spray paint.

Progress:
- Draw a wavy line in a circle approximately in the middle of the bottle (you can have a straight line) and carefully cut the bottle into two parts along it (you get two blanks for pots);

- Glue the part with the neck to the middle of the disk (before screwing the lid tightly);

- When the glue sets, turn the workpiece over and drip a little glue along the edges for stability;

- Use a hole punch to make holes along the wavy edges;
- Spray paint the resulting pots and wait until completely dry.

The pots are ready! You can plant plants.


To ensure that the edges of the cut bottle are even and smooth, they can be trimmed with a soldering iron. You can also use a soldering iron to give the edges an original shape.
Hanging pots are also easy to make from bottles. The most simple model suspended from both sides - by the bottom and neck. One side of the bottle must be cut lengthwise, and two through holes must be made on the sides with an awl or soldering iron so that the pot-bottle can be hung.

Plants can be planted directly in such pots, or they can be used as flowerpots. If desired, paint the outside of the bottles with acrylic paint.
More interesting models are cats. To make them you will need:
- bottles with embossed bottom;
- marker;
- spray paint;
- stationery knife;
- soldering iron or awl;
- ropes or pieces of strong fishing line (4 pcs.);
- sample.
- Cut off the bottom of the bottle;
- Draw ears by hand or using a template and cut them out;


- Paint the workpiece from a spray can and wait until it dries completely;

- Make a muzzle with a marker: draw eyes, ears, mustache, nose;
- To hang the pot, you need to make holes on four sides and thread ropes or fishing lines into them.

Ready! You can plant a plant.

Instead of cats, you can make other animals, for example, a bunny or a bear.
Original pots are easily made using tin cans and clothespins. To do this you need to do the following:
- Peel off the label and wash tin can, dry;

- Attach ordinary wooden clothespins tightly to each other to the wall of the jar.


The result was a small pot, reminiscent of a traditional tub. If desired, you can paint the clothespins acrylic paints, and so that they retain their original appearance longer, coat them with varnish.


Eco-friendly pots and vases can be made from wood. They will decorate both the apartment and Vacation home. Tree - cheap material, easy to process. However, it is worth remembering that when making a wooden pot, the hygroscopicity of wood should be taken into account. To prevent the tub from starting to rot or deteriorate from moisture, it must be treated in a special way - soaked in moisture-protective agents, covered with stain, varnish or other means.

The easiest way is to assemble a pot from ready-made wooden beams, securing them with glue or nails.


Unusual outdoor wooden tubs and flowerpots for summer cottage can be made directly from a piece of log. To do this you need:
- a log or stump of sufficiently large diameter;
- drill with a drill length of up to 25 cm and a diameter of 20 mm;
- chisel;
- file and sandpaper for smoothing the walls of the pot;
- impregnation for wood against moisture and decay;
- polyethylene.
Flower pots are a favorite handicraft theme. In this case, improvised raw materials are often used. Take, for example, a plastic bottle: it can become the basis for the most unexpected creative ideas. Let's look at the technique of turning a flower pot from a plastic bottle and note the main features of such products.
Features of homemade models
Pots made from plastic bottles have many advantages. There is no need to buy them, spending large sums of money. family budget. These products are lightweight, they are not afraid of temperature changes and can serve the grown plants for a long time. Considering that they do not crack and are not afraid of mechanical damage, Such pots can be placed on the floor, where there is a risk of accidental contact.


It is worth noting the nuance that pots made from plastic bottles can be very diverse. Selecting for their manufacture various materials and decor, you can make them to suit different interior styles or even landscapes. Plastic bottles can be painted, they are not problematic when working with glue, and allow decoupage and cutting techniques work surface in any places.
In addition, drainage holes can be made in them to ensure the drainage of excess water.


The resistance of plastic to water is amazing: it takes more than 100–200 years to decompose. There is no need to be afraid that such pots will be destroyed under the influence of moisture and constant dampness. If the craftsman has the skills to melt plastic, he will be able to decorate the pots with the melted material, giving it the shape of, for example, a multi-layered flower. By using colored bottles, beads and wire for this, you can get a product with the illusion of airiness, which is not inferior in filigree work to analogues made from the finest textiles.


For such pots you can create similar plastic trays. Also, pots made from plastic bottles can be used with regular pallets. From this raw material you can also make group potted compositions for decorating the landscape or small home greenhouses. Such pots can be used as independent interior elements or internal containers, decorating the top with flowerpots made of various materials.


Materials
To work, in addition to the plastic bottles themselves, you may need various raw materials. These can be acrylic paints and clear acrylic varnish, permanent markers, twine, satin ribbons, buttons, beads, seeds. In addition, textile scraps and knitted fabric can be used in the work. The type of material that will be preferred will depend on the features of the style, to emphasize which it is planned to make a flower pot.


In addition to decorative elements, you will have to use a knife or scissors. The decoupage technique requires special three-layer napkins for decoupage with beautiful design. In addition, you will also need a brush to level the napkin layer and remove air bubbles. If the technology requires it, use a soldering iron and a glue gun when working.


Making holes
Holes for water drainage can be made different ways, which depends on the type of plastic of the bottle itself. If the thickness is large, you can drill holes with a screwdriver or drill. When it is thin, it is enough to heat up a screwdriver or a thick awl and, until the tool has cooled down, pierce the bottom of the future pot with it. It is difficult to make holes with a soldering iron, since they will turn out to be large, however, some craftsmen have found an alternative to it in the form of dowels.
Other craftswomen use old knitting needles, heating them and piercing thin plastic.


How to do it?
The options for making a flower pot from a plastic bottle are varied. For example, if you have artistic skills, you can paint a cut piece to look like a bee or a May beetle. Such a product can become a decoration for a summer cottage or veranda. If you need something very simple, you can put wicker or knitted covers and put funny faces on them.


If you want something more sophisticated, you can do the following. Take a transparent bottle, cut it into 3 parts, removing the one in the middle. The lower part will become the base and at the same time a pallet, the upper part will serve as the main container with soil. The edges of the upper part are cut off with scallops, after which they are melted using a soldering iron. The sharp edge of the lower part is refined with a soldering iron.
Next, take blue paint and paint the top part with it, leaving the neck transparent. The edges are folded back, forming a kind of flower. The lower part is decorated using special markers or acrylic paints and a brush.
In the second case, dyes are used water based, which after drying become resistant to moisture.

You can draw anything on the lower part, from flowers to monograms and lace. After the paints have dried, you can pour soil into the working container and plant a plant. To prevent the soil from spilling out, initial stage manufacturing, you can plug the bottom and make holes in it for drainage. You can use a hot awl or knitting needle for this.
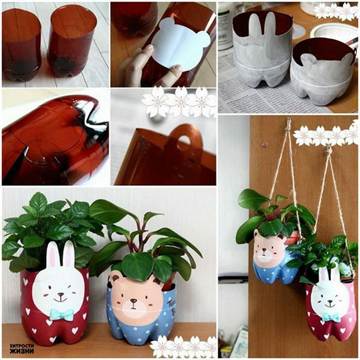
Using an approximate diagram, you can make such a funny pot with your own hands. Take a small plastic bottle and cut it in half with scissors. The upper part is decorated with a funny face using improvised decorative elements(you can buy eyes for soft toys, draw a mouth on paper and cover it with tape on top).
You need to make a drainage hole in the cork, into which you then need to insert a rolled-up piece of fabric. The flap is secured with glue and then cut from the bottom, making a kind of wick through which water can flow down or, conversely, rise to the roots of the planted plant. After this, close the lid, pour soil into the top container and plant the flower. The upper container is then inserted into the lower one.


Using this principle, you can make a flower pot from a five-liter bottle. If you want something different, you can resort to using cement mortar and old towels. In this case, pallets should be made from the same material so that the finished product looks holistic and organic. To create a unique shape, you need to soak old towels in the cement paste, then turn the bottle over with the neck cut off and put these towels on it, forming folds and draperies.
After drying, the product must be turned over and painted with gold or bronze paint. In this case, the holes must be drilled extremely carefully. You can simply wrap a bottle with a cut off neck and drilled holes in textiles, tying it with a beautiful ribbon. You can then secure the fabric by spraying clear varnish.
DIY flower pots made from plastic bottles will become exclusive design solution for your home. Self-production- this is not only an exciting process, but also saves you money.
Making flower pots with your own hands is a fun process and saves you money.
The popularity of floriculture is growing. Almost every housewife is ready to boast of a variety of green pets. Not a single flower can do without a pot. You will say that it is easier to buy pots in a store where there is a large selection of products of this kind.
But only flower pots DIY ones will be different original decor. Why buy when you can make a real work of art with your own hands.
Pots made from plastic bottles for flowers
There are many manufacturing methods. The most important thing is to use your imagination and, of course, prepare all the necessary materials.
For the first method of making a flower pot you will need:
- plastic bottles;
- music disc;
- stationery knife;
- scissors;
- acrylic paint;
- glue gun.

The manufacturing process is simple. First you need to cut the plastic bottle into two halves. It is better to cut it unevenly: a pattern or wave will look more interesting. The most convenient way to cut a bottle is with a stationery knife. The next manufacturing step is to attach the unwanted CD to the bottle. From the side of the neck, use a glue gun to glue the disc. You need to wait until the structure dries and then paint it in any color. It is better to take acrylic paint, since after drying it does not stain your hands and is not washed off. A flower pot made from a plastic bottle is ready.
There is another very interesting one unusual way making a pot from a plastic bottle. The peculiarity of this product is that flowers will grow from the bottom of a plastic bottle. And after a while, when the flower pot is entwined with the plant, the effect will be as if the flowers are floating in the air. It is important that when watering a flower, water will not pour out through the bottom.
This product is well suited for a home that has pets that can damage flowers, which is why flower pots made from plastic bottles are hung from the ceiling.
To work you need to take:
- a 2 liter plastic bottle (the upper part should resemble a sphere);
- air blow dryer;
- pliers;
- stationery knife;
- tourniquet or fishing line.

A construction hairdryer is necessary for working with plastic.
The bottle must be placed in a vertical position and its upper part must be heated construction hairdryer. Heating must be done very carefully and evenly, especially at the bend. After the bottle has warmed up and softened, you should take pliers and gently press the neck inward. Instead of a hairdryer, you can use an electric stove. Attention! Use open fire is strictly prohibited. After the product with the pressed part has cooled, it is necessary to cut off the bottom and also make holes so that the product can be hung. Then the roots of the flowers are pushed into the hole and the soil is filled. The result is a wonderful pot made from a plastic bottle to decorate an airy greenhouse.
A good solution for the garden and for open greenhouses would be the following flower product. To work you will need:
- several plastic bottles;
- scissors;
- thin rope or cable.
First, you need to cut a rectangular hole on the side of the bottle so that you can easily place the plant there. It turns out something like a mini flowerbed. Holes need to be made at the bottom and near the neck of the bottle for hanging the product. The holes must be smooth and symmetrical. The structure of placement of such pots can be chosen at your discretion.
DIY flower pots made from plastic bottles
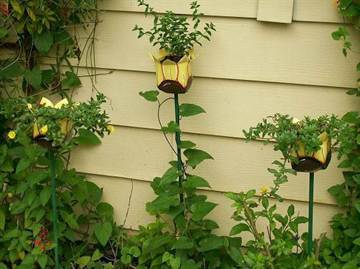
The most in a simple way Making flowerpots for plants is considered the following. You need to take a plastic bottle of a size that is suitable for the future flowerpot. Then you need to cut off the lower part with a stationery knife, choose the height that you like best. Next, use an awl to carefully make holes in the sides of the product so that it can be hung. For decoration, original cutouts from the remains of a plastic bottle are perfect, for example, butterflies, flowers, funny figures, as well as stickers, applique, decoupage. The product can be crocheted or painted in your favorite color with acrylic paints. A DIY pot will be a wonderful decoration for your home and garden.
Another manufacturing method is no less interesting and simple. An elegant flowerpot will decorate any interior, and even more so if the house has a blank wall. To disguise such walls, they usually use climbing plants. But you will have to wait quite a long time until they cover the entire surface. While the ivy is growing, you can cover the entire wall with beautiful flowerpots. To make it you will need:
- a wall with nails that are driven in in any order;
- plastic bottles;
- cable, twine, fishing line;
- awl;
- scissors;
- stationery knife;
- the soil;
- flowers.

It is necessary to firmly and firmly drive the nails into the pre-cleaned wall at such a distance that the flowerpots can be positioned freely and beautifully. It is recommended to leave gaps of about 10 cm between plants. Next, you need to cut the bottom of the bottle to the height you like. The edge can be figured. Cut out animal faces from the remains of the bottle and attach them to the front of the flowerpot. Holes for the rope are made on the sides with an awl. The container is filled with soil into which the plants are planted. The flowerpot is ready. It is imperative to make holes in the bottom. If the pot is voluminous, then it is better to hang it on two nails. In this simple way you can turn a gray, nondescript wall into a blooming garden.
Another option for making flowerpots: in the form of a so-called vase. To make it you need to prepare:
- scissors;
- rectangular bottle;
- rope;
- soil;
- plant.
It is necessary to cut 2 pieces of plastic along the bottle, not reaching the bottom, but with a good distance from the neck. On the sides of the product, holes should be made at the bottom and several at the throat to ventilate the root system. Next, you need to insert a rope into the holes located at the bottom and fill the pots with soil to the very top. Then plant a flower in a flowerpot and hang the product upside down in a suitable place.
Flowerpot made of plastic bottles
DIY flowerpots made from plastic bottles will decorate any home, and almost anyone can make them. The first step is to cut off the bottom of the plastic bottle. For cutting, it is better to use a stationery knife, although ordinary scissors will be suitable for the job. A hole should be made in the bottom of such a size that the neck can fit into it. In a suitable place where you plan to install the flowerpot, you need to dig a base. You can use old wood, fittings or a piece of pipe for it. Please note that the height of the base should not be large.
Next, it is recommended to carefully pour sand and pour water to approximately the widest part of the product. The verticality must be well adjusted. Then you need to wait until the sand settles and fill the pot with soil. For safety, you need to cut the rubber hose and put it on the edges of the flowerpot. After this, paint the product. Spray paint is best. A product painted in metallic colors looks very advantageous: copper, bronze, silver, gold. Figures, butterflies, flowers, etc. cut out from plastic bottles are also great for decoration. If you attach a handle to the flowerpot, you will get a nice basket. You can fantasize endlessly. This is how you can very easily create masterpieces with your own hands.
If you want to plant your flowers in a beautiful decorative pot, but there is no suitable container on sale, you can make a flowerpot from a plastic bottle. A homemade container can be stylized as bronze, gold or any other metal.
To make an original flower pot you will need:
- volume 5 l;
- several old newspapers;
- napkins;
- PVA glue;
- dye.
You will need to use scissors, a soldering iron and paint brushes. To make the base it is used glue gun. You can make a pot in a few hours. The finished product is varnished to give the pot a “metallic shine.”
Preparing a plastic container
To make a pot, cut plastic container in half. Cut off the bottom of the bottle. It will serve as a stand for a flowerpot. In the center of the base you need to cut a hole for the neck of the bottle. Its second half is the main part of the pot.
In the cap of a five-liter bottle, cut several drainage holes to drain water. Without them root system the plants will rot. The pot stand and its main part need to be fastened liquid nails or glue using a glue gun.
Preparing decorations for a flower pot
To decorate the pot, you need to make decorations from newspapers. To do this, roll up several tubes of newsprint. Then make six “snails” from the tubes. Make flower petals out of five, and use the sixth “snail” as its middle.
When all the decorations are ready, you can start decorating the plastic base of the pot. It is covered with newspaper paper. Then another layer of PVA is applied to the newspaper to glue the napkins to the paper. Use a brush to wrinkle them a little. This gives the flowerpot texture. The pot is then decorated with a flower made from newspaper tubes.
Painting the pot
When the glue dries, you can paint the pot any color you like. To style the pot as bronze, it is painted black with splashes of purple and bronze paint. The flower pot can be varnished to make the flowerpot look stylish.
After the paint has dried, such a pot is filled with fertile soil mixture and plants are planted in it. Any indoor flower will look great in such an original flowerpot.