Do-it-yourself wooden table (photo). Do-it-yourself wooden table for a summer house: drawings. It’s easy to make a table with your own hands Make a beautiful wooden table
A large table is often very necessary for a private home or cottage. It's a great place to sit in the evening with your family or close friends. If you want to put it on the veranda, then it is best to make such a table yourself rather than buy it. The fact is that a product from a store will quickly become unusable due to bad weather.
How to do it kitchen table with your own hands? What types of tables can be made from boards? This and much more will be discussed in this article.

Tools
In order to make such a table, you will need:
- hammer;
- nails;
- shovel;
- Oil paint;
- bitumen;
- drying oil;
- jointer;
- plane;
- beam;
- logs without bark.
Material
Initially, you will need to select the type of table, prepare drawings, and only then the material itself. By the way, it can be different:
- Array. Due to its high cost, it is not very popular. The advantage is that it is very easy to make a table from this material.
- Timber and cut boards. Most often, these materials are used in the manufacture of tables.
- Chipboard. Easy to use and highly popular.
Do it yourself
Let us consider in detail the manufacture of a table from timber and boards.
After all the measurements have been taken and the necessary cuts have been made, you will need to sand grinder each element of the future table. Use a damp sponge to collect any dust that appears during the process. After this, you need to cover the wood with a solution - an antiseptic from possible moisture. When the wood is dry, all work can be continued.
It will be necessary to form a support structure from bars and beams. The bars themselves are rounded, and holes of the required diameter are made at the top of the beam. This is necessary for further connection. You will have to make some effort to connect them correctly. It will be better if you pour glue inside.

Now it's time for the tabletop. You will need to cut the board itself in half lengthwise. Between the two sections, lay the rest alternately. If everything is done correctly, you should end up with a loose tabletop.
For the front and back boards, make holes in the center of the other boards on the opposite side. After this, full holes are drilled to a depth that allows the screw to be completely screwed in.
You will need to use screws that are not susceptible to rust. In this case, galvanized screws are perfect. The rail must be screwed onto all joints. Fixation should occur in a checkerboard pattern.
At the final stage, you need to combine the tabletop and legs into one structure. To do this you will need metal corners. To make the joints you will need glue. After this operation, the structure is pressed down with a heavy load for six hours. It is best to put plugs of a suitable color on the screw heads.
Final stage
The table is assembled. Now it should be covered with stain and varnish. Once this has been done, the table is left to dry for 36 hours.
To make holes large diameter, you need to use crowns and drill attachments for the drill. With their help, you can form both external and internal contours.
DIY round table (video)
How to make a table from a windowsill
Using the surface under the window, you can easily make a table. The lighting falls perfectly on the windowsill, and with the help of a view of the street you can relax tired eyes.
Materials
To make a table from a window sill, The following materials will be required:
- various screws;
- polyurethane foam;
- sandpaper;
- furniture panel made of pine;
- chromed metal racks;
- timber to strengthen the window sill;
- glue;
- matte enamel;
- wood putty;
- plastic plugs for racks;
- mounting profiles;
- wood antiseptic;
- polyurethane foam.

Tools
Required tools:
- hacksaw;
- pencil;
- ruler;
- cord;
- roulette;
- paint brush;
- putty knife;
- Bulgarian;
- plane;
- electric jigsaw;
- drill.
Manufacturing
First of all, you need to make drawings in such a way that the table from the window sill is convenient for work and does not interfere with the passage. After the measurements have been made, you need to take up the furniture board and its markings. It should be comfortable to sit at the future table. If there is a battery, then your feet should not rest on it.
You will need to cut out the drawn blank from the panel and try it on the window sill. Using a pencil, draw future holes through which hot air from the battery will circulate. If the table is short, you will need one leg in the center.
After this, you need to make short holes across the entire width of the table using a thick drill. To avoid burrs, you will need to treat the surface with sandpaper. Next, the legs are screwed to the tabletop.
The tabletop is secured to the windowsill with liquid nails. The surface is leveled and the legs are adjusted in height. After this, you can consider that the table is ready.
Making a wooden table (video)
Folding table
You also need to consider an option such as a folding table made from a board and a window sill.

First, a piano loop of the required size is attached to the bottom of the window sill. The table top is cut out. Several rows of holes are made in it, which will conduct warm air from the battery. A crossbar and a pair of legs are made from timber. The product is sanded and varnished. All sawn elements are connected with screws.
The legs with the drawer are attached to the tabletop using a piano hinge. A cover is attached to the window sill. The table perfectly decorates the room and covers the radiator, especially when folded.
How to make a round table with your own hands
From the boards you can make it yourself round table. Previously, it was considered a necessary attribute in any apartment. The whole family or friends gathered for it. Moreover, no one sat in the corner, since a round table simply has no corners. Today, these tables are again gaining popularity. Make it with my own hands not difficult.
Preparing parts
Parts must be carefully prepared for assembly. The tabletop will be a disk, and the circle will connect the legs and the tabletop itself.
The plywood is sanded and varnished in several layers. The same procedure is repeated with what will be the future legs.
The legs are attached to the tabletop using a plywood ring.

Assembly
Markings are made on the plywood ring for the holes in which the legs will be. In those places that have been marked, holes of the required diameter are drilled.
The legs will be timber, sawn into four parts. They will need to be processed before assembly. The legs are attached to the ring using a screwdriver.
The table must be both beautiful and stable. You need to install two plywood strips crosswise between the table legs under the tabletop.
The entire supporting structure is fully attached to the tabletop. The plywood ring is connected to the tabletop. After this, the round table is ready.
DIY plank table (video)
Conclusion
You can make it with your own hands from a board different kinds tables. As you saw from the article, the manufacturing process does not seem complicated. Even a novice home craftsman can handle this.
If you dream of having a pleasant time in your garden plot, then you simply need big table, which can accommodate a group of your friends and family. Moreover, you can do it with your own hands, spending very little time on it. In some cases you may need a helper, sometimes an extra pair of hands won't hurt.
This article provides detailed step-by-step instructions for making a wooden table for a summer house.
To give you a choice, we offer you four project options at once country table- two regular tables for a picnic, a table with benches that form a single structural unit, and finally a round table. You should think through all the details in advance and choose the type and size of table that would suit your needs and the style of your garden plot.
Folding picnic tables - mobility comes first
Folding tables are very convenient, and most importantly practical and simple. They don't take up much space. At any moment, such a table can be neatly folded into the garage, and, if necessary, again moved outside. The mobility of furniture is especially appreciated in small areas.

How to make a garden wooden table with your own hands
A dacha is the place where a craftsman, a carpenter, a carpenter, a gardener, in general, a master, awakens in a person. Buy furniture for suburban area- it’s a simple matter, but to do it wooden table Not everyone can do it with their own hands. You must immediately be prepared for what to do garden table you will do it yourself for a few days. But the tips listed below will help you make a good-quality table yourself.
Today we will construct a fairly simple country table with our own hands in provencal style. Such tables not only look great, but also have quite reliable design. It's worth paying attention to the boards. They must be even, since the appearance of our country table will directly depend on this.

When designing a table for a summer house, it is necessary to prepare lumber in three dimensions:
- Supporting frame - section 38 x 90 mm.
- Tabletop - section 38 X 140 mm.
- Supporting strips - section 19 X 64 mm.
- Drawing
Before starting work, the most important thing is to find it on the Internet, or make your own drawings of a table for a summer house with your own hands. An accurate schematic designation will allow you to select lumber that will be most suitable in cross-section to the dimensions indicated on the diagram. It doesn’t matter if the dimensions don’t exactly match each other, because you can always make an adjustment using an electric planer.

- Preparation of material
When deciding how to make a garden wooden table, approach the issue responsibly, since the life of the furniture will depend on this:
- purchase of blanks. Professionals advise purchasing lumber from coniferous trees, which was previously well dried. Its main advantages are:
- price;
- simplicity and ease of manual processing;
- beautiful structure;
- furniture glue;
- 4 X 65 mm screws;
- 3 mm drill;
- drill;
- tape measure, pencil, sandpaper.
- Further actions
We will need:
- two upper transverse beams, dimensions 38 X 90 X 978 mm;
- four legs for a country table with your own hands, size 38 X 90 X 695 mm;
- two bowstrings - 38 X 90 X 921 mm;
- one longitudinal lower and one upper beam - 38 X 90 X 1575 mm and 38 X 90 X 1473 mm, respectively;
- two pieces of braces 38 X 90 X 772 mm;
- blanks for the tabletop - seven pieces, measuring 38 x 90 x 2337 mm;
- six support strips - 19 X 64 X 432 mm.
Advice: start work on a flat surface. It is extremely necessary to observe the joining angles of the parts. The blanks, which will later become the legs of our country table, should be cut on both sides at an angle of 10°. The cuts must be parallel. But the bowstring blanks, which are similarly cut at the same angle, should be cut one towards the other.
Stage 2. The legs of our country table should be attached to the cross beams and this entire structure should be fastened with screws. There are two screws for each connection.

We screw the string diagonally to the leg with inside, in the same way fastening the structure with two screws.
The lower beam must be used to connect both strings to each other. As mentioned above, using screws.

Next, holes are first made in the upper longitudinal and transverse beams for a fastener called a dowel, after which we again diagonally connect the blanks of our country wooden table with existing screws.

Tip: When connecting all the elements, use glue for additional strength. Remove excess immediately.
We place the braces on the screws.

Tip: blanks intended for braces should first be cut at an angle of 45 degrees
We fasten the blanks for the table top with screws to the cross beams with our own hands.


How to make a rectangular table for a garden
After developing a work plan and approving the drawings of the garden table, purchase all the materials needed for this project. Choose wood designed for outdoor use - pine, cedar, redwood or pressure-treated wood. When purchasing, check each board: they must be completely smooth and without any visible defects. Do not skimp on the quality of lumber, because your structure will have to withstand all weather adversity.

There are a few important points, which you must take into account if you want the result to be high professional level. Do not forget about the accuracy of measurement and use professional tool when cutting boards and bars and drilling holes. To increase the reliability of the design, you can additionally use waterproof glue for fastening parts. Round open edges using a router or sandpaper.
Attention! Dimensions are based on the inch system and may not correspond to metric system measurements. Choose lumber that is as close in size as possible. Or just customize it yourself.
Tools required to implement the project:
- hacksaw, jigsaw;
- milling cutter;
- drill and drill bits;
- chalk cord, tape measure, spirit level, pencil;
- safety glasses and gloves.
Time:
- From one day to a week depending on the chosen project. If you have power tools at your disposal, you can finish the job even faster - in just a few hours.

Adviсe:
- A router will help smooth the edges of wooden blocks and boards.
- Before screwing in screws and self-tapping screws, drill into wooden elements design guide holes.
- The heads of the screws that are screwed in should not protrude above the wooden surface, and for this, the entrance parts of the holes must be countersunk.
- Do not use cracked or warped lumber.
- Do not use excessive force when tightening the screws, otherwise the wood may crack.
DIY picnic table. Step-by-step instruction
Materials:
- A - Legs: 5x10 cm bars, 106 cm long (2 pcs.), 43 cm long (2 pcs.) and 56 cm long (2 pcs.);
- B - Frame: bars 5x10 cm, length 87 cm (2 pcs.);
- C - Tabletop: boards 5×15 cm, length 180 cm (6 pcs.);
- D - Tabletop base: boards 5x15 cm, length 87 cm (2 pcs.), bars 5x10 cm, length 62 cm (2 pcs.).
The first stage of the project is making the table legs. Saw off the bars of the required size. To speed up the process, you can use a circular saw. Smooth the edges of the bars and cut lines with sandpaper.
Connect the bars to form an X-shaped structure and fasten them with 60 mm self-tapping screws, not forgetting to pre-drill the guide holes. Lubricate the joints with glue. Make sure there are no cracks or gaps.
Fasten each pair of legs with a horizontal block, using 60 mm self-tapping screws for this purpose. Cut off the ends of the bars as shown in the figure.
Place the boards intended for making the tabletop on a flat surface. We advise you to place pieces of 6 mm plywood between them, this will create uniform gaps. Place the assembled table sides on the tabletop and secure them by screwing in self-tapping screws at an angle of 90 mm. Before fixing, make sure the legs and table top are perpendicular using a spirit level.
Place sawn pieces of 5x15 cm boards on the underside of the tabletop and secure them with 60 mm self-tapping screws.
Saw off the ends of the bars, which will serve as supports reinforcing the structure, at an angle of 45º. Place the supports in their place and secure with 90 mm self-tapping screws screwed in at an angle.
And finally, last but not least: check that the heads of the screws do not protrude above the wooden surface, and fill all cracks and holes with wood putty.
Tip: To protect wood surfaces from the damaging effects of atmospheric moisture, cover them with several layers of exterior paint or stain.
Table with benches. Instructions with drawings
Materials:
- A - Legs: bars 5x10 cm, length 95 cm (4 pcs.);
- B - Crossbars: bars 5×10 cm, length 160 cm (2 pcs.);
- C - Fastening the tabletop: 5×10 cm bars, 75 cm long (5 pcs.);
- D - Inclined supports: bars 5x10 cm, length 84 cm (2 pcs.);
- E - Tabletop: boards 5x10 cm, length 180 cm (14 pcs.).
You should start by making the legs. Since the legs of this table will be inclined, the ends of the 100 cm long bars should be cut at an angle of 30º. Connect the elements with 90 mm bolts.
Make sure the surface you are working on is fairly level. The mounted sides of the table must be identical, only in this case can you hope for an excellent final result.
When the sides of the table are ready, you can begin making the wooden tabletop. We recommend that you knock it together on the ground (floor), and then attach it to the legs using self-tapping screws.
Tip: Don't forget to make sure the side walls of the table are vertical using a spirit level, otherwise the end result of your work is unlikely to satisfy you.
Rigidly fix the entire structure using inclined supports. Their ends should first be cut at an angle of 26º.
Now all that remains is to build the benches. Saw off the boards of the required size, place them on both sides of the table and, having previously drilled several guide holes at a distance of at least 1 cm from the edges, secure them with self-tapping screws.
Tip: To ensure that the seat boards are evenly distributed, place nails or pieces of plywood between them before attaching them. Thanks to this little trick, all the gaps will be the same.
At the end of the work, pay attention to small but very important touches. Fill all cracks and holes with wood putty. After the putty has dried, sand the wood surfaces with medium-grit sandpaper.
Tip: Be sure to apply several coats of paint or stain to protect wood surfaces from exposure to water and sunlight.
Round table. We do it at the dacha on our own
Materials:
- A - Base: 5×10 cm block 102.5 cm long (1 piece) and 47 cm long (2 pieces), 2.5×10 cm block 9 cm long (4 pieces);
- B - Stands: bars 10×10 cm, length 60 cm (4 pcs.);
- C - Tabletop base: 5x10 cm bars 82.5 cm long (1 pc.) and 52.5 cm long (2 pcs.), 2.5x10 cm bars 47.5 cm long (4 pcs.) and 60 cm long (2 pcs.) ;
- D - Tabletop: boards 2.5×15 cm, length 195 cm (9 pcs.).
The first stage of the project is to create the table base. To connect its constituent elements, use waterproof glue and self-tapping screws. Make sure that the corners formed by the bars being connected are straight. To protect the assembled table base from rotting under the influence of rainwater, place it on small stands made from scrap 2.5x10 cm boards.
Now you need to attach four posts made from square bars to the base. Before fixing, make sure they are vertical using a spirit level. The height of the legs may differ from that proposed by us, in in this case You should first of all focus on your own needs.
The most difficult stage of the project is making the countertop. Place the boards on a flat surface and mark the center of the square. Secure one end of a 60 cm strip at this point. Rotate the other end of the staff to mark the outline of the circle. A jigsaw with a sharp blade will allow you to make circular cuts at a high professional level.
After cutting the boards of the future tabletop, we recommend that you fasten them together with waterproof glue and additionally secure them with several clamps. Attach the bars that serve as the base of the tabletop, as shown in the picture (yellow elements should be made from 5x10 cm bars, green ones from 2.5x10 cm bars).
Tip: To attach the bars to the tabletop, use waterproof glue and galvanized screws (30 mm self-tapping screws for fastening 2.5x10 cm bars and 50 mm for fastening 5x10 cm bars).
After the glue has dried, you should attach the legs to the base of the tabletop using 90 mm self-tapping screws, having previously drilled pilot holes. Use a spirit level to check the perpendicularity of the legs and tabletop.
To ensure that the result of your work corresponds to a high professional level, make sure that the heads of the screws are recessed deep enough. Cover all cracks and holes with wood putty, and after it dries, sand the surface with sandpaper.
Tip: Apply several coats of exterior paint or stain to protect the table from moisture damage. To ensure that the base stands are also untouched by water, place the table on a concrete surface and seal them tightly.
Now you know how to make a picnic table yourself. You just have to put in a little effort, which will subsequently be rewarded with enthusiastic exclamations from friends and pleasant summer evenings spent with your family at a large table.
One of the mandatory attributes of human housing is a table. It should be in the apartment, and in the cottage, and summer house in the country.
Making a wooden table with your own hands is not like that difficult task as it appears at first glance. Simple design, which is suitable for a summer residence, can be assembled by absolutely anyone, even if this is the first time he has picked up a carpenter’s tool.
More complex models, which will decorate the kitchen or living room, will require a creative approach and certain skills, but this work is also doable if you follow certain rules.
Possible options
Despite its simplicity, the table is considered a variable product and the right approach will fit organically into any room. Manufacturers wooden furniture Usually they offer the consumer the following types of models:
- with the correct geometry - rectangular, round, oval;
- corner - help save internal space;
- transformers – multifunctional structures;
- folding and sliding – allow you to place a large number of guests;
- “books” are a common modification of a folding table.
It is noteworthy that all of the listed table options can be made in a home-made environment, literally from scrap materials.
Regardless of design and shape, homemade table made of wood must satisfy two requirements. First, comply interior premises, if you do not follow this rule, even a beautifully decorated carved tabletop will look unpresentable. Secondly, the width of one seat must be at least 70 cm, otherwise people will experience discomfort.
Otherwise, the width and height are selected individually, depending on personal preferences and the intended use of the table.
Preparatory stage
Even a simple rectangular table on four legs cannot be made without some preparation. Let's figure out what a home craftsman will need during the production process.
Blueprints
This required condition, which will allow you to visualize the future table, determine the size and amount of material. You can search for finished drawings on the Internet: many craftsmen willingly share the results of their work with Internet users, describing in detail each stage of production.
If we are talking about a unique table design that you plan to create according to your own design, you cannot do without a drawing. You can draw the future model with a simple pencil on a regular notebook sheet. It is recommended to pay special attention to the following points:
- external dimensions (length, width, height);
- attaching the legs to the tabletop. Round models usually have one support post located in the center; rectangular designs require 1 support for each corner;
- mechanisms (relevant for folding options and transforming tables).
It is necessary to carefully consider how all the parts of the table will be assembled together, what additional wood processing will be required before or after assembly.
Material
It's no secret that the tree different breeds has different properties and not the entire array is suitable for artisanal processing. Depending on the species, all wood can be divided into 3 groups.
Soft. This includes almost all coniferous species (spruce, pine, fir, cedar) and many deciduous species (linden, aspen, poplar, alder). This material is easy to process, but the finished table will require additional protective coating, especially if it is intended to be used outdoors. Coniferous wood is dependent on external factors and is prone to deformation and cracks. The exception, perhaps, is larch, which is used in construction wherever possible, including for making tables.
Solid. This group includes birch, oak, walnut and fruit trees: plum, pear, apple, apricot. Such timber, even without impregnation, is resistant to humid environments and direct influences. sun rays, but in the processing process you cannot do without a power tool.
Super durable. This category includes boxwood, acacia, hornbeam and yew. The material has high consumer properties, but requires professional processing, which is only possible in the workshops of industrial enterprises.
Tool
The simplest rough table made of boards can be assembled with your own hands using just a hammer, nails and a hacksaw. But for more accurate execution, additional tools will be required:
- electric jigsaw;
- sander;
- Screwdriver Set;
- drill with a set of drills of various diameters;
- roulette;
- a simple pencil;
- square
In addition, it is recommended to pre-treat the wood with special antiseptics, which will make the finished product more durable and resistant to dampness. If you plan to cut a pattern on the legs or sides, you will need special cutters. A lathe or milling machine woodworking, but not everyone has such tools.
Homemade tables for the garden
The simplest and most practical option for arranging a summer cottage is a table made of wooden pallets. Unnecessary, at first glance, pallets are ready-made source material, requiring virtually no additional processing, but offering several options for use. For example, from 2 pallets you can make a small hanging table with a wall mount, which can be used as a shelving unit or for small friendly gatherings.
This design is made in an elementary way. One pallet is attached to the wall using nails or self-tapping screws. The installation height is selected individually. The working part – the tabletop – is attached to the fixed base. The elements are connected to each other by two chains, which will perform a supporting and supporting function. For ease of use, 2 hinges are placed at the junction of the pallets; additionally, you can install locking mechanism, for example a hook that will hold such a table in the closed position.
A more complex option - coffee table from pallets that will look organic on the veranda or terrace. In this case, the pallets are carefully disassembled into their component parts, sanded, and painted. After this, the boards are knocked together into a rectangular tabletop and fixed around the perimeter with vertically arranged elements. The function of the legs is performed by 4 square bars. This design can be made in 3-4 hours and is quite suitable for evening tea parties and family holidays.
We use leftover building materials
On almost any personal plot there are boards left over from the construction of a house or outbuildings. This material is quite suitable for creating simple rectangular table, which can be placed on the veranda or in the garage, used as a dining room or utility room.
Here you need to follow these instructions:
- we assemble the frame. To do this you will need 4 boards: 2 long and 2 short. The sides are fastened together with self-tapping screws, forming a regular rectangle. To preserve the geometry, we use a square. Iron corners can be placed at the joints, which will give the structure rigidity and reliability;
- screw the legs. For these purposes, 4 boards or bars are suitable. The length is chosen arbitrarily: 80-100 cm. Support posts are installed on the inside of the frame, secured with nails or self-tapping screws;
- stiffening rib . An additional wooden crossbar is nailed approximately in the middle of the legs. A crossbar is installed on both sides, making the structure more durable and stable. In addition, these crossbars can later be used to install a shelf where you can place dishes or other small items necessary for the household;
- table top This is where the remaining boards go, which are best placed across the frame. The material is cut with a hacksaw to the width of the table and attached to the frame with finishing nails.
At the final stage, all surfaces are treated with a grinding machine, primed and varnished. You can paint the table, in which case the wood will last much longer. And if you go over the boards with a brush and apply stain on top, you will get an antique table.
Table with benches
This option is perfect for a garden; the wooden structure is installed permanently; depending on the chosen dimensions, it can comfortably accommodate 8-10 people. A garden table and benches are made from boards separately, then the elements are fastened together threaded connection: steel studs.
The manufacturing process begins with benches. To do this, the boards are cut to size according to the drawings. To assemble the bench you will need:
- 3 long boards that will go on the seat;
- 4 short pieces, cut at the edges at an angle of 45° - the length of these elements should not exceed the width of the seat;
- 4 boards 40-50 cm high - these will be the legs;
- 1 board is 25-30 cm shorter than the length of the seat - a stiffener.
note that all of the listed elements are duplicated, since there are supposed to be 2 benches for such a table.
The benches are assembled according to this pattern. A longitudinal stiffener is attached to two short cross members. The legs are installed, which are clamped with the remaining segments. For reliability, short parts are drilled through and, together with the legs, secured with pins.
Seat boards are nailed to the top of the frame. There is no need to place them closely; it is better to leave small gaps.
The finished seats are connected to each other by four boards 160-180 cm long. The fastening is done at the bottom of the legs so that the support posts are clamped by the boards on both sides.
After preparing the base, the table is assembled. The tabletop and areas for mounting support posts are made according to a principle similar to benches. The legs themselves are made cross-shaped and fixed to the longitudinal supports that connect the benches to each other. The result is a comfortable DIY wood kitchen table that can be used for family gatherings.
Round tables
Despite the specific geometric shape, making a round table from wood with your own hands is not as difficult as it might seem at first glance. In particular, if in the yard multi-storey building or old trees are being felled next to a personal plot, you can get an original round table top without any extra effort. A tree cut made in the thickest part of the trunk is quite suitable for this. Such a round piece, 5-7 centimeters thick, is varnished and can become a table for keys installed in the hallway.
If you are unlucky with fallen trees, you can create a round tabletop on your own. To do this you will need 4 boards of the following sizes:
- length – 2000 mm;
- width – 250 mm;
- thickness – 40 mm.
The boards are tightly connected to each other (without fastening), and a circle of the required diameter is drawn on the surface. After this, the boards are cut with a jigsaw exactly along the intended line. A rectangular or triangular frame is assembled under the legs from bars. The shape is selected depending on the number of legs. If 3 support posts are assumed, the frame is made in the shape of a triangle. The elements are fastened together with self-tapping screws, the legs are fixed in a similar way. The tabletop is installed using corners; after assembly, the entire structure is varnished. If you make such a table carefully, you can install it in an apartment in the kitchen or living room.
An oval table is assembled using a similar principle. The only difference is that on the boards connected to each other, not a circle is drawn, but 2 semi-ovals at the ends. The boards are cut along the line with a jigsaw. The frame is also made of bars, but has a strictly rectangular shape. Ideally, the frame should be located at a distance of 10-20 cm from the edge of the tabletop. Small tables are often used as coffee tables and look especially interesting on curly legs. However, the manufacture of carved supports will require certain knowledge, so it is better to order such elements from a furniture manufacturer.
Transformable tables
A folding table made of wood, made by yourself and capable of changing its original shape, is a real masterpiece. Folding structures look equally advantageous in a country house and fit into the interior of a city apartment. The simplest option is to make a transformer for a personal plot, and you can easily cope with this task yourself.
To surprise guests and get a comfortable wooden picnic table, you need to assemble 2 benches with high backs. The seat is made of 3 boards connected to each other by crossbars. There is one nuance here: the edge of the crossbar, which is located on the back side, should protrude beyond the edges of the seat by 10-15 cm.
Table legs are made in different lengths. A short support post is placed on the side of the seat, the long one will serve as the basis for the backrest. Note that the recommended height of the backrest should vary between 60-90 cm. The design feature of the backrest is that it is mounted on one bolt, which is located in the upper part and performs the function rotary mechanism. Closer to the seat, a hole is drilled in the rack where the lock for the backrest will be inserted.
After completing all the operations, you get 2 benches on which you can sit quite comfortably while discussing last news or admiring the sunset. If you lift the backs of these benches and move them closer to each other, you get a table with two rows of seats. Taking into account the width of each backrest, a tabletop measuring 120-180 cm is obtained.
Computer desk
If we are talking about a factory product, computer desk seems to be a rather complex structure. He has pull-out shelf under the keyboard, storage boxes for disks and other elements, the manufacture of which requires experience. However, the model of a table made of wood can be significantly simplified, leaving a minimum of parts necessary for working at the computer.
Here you can try this option:
- steel frame in the form of a welded rectangle made of corrugated pipe with 4 support posts. On one side, a frame is immediately made for the shelf where the system unit will stand, and two similar elements on the other end;
- the tabletop is made from boards or fiberboard sheets cut to size;
- the shelves are made of material similar to the tabletop.
All elements are connected to each other with a threaded connection or angle. Of course, this design is inferior to factory analogues in terms of external design, but it is several times cheaper and copes with its task.
Processing and external finishing
To ensure that a homemade wooden table has a presentable appearance and retains its properties for as long as possible, before assembly, all parts are impregnated with a water-polymer emulsion. It is better to repeat the treatment 2-3 times with an interval of 5 days. After installation is completed, the surfaces are thoroughly sanded, small flaws are masked with putty. Then varnish is applied: it is better to choose acrylic-based compositions that are safe to use.
To extend their service life, it is recommended to protect wooden tables from extreme wetness and direct sunlight. In a dacha garden, it is better to install them in a shaded place and cover them with film during rain.
There is none home handyman who would not want to assemble a wooden table with his own hands, and this desire does not depend on gender and age. It is important to comply with many aspects so that the result of the work is truly high-quality.
Figure 1. Diagram of a wooden table with legs in the form of crosses.
In the beginning there was a tree
Initially, the type of table is selected, and then the material with which the work will be carried out. Tables are different (Fig. 1, 2 and 3), and in each individual case different materials are used.
Chipboard is the cheapest and easiest to work with, which is why it enjoys the highest popularity. The thickness usually ranges from 1.5-3 cm, the color range is limited only by imagination, and the density depends on preference. But chipboard also has its drawbacks: low strength indicators, all colors are of artificial origin (even if desired, you cannot stylize them as original wood), as well as harmful chemical emissions from non-laminated areas.
The array, in turn, is the least popular due to its high cost. In this case, the work is quick and easy, because the cut just needs to be shaped to form a tabletop, after which you can mount it, and the shapes can be from simple to the most intricate.

Figure 2. Coffee table diagram.
Edged boards and timber are the main elements that are present in most cases as a supporting structure, but sometimes they are used as the main material, which makes the work much more difficult, but the result is much more interesting.
It is the table made of boards and timber that will be considered as an example, because By starting with the complex, you can easily learn to do the simple.
Work activity
Tools and materials:
- jigsaw;
- sander;
- screwdriver;
- roulette;
- beam;
- bar;
- edged board;
- rail;
- steel corners;
- furniture plugs;
- stain and varnish;
- flat brush.
Initially, you need to decide on the dimensions of the future table, and only after that start cutting. Let the table have a standard height of 110 cm, width of 90 cm and length of 150 cm, although any of the given data can be changed depending on your desire. And after an accurate determination, you can start cutting:
- timber 75*75 mm – 4 pcs. 105 cm each;
- block 45*80 mm – 2 pcs. 75 cm and 2 pcs. 135 cm each;
- edged board 50*150 mm – 6 pcs. 135 cm and 1 pc. 90 cm;
- wooden slats 10*40 mm – 5 pcs. 145 and 2 pcs. 85 cm each.
After the cutting is completed, each working element must be thoroughly sanded with a grinder or sandpaper, and all remaining dust must be collected with a barely damp sponge. The top of the wood is coated with an antiseptic solution to prevent moisture and insects, and only after complete drying can work continue.

Figure 3. Assembly diagram of a round table.
To begin with, a support structure is formed from beams and beams. To connect them, you will have to round the bars at the ends by 2.5 cm, and make a round holes with a corresponding diameter to a depth of 2.5 cm. They should be joined with some force, but it is still advisable to pour wood glue inside (a few drops at the very bottom).
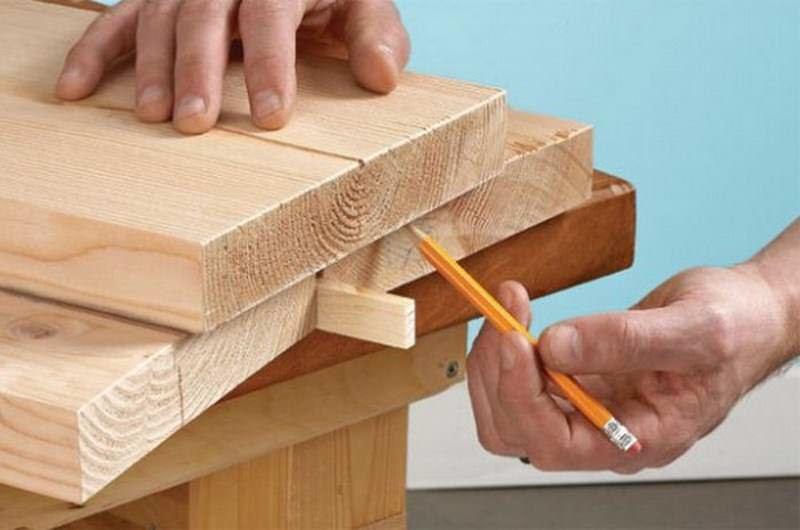
The tabletop is much more difficult to make, because... First, you need to cut a 90 cm board exactly in half lengthwise. Between the resulting 2 cuts, all the rest are laid alternately. The result is a tabletop that is formed, but not yet interlocked.
6 wide holes are made in the front and back boards to a depth of 2.5-3 cm, and all holes should be located exactly in the center of those boards that are on the other side. After this, full-fledged holes are made with a thin drill to the depth of the screw, and if this is not done, then it is highly likely that the wood will split.
Galvanized screws are used for coupling, because they are not subject to rust, and for wood this is very important. A strip is screwed from below onto all joints, and the fixation is made in a checkerboard pattern with a step of 20 cm for longitudinal ones, and in pairs on each board for transverse ones. Thanks to this, the countertop is no longer afraid of anything.
At the very end, all that remains is to combine the legs and tabletop into 1 structure, for which dowels and steel furniture corners are used. When making a joint on the dowels, you will again have to use glue, and then press down on the table with a load of 20-30 kg for 5-6 hours so that everything is fixed in this position. The corners, in turn, will act as a control fixation.
At the very end, caps of the desired color are placed on the heads of all visible screws.
Shutdown and additional considerations
After you have managed to assemble the table with your own hands, you need to completely cover it with varnish and stain. What is especially important in this case is the possibility of giving appearance from any breed. The varnish takes 30-36 hours to dry, so after coating you need to leave it finished work exactly at this time. Often misleading is the fact that after 4-5 hours there is no longer any smell, and the fingers completely stop sticking, but at the same time, harmful chemical compounds still continue to be released into the environment.
To form large-diameter holes, special drill attachments and drill bits are used, and they allow not only to form the internal contour, but also to cut the external one.
Before making a wooden table, you need to set aside 1-2 free days for the entire process, because... it would be very inappropriate to interrupt.
Sometimes errors and shortcomings occur during work, but this is within normal limits, so you need to have a 10-15% supply of all materials.
In total, with a full hand, the table is made in 1 day, after which it is dried, and you can begin to use it. Natural wood is attractive, but not the most cheap material . Making a wooden table with your own hands is more profitable than choosing finished model
(and in some cases easier than finding a table that matches the rest of the decor). Due to the absence of manufacturing costs, you can afford not to skimp on the quality of raw materials.
In contact with
Classmates
What kind of table can you make yourself?
Tables vary in design. Almost any model can be assembled yourself with some woodworking skills, the right tools, and instructions.
The complexity of manufacturing is determined by the purpose, shape and size of the table. From the “technological” side, any table consists of two structural parts: the upper part (the tabletop itself) and the legs.
Types of tables Before you make a table with your own hands, you should decide suitable model
and its features. The type of table will determine the choice of materials (solid wood or slabs of chips), finishing, as well as the set of tools that will be required for the work.
A table with a single support is usually made with a rounded top.
Note!
Models with two legs, connected by a jumper for greater stability, are considered the most convenient.

The easiest way is to make a “classic” table on four supports - reliable and “understandable”. In this case, special attention is paid to the legs. In case of inconsistencies and errors during work, the upper part of the table can be hidden under the tablecloth, but the legs of the table will instantly “give away” the hack.
Types of countertops Scandinavian style(the space should be large enough so that the furniture does not interfere with free movement). An oval table is a convenient option for a dining room. Small tabletops of the same shape look great on or coffee tables.
Rectangular and wooden tabletops are the easiest to make, and they are also a universal shape suitable for any interior and table of any functionality. Tables of complex designs, folding, portable or multifunctional, are usually made in the same format. For example, if there is not enough space in the room, but from time to time it is planned to place a large number of guests at the table, good decision There will be a compact, assembled book table, which, if necessary, can quickly be turned into a dining table (by raising both “wings”) or a work table (by unfolding one side of the tabletop).
Tools for work
The complete list of tools depends on the table format, as well as the material chosen for the work. In most cases you will need:
- or saw;
- or a screwdriver (and various drills for them);
- connecting elements (nails, screws and the like);
- wood sanding machine;
- means for measuring and marking (pencil, ruler or tape measure);
- protective equipment during work (gloves and safety glasses).
It is unacceptable to work “by eye” based on approximate calculations - the result will be far from the desired one. You will also need drawings with the dimensions of each table element.

Tabletop material: chipboard
The thickness of the sheet of such material is usually 16 or 18 mm. For dining table On massive legs, the chipboard may be a little thin - the structure will look disproportionate. It is better to glue two sheets of covering together to add “solidity” to the tabletop. The perimeter of the table top is edged. Material sold in construction stores, is most often made of plastic, and is covered with an adhesive base on one side.
The edge on the tabletop is secured with an iron. The edge is ironed with strong pressure and slowly enough so that the glue has time to melt. You will have to control the degree of melting by looking under the edge of the tabletop - the composition will protrude from under the edge and change color slightly. Chipboard table with such an edge correct installation will last long enough.

Wooden table
Table top material: wood
Solid wood is the most expensive of materials, but also the most durable. It is better to choose hard wood for the table. The best option in terms of price-quality ratio there will be beech or a similar tree. It is worth finishing the edge of the tabletop with a figured lath or baguette. Wood is usually chosen for massive tables; the thickness of the tabletop (and solid) should be about 4.5-5 cm.
It is worth considering the feature natural wood: It dries out over time in response to changes in humidity and temperature. When assembling the table, it is worth attaching a plywood “spacer” made from a 10mm sheet under the main tabletop (the dimensions of the sheet should be 10 cm smaller than the dimensions of the table). With this design, the furniture legs will be attached to the plywood. The table is guaranteed not to fall apart “from old age” even if the wood of the tabletop cracks and requires restoration.

Tabletop material: boards
Boards are an intermediate material for countertops both in price and aesthetics. A table made of boards is suitable for country house or a country style interior, and it is easier to assemble than a solid wood model.
For work, boards made of spruce or pine are most often chosen. Less commonly used are oak, walnut or birch boards. Their thickness should be the same, the length can be adjusted during the manufacturing process of the table.
Assembling the basic table model
First, a frame is prepared that will hold the remaining elements. Four boards of equal length are placed at the same distance. The end parts are laid out perpendicular to them. Fix the base with screws (screws, nails or analogues). To make the frame stiffer and stronger, the other two sides are also reinforced with boards.
The tabletop is made of boards of equal length and width, which are fixed to the base.
A table with a single support is usually made with a rounded top.
The legs (in the basic version - ordinary blocks of wood) are attached to the same nails or screws.
The final finishing of the table is carried out after assembly. Boards need to be sanded with a special machine or several types of sandpaper; if desired, the table is covered with stain, varnish or paint.

DIY table
Complex designs: folding picnic table
The folding table differs from the basic model primarily in the design of the legs. This part is technically the most difficult, however, it can also be done “at home”.
For the legs you will need to prepare wooden blocks (you need to leave a small “allowance” along the length). Any type of material is suitable for the countertop. If you plan to move the table, you should choose a light and durable one - for example, varnished plywood or wood.
The cut areas are edged, the legs and jumpers are rounded or cut at a right angle and sanded (with a machine or sandpaper).

Folding table
How to assemble a folding table?
The legs are secured with a bolt (no longer than 3.5 cm). The table is assembled according to the following scheme:
- fasten the legs and supporting elements;
- Places for attaching the support are marked on the tabletop (self-tapping screws are used for fastening);
- all structural elements are numbered to simplify the final assembly;
- final grinding of all surfaces is performed;
- parts are coated with a protective compound;
- the table is assembled “clean”.
Do folding table Doing it yourself ultimately turns out to be no more difficult than assembling a basic model, although this will require careful calculations and strict adherence to the drawings.
How to make a wooden table with your own hands video:
(and in some cases easier than finding a table that matches the rest of the decor). Due to the absence of manufacturing costs, you can afford not to skimp on the quality of raw materials.
See inaccuracies, incomplete or incorrect information? Do you know how to make an article better?
Would you like to suggest photos on the topic for publication?
Please help us make the site better! Leave a message and your contacts in the comments - we will contact you and together we will make the publication better!