Making cesspools. How to make a drainage pit: construction requirements and an example of DIY construction. Video - Cesspool
For collecting household waste in private homes or on garden plots a drainage pit is required. Its construction is not difficult, so you can do it yourself, without the involvement of specialists. To create a drainage pit with your own hands, you will need some knowledge, we talked about it in this article.
Sanitary restrictions
To avoid penalties and litigation with neighbors, when choosing a location for a drainage pit, the following sanitary and technical requirements should be taken into account:The storage pit for domestic wastewater is located only on the territory of a private household; you do not have the right to place it outside; distance from the fence – from 1 m;
In order to avoid wastewater getting into drinking water if the seal of the pit is broken, it is necessary to place it at a distance (at a distance of 10 m) from the water supply branch; from the well with drinking water retreat at least 20 m (on loams up to 30 m, sandstones - 50 m);
The close location of such a pit when it is drowned or washed away can lead to the destruction of the foundation, so the distance from residential buildings (including neighbors) is 10-12 m;
The depth of the hole depends on the occurrence of groundwater, the maximum depth is 3 m.
When choosing a location for treatment plant The possibility of access to special equipment for pumping out should also be taken into account.
To avoid appearing in the house unpleasant odor You should not place it near windows - you should retreat at least 5 m.
Distance to cesspool
Violation of sanitary standards is fraught with more than just fines. In case of a spill Wastewater damage to the natural environment or the health of others will be caused, a criminal case may be opened against you (Article 250 of the Criminal Code).
Important! The construction of cesspools without a bottom is allowed only if the volume of domestic waste per day does not exceed one cubic meter. In all other cases, the waste collection container must be sealed.
Types of drainage pits
A variety of materials can be used to construct a storage tank for domestic wastewater:Concrete (including concrete rings);
Plastic;
Rubber tires.

Drain pit made of brick
Due to their low airtightness, wood and rubber tires are used only for the construction of small drainage structures. Most often, cesspools are constructed of concrete or brick.
Calculation of storage capacity
The size of such a container depends on the number of residents, the number of installed plumbing fixtures, the presence of a shower or bathtub, bathhouse, dishwasher, washing machine, pumping frequency and other nuances. The generally accepted rate of wastewater per person without further filtration is 30-50 liters (0.03-0.05 cubic meters) per day.Thus, provided that the drainage pit is pumped out once a month for a family of 3 people, you will need at least:
0.03 x 3 x 60 (number of days in 1 month) = 4.5 m3
Advice. In case of unforeseen situations (for example, snow drifts and the impossibility of timely pumping), it is better to size the storage tank with a reserve. Since the volume of one GAZ sewer truck is on average 3.8-4 cubic meters. m, in order not to overpay for driving the car, it is wiser to make the holes a multiple of this value.
Concrete drainage pit. Construction stages
1. Initially, the hole is prepared manually or using an excavator. Usually its width is no more than a meter. Length cesspool calculated depending on the volume of wastewater. For ease of pumping, it is better to make the bottom of the pit with a slight slope.2. To prevent the walls from crumbling, they are leveled.
3. Pipes are connected to the pit. In order for wastewater to flow into the pit by gravity, it must be located at a certain slope. For pipes d160 mm it is 10 mm per meter of passage; the slope of 100 mm pipes is 20 mm.
4. It is advisable that drain pipes be located below the freezing level. Otherwise, they will have to be carefully insulated.

Pipe supply
6. It is better to make a hydraulic lock between the walls of the pit and the ground. To do this, wet clay is poured between the formwork and the soil and thoroughly compacted. This must be done as the formwork is being erected.

Clay castle
7. Walls concrete pit It is advisable to waterproof it using ordinary polyethylene film.
8. Standard formwork is prepared for the side parts of the structure. Since concrete walls have a significant mass, the formwork is secured as firmly as possible using self-tapping screws.
9. The structure must be reinforced. All metal rods are connected with wire.

Cesspool reinforcement
10. The thickness of the concrete cesspool walls is 25 cm.
11. To avoid the appearance of cold seams (places of “weakness” in concrete), walls are poured only in one step.
12. The solution is mixed in a ratio of 1:2:3 (cement, sand, crushed stone). It should be quite liquid. If you throw a small pebble into it, if there is enough liquid, it should be completely immersed in the solution.
13. During the pouring process, the solution should be periodically compacted with a shovel or vibrating compactor (bayonet). Otherwise, voids will form in it, which will negatively affect the strength of the structure.

Compacting concrete makes it stronger and prevents voids
14. In hot weather, to avoid cracking, it is better to cover the drying concrete surface with bags.
15. After the concrete has completely hardened (this happens on average within a week), the pit is carefully waterproofed with bitumen. To do this, the walls are first cleared of irregularities. The bitumen is crushed into pieces, heated to a boil, then removed from the heat and gradually added to it in a thin stream. a small amount of kerosene, gasoline or diesel fuel (10 liters of bitumen will require a liter). This is done so that the bitumen is more liquid. If you don't dilute it, it will harden almost immediately after you remove it from the heat.

Heating bitumen on a fire
16. You should not overheat the bitumen or heat the mixture together with gasoline, kerosene or diesel fuel, otherwise it will flare up. If the heated bitumen does catch fire, to extinguish the flame, you should immediately cover the container with plywood or a suitable lid.
17. For waterproofing, you can also purchase a ready-made solution of roofing bitumen mastic, but this will cost more.
18. The resulting mixture is applied to the walls with a brush. After the first layer has dried, another one is applied.
19. A reinforced concrete slab with a hatch for pumping and cleaning can be used as a cover.

Drain pit hatch
Advice. In the drainage pit, as a result of waste rotting, methane is formed - a rather explosive gas. It is vented using a ventilation pipe located in the pit lid. The diameter of such a pipe is 100 mm with a height of 600 mm.

Ventilation pipe arrangement
Video: Drain pit: stages of construction
In most cases, sewerage is not provided at the dacha. Instead, a cesspool is used. There are quite a few options for its construction, and each has its own advantages and disadvantages. Next we will consider in detail standard designs cesspools and discuss how to install them.
What is a drain hole and why is it needed?
A drainage pit, or as it is also called a cesspool, is necessary for private houses that do not have a direct sewerage supply. A proper drainage pit processes waste, allowing some substances after treatment to be absorbed into the ground without harming it.

The popularity of this type of treatment plant is due to the ease of installation and speed of work. One person without assistants is able to complete all the work within 3-5 days, depending on the type of structure.
On the other hand, there are certain difficulties associated with the further operation of the cesspool. First of all, this concerns the issue of pumping out sewage. The correctly selected volume of the pit is no less important.
Drain pit device
The simplest designs, which are most often found in rural houses and simple summer cottages, are digging into the ground old barrel or a tank that has served its useful life. Such a design will allow for the collection and partial filtration of wastewater, provided that its daily amount does not exceed 1 m³. Such schemes have not received approval from sanitary services, since they can harm the surrounding ecology.
The simplest drainage hole in a private house is a simple design. Through the sewer pipe, although direct entry is often found, sewage enters a container whose bottom is covered with silt. The drainage pit must be equipped with a gas outlet pipe through which the methane generated during waste processing will escape to the outside.

Such a system is completely unsuitable for those houses in which it is planned permanent residence. Considering that the average daily water consumption for a family of four is up to 1 cubic meter, this leads to the need for frequent cleaning of the cesspool, and, accordingly, to financial costs. Previously, there was a widespread method of removing sewage into the soil with its subsequent natural filtration, but in the current realities this method is, for obvious reasons, prohibited by the sanitary service.
However, such a design is quite common, and there will not be any special alternatives for summer cottages with infrequent attendance. It is not difficult to equip it on your own, but you need to take into account the following points:
- The walls of the pit will require strengthening, as the water will gradually begin to collapse the structure. To prevent this, they install a tank, or build walls from brickwork or concrete rings.
- The volume of the cesspool must be at least three cubic meters. The correct calculation is made taking into account the fact that each person will require at least one cubic meter of space.
- Installed ventilation will increase the rate of waste recycling.
- If an overflow pit is installed, it practically does not need to be cleaned, since its design involves the presence of several chambers for waste processing. In this case, sewage enters the first chamber, where it accumulates. After the level of sewage reaches the overflow partition, it will flow into the second pit and there it will be absorbed into the ground. Solid waste remains in the first pit and is processed by bacteria.
Types of drainage pits
According to the type of execution, cesspools are divided into:
- concrete storage,
- brick,
- with receiving capacity,
- temporary,
- with timber formwork,
- without a bottom, with waste moisture discharged directly into the ground.
Making a drainage pit from concrete
It is a quickly constructed solution for receiving sewage and has the following advantages:
- Construction speed. In fact, with a set of factory-produced concrete rings, such a structure can be built in one day. There is only one drawback - for work you will need crane or an excavator.
- Reliability and durability of concrete.
- Minimal installation complexity.
Such a structure is erected quickly:
- First, a hole of the planned depth is dug.
- Next, the site is leveled.
- The first ring is installed using a tap.
- The soil from under the ring is evenly removed, while placing signal supports that prevent the structure from skewing.
- After the second ring has been installed on the first ring, they are fastened together using metal staples.
Installation continues in a similar way to the planned depth.
When all the rings have been placed, a concrete floor with holes made in it for the hatch and ventilation pipe is installed using a crane. The finished structure must rise above the ground at a level of at least 30 cm.
To ensure better tightness, all seams and the junction with the sewer pipe are carefully sealed with bitumen mastic.
The problem with a sealed structure will be its rapid filling, and the need to frequently call sewage disposal services to pump out sewage. In the same case, if it is allowed to discharge water into the ground, then purchase rings with holes made. The installation technology is no different from that described above.
To give the finished structure a more complete look from an aesthetic point of view, you need to sprinkle the part of the drainage system protruding above the ground surface with soil, while providing plantings that will serve a decorative function. For example, planting a Moorish lawn that is undemanding to conditions will allow you to turn a wastewater treatment plant into a flowering flowerbed. 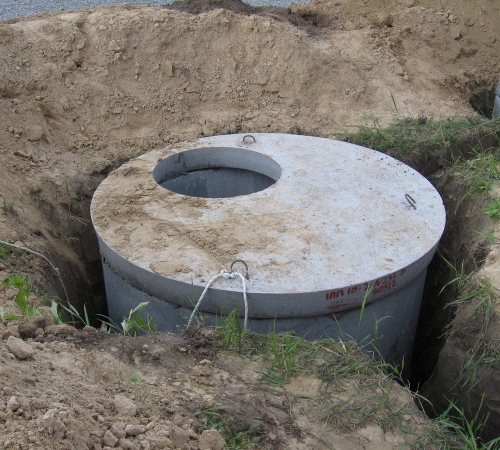
Brick drain pit
According to experts, the best option will be the application ceramic bricks which will ensure the strength and durability of the structure. The process of constructing a brick drainage pit is conventionally divided into several stages:
- a drainage layer 20 cm thick, consisting of sand and crushed stone of different fractions, is placed in a hole dug to the required depth,
- after this, they begin to build the walls, laying bricks in a checkerboard pattern, taking into account a gap of 5 cm between them for better filtration of waste substances,
- on all sides the bricks are covered with crushed stone of large fractions as the masonry grows,
- make the necessary gap in the masonry for inserting a sewer pipe.

There are often conflicting recommendations about the final stage. For example, to reduce costs, it is proposed to make masonry half a brick thick, but it is important to remember that such a structure will hardly take on the weight of the concrete closing cover.
The design itself provides two options for laying bricks:
- to ground level
- 80 cm below ground level.
In the case of laying bricks to ground level, space must be left taking into account the thickness of the covering concrete cover. The recommended design with the completion of the masonry not reaching the ground surface by 80 cm raises some doubts about its feasibility for a number of reasons:
- since the design will require the installation of a closing cover, in the end the drain will still be deepened into the ground by at least 50 cm - which is dangerous due to the possibility of falling into a hole,
- It is recommended to fill the lid with earth up to the surface level, but in this case, either access to the hatch will be blocked, or another pipe with a larger diameter than the size of the lid will have to be installed on the installed lid - and in this case, the system will be subject to additional load.
Masonry is inferior to concrete in a number of factors:
- a concrete structure is erected noticeably faster and ultimately requires less funds for the construction
- brick is more susceptible to moisture,
- To evenly distribute the load on the walls, the cesspool must have a cylindrical shape.
The feasibility of erecting brickwork appears only when it is not possible to call in heavy trucks.

Plastic receiving containers
If the question of how to make a drainage pit without resorting to special costs is urgent, then you need to pay attention to the option of installing a polymer tank of the required capacity. In this case, all the work boils down to digging out the required amount of earth under the tank, and then placing the collection in the prepared hole. After this, the remaining space is filled with soil. It is important to remember that sealed structures necessarily require the installation of a gas outlet.

The advantages include the following:
- ease of construction,
- minimal costs in terms of labor intensity,
- protecting the air from the release of unpleasant odors,
- durability of the polymer material, which is up to 50 years,
- During use, no waste substances enter the soil.
Among the disadvantages, you need to pay attention to the need for periodic pumping of sewage and the small capacity of the tank, so this option is optimal for use in conditions low load. For example, if the dacha is visited once a week, and a small amount of waste goes into the drainage pit.
Temporary drainage pits
They are made from used car tires. It is important to consider that the internal diameter must be at least a meter, otherwise the pit will quickly become clogged with sewage. In fact, the structure is easy to erect: a hole of the required depth and diameter is dug, after which it is filled with tires, laying them one on top to ground level.

The advantages of the design include the following:
- simplicity of work,
- low price of used tires,
- after installation, the empty space is filled with earth, and no additional finishing is required.
It is worth remembering that the design is suitable for a toilet placed outside and not connected to the house by the sewer system. Since it is assumed that the load on the pit will be negligible. Despite its name, with infrequent use, such a pit will last up to 25 years.
Drainage pit with wood formwork
Like the previous design, the use of wood is suitable as a temporary solution. In fact, this option is still sometimes used in rural areas and at some dachas, but due to the fact that wood, even with high-quality processing, will not withstand more than ten years, it does not make much sense to use wooden formwork. Nevertheless, this is a drainage pit, the price of which will be most reasonable and will not exceed 3000-4000 rubles.
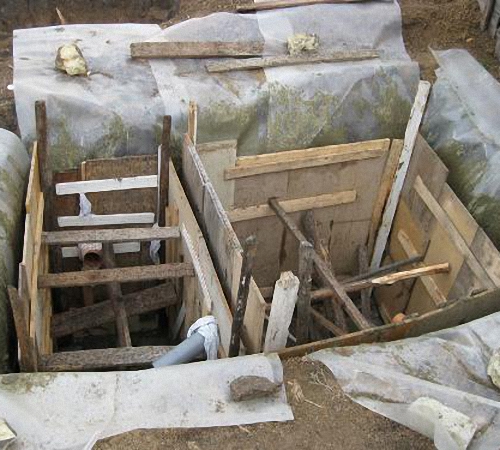
Of course, the speed of construction and isolation of the soil from sewage are advantages of the design, but nevertheless, it is inferior to all types of cesspool and for the most part serves as a relic of the past.
Drain hole without bottom
It is a cesspool constructed of brick, with the difference that the bottom of the drain is not treated. In some cases, the bottom is covered with a metal mesh, but in a chemically aggressive environment it quickly rusts and loses its usefulness. Sewage evenly falls into the ground, but due to heavy silting of the bottom of the pit, additional cleaning is periodically required.
In addition to the above, when arranging a cesspool, you need to pay attention to some tips to increase recycling efficiency and ensure greater durability of the structure:
- It is better to drain the bottom of the pit using coarse crushed stone to prevent premature siltation. The layer thickness must be at least 10 cm.
- To improve drainage, they are inserted at the bottom asbestos pipes, which are installed with a protrusion at a level of 50 cm from the bottom.
- It is better to finish the walls with clay to reduce the concentration of ingress harmful substances into the ground.
- In the event that there is one cesspool on the site, but its volume is not enough, it is more advisable to build another one nearby and connect it PVC pipe from the first. In this case, the structure will become overflowing and will need cleaning much less frequently.
- From the first moment of use, it is necessary to use special preparations containing bacteria. They speed up the natural recycling process and reduce bad smell.
- The overlap should extend above the ground level so that in the event of heavy rain, the drainage hole does not overflow with water and its contents do not fall onto the site.
- In any embodiment, the design must have an exhaust pipe to remove accumulations of methane and other hazardous substances.
- Inorganic substances, including low-quality toilet paper, can significantly reduce the service life of the structure and contribute to severe siltation of the surface.
16.06.2016 0 Comments
The cesspool for a private home has evolved somewhat over the past decades. In addition to the simplest design (a hole in the ground) and the type concrete well, over the past 10 years, septic tanks have been actively used privately. The latter direction has a number of branches: pumpable sealed septic tanks and systems with wastewater treatment for further discharge. Below is more information about each type of sewerage structure.
In contact with
Classmates
Calculation
For cesspools with a filter bottom, a simple formula is used to calculate their volume - 0.15 m 3 per person per day living in a given house. For longer use from cleaning to cleaning, if you are planning a sealed design, you can increase the volume by 50...70% for each person.
Do not get too carried away with increasing the volume, as this will entail additional construction costs, and the benefit from rarely calling the car will be offset by the costs of cleaning the tank: over time, sludge accumulates in the containers/pits, which also needs to be removed. In a cesspool with a filter bottom, this process also occurs: over time, the soil loses its ability to filter wastewater - it becomes clogged with fats and waste fractions that are not subject to decomposition.
For sealed systems, it is recommended to take the wastewater rate from 0.2 m 3 / person per day for calculation. This is the required minimum. The second calculation option is based on the maximum amount of wastewater based on the consumption rate of plumbing fixtures for 2...4 weeks. This option is more reliable.
The consumption rates are as follows:
- 1 tap – up to 0.1 m 3 per day;
- Shower (taking into account the number of residents) – 0.08 m3 per day per person.
- Bathroom - up to 0.25 m3 per week for each resident.
- Toilet - from 0.04 m 3 per day per person.
- Washing (dishwasher) machine - 0.01...0.02 m 3 each time it is turned on.
- Other plumbing fixtures are subject to availability.
- Reserve – at least 30%.
Calculation example for a family of 4 people
For a day, a family of four needs
- Household needs - 0.1 m 3
- For shower - 0.32 m3
- For taking a bath once a week: 0.25/7*4=0.14
- Sanitary needs - 0.16 m3
- Washing once every 2 days: 0.02/2=0.01
- Total minimum required for daily use: 0.82 m3
- Taking into account the daily supply, 1.1 m 3 of capacity is required.
Next, you consider how much volume you can afford, taking into account the cost of forced cleaning and the required space for construction. For a pit with a filter bottom, 6 m3 will be enough. For a sealed design with weekly cleaning, you will need a capacity of at least 6 m 3, taking into account weekly cleaning.
Simple and proven option
A simple cesspool in the yard is a mandatory attribute of any private home that does not have the opportunity to connect to a central sewer system. The construction of cesspools can be as simple as possible: if there is dense soil and compliance with construction standards, they dig a well and cover it.
Location options
- at least 5 meters from the house or more;
- no further than 1...4 m from the fence;
- no closer than 30 m to the nearest body of water;
- from a source of drinking water - no closer than 50 m.
It is advisable to fence the area, but leave access for the vacuum cleaner service vehicle.

The location of the cesspool relative to other objects on the site
This DIY cesspool design is ineffective. Construction is fraught with a number of difficulties: it is necessary to dig down to solid layers of soil, and then additionally remove from 2 to 4 m 3 of rock. The last disadvantage of the design is the low volume of wastewater that it is able to serve - up to 0.5...1 m 3 per day. There is one advantage: it’s cheap and you can do it yourself.
Work procedure for a do-it-yourself cesspool without pumping:

Conclusion: the simplest cesspool, without strengthening the walls, is suitable for use with a small volume of wastewater. This option is acceptable for a summer residence, but not for permanent residence.
Brick/concrete sewer well
 Prefabricated sewer wells they dig in the same order as a simple cesspool. Their difference is the main walls made of brick or ready-made concrete rings. Brick is practically not used in such structures today.
These designs come in two types: sealed and with a filter bottom (do-it-yourself cesspool without pumping). In the first case, the well is concreted and sealed. Ventilation is required. In designs with a filter bottom, the bottom is left open and the soil underneath acts as a filter for wastewater.
 The order of work is similar to the first section, only the operations of laying concrete rings (brick laying) are added. You can build a do-it-yourself cesspool using bricks yourself; you will have to hire equipment to lay concrete rings.
A cesspool made of concrete rings is strictly limited in size. There are three main sizes of these products for private yards: 70, 100, 150 cm. In industrial construction, rings up to 2 m in diameter are also used.
 Instead of a do-it-yourself cesspool for a private house, you can build a more modern structure - a septic tank. With a sealed septic tank for 1 chamber, you are not so limited in choosing the location of the structure - this is its advantage. But construction will be a little more expensive than for option 1, but much cheaper than a cesspool made of concrete rings.
The second option is a multi-chamber septic tank with several levels of water purification. In essence, this is a minimal water treatment plant, the product of which can be returned to the soil, used for irrigation or discharged into a reservoir. The conditions for using such a design are that you must constantly monitor the condition of the discharges and control the quality of the purified water. For this purpose, a number of technological measures (filtration systems) and special preparations (chemical and/or biological treatment) are used.
This option for a do-it-yourself cesspool is more expensive, but eliminates the constant use of forced cleaning services.
Procedure for installing a septic tank
- Preparing the pit (according to the dimensions of the tank, taking into account the cushion).
- Backfilling of crushed stone cushion - from 0.5 m.
- Laying sand (up to 0.1 m)
- Tank installation. Compensation structures must be installed on the outside of the tank. They can be done in different ways: scald the tanks with reinforcement, line the pit with bricks, etc. The main task here is to prevent the soil from the outside from pressing on the walls of the tank, otherwise it may burst and depressurize.
- After installing the septic tank, the free volumes around the tank are filled with sand, and a soil backfill is laid on top (again, on a protective structure, so as not to push the tank from above).
Note. For round tanks there is no need to make a protective unloading casing. For “cubes” - a must.
 In conclusion, the basic rules for laying pipes (as a reminder):
- Calculate the slope angle for all communications: for each meter of sewerage, the slope must be at least 2% (difference in level 2 cm). With a pipe length of 5 meters, the difference should be at least 10 cm. For longer sections of pipelines, it is advisable to set a larger inclination angle of 3...4 cm per meter.
- Consider the freezing depth. Sewerage – “ warm system": reactions are constantly taking place in it with the release of heat. But it must be insulated (in case of long downtime), and buried to a depth of at least 1 m for moderate latitudes.
- The pipes are laid on a sand cushion; after laying, they must be covered with bricks. Plastic will not bend under soil pressure, but under constant pressure it very often cracks. An example of such an impact would be a vehicle constantly driving over a pipe. For protection, it is enough to lay out a protective tunnel with walls made of brick, old concrete curbs, stone and cover the pipe with the same materials. The pipe in the tunnel can be covered with sand. Another option is to fill the structure with concrete and then backfill the trenches. But it's not convenient. If pipe repair/cleaning is required. Or in the case of adding a new branch to it from a guest house built 3...5 years later.
In contact with
If there is no centralized sewage system nearby, then as an effective solution to the problem, we suggest you learn how to make a cesspool with your own hands.
In any country house or in a country house where there is a toilet and a hot and cold water supply, there is a need to collect and drain sewage. And below we will consider the most important points when arranging a cesspool:
| Choosing a location for a cesspool in a private house. | |
 |
Construction different types cesspools with your own hands. |
 |
What materials may be useful in your work? |
A cesspool is the simplest sewerage option in a private house or country house, which you can implement with your own hands.
Attention! Your site may require drainage, and you can buy everything you need for it at a discount in the online store https://www.drenaj-shop.ru/. But be sure to indicate that you came from our website “Remontik”.
Where should a cesspool be located in a private house?
First of all, you must choose a place for the cesspool, being guided by the following requirements:
- the pit must be located in an area adjacent to a dacha or private house;
- It is allowed to install a cesspool no closer than 10 m from the foundation of the house and other structures on the site and to structures located on neighboring sites.
Attention! This requirement is, first of all, explained by the fact that if the cesspool is located close to each other, the foundations of nearby buildings and structures may collapse and flooding may occur:
- the distance from the cesspool to the fence is regulated and must be at least one meter;
- the depth should in no case be more than 3 meters (when choosing it, you must take into account the depth of groundwater);
- the pit must be located at a certain distance from drinking wells (25 meters).
This distance directly depends on the type of soil on the land:
- For sandy loam and sandy soil, the cesspool should not be located closer than 50 meters from the well.
- If clay soil predominates, at least 20 meters.
- When su clay soil- no closer than 30 meters.
How to make a cesspool with your own hands? Main types
Today, there are two options for arranging a cesspool:
- sealed cesspool;
- an ordinary cesspool without a bottom (drainage).
In this type of drainage pit, wastewater goes into the ground, where it is purified by anaerobic bacteria. A striking example of such a cesspool would be an ordinary village toilet.
- If there is a large daily volume of wastewater (more than 1 m3), you will need a device sealed pit, which needs to be pumped out from time to time.
This requirement is directly related to the fact that the presence of a bottom in a cesspool, water goes into the ground and its purification is carried out by microorganisms that live in the thickness of the soil. However, their capabilities during processing are limited.
With large volumes of wastewater, microorganisms cannot cope with their purification. In this case, the wastewater will pollute the adjacent soil and it is possible that it will enter the water-bearing layers of the soil with further contamination of drinking water.
If it is necessary to dispose of a large volume of wastewater, you may want to think about installing a septic tank with filtration fields.
How to make a regular cesspool with your own hands
A simple cesspool is very easy to make:
- A hole is dug 2 m wide, up to 2 m deep and 2.3-3 m long.
- Soil walls are laid or strengthened.
- A layer of crushed stone is placed at the bottom.
- A protective ceiling with a hatch is installed on top.
The main advantages of a pit without a bottom:
- simple and quick installation;
- low cost of operation and construction;
- simplicity and ease of use.
Some disadvantages of a drainage pit:
- unsuitable for using large volumes of wastewater;
- environmentally hazardous;
- spreads an unpleasant odor;
- unscheduled overflow is possible due to rain or melt water;
- The groundwater level may be below the level of the cesspool.
How to make a sealed cesspool with your own hands
A sealed storage tank (cesspool) is a sealed container into which wastewater flows through pipes. As the container fills, wastewater must be pumped out using a sewer truck.
The main advantages of a sealed pit:
- does not depend on groundwater level;
- environmentally friendly, since wastewater does not enter the environment;
- the location of the pit does not depend on the types of soil on the land plot.
Main disadvantages:
- high construction costs;
- monthly operating costs (you have to regularly call a sewer truck, on average 2-4 times a month);
- a smell is possible if the storage tank is made in the form of a well.
Calculation of the size of the cesspool
V pits = number of days x number of people x V people x 0.001, where:
V pit – working volume of the cesspool, calculated in cubic meters;
number of days – frequency of calling a sewer truck to clean the pit;
V person is the water norm for one person per day, measured in liters. Accepted 100-200 liters per person.
Here's an example of a calculation:A family of 5 people lives in the house, and you are going to order a sewer truck once every two weeks. We accept V people - 150 liters per person per day.
As a result, the required volume of the drainage pit is:
V pit = 14x5x150x 0.001 = 10500 liters, or 10.5 m3.

What materials can be used for a cesspool
Let's consider different variants and types of cesspool structures that you can build with your own hands. It’s worth saying right away that they are all divided into permanent and temporary.
- Tires.
If you need a cesspool for a toilet with minimum costs, we recommend building it yourself using old car tires.
This is a quick and cheap option for constructing a drainage pit. It has a simple design. First, a pit is prepared where the tires are laid (one on top of the other). Crushed stone is placed at the bottom of the pit; if necessary, additional sealing of the tires can be done with a clay lock.
Advantages:
- simplicity, low cost and fast speed of construction;
- durability;
- easily restored if necessary.
Flaws:
- tires rot;
- rapid filling with irregular cleaning, as a result of which you will lose useful volume;
- with a large load on the pit, it negatively affects the environment.
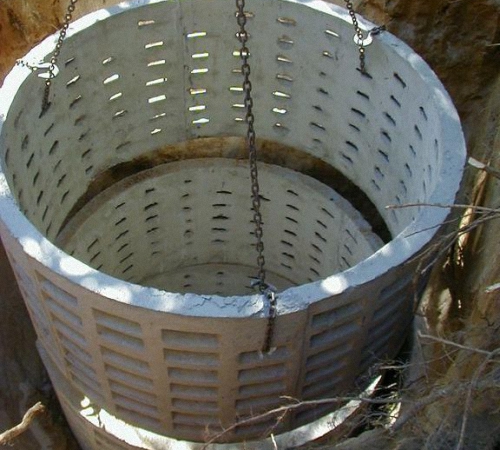
- Concrete rings.
We suggest considering the possibility of constructing a cesspool using concrete rings.
This is another good option for quickly building a cesspool. In structure it resembles a well. Concrete rings are stacked on top of each other. If desired, the joints between the rings are sealed using a concrete screed.
According to the principle of operation, a pit made of concrete rings is more likely to be a sealed type of cesspool, so it needs to be emptied in a timely manner. Although it is possible to build a septic tank from concrete rings.
Advantages:
- relatively low cost;
- durability;
- ease of construction of a protective cover with a hatch;
- the possibility of constructing a cesspool with your own hands.
Flaws:
- the need for regular bowel movements;
- high labor intensity of work;
- the possibility of an unpleasant odor forming from the ventilation pipe.
- Brick.
A brick drainage pit is a successful and optimal solution if you need a drainage pit for a bathhouse or a pit for a toilet.
Advantages:
- ease of construction - any summer resident can cope with brickwork;
- economic security - the contents of the pit require regular removal by a sewer truck or can be cleaned directly on site.
Flaws:
- an unpleasant odor occurs periodically (you can cope with this problem by regularly cleaning the drive and using drugs that accelerate the decomposition of biological waste);
- short service life (about 15 years), as a result of degradation of the brickwork in the unfavorable conditions of the pit;
- flooding (flooding can be avoided by regularly pumping out the liquid that collects in the storage tank).
How to make a brick cesspool with your own hands: description of the main stages
First of all, decide where the cesspool will be located, taking into account compliance with all requirements and ease of use.
Then decide on the design. A brick cesspool, depending on its purpose, can have square, round or rectangular masonry.
We calculate the volume, determine the dimensions and prepare the foundation pit.
In the case of a rectangular pit, we slope the bottom towards the location of the hatch. We lay a sand cushion 10-15 cm thick at the bottom, after which we fill it with concrete mortar. You can also use a ready-made concrete slab of the required dimensions. A screed of cement mortar is made on top.
We carry out laying of walls, the thickness of which should be at least 25 cm. It is best to lay half-brick walls in a checkerboard pattern. Quarter brick masonry is also acceptable.
Once the walls are ready, you need to build a clay castle on the outside or cover them with bitumen mastic for a more reliable seal.
Plastering the inner surface (if necessary). For plastering, you can use a solution of sand and cement in a ratio of 2 to 1.
Installation of covering and hatch. When the base of the pit is ready, we install its ceiling with a hatch. It should be no less than half a meter overlapping the pit on different sides.
It can use tightly packed logs or reinforced concrete slabs as a floor. When installing a ceiling, it is necessary to provide in advance a place for a hatch, the diameter of which should be 0.7 m.
On top of the coating, waterproofing is made of polyethylene film or roofing felt. We cover the waterproofing with a layer of slag or soil 40 cm thick.
Attention! In order to prevent the spread of smell from the pit, as well as its freezing, the hatch is made double. The top cover should be level with the ground, and the other at the ceiling level. You can fill the space between the covers with heat-insulating material (slag, expanded clay, polystyrene foam, etc.).
- Barrel.
A drainage pit made from a barrel is an excellent option for arranging a sewer system with your own hands. It can provide natural wastewater treatment in case of small volumes of wastewater (up to 1 m3).
Preparing a barrel for a drain pit:- Take a 200 liter barrel made of non-corrosion material, make the side walls in a checkerboard pattern using a drill or grinder. These will be the drainage holes. They are recommended to be done in increments of 10 cm.
- We prepare and attach a pipe for fixation to the bottom of the barrel drain pipe. To ensure high sealing, use silicone sealants. Cover the connection point of the pipe with bitumen mastic.
- We wrap the barrel on different sides with geotextiles and secure it with non-heating twine. This is necessary to ensure high-quality protection of the barrel from the penetration of foreign particles and soil into its container while maintaining drainage efficiency.
Preparing a pit for a barrel and installing a sewerage system:
- dig a trench and place it there sewer pipes with a slope;

For residents of city apartments, all communal amenities become familiar and natural for each apartment. A completely different case is country houses, in which all such amenities are constructed with your own hands.
Sewage, in the latter case, is a priority element. In some cases, such a system can be connected to a central network, but in others it is necessary to use similar autonomous methods, such as a cesspool, storage tanks or. Each of these methods has its own individual characteristics.
Features of a cesspool in a private house
Selecting a location

A cesspool is a container into which waste is drained and accumulated. domestic water. To determine the optimal location for its location, you will need to analyze land plot and find the most suitable site.
A schematic plan of a private plot can help in this matter, in which the locations of the following important elements are necessarily indicated:
- Residential building
- Household The buildings
- Water wells
- Gas pipeline
- Water supply pipes
Also, this diagram should indicate the landscape elements present on the site. To make it easier to locate a cesspool, you need to mark on the plan neighboring buildings and other structures located in neighboring areas, including wells and all communications.
When planning the location of the pit, you need to take into account the direction of movement of groundwater. This information can be obtained from the relevant services.
At the moment, some sanitary standards have been stipulated for the distance of this building from other structures:
- The neighboring building and adjacent buildings are 10-12 m.
- From the boundaries of your site - 1.5 meters
- Your own house – 8-10 m.
- Wells for water intake - at least 20 m.
- Water supply networks – at 25 m.
- Groundwater – at least 25 m.
- Gas pipes – about 5 meters
When arranging a cesspool, it will be necessary to take into account the condition of the soil in which this structure will be placed. For clay soil, water intake wells should be located at least 20 meters from the pit. With loamy soil, this distance increases by 10 m and will be 30 meters from the cesspool. For sandy or super-sandy soil - at least 50 meters.
Also, it is necessary to take into account another extremely important point. It is strictly forbidden to build cesspools along the groundwater flow, since in in this case they may become dirty.

The first value that needs to be calculated before building a cesspool is its volume, since the efficiency of the entire sewer system and the frequency with which the drain will need to be cleaned will depend on it. This value can be calculated based on the number of people living on the site. For example, only 4 people live in a private house, 3 of whom are adults, and the last one is a child.
As a rule, one adult produces at least 0.5 cubic meters of waste, and for a child this value is reduced by exactly half - 0.25. If water consuming devices are connected to the cesspool drain, they are also taken into account. They are not used in this example.
As a result, we get 1.75 m 3 of waste going to the cesspool (0.5 + 0.5 + 0.5 + 0.25). The resulting number should always be rounded up to help avoid overfilling wastewater tanks. In this example, the number will be 2 cubic meters.
The total volume of the cesspool tank should exceed 3 times the volume of waste waste. That is, 3*2=6 m3. This is the optimal volume of a cesspool tank for a family of 3 adults and 1 child.
To erect a similar structure for summer cottage, it is necessary to use a different construction scheme. For this case, you can take 1-2 as the optimal value cubic meters, since people come to such areas not so often and not in very large groups of people. But, if other circumstances are present, it is possible to increase the volume of the reservoir for the summer cottage.
Having the required volume of the tank, you will need to determine its structural dimensions. The depth of the structure is determined by determining the level of groundwater and the features of further maintenance of the cesspool. To periodically clean the tank from accumulated liquid and solid growths on the walls and bottom, you will need to use the services of vacuum cleaners.
The hose of a sewage disposal machine rarely exceeds a length of 3 meters, so you should not make the depth of the tank exceed this value. Otherwise, this may affect the quality of cleaning the cesspool. The most popular cesspool depths are 2.5 and 2.7 m. The maximum depth of 3 m is used extremely rarely, but this depth can be compensated for using a sand-crushed stone cushion. This is most relevant for leaking drains.
Also, it is worth remembering that if the underground groundwater is higher than 2 meters, there is no point in constructing a cesspool, as this can lead to the filling of the tank groundwater. This will mean a drop in the efficiency of the entire sewer system.
In this case, most suitable options There will be septic tanks or barrels of the required size, but they will need to be protected with a casing made of cement or metal mortar.
Construction of cesspools
Cesspool without bottom
At first glance, the construction of such a structure is quite easy:
- The optimal location of the cesspool is selected
- Dig a hole of suitable size
- Cover the walls with a layer of concrete, brick or concrete rings
- Dig a trench for sewer pipes to pass through
- Lay pipes from the building to the cesspool
- Build the ceiling


