How to update an old chest of drawers with your own hands. How to wallpaper a cabinet: ways to restore furniture Wallpapering wooden cabinets
Despite the fact that Soviet-era furniture is quite reliable and strong, it is not considered beautiful, let alone competing with modern furniture. In addition, by this time it was pretty worn out and in need of repair. Even in such conditions, the owners are sorry to part with it. To buy a new, modern one, you need a lot of money, because furniture has always been not cheap, and it is not cheap even now. In this case, there is one Alternative option leave old furniture and not buying a new one is to try to update the furniture with your own hands, giving it an attractive and modern look. appearance. Cabinet furniture is quite easy to remake, especially since there are all the materials necessary for this. In any case, it will be much cheaper to purchase materials for remodeling furniture than buying new furniture. One of the easy and affordable tricks is to change the color and replace the hardware. There will be no special problems with fittings, but with a change in appearance, everything is much more complicated. There are several options, but two are considered the most common - painting and gluing a special film or wallpaper.

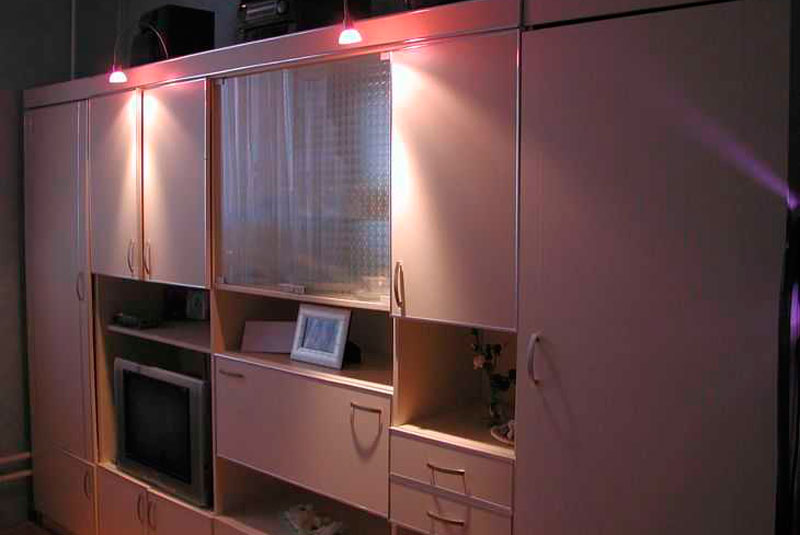
The most affordable and easiest option is to paste old furniture with self-adhesive film. On sale you can find a film for every taste, both color and monotonous, of various colors, shades and textures. Many prefer wood effect film, but there are other options that meet the spirit of modernity. This approach can really turn an old wall into furniture that will have an attractive and modern look. It is not at all difficult, it is enough to do your work slowly and carefully, which will allow you to get an interesting result that deserves attention. To see this, just look at 2 photos. In the first photo, an outdated Soviet wall made of chipboard, and in the second - the same wall, but after renovation.

The wall has received a new appearance thanks to the use of compacted self-adhesive furniture film, cream color with a matte surface. Where there was an open part of the wall, there are glass doors pasted over with a translucent matte film. For edging used furniture layout, chrome colors, and also self-adhesive.
The work consists of the following stages:
- The old wall is dismantled, everything that is not needed is removed, including accessories.
- All surfaces are cleaned of dirt and degreased. To do this, use a soft cloth and detergent. After that, the product is washed off with warm water and vinegar and finally the surfaces are wiped with a dry, clean cloth.
- Fragments of the required size are cut out of the film, with a margin of up to 1 cm. After pasting, the excess film is cut off with a clerical knife.
- The surface before pasting is irrigated with water from a spray bottle. A wet surface will allow you to accurately position the film, as it can be moved, or even peel off if the first time it was not possible to glue it well.
- Before pasting, the protective film is removed from the film, after which it is laid on the surface. Having correctly positioned the film fragment, they begin to smooth it with a soft cloth in the direction from the middle and to the edges. The main thing is that there are no air bubbles under the film. In this regard, all work is done slowly and very carefully.
- When bubbles form, they are pierced fine needle and expel the air from them. This operation is also carried out with a rag, moving from the edges to the puncture point. After that, this place is carefully rubbed with a rag.
- After the film is glued, a thin cotton fabric is taken and superimposed on top of the film, after which an iron with an average heating temperature is used. The fabric is ironed along with the film.
- In conclusion, the finish (edging) is glued and fittings (handles) are installed.
- This technology is applied to each glued part. Glass is glued in the same way, only from the inside. After complete assembly, you will get a completely new furniture wall. In this way, you can breathe a second life into items such as bedside tables, chests of drawers, cabinets and kitchen furniture.
After the wall was successfully pasted over, the old wardrobe and installed on the right. As a result, it turns out that the entire wall is filled with updated furniture. Using the same technology, you can update the old kitchen furniture– glue the self-adhesive film and replace the handles.
There is a second option for updating furniture, which is less expensive and, most interestingly, you don’t need to disassemble anything. In this embodiment, only furniture doors are pasted over and not with a film, but with non-woven wallpaper. PVA glue is used for pasting. So that the edges of the wallpaper do not bulge, they are cut into blanks, the size of which is 5 mm smaller than the size of the doors. Judging by the photo below, the result is not bad at all.

The advantage of such a finish is that the finish can be replaced with new wallpaper at any time.
As a rule, the surface pasted over with wallpaper lasts for five years. A similar technology was used in the finishing of the kitchen set. To make the surface washable, the wallpaper is covered with two layers of PVA glue. The most important thing here is to do everything carefully so that smudges do not form, since you will have to work with a brush.
Alternatively, the wallpaper can be varnished, but before that it is better to experiment on unnecessary wallpaper. It is important to determine what will be the reaction of the wallpaper to the varnish. When choosing a varnish, you need to know that acrylic and cellulose give a transparent surface, and polyurethane, after a certain time, will turn yellow. Polyurethane varnish is practically not amenable to the action of solvents and, if it is necessary to remove it, then mechanical action will have to be resorted to. Usually, coarse sandpaper is used for this or an electric drill with a nozzle is used.
How to update a chest of drawers
An old chest of drawers can stand in the attic for several years and lose only its appearance. As a rule, the old lacquer coating cracks, but otherwise, modern furniture can envy it. It does not dry out and remains as reliable and strong as it was before. In this case, the chest of drawers undergoes a more complex update, using painting and decoration, using polyurethane molding and wallpaper.
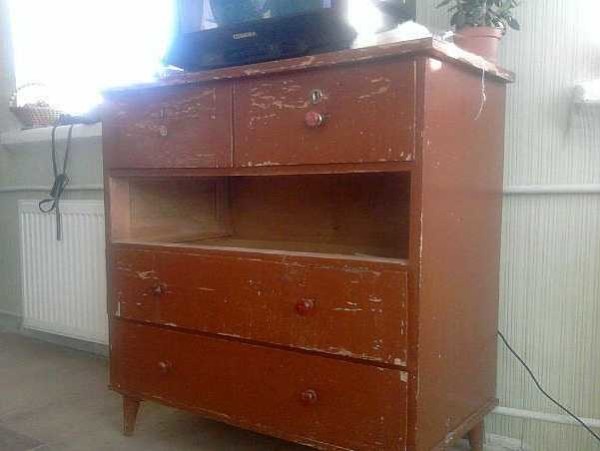
Stage number 1. All fittings are removed from the chest of drawers, after which the old coating is removed. As a rule, the old varnish coating is removed mechanically using sandpaper (large). All shells, cracks and chips are sealed with putty and wait for it to dry. After complete drying, the surface is polished with a fine emery cloth. The result is what is in the photo below.

Stage #2. Installation of polyurethane moldings. The main task is to choose the right moldings so that they are neither small nor large. Basically, products up to 5 cm wide are selected and very narrow if you look at them in profile.
Acquired moldings are very carefully and accurately cut into segments of the required length, and the corners are cut at an angle of 45 degrees. At the same time, care must be taken to match the pattern. The molding is attached with PVA glue. Alternatively, you can use self-tapping screws for reliability. At the same time, before screwing them, recesses are made for them. All recesses are sealed with putty very carefully, otherwise there may be problems when the putty dries.

Stage 3. All surfaces for gluing are treated with a primer. As a primer, it is possible to use PVA glue diluted with water in a ratio of 1:2. After the primer has completely dried, proceed to painting. As a rule, 2 coats of acrylic paint are applied on water based. Color - coffee with milk, although the photo does not match the color indicated due to poor color reproduction.

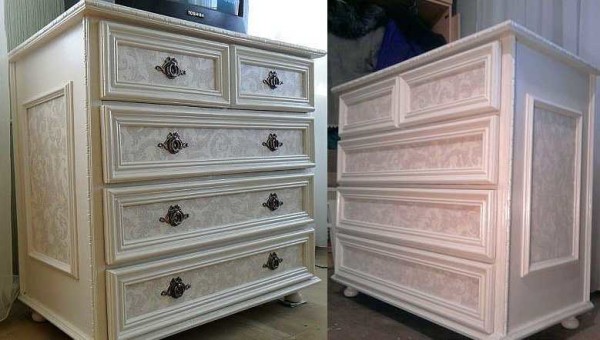
Stage number 4. Decoration is carried out on the basis of wallpaper made using silk-screen printing technology. Segments of wallpaper are cut clearly according to the size of the inner part, bordered by molding. The wallpaper is glued with PVA glue. After complete drying, the entire chest of drawers is covered with a water-based varnish in 2 layers.

Stage number 5. In conclusion, modern legs in the form of wheels for furniture are screwed to the chest of drawers and handles are installed.
If you carefully study the technology, then everything is much simpler than it might seem. Although, all stages require a certain accuracy, otherwise there will be problems with the appearance. In the same style, you can update the wardrobe. The result is not a bad set for a room or bedroom. Maybe not quite modern, but original and stylish, and most importantly - very cheap.
If old furniture has a varnish coating, then getting rid of it is very difficult. In the absence of obvious flaws, it is better to resort to the help of a primer for complex surfaces and only after that proceed with painting. This approach will minimize the effort to update old furniture.
Updating an old nightstand
The photo below shows the process of updating an old polished bedside table. First of all, polishing was removed, after which the surfaces were puttied and sanded. After that, it was painted with acrylic paint in two layers. In conclusion, paper from the gift bag was glued onto the door, thanks to which it was possible to obtain an original drawing. After that, the entire bedside table is covered with two layers of semi-gloss acrylic varnish.

All stages are not particularly difficult if you have the slightest skills. All processes correspond to the sequence of actions described during the restoration of the chest of drawers. The result exceeds all expectations.
 This old nightstand needs to be updated.
 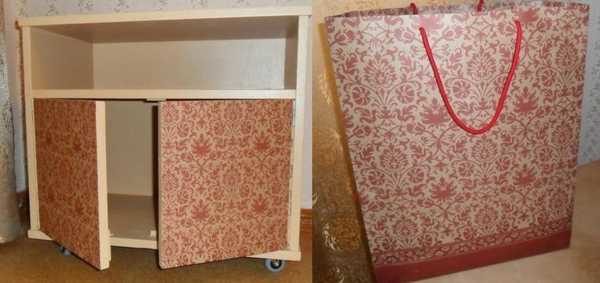 This package will serve as an excellent decor for the doors.
  The result of updating the old nightstand.
 Remodeling furniture with your own hands is simple and accessible to everyone, if there is a desire. Unfortunately, without desire, nothing will work. Above in the photo, you can see a bedside table, remade according to a very simple technique: the bedside table was simply pasted over with embossed wallpaper and varnished twice.
How to remake a table
Having adopted such technology, it is enough just to turn an ordinary Coffee table ik into the subject modern interior. It is simply taken and pasted over with wrapping paper. This is a thick paper that sticks without problems and does not sag under the action of varnish.
First you need to do the legs and edges of the tabletop. They need to be painted in a light color so that they fit more with the new style. After that, you can proceed to further work.
Before gluing, a paper blank should be cut out a little larger than the size of the countertop. PVA glue is used for gluing. The surface is well rolled with a roller so that there are no air bubbles. The result should be a perfectly smooth surface.

After that, remove excess material by running a fine-grained emery bar along the edge of the tabletop, pressing the paper against the tabletop. This method allows you to very evenly remove excess material, which is more like a professional action.
Finally, the surface is covered with two layers of varnish. In this case, the layers should be thin. Each layer is applied perpendicular to the previous one.

Alteration of furniture: photo ideas
Soviet-era furniture - walls, cabinets, chests of drawers - does not differ in beauty, but is reliable and strong. Well, it's just that the hand does not rise to take it to the landfill. And rightly so. It is very easy to upgrade, giving a completely new sound and modern look. Alteration of cabinet-type furniture may not be very difficult: there are materials that allow you to significantly change the appearance with little effort. Most easy way— change the color and fittings. With fittings, everything is clear - choose what is more suitable for the style, and the color changes in two ways - paint and glue the film (or wallpaper).
Alteration of the old wall: changing the design
Pasting old furniture with self-adhesive film is the easiest way to change the decor. The film is today both monophonic and color, different colors, textures and shades. It does not make sense to glue a film with a wood pattern: otherwise it is in trend today. But plain or with a pattern - this is what can turn an old wall into new furniture. The actions are simple, but the work requires accuracy. But the result is excellent. See two photos. On the first one there is an old Soviet wall from before the renovation, on the second - after.
Updating an old furniture wall - before and after
Now about how it was updated. A compacted self-adhesive furniture film was used, cream color, matte surface. The open part of the old wall was closed with glass doors, a translucent matte film was taken for the glass. Edging - furniture layout (also self-adhesive) color chrome. The order of work is as follows:
- Everything that can be removed, removed, disassembled. Remove old hardware.
- Surfaces must be clean and free of grease. This is easier to achieve with a soft cloth dipped in dish detergent. Then everything is washed off with warm water with no large quantity vinegar. Wipe clean with a dry cloth.
- Cut out the details. It is better to cut the film 8-10 mm more. The rest is then cut off with a paper cutter.
- Spray the part to be glued with water from a spray bottle. On a wet surface, the film can be moved if something goes wrong. You can even peel it off without damaging it.
- After removing the protective layer from the film, carefully lay it out. Aligned, start smoothing soft cloth from the middle to the edges. Try not to have bubbles. To do this, you need to move gradually, without jumping from place to place.
- If there is still a bubble, it can be pierced with a thin needle approximately in the middle. Then expel air from the edges of the bubble to the hole and wipe the puncture site.
- After gluing the film, we take a clean thin cotton fabric, spread it on top and iron it with a warm iron (medium heat).
- We glue the trim, install new handles.
Such a sequence of work with every detail. With glass, everything is the same, only you need to glue it on the inner surface. After assembly, you have an updated wall. This technique can be used for any item: chest of drawers, bedside tables, wardrobe, etc.

For example, after a successful experiment with the wall, they redid the old cabinet in the same way and added it to the right. Now the whole wall is occupied. In the same way, you can update the kitchen set: stick a self-adhesive film and replace the handles.
There is a second way. It is a modification of the proposed method, but simpler and less laborious. Only the doors are pasted over and not with a film, but with non-woven wallpaper. Wallpaper is glued to PVA glue. To prevent the edges from bulging, the parts are cut 5 mm less on all sides. It turns out a kind of edging. Everything looks good (example in the photo below).

What is good about this method: it is easy to change the decor. Tired of the old appearance, cut off the wallpaper, pasted new ones. Despite the fact that the method seems frivolous, the appearance persists for several years. Its author even tried it on kitchen set. Only the wallpaper on top is covered twice with PVA glue. In this case, the lockers can be washed. It is important to apply a layer of varnish evenly, without sagging, there are no other difficulties.
Sometimes the wallpaper is varnished. But before you do it, try it on an unnecessary piece: see how they react to it.
When choosing a varnish, you need to remember that acrylic and cellulose varnishes remain transparent after drying, polyurethane turns yellow after a while. Also, polyurethane is almost not softened by solvents: it can only be removed mechanically (from wood it is cleaned with sandpaper).
Dresser update
The old chest of drawers stood for who knows how many years in the attic, but it is very strong and reliable, not a single gram of cracked, only the polishing cracked. In terms of strength, it far exceeds modern products. This is the feature that is inherent in the old, still Soviet times, furniture. It is not very rich in details (to put it mildly), but having stood for several decades in bad conditions, remains strong. The makeover of the chest of drawers is more complicated: two techniques were used: painting, and then decorating with polyurethane moldings and wallpaper.

Step 1. We remove the accessories, remove the old coating. In some places the polishing was scraped off, in some places it was polished with sandpaper. Chips were covered with putty on wood, waited until it dries. At the final stage, everything was cleaned with a sandpaper with a fine grain. At the same time, the chest of drawers became the same as in the photo below.

This is after it has been puttied and smoothed with sandpaper.
Step 2. Installation of polyurethane moldings. When choosing moldings, make sure that they are not voluminous: too thick on a small chest of drawers will look very rough. They should be no wider than 5 cm and as narrow as possible when viewed from a profile.
Purchased polyurethane moldings are neatly cut, the corners are sawn down at 45 °. (). The pattern match must be perfect. We glue them on PVA. For reliability, you can additionally fix it on self-tapping screws with wide caps. A small recess is made under them, after the screw is screwed in, the hole is covered with putty. Try to ensure that the putty immediately lays down perfectly (you can touch it up with a wet finger), since it is problematic to clean off the dried one.

Moldings are glued and put on self-tapping screws
Step 3 Everything is treated with a primer. You can use PVA glue diluted with water in a ratio of 1: 2. After the primer dries, paint (two layers). For this case, water-based acrylic paint was chosen. The color is coffee with milk, although it looks very different in the photo. Color rendering is inaccurate.

This is after the second application of paint. pretty
Step 4 For decoration, wallpaper was chosen, in which the coating is made using the silk-screen printing technique. Pieces are cut according to the size of the inside of the frames from the moldings, glued to the PVA. After the glue dries, the entire chest of drawers is coated twice with a water-based varnish.

Step 5 And the last to install new legs (furniture wheels) and handles.

We install handles and legs)) The updated chest of drawers is not at all like the one you saw in the first photo.
As you can see, there are no difficult jobs. Everything is really elementary. But all processes require accuracy - the appearance depends on it. In the same way, you can update the old wardrobe. Get a set for the room. Stylish and original.
When updating furniture, the worst thing is if the surface is varnished. The polish takes a long time to peel off. If the surface is smooth and polishing is not damaged, you can apply a primer for difficult surfaces on it, and paint after drying. This greatly speeds up the process of painting lacquered furniture.
If you have kids and a dacha or yard, you might be interested in reading with lots of photos. And about
How to update an old nightstand
In the photo gallery below you can see the restoration process of an old polished nightstand. First, the old polishing was removed from it, puttied, sanded, and after processing it was painted twice with acrylic paint. Then paper with an interesting pattern was glued to the doors (it was a gift paper bag). After drying, everything together was covered with two layers of semi-gloss acrylic varnish.
The sequence of work is simple if you know how to do it. All processes will repeat the sequence of actions that you saw in the example of updating the chest of drawers. The result is also impressive.
Remaking furniture with your own hands is a painstaking task, but the result is worth it. Below is a photo of a bedside table restored using a simple technique: it is pasted over with embossed wallpaper, and varnish is applied twice on top.

Table makeover
Using the same technology, a banal coffee table can be turned into a modern piece of furniture. In this case, it was pasted over with wrapping paper. It is dense, sticks well and does not sag when applying varnish.
Before starting work on decorating the tabletop, the legs of the old table and the edges of the tabletop were painted in a light color: this way it suits the new design style more. Then began the process of its transformation.
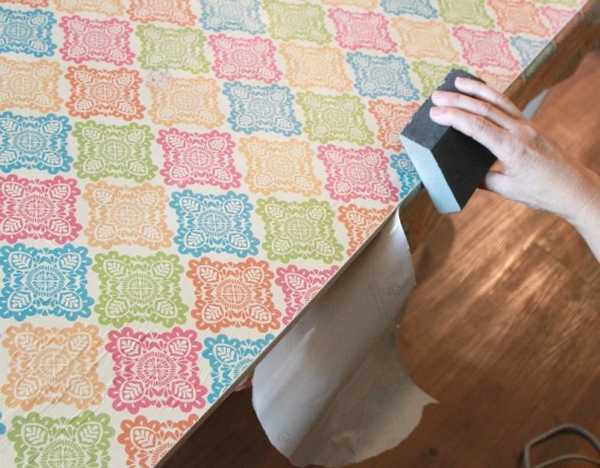
When pasting, the panel is cut out much larger than the dimensions of the tabletop. So it is necessary. Paper is glued on PVA, rolled with a roller so that there are no lumps and swellings. The surface must be absolutely smooth.

After pasting, take sandpaper with fine grain (it is more convenient to work if it is attached to a bar). Passing it along the edge, they bend and at the same time separate the excess paper.

Even cutting on a guillotine you will not get a fairly even edge. And with this method, it turns out to be designed professionally. Do-it-yourself and does not smell.

After the glue has dried, the surface is covered twice with a thin layer of varnish. It should be applied with a soft brush a small amount. Layers are applied in different directions: first along the long side, then across.
Alteration of furniture: photo ideas
Remaking furniture with your own hands is a creative business. Even a boring one can be made into a great thing. And it is not necessary to repeat exactly what you saw. Lot useful ideas comes during the execution of the "project". The only pity is that some of the plans are not as attractive as it seemed. Try, experiment. Good modern technologies allow you to do this at minimal cost.
Many of us have such furniture in the house that still functions, but outwardly already outdated. No need to throw away old things, because they can be transformed. One of the best solutions for such furniture is redecorating. Consider simple and interesting ways how to update old chest of drawers with your own hands.
Transformation of an old chest of drawers
Using this technology, it is not necessary to restore the old chest of drawers, you can also transform the new one a little, thereby betraying a little chic to the furniture. Before starting work, it is important to properly prepare the surface for painting.

Preparing furniture for painting:
- Before painting it is necessary to remove all fittings from the chest of drawers. You also need to remove all decorative strips and drawers.
- Now we need a rough skin, we will grind the surface with it. Then we will replace it with a fine skin.
- Next, we collect a basin of water. We soak a rag and wipe the dust. Moreover, the rag should not be wet, but slightly damp. We wait until the surface is completely dry.
- Using putty, it is necessary to level all chips and cracks. After drying, sand again with fine paper. We clean from dust.

Choosing a paint for a chest of drawers
There is a huge variety of paints for furniture. We recommend choosing water-based acrylic paints. They can be easily applied to any surface. In addition, they are harmless and do not contain lead.

Let's start painting
- First of all, it is necessary to prime the surface of the dresser with a 20% paint solution. Acrylic paints enough to dilute with water. The primer allows you to reduce the consumption of paint material and smooth the surface.
- Now, with the help of a roller, we apply several even layers of paint material. But we don’t do it right away, after applying the first layer should dry, only then you can apply the next one. Remember that the paint can dry all day.
- If you are painting outdoors, do not do it in windy weather. Evening is also a bad time to paint furniture, as dew will prevent the paint from drying properly.
Attention!
The first 2 weeks after painting it is forbidden to clean the surface with detergents, it is enough to moisten a cloth in water and wipe the dust.
We carry out decor
When decorating furniture, the option of painting with a stencil looks very original. It can be made independently from a dense PVC film, linoleum is also suitable. You can look at the design on the Internet or come up with your own, then cut it out on the film with a clerical knife. If there is no time for cutting, then you can order ready-made stencils.

After choosing a pattern, it is necessary to limit the surface for painting with masking tape. We apply the stencil to the chest of drawers and fix the edges with tape. We pass the roller with paint on the sticker several times.
If it seems to you that the drawing turned out to be small, and the area of \u200b\u200bthe furniture allows you to still apply the design, then you can safely rearrange the stencil and paint in other areas. In the same way, you can decorate the sides of the chest of drawers.
Restoration of a chest of drawers in the style of craquelure
The craquelure technique is small cracks on the surface of the furniture. Often they are covered with paint and craquelure varnish in several layers. To make the paint raw materials dry faster, you can use a hair dryer.
Attention!
It is not worth driving a brush over the same place, as the paint will roll into lumps.

Following the craquelure technique, you need to understand that in which direction the coating is carried out, there will be cracks.
It was a single-phase method, but there is also a two-phase method. Its main difference is that cracks are formed not from paint, but from the finishing layer of varnish. It contains a pigment that tightens the paint when it dries.


Decoupage restoration
The decoupage technique combines aging and sticky decorations. Scuffs are made with a stain and applied with a dry brush. Then comes the acrylic layer of dark shades. As soon as the layer dries, the surface is rubbed with wax. Then the last layer completes the painting work.

For decor, you can use ready-made stencils or a large paper print. If desired, you can stick small pictures to the chest of drawers and cover with a layer of varnish.
Aging technique
First of all, the entire surface of the chest of drawers must be cleaned and primed. Apply to desired areas dark color coatings. Then everything is waxed and varnished. If there is no wax at hand, then sandpaper is suitable for work. In this case, the varnish layer will have to be applied several times.

How to replace metal parts
It’s not enough just to decorate an old chest of drawers, it still needs to be restored. Metal elements of furniture eventually become unusable.

For modern restoration it is necessary to change furniture handles for new products.
- It is necessary to carefully inspect the condition of the fasteners.
- Unscrew loose screws.
- Pour glue (carpentry) into the holes.
- We select the size of the dowel and install. Then we screw the screws into them.
- Using metal corners, we fasten the frame parts inside the chest of drawers.

Now we check the condition of the legs of the furniture. If they are loose, they should be replaced. Mounting strips are replaced with furniture rails. This is necessary so that the boxes slide easily. Then you can start decorating. As a decoration, you can use metal decorative plates.
Restoration of a children's dresser
Children's chest of drawers is a reliable and practical thing, where a lot of children's things are stored.

Furniture made in a thematic style is placed in the child’s room, then it will fit perfectly into the interior.
- Children like bright colours. For boys, furniture should be painted in blue, light blue, brown or green. While girls use other shades: pink, white, red, yellow, beige.
- As a decor, pictures with characters from cartoons and fairy tales can be applied to the chest of drawers, creating interesting collages. And varnished on top. Also girls love butterflies, flowers, animals, boys cars, robots, soldiers.


Here it is important to choose everything correctly so that the color scheme of the furniture is in harmony with the overall interior.
With the help of self-adhesive film, you can update the design of any furniture. The properties of the material imply its use for restoration purposes. They can replace cracked laminate and veneer, hide partially or completely damaged facades, completely paste over an old cabinet (table) and give them a different look or improve performance. The process of updating furniture with self-adhesive film is simple, but it requires some patience and knowledge of the sequence of how to paste over an old cabinet with self-adhesive film and what tools will be needed. 
Similar articles:
To choose a self-adhesive film for decorating an old cabinet, you need to familiarize yourself with the properties and characteristics of this coating, pay attention to the structure, base material, surface type, decorative design and appointment.
At the heart of all films are used: polyester, propylene and polyvinyl chloride. Additionally, plasticizers, stabilizers, pigments, paper, natural and synthetic fabrics can be added.
Self-adhesive film consists of three main parts:
- The surface is made of paper, polymer film or metallized foil.
- Acrylic or rubber adhesive base.
- Protective backing made of siliconized paper. Retains the adhesive side of the film and peels off before sticking.
There are calendered films that are able to stretch under the influence of high temperatures and shrink during cooling. They are best used in order to paste over a cabinet with even, smooth facades. If it is necessary to decorate rough or corrugated facades with a self-adhesive film, to hide existing protrusions, preference is given to molded materials.
The surface cloth differs in structure, it can be:
If all quality characteristics affect the durability and scope of application, the appearance of the furniture depends on the type of surface. There are the following types:
- Glossy film - has a high reflectivity. It can be pasted over the facade in dark and small rooms.
- Matte - has a soft surface. The canvas is used in good light.
- Mirror.
- Transparent coating - excellent for processing glass elements in facades.
- holographic material.
When choosing, take into account the size of the parts that will be glued. You need to purchase the most suitable roll of film to avoid a lot of waste. The length can be 2 and 15 m, the width is 45, 67.5, 90 cm.
Pasting the cabinet
The process of updating furniture with a film is simple, but it requires patience and knowledge of how to glue a cabinet and what tools will be needed.
Required tools and materials
To start, in addition to the adhesive web, you will need a number of improvised tools:
- ruler or tape measure;
- pencil or marker;
- scissors, clerical knife;
- silicone spatula or dry rag;
- a spray bottle with soapy water;
Training
Sticking a polished cabinet with a self-adhesive film begins with surface preparation. From the very beginning, remove all removable fittings. For convenience, you can remove the doors from the hinges.
All furniture should be carefully examined for protruding fasteners, chips and cracks in the coating, since in the future all these defects will appear. It is enough to simply tighten screws and bolts with a screwdriver or wrench, and it will be more difficult to deal with irregularities. You will have to level the surface with putty, and then process it with sandpaper.
After leveling, proceed to cleaning and degreasing by means of any detergent and ethyl alcohol.
If the cabinet is unfinished wood, MDF or chipboard, a light coat of furniture primer can be applied to enhance adhesion and allowed to dry.
An old chest of drawers step by step to make it look like new. We will also give 10 cool examples of how craftsmen give storage systems . We are sure that after that you will want to pick up paint, brushes and set aside a weekend for rework.
How to Restore an Old Chest of Drawers DIY: 5 Steps (with Pictures)
1. Remove the cover
Paint
To do this, we need a solvent, a spatula, and ideally - Sander.
How the process of removing the old coating manually looks like: we remove the material with a spatula, if necessary we use a solvent - it can be acetone or any other store-bought product. With it, the decorative coating will come off much easier. Take an unnecessary cloth (or rag), saturate it with solvent and wipe the surface. The previous finish should come off almost completely. And the remains after can be removed with a spatula.
By the way, if you are working with solvents, do not forget your mask and gloves - as these are toxic substances and the fumes can make you feel bad and damage your skin.
But what if you work with a grinder? Suddenly you have friends from whom you can borrow equipment. The grinder must be with a nozzle - for stripping with an abrasive. It is this nozzle that helps to completely remove paintwork and leave a clean wooden surface. For a perfectly even coating after the machine, you can “walk” on the wood with a grinding wheel.
Of course, this option is faster and easier, but please note that when working with the machine, it may be a large number of dust. Stock up on a respirator and goggles.
plastic film
The furniture was sheathed with films under the tree. If you need to remove it, the easiest way is to use a building hair dryer. Hot air will help to easily separate the plastic coating from the base. Follow the simple instructions: first heat one of the parts of the structure - for example, a countertop or a door, then pick up the film and carefully separate it. Repeat the procedure with other parts.
If you want to do this without building hair dryer, the process will be the same as with paint.

2. We close up cracks and other imperfections
Despite the fact that the restoration of a chest of drawers with your own hands at home is a simplified version, frank flaws cannot be left. Moreover, fixing them is not so difficult.
You will need wood filler. Please note that it is better to choose a special putty, since ordinary Construction Materials may contain large abrasive particles, and eventually damage the coating. And the material for the tree will lie flat and neat.