Make a pvc pipe flute drawing. What can be made from PVC pipes - some of the most interesting and useful ideas. Making a pipe with your own hands
Flute How to make a flute with your own hands
If you want to learn how to play the flute, but you do not have the opportunity to purchase the instrument itself, we suggest that you make it yourself from ordinary PVC pipes. You can find out detailed instructions for making a Bansuri transverse flute from the video tutorial "How to make a flute with your own hands." The presenter of the video will share his secrets with you, and also tell you in detail and in an accessible way how to turn an ordinary plastic pipe into a musical instrument.
How to make a flute with your own hands
The general name for a number of musical wind instruments from the woodwind group. It is one of the most ancient musical instruments in origin. Unlike other wind instruments, the flute produces sounds as a result of cutting the air flow against the edge, instead of using the tongue.
Origin, history of the flute. In Greek mythology, the inventor of the flute is considered a son Hephaestus Ardal... The oldest form of the flute appears to be the whistle. Gradually, finger holes were cut in the whistle tubes, turning a simple whistle into a whistle flute, on which it was already possible to perform musical works.
The longitudinal flute was known in Egypt five thousand years ago, and it remains the main wind instrument throughout the Middle East. A longitudinal flute, which has 5-6 finger holes and is capable of octave overblowing, provides a full musical scale, the individual intervals within which can change, forming different frets by crossing the fingers, closing the holes in half, as well as changing the direction and strength of breathing.
The transverse flute with 5-6 finger holes was known in China at least 3 thousand years ago, and in India and Japan more than two thousand years ago. In Europe during the Middle Ages, mainly simple instruments of the whistle type (the predecessors of the recorder and harmonic), as well as the transverse flute, which penetrated into Central Europe from the East through the Balkans, where it still remains the most widespread folk instrument, were widespread.
By the end of the 17th century, the transverse flute was improved by French craftsmen, among whom Otteter stands out, who, in particular, added valves to the six-finger holes to perform the full chromatic scale. Possessing a more expressive sound and high technical capabilities, the transverse flute soon supplanted the longitudinal (block flute) and by the end of the 18th century took a firm place in the symphony orchestra and instrumental ensembles.
You will learn more information by watching the online training video « How to make a flute with your own hands»On our portal. Great result to you!
Watch this video lessons on our portal for making the Flute at a convenient time for you. Join our groups in VKontakte, Facebook, and Google+ and subscribe to our YouTube channel. Enjoy your viewing.
Svirel (it is also called "snot" or "tartar") - one of the types of longitudinal flute, common in Russia. According to Slavic legend, Lel, the son of the goddess of love, played the flute. Therefore, it was believed that the pipe can awaken mutual feelings.
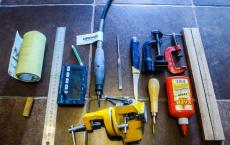
Materials and tools for making a pipe
To make a pipe out of wood with our own hands, we need a rather impressive arsenal:
- sandpaper
- small wooden sleeve (1.5 cm in diameter and 4 cm long)
- ruler
- pencil
- tuner
- small vise (not necessary, but much more convenient with them)
- something that can be drilled (drill, drill, engraver) and drills of different diameters: from about 0.8 to 4.2 mm
- file
- semicircular cutter
- pair of clamps
- pVA glue
- two wooden blocks 30x2x1 cm.

Making a pipe with your own hands
First, we take wooden blocks and mark them. It is necessary to draw the boundaries of the internal channel of the flute, on one side of the bar this channel is 1.5 cm wide, and on the other, 1 cm, that is, the channel will slightly narrow towards the end of the flute.

Now we clamp one of the bars in a vise and begin to cut out a semicircular canal. There is a shaded area on my workpiece that will need to be removed with a cutter.

We carefully and slowly remove the shavings, follow the direction of the wood fibers. They may not always go along the workpiece, so be careful, otherwise the cutter may go crooked.

We try to cut the canal to a flat semicircle along its entire length. We do the same with the second bar.
When both halves are cut, you need to sand them. With a piece of sandpaper we pass along the inner surface of the channel, achieving smoothness.

After grinding, go to the whistle. Having retreated 4 cm from the upper edge of the workpiece (where the wide end of the channel is), draw a rectangle 5 by 7 cm, preferably exactly in the center.

With a 4.2 mm drill, we make three holes close to each other, so that an oval window is obtained.

Now we take the file and bring the window to a rectangular shape, according to the markup made.

After that, with the same file we grind off one side of the window at an angle of about 30-45 degrees. This is the most important part of the job: the sound quality will depend on the sharpness and smoothness of the edge.

It's time to put the halves together. We smear them with PVA glue and fold them, carefully aligning the channel. Press with clamps and leave to dry for a couple of hours.

When the glue is dry, unscrew the clamps and take the knife. Cut off the top of the small wooden sleeve, about 1.5 mm, so that you get a flat, even edge. Look at the photo and everything will become clear.

After that, grease the sleeve with glue and insert it from the upper end of the flute, forming a whistle. Cut edge upward, exactly to the edge of the whistle window.

We are waiting for the glue to dry, and we take up the knife. Gently rounding off the workpiece, give it a rounded shape, then smooth it with a sandpaper.

To make it convenient to play, we will make a cut at the upper end of the pipe at the back.

Now the fun part is setting. Try blowing a pipe, listen to the sound, and check the tuner. If you did everything carefully, you will get A sharp. This is the lowest sound that our pipe can make.
In total, we will have seven notes and six playing holes. Let's mark them: the very first hole will be 6 cm from the lower end of the pipe, the rest of the holes will be in 2 cm increments.

Armed with drills of different diameters, we begin tuning. The pipe is often tuned in natural major. This means that we should get the following series of sounds: A sharp - Do - D - Re sharp - Fa - Sol - A.
The general principle of tuning is as follows: the larger the hole, the higher the sound. Therefore, first we drill a very small hole, listen. If you need a slightly higher sound, drill out more. The main thing is not to overdo it, because you won't be able to make the hole smaller.

We start drilling from the very bottom hole. When it is configured, move on to the second. The second hole is adjusted when the first one is open, and so on. That is, when you listen to sound from some hole, this very hole and all holes below it must be open.

So that is all! The pipe is ready, you can start playing. Or you can decorate it to your taste. I just covered my pipe with stain.
I met a kind person who was totally interested in ethnic wind instruments. I had many, tried, played on some. Imagine, in the morning, after a night of sleep on the seashore, I slowly return to my parking lot, and he stands knee-deep in the sea and plays the shakuhachi. Plays calmly, uninterruptedly, quietly. Needless to say, after such a meeting, an idea settled in my soul ...
As time went on, the options were considered "buy bamboo on the Internet", order from a master in Russia, order from a master in Japan, buy a plastic one in Japan. In the end, I settled on the following: I'll try to make a flute myself! Here it was especially helpful to meet people who have passed this way and are already playing.
After listening to good advice, I easily found a site on the network where there was a simple step-by-step instruction. I had all the necessary tools at home, and I easily bought the raw materials from a plumbing store just across the street from my house. I paid 159 rubles for a set, from which I plan to make two flutes. These are two pieces of PVC water pipe, each one meter long (pipes are sold in multiples of a meter) + a simple straight connector for each pipe (the pipes have different diameters - 1/2 "and 3/4", so each has its own sleeve).
For comparison, the size of my desktop is 80x120 cm. I decided to start with a half-inch one (as advised on the site).

First of all, I glued the coupling to one of the ends, used Dragon polymer glue and a mallet (the coupling does not sit on the pipe itself - they are designed for a special soldering iron: when installing the water supply, the end of the pipe and the half of the coupling are simultaneously heated, only then they can be joined).


The most important stage! One and eight tenths of a shaku, 545 mm. Irreversible action! (Measured seven times, of course)


More precise finishing, large metal file - tuning to the note D of the first octave. This should be the main tone of the flute. An empty tube of any material at this length makes this sound, for example, falling on the floor.

A coarse thread attached to the pipe with electrical tape helps to mark the centers of future holes - on one straight line.


Marking holes and nakernivanie them with an awl require accuracy, although the matter is simple.


In order not to damage the opposite wall from the inside during drilling, it is advised to lay some kind of bar in the tube.

I used wood drills (10mm and 9mm) and a screwdriver in screwdriving mode (i.e. at slow speeds). PVC is easy to drill, fast turns can ruin something uncontrollably. The third hole was supposed to have a diameter of 9.5 mm, but I did not have such a drill, and I did not bother, but just flared it a little after drilling with the same nine.

The most difficult step was the hole machining. They need to be chamfered and deburred. Mock knife, abrasive sponge, oval file + precision. Honestly, I didn't manage to do it really well and beautifully. On the "four".

The flute is ready! And while I still do not know how to play myself (I only publish, and even then - with difficulty, a few incoherent sounds), listen to a person who has been moving along this path for a long time. Of course, his shakuhachi is from root bamboo, everything is as it should be!
P.S. The whole process (excluding the waiting for the Dragon glue to polymerize) took me about two hours. A wonderful two hours of leisurely manual labor! And yes, in parallel with this, I made of plywood and trimming the stalk of a chess horse for a hiking set (which travels with me to Limanchik) ... Initially, this chess came into my life with one white knight instead of two ...

A flute, in our case a pipe, is an ancient wind musical instrument. The emergence of the prototype of the flute dates back almost 35 thousand years ago, which makes it one of the oldest instruments. And the flute familiar to us became known in Egypt, five thousand years ago, and is still the main instrument in the Middle East. Folk or folk-rock cannot do without it. For those familiar with fantasy worlds, the pipe is one of the elves' favorite tools. And in our reality, playing the flute will brighten up winter evenings. And this wonderful tool can be made in less than an hour.
For manufacturing we need:
Wooden tube (reed, bamboo, reed, etc.)
Piece of wood or cork
Drills for 2; 4.2 and 6 mm and something that can be drilled (screwdriver, drill, engraver)
File
Hacksaw blade for metal
Flute barrel
The first step is to choose the body of the pipe. Any hollow tube will work, be it reed, reed or PVC plumbing pipe. I found a great bamboo tube at my place.
It is not quite round, with internal diameters of 23 and 25 mm. I sawed off 400 mm, this will be the length of the flute. Although it was necessary to cut off 300 mm, as usual, I mixed everything up.
From one end we make two holes close to each other, the boundaries of which should be located at a distance of 40 mm from the edge. First, I marked the holes with a 2 mm drill, and then reamed with a 4.2 mm drill. Next, make a rectangular hole with a needle file, with a length of 5 mm and a width of 7 mm. And we grind off one side of the window at an angle of 30-45 degrees, with the same file. This is the whistle hole. The sound quality will depend on the sharpness and smoothness of the bevel.


Next, we make six play valve holes (the markings were earlier). The first hole will be 60 mm from the bottom of the flute, the rest will be in 20 mm increments. Again we make holes with a 2 mm drill and reamed with a 6 mm drill. In general, these drills were right for me. The principle of adjustment is as follows: the larger the hole, the higher the sound, so you can start drilling from 4 mm. The main thing is not to overdo it, because it will no longer be possible to reduce the hole. You need to start drilling from the bottom hole. Using the tuner, we will tune the pipe in natural major. We drill the lower one and blow, adjust according to the tuner, then drill the second one. The second hole is rebuilt when the first one is open, and so on. You should get the following row of notes: A sharp, A, G, F, D sharp, D, C.
We grind all holes with sandpaper, but very fine, so as not to damage the natural color of the bamboo.

Whistle
Now, from the end where the hole for the whistle was made, you need to make a bevel. We retreat 4-5 mm down from the edge, and 40 mm to the left. We make the bevel with a cloth for a hacksaw for metal.


Now we make a sleeve from a piece of wood or cork. First I gave the piece of wood a round shape, then I made the same bevel as on the flute itself. I found the tree soft, so I did everything with a knife. From above it is necessary to make a flat edge, stepping back from the edge of 1 mm, as in a regular whistle. You cannot make a bevel too large, there will simply not be a whistle. Insert the sleeve into the "body".

I made the sleeve too small. It should fit tightly into the flute and sit securely there. I had to glue all the gaps with hot glue. I smeared the sleeve itself with PVA glue before inserting it into the flute.
This completes the production of the pipe. You can already get the first sounds. Again, this is ideal for learning. Since a good pipe costs a lot, it should not be confused with a recorder. And our homemade flute had an acceptable sound, and the manufacturing process took half an hour. You can decorate the tool to your liking, but my bamboo looks good anyway.
I have already written repeatedly that I really appreciate the rare master classes on our website. Therefore, I am pleased to present to you the story of Dmitry Dubrovsky about how to make a musical instrument Pan's flute (Kugikly) do it yourself. Now, of course, is no longer the time to collect reeds in our latitudes, but next year it may come in handy, save it to your bookmarks.
DIY reed flute for children
“Reed is an amazing natural material. Just a storehouse for all sorts of things. Since ancient times, many peoples on Earth have used it in agriculture and art. The hollow stem device itself begs for the manufacture of a wind instrument. One of the simplest tools - kugikly... Different peoples call such a wind instrument in their own way: nai, skuduchay, samponyo, syrinx, etc. Also known as pipe or pan flute (in honor of the ancient Greek goat god). Making it yourself is not difficult. In fact, this is a set of tubes of different sizes.
This pipe will definitely delight your child. Better if you do kugikly you will be with him. From a pedagogical point of view. Especially at the first stage.
And the first stage is collecting material. Take one day off for a walk in the fresh air. Reed grows along the banks of rivers and ponds. You should bring a knife, gloves and rubber boots with you. It is necessary to collect reeds in the fall, in October. At this time, he is already fully ripe.
So, you are in the reeds. It is necessary to choose straight stems, approximately the same diameter.

You need to "mow" a lot, since during the cleaning process, some will inevitably go to waste. In order not to take home excess organic waste, it is recommended to clean the stem of leaves on the spot.

After cleaning, it is much easier to identify crooked stems. It is also desirable to cut them off. Take the remaining armful of quality raw materials home.

Let the reed dry. Find a comfortable place at home where your "prey" can lie quietly for a couple of days (sometimes a week). Putting on a battery or drying with a hairdryer is not worth it.
Well, the reeds are dry. As you can see, the reed consists of tubules connected by "knees". Identify five of these tubes. It is necessary that they match in diameter and length. Now let's separate the reeds. If you cannot masterfully work with a knife, then it is recommended to take a jigsaw. Do the subsequent manipulations yourself, without the participation of the child.

Saw carefully exactly in the middle of the knee. The resulting tubes are protected by membranes on both sides. You need to pierce them. A knife or a large nail will do.

Then we remove the pulp from the core of the tube. You will need a straight, round stick with a slightly smaller diameter.

Or a round file. You need to be extremely careful with the file, do not overdo it. The inner walls should be smooth. Blow it out.
The first tube is the longest. We use it to measure the length of the other four. Then we cut each one down from the first. The width of the thumb will serve as a measure.

After all, this is a folk instrument, jewelry precision is not required. We clean the ends with sandpaper (low grain size) from irregularities. You can check the sound. Pinch one end of the tube with your finger, blow on the other. But you need to blow not like a ball or an ordinary pipe, but casually. Make a Mona Lisa half smile, lean the free edge of the pipe vertically against the lower lip and blow.
The final stage. All tubes must be connected "in a row". The classic folk way is quite laborious. It is necessary to tie all the tubes in pairs, and then together with a thread. Fix it all with the same reeds split in half. There is an alternative option - cold welding.

In any household or auto parts store there is one. It is quite inexpensive. It consists of two components that need to be mixed, kneading in the hands like plasticine. However, it is not necessary to mix the entire contents of the package. Leave half, it will come in handy.

We fasten the parts of our Pan's pipe. In a couple of hours everything will be seized, tightly. Therefore, you should put the future musical instrument in a place where it will not be disturbed. Now you need to plug the bottom holes. Alternatively, it will work. Or the remaining cold welding. We roll the sausage equal to the inner diameter of the pipes, cut into equal parts. The plugs are ready. Kugikly are ready. We play, enjoy.

Now give the child, let him try to play. And nothing that doesn't work right away.
And a little advice in the end. When playing the kugiklah, they play (blow) with a diaphragm: the tone of the sound depends on the force with which the air is blown out. "
Many thanks to Dmitry for this do-it-yourself workshop on making Pan's flute. And how it should sound, you can listen to the author's video in this video:
In Voronezh there is a "Museum of Forgotten Music" by Sergei Plotnikov, we listen to kugikly:
Still interesting:
Discussion: 12 comments
Thank you, Dmitry, for an interesting MK! Your story is interesting not only as a very useful MC, but also interesting, even with a bit of humor, presentation of the material. * BRAVO * * BRAVO * * BRAVO *
Reply