Make a chandelier with your own hands from wood. Simple DIY wooden lamp. What will it take?
The topic of our article is wooden ceiling lamps. We will analyze the advantages and disadvantages of this material both from the point of view of design and from all other aspects; We will find out where these lamps can be used, and where it is better to use other materials.
Finally, we will find out how you can do it with little effort and time. wooden lamp with your own hands.
What is wood associated with in room design? First of all, with antiquity, with the Middle Ages. With time, when people woke up to the singing of birds, and not the noise of cars outside the window; when men were courageous, women did not know the word “emancipation”, they were punched in the face for meanness, and life was much simpler and clearer.
That is why wooden lamps most often have deliberately ancient shapes. For example, chandeliers in the shape of a cart wheel are very popular.
After all, this is what real, let’s say, indoor lighting systems looked like several centuries ago: an old wheel on chains or ropes was suspended from the ceiling, and candles were placed on it.
Why is a wheel with spokes convenient as a stand?
Why did the ancestors settle on this form?
- When the candles were placed evenly, it gave equal illumination to all parts of the room;
- The spokes created minimal obstruction to the light, unlike a solid rim.
Modern stylizations have the same advantages; Of course, lamps are used instead of wax candles or torches. Most often, of course, also in the form of a candle.

However, we digress. What is bad and what is good about wooden ceiling chandeliers?
Features of the material
Advantages
- Wood is not just environmentally friendly. Wood not only does not emit harmful substances; against, for a long time it saturates the air with aromatic resins, which make breathing easier for asthma patients and relieve inflammation of the respiratory tract...
What can I say - you probably remember how easy it is to breathe in a recently felled wooden house! - Wood is easy to process, which opens up wide scope for creativity. If the manufacture of a lamp made of plastic or chromed metal requires devices that are not available in a standard city apartment, then lamps made of wood require a minimum set of hand tools for manufacturing.
However, alas, not all features of wood as a material for a lamp are as pleasant:
Flaws
- A tree is still flammable material . Position wooden elements near incandescent lamps that are going out of fashion is an extremely bad idea; a burnt contact in the lamp socket can also lead to a fire.

- Wooden chandeliers are susceptible to attacks by bloodthirsty bugs- woodworms, fungus and other evil spirits.
Please note: coniferous wood suffers from insects and rot to a much lesser extent.
In addition, for hardwood there are antiseptic impregnations, which at the same time reduce the flammability of wood.
- Wood is a hygroscopic material. It absorbs moisture from the air; when drying, it can change volume, deform and crack.
If we want our lamp to retain its functionality for a long time appearance- we will have to provide it with more or less constant temperature and humidity.
conclusions
The negative features of wood are not given to dissuade you from buying or making a wooden lamp, not at all. Let us repeat, this is a wonderful, very beautiful and easy to process material.
However, you need to use it wisely:
- Lamps made of wood must be shaped in such a way that all heating elements (sockets and lamps themselves) are as far as possible from the wooden structural elements.
It is better for the lamps to point upward: then the upward flow of heated air will not cause deformation of the wood.
Standing apart are the lamps, the very style of which involves the use of natural cracks in dried wood. For example, a log with lamps suspended on chains looks great both dried out and cracked.

- For fire safety reasons, it is not advisable to place wooden chandeliers under flammable ceiling elements.
Yes, the same log on chains will look amazing under an equally old-looking one; however, if it catches fire, the fire will spread very quickly. - Wooden lamps are perfect for a bedroom or living room. But in the kitchen with its abundance of steam when cooking or in a damp bathroom, wood is inappropriate.
It will crack quickly; besides, raw wood is no longer a dielectric at all.
If a phase is shorted to the wooden elements of the lamp, it is quite possible to receive an electric shock. If at this moment you hold on to a grounded pipe or bathtub, troubles can be very serious...
Homemade products
Need I say that something made with your own hands is much more pleasing than something purchased? Yes, your lamp may not be as neatly made as a store-bought one; but the joy of creativity is worth coming to terms with the small shortcomings of the product.
In addition, you will know absolutely for sure that your lamp was made in one copy. Not a single guest, coming to you, will see exactly the same chandelier as at home. Homemade ceiling chandeliers are always exclusive.
Coffee service

We will need:
- Dry board from any wood. The texture of ash is very beautiful; oak does not need to be stained or varnished. But ordinary pine, spruce or birch will also work.
- Three translucent coffee cups and three saucers to go with them.
- Three cartridges for a small base with fastenings for them.
- Three matching light bulbs. Preferably LED lights: remember the fire safety recommendations outlined just above.
- Three or six rubber gaskets. The quantity depends on the method of attaching the cartridges.
- Meter - two two-wire copper wire minimum section. 0.75 mm is enough for the eyes.
- A thin chain or twisted cord to hang a structure from, for example.
- Four screws for the ring instead of the cap. It is for them that our lamp will be hung.
In addition, you need to stock up on a drill with drill bits for wood and tiles, pliers and a screwdriver.

Let's get started:
- We process the planed board with sandpaper - first coarse, then finer.
- We drill three holes where the cartridges will be located.
- If noble types of wood are used, then the processing of the board ends there. If the wood is simpler, we cover it with stain and after drying, varnish it twice.
The nitro varnish only dries in the air for a couple of hours, so you won’t have to wait long. - Then comes the most dangerous stage: we need to drill into coffee cups and saucers holes without breaking them.
We use only and exclusively drill bits for glass and tiles. Great efforts are unacceptable; We drill slowly, without distortions. The key moment is when the tip of the drill goes through: pressing the drill a little harder at this moment will split the cup or saucer.

- We attach wires to each cartridge. Until we fasten them to each other.
- We screw the entire future lamp into a single whole. If our chucks use platforms with holes for screws, we pull them to the board directly through the holes in the saucer and cup.
If there is a hollow threaded tube and a nut at the end of the cartridge, we again pass them through the cup, saucer and board. A rubber gasket is placed between the metal and glass.
You can cut it yourself from an unnecessary bicycle or car tube; You can use a ready-made gasket of a suitable size from any plumbing repair kit. - We screw screws with rings into the back side of the board.
- We connect the cartridges in parallel. You shouldn’t leave the twists wrapped in electrical tape: we’ll carefully even do the side of the lamp that no one will see. Use a block to connect the wires.

- The block is fixed on the back side of the board in any way - a drop of glue or a screw. A piece of wire that will be connected to the wiring is clamped in it.
- We attach chains or cords to the rings on the back side; their other end is attached to a hook in the ceiling. The wire runs along one of the chains. Light bulbs are screwed in.
Press the switch and enjoy.
As you understand, the shapes that wooden chandeliers can take are limited only by your imagination. Let's show a few more original designs.
Sailboat made from driftwood and TV packaging

This original lamp made from oddly shaped driftwood picked from the forest. The author kindly posted a photo of his creation online.
The structure, of course, is not a fire safety monument. However, remember that LED lamps are extremely economical and practically do not heat up. If so, the risk of fire is reduced to nothing.
Chandelier made of dry boards and rope

Here, two ready-made matte lampshades are used as light sources. The simplest and most inexpensive. Everything else is the author's improvisation.
What is most striking is not that the lamp was made by hand: as you can see, there is nothing structurally complex about it. It is surprising that the author of the work was able to see beauty in such a seemingly worthless thing as an old board. And show this beauty to others.
Please note: in this design it is also worth using only and exclusively energy-saving or LED bulbs.
Incandescent lamps, especially high-power ones, create a very real fire hazard.
Timber with pots

And such ceiling lamps are not mass produced. Looks very original. To drill the bottoms of pots, you also need to use only and exclusively tile drills. In addition, you should not use incandescent lamps here either. Even low-power ones.
Hollowed out log with soffits

Another fire inspector's nightmare come to life. However, here too the use of light sources with minimal heat generation reduces the risk of fire to nothing.
Despite the exaggerated and simple appearance of the lamp, it can hardly be called made in five minutes on the knee: it was probably difficult to hollow out the log inside.
Conclusion
If you liked the wooden ceiling lamps described and shown, great. Even better if you have your own, original ideas. As you can see, they can be the most unexpected. Good luck with your creativity!
Such a product would look great in a country or country house, in the hallway of the bathhouse and even in an apartment furnished in a rustic style. But finding it in stores is far from easy, and at an affordable price it is not at all possible. There is no need to rush to search online stores, because you can easily make it yourself. Let's consider two versions of the product, which differ from each other in the degree of difficulty of production.
Self-assembly of a simple product
To make a wooden chandelier of a similar design with your own hands you will need the following:
- Wooden beam of square section 10x15 cm.
- Battery-powered LED lamps.
- Chisel.
- Hammer.
- Needle file.
- Drill.
- Antiseptic.
- Sander (fine and coarse sandpaper).
- Stain.
- Hanging hooks.
- Chain.
- Linen rope.
 DIY wooden chandelier
  Chandelier made of wood and bottles
Basic energy saving lamps and their features.
Assembling a wooden chandelier with your own hands is as follows:
1. We mark the future location of the lamps on the timber. Draw contours of appropriate sizes.
2. Using a drill, we make many holes inside the contour, splitting the wood as small as possible.
3. Using a chisel and hammer, knock out the excess wood. It is advisable to make the holes through.
4. Using a needle file, level and sand the inner sides of the squares.
5. Sand the entire surface of the timber by hand or with a grinder.
6. We treat it with an antiseptic in several layers.
7. Protect the surface with the finest grain sandpaper and clean it from dust.
8. Cover the timber with stain of the desired color.
9. On the back side of the product and on the ceiling we make holes for hanging hooks.
10. Cut off sections of the required length from the chain and attach them to the hooks on the beam.
11. To enhance the decorative effect, we wrap linen rope around the edges and in the middle in several rows around the beam. The ends of the segments are fixed liquid nails.
12. We insert light bulbs into the holes, which are fixed in the sockets with liquid nails.
13. Instead of LED lamps, you can insert sockets into which energy-saving light bulbs will be screwed. The wiring will be hidden from the top of the product and in the fastening chain.
 DIY veneer chandelier
  DIY chandelier from branches
DIY options step by step master class from various materials.
DIY assembly of a wooden chandelier of a more complex design
To make a wooden chandelier with your own hands, more complex plan You will need the following tools and materials:
- Untreated or debarked logs.
- Shingles (wooden slats) 2.5 cm wide and 0.5 cm thick.
- Linen rope.
- Ammo.
- Coarse and fine grain sandpaper.
- Stain.
- Chainsaw or hand.
- Drill and cutter.
- Screws with bolts.
- Solvent (turpentine, acetone or gasoline).


The product is manufactured as follows:
1. A third of its thickness is sawn off along the log (a fourth is possible). You will need three of these blanks.
2. Their length is determined individually depending on the desired dimensions of the product.
3. Bark is removed from untreated logs.
4. The surface of the workpieces is wiped with a solvent to remove any resin that has emerged.
6. Then they are folded into a triangle, so that one edge of the workpiece overlaps the edge of the other, and the second lies on top of the edge of the third.
7. Marks are made at the joint for drilling. Centered large hole for the cartridge, on the sides of it there are smaller ones for screws.
8. Using a cutter, large through holes are cut with a diameter that allows a cartridge to be inserted into them. A drill is used to drill through holes of smaller diameter for screws.
9. Closer to the vertices of the triangle, three more holes are drilled from the sections of logs to thread through them the ends of the rope on which the product will be suspended.
10. The surface is sanded with fine sandpaper.
11. The shingles are sawn into small pieces of equal length.
12. Lampshades are assembled from chopped shingles, which were previously coated with antiseptic and stain. Two parts are placed parallel to each other, two more elements are placed on their edges, which form a square. One lampshade consists of 24 elements.
13. Fastening of parts in the lampshade is carried out using liquid nails.
14. The blanks are coated with antiseptic and stain, assembled together and fixed with screws and bolts.
15. Lampshades are glued to the blanks using liquid nails or wood glue.
16. The assembled product is varnished.
17. The edges of the ropes are threaded into the holes, which can be hung, for example, on a hook.
You can make a completely elementary version of the product, which is presented in the form of branches tightly tied together. They can be painted or varnished, and lamp sockets with lamps are hung on long cords from above. This option is suitable for a home in a minimalist or eco-style.
Today, in order to give individuality home interior we use many different design techniques. Lighting is often a very important part of the decor. Sometimes you just need to add the right element of lighting and everything immediately falls into place. In this article, the author describes a method for making an original wooden lamp that anyone can make. The work is not difficult, and any untrained person can cope with it.
To complete this work we will need.
Tool:
Ruler;
- metal scissors;
- hammer;
- pencil;
- wood hacksaw;
- clamps;
- grinding tool.
Materials:
Rail with a section of 1 x 1 cm;
- wood glue;
- small nails.
Let's start manufacturing.
We take a strip with a cross section of 1 x 1 cm and cut it into equal parts, in in this case the author chose a length of 15 cm, but you can take the size of the slats at your discretion.

To prevent the strip from moving during cutting, we fix it with a clamp. We use a hacksaw as a cutting tool.

You should get something like this.

Next, we take the obtained parts and put them in the so-called “well”, we line them up until we reach the height we need.

Since the ends of the workpieces may be cut unevenly and have defects, we sand them with sandpaper or use a bur machine with a special grinding attachment.

We get approximately the following.

Then we fix the finished parts together with wood glue, while trying to align them as evenly as possible again in the shape of a “well.” To ensure that there are no displacements, we place the workpiece under the press and let the glue dry.

The next day, let's see what we got.

Since the lamp generates heat, it is best to design the lamp so that the wood does not come into contact with the lamp. Next, we take a perforated tape, the thickness of which is 0.75 mm, from which we will make a fastener.

We additionally strengthen the finishing top slats with nails, since they will carry the main load. Then we attach two strips of tape using small screws.

In order to make the glow of the lamp a little softer and more pleasant to perceive, we make a so-called diffuser lampshade, use tracing paper, or organza, or other available material. This design will be fireproof, because the lamp will be fixed strictly in the center and will not come into contact with the inside of the lamp. We check that everything is properly fixed, nothing should be loose. Next, we put the cartridge on the suspension and clamp it with a clamping ring. We hang the lamp in the place we need.
Nothing adds coziness to your interior like objects made of wood: tables, bedside tables, beds or pleasant, pleasing things to the eye - crafts, paintings and other little things. Have you ever thought how stylish and homely lamps made of wood will look?
4 master class on how to make a chandelier from wood - very stylish and modern!

Watch the master classes offered below, evaluate the photos of finished wooden chandeliers - you will be amazed by the ease of manufacture and the elegance of the forms. Such DIY wooden chandeliers will look harmonious in any room - from the hallway to the bedroom, moreover, they can be hung on the veranda or in the garage - they will emit warm, romantic diffused light everywhere.
What makes up the geometry of the room? From the placement of walls, furniture, tulle, paintings... Add more style to your room by introducing the geometry of a chandelier! So stylish ceiling lamp from wooden slats It’s not difficult to make but looks very impressive.


Materials and tools
- 18 wooden slats (posts);
- construction stapler with staples;
- metal pendant for a chandelier;
- metal paint;
- jigsaw;
- ruler;
- pencil.
Installation process
Let's prepare the frame of the chandelier - wooden posts. They will be natural in color.
- Let's cut first 4 identical high columns- according to the height of the chandelier.
- Then let's make 8 more - for transverse inserts.

Step 2: We make the frame of the chandelier.
- Let's make the first frame. Let's take it 2 long guides, put them parallel to each other, 2 short - across between them and fasten them in all corners with a construction stapler.
- We also use a second pair of long slats. It turned out to be 2 frames. Using the same stapler, we connect them with other transverse slats. It turns out to be a kind of cube.


Let's add a designer touch to the frame - we'll lay another diagonal rail through each side of the cube. To do this we will cut one corner of the rail at 45 degrees and apply it to one of the sides for fitting.

Step 3.
- Mark with a pencil and cut off with a jigsaw.
- We attach the diagonal with a construction stapler, as shown in the photo.
- We will do the same for the other parties.

Step 4: Attachment
The model of this chandelier does not include a lampshade, so we take a ready-made blank for the lamp - an original pendant for the lamp. Let's paint it in favorite color and leave to dry.


Step 5.
While the paint is drying, we will make a hole in the frame to secure it to the factory hanger. The diameter of the hole should not be much larger than the diameter of the pipe so that the lamp does not fall through.
But in any case with inside you need to tighten the washer or proprietary limiter.


When the suspension is dry, we fix it to the ceiling, then put on the lamp frame, tighten the limiter and screw in the light bulb.

Looking at this chandelier, you will understand that you would not find it in any store. It will become a favorite decoration of even the simplest and smallest room and will definitely be an artful addition to your home interior.

These master classes are intended for anyone who would like to learn or improve their skill in making practical, unique and quite elegant wooden chandeliers with their own hands. The advantages of these products are that wood is easy to process, it is safe, because all conductive parts are hidden in insulated housings, and you can fit chandeliers made by yourself into any interior!
Master class No. 2. Designer chandelier made of wood
Simple creative lamp made of wood can be used as a night light, if you make it so that little light passes through, or as a chandelier, making fewer stripes.

Materials and tools:
- very thin wooden plywood or thick sheets of paper (the main element of the lamp);
- glue for wood or paper (PVA);
- clamps or clips (useful only during the process);
- a wire with a socket and a plug (if it is a lamp from a general power supply);
- pencil;
- scissors or paper knife.
Chandelier assembly
If you don't have ready-made strips, you can cut them from a piece of thin plywood or thick paper. You can mark the strips with a pencil or cut them straight away, because they don’t have to be the same. Any design solutions are welcome!

Glue the strips together. We make a rim of the desired diameter from each strip and glue it overlapping with PVA or wood glue.
It is better to glue it right away, creating the final design of the chandelier, since it will be difficult to make one shape from rims of different diameters at the end. Insert strips between others and fasten them together with clamps.

- It is necessary to make a mount for the socket and lamp. Use energy saving light bulbs and when the power is on, do not touch the electrically conductive parts of the cartridge.
- Let's cut it out square piece of plywood and make a hole in it for the cartridge. To do this, you need to circle the inner diameter of the cartridge so that later it does not slip through.


- We cut a hole with a knife and fix the cartridge in it.
- We drag the wire through the lamp, taking into account how it will hang.
- Then we fix the cardboard itself with the socket in the lamp using glue, as shown in the photo.

To dry, secure the plywood with two clamps. Let's leave it for a while.


When the glue has dried, remove all clamps. All that remains is to hang the lamp you made with your own hands, where it will delight you every day!


Master class No. 3. Wall lamp made of wood
If you like bright electric light and the romance of simple details, watch this master class. Nothing complicated, but original and stylish. A very simple wall lamp made of wood in a loft style.

Materials and tools:
- wooden bracket (can be purchased at home improvement stores, such as IKEA);
- cartridge with plug and textile cable;
- spray paint on wood;
- old box or newspapers;
- signets.

Manufacturing technique
Take an unnecessary box or spread newspaper to paint the bracket. It is better to do this with gloves so as not to get dirty. Spray paint over the entire surface. If the color saturation after the first painting does not satisfy you, leave the part to dry, then cover it with a second layer and leave it to dry again.

We insert a textile wire into the hole in the bracket and make one turn around the bracket. Textile wire is the highlight of this lamp, but you can use any wire.
We insert the other end of the wire into the socket and make zero and phase wiring in it.
We secure the bracket to the wall with screws or dowel nails. Screw the pear-shaped light bulb into the socket and insert the plug into the socket. How lovely! And in the evening, when these bulbs are the only source of light, they create a romantic mood of a summer evening.


Master class No. 4: Lamp with wood veneer
Fantastic hanging lamp from flexible wood plywood will serve as a decoration for a dining room or bedroom; its rounded shapes and neutral colors will complement any interior.

Materials and tools:
- a piece of flexible plywood board (its length determines the height of the chandelier + a small piece for fastening);
- 2 wooden hoops (you can use hoops of the same or different diameters);
- office or construction clips;
- glue gun (hot glue);
- long ruler;
- pencil;
- knife or large scissors.
Lamp manufacturing technology
Step 1: Prepare the cartridge mount.
- We take a hoop of smaller diameter and a piece of plywood board. Place the hoop on the board and trace the inner diameter with a pencil.
- Cut out a circle (or almost a circle - a piece sufficient to secure the lamp).
- In the center of the circle, cut out a smaller circle - the diameter of the cartridge.
- Take hot glue or wood glue and glue the circle with the hoop.

Step 2.
We take the second piece of flexible plywood and fix it on the table for accurate measurements. Take a ruler and a pencil and draw parallel lines - approximately 2 cm wide.
But you can make the stripes as wide as you like - narrower or wider depending on your preferences.
We cut the plywood into equal strips. We will need 4 additional strips to adhere the rims to each other. These strips will be shorter than the others (almost half as long).

Step 3.
- We fix 4 short stripes on lamp. To do this, use one clamp to hook one strip on the small hoop from above and a second clamp from the bottom on the large hoop.
- We repeat this procedure on 4 sides, as shown in the photo (in order for the chandelier to be level, the hoops must be positioned strictly parallel to each other).

Step 4.
- We attach the remaining strips in the same way, starting with four on all sides, and then filling the voids between them (this should be done for overall symmetry).
- The strips should be equally curved so that the appearance of the chandelier resembles a lantern.
- Latest 2 strips must be left to hide the clips.
- We glue them one at a time - each according to the diameter of the hoop. You can glue it overlapping - it will be invisible.


All that remains is to hang the lamp and secure the socket in the hole. The air lamp is ready!
In contrast to the rapid progress of technology, everything more people When arranging their homes, they turn to the roots. Natural materials, simplicity of lines – are becoming relevant again. As you know, lamps have an important mission; they seem to set the general background in the interior. Made from wood original chandeliers, sconces or floor lamps will fit perfectly into rooms decorated in eco-style. The beauty is that you can make them yourself, taking into account the features of your room.
Let's look at some striking examples of wood crafts, depending on the type of base used.
Ready base
Lamps created on the basis of finished wood products look great. Everything that your imagination allows will be used: from the cart wheel, old barrel, to the helm of a ship purchased at a flea market.
Surely many have seen massive wooden chandeliers made of wheels in atmospheric establishments. Equipped with candle-shaped bulbs, they look like aliens from the Middle Ages. Why not make such a lamp yourself?
Wheel chandelier
You will need: a base wheel (you can find it in large construction supermarkets), a dozen light bulbs simulating burning candles, fastening chains and a ceiling lining to hide the wires. Decorate it with forged parts to your taste.
Couldn't find the wheel? No problem, with the help of ordinary wooden clothespins you can make funny “plafonds”. Even a teenager can handle this kind of work.

Lamp made of clothespins
And another masterpiece made from wooden clothespins - attach clothespins in tiers to a metal mesh. Such a lamp can be made in an hour by connecting a child - both educational and useful for business. Complete it with an original candlestick, and you are guaranteed a romantic atmosphere in your home.

Candlestick made of clothespins
And that's all he needs tin Yes, a couple of dozen clothespins, you don’t even need to glue anything.
But what a miracle can be made from ordinary wooden hangers. Drill a hole under the hook, thread it onto the pin and secure tightly by fanning them out.

Trempillar lampshade
Even an old dried out barrel will come in handy - just remove it through one of the side boards. It makes an excellent lantern for evening gatherings under the stars.

Barrel lamp
Wooden balls
The most popular DIY lamps often have a spherical shape. So, in fact, you can make an original twig ball-shade from waste.
The same technique is used here as when creating thread balls. To do this, wrap an inflatable ball of the correct shape in film, attach small pieces of sticks using a thermal gun (10-12 cm centimeters - based on the size of the ball, the smaller it is, the shorter the length of the sticks.)

Ball-shaped lampshade
Done, you can enjoy your exclusive lampshade. If desired, open it with paint, varnish or silver from a spray can.
In the same way, you can randomly wrap fresh willow twigs (or young bamboo shoots) around a round (square or cylindrical) base. True, the finished lamp will have to stand longer so that the branches dry out properly.

Willow lampshade
Truly magnificent ball lamps are made from medium-thick branches, cut into round shapes. Drill a hole in the center in each, do not make it too small - the light transmission of the “shade” will depend on this. And glue them together according to the algorithm described above.

Lampshade made of branches
Take branches of different diameters to fill the surface of the base as tightly as possible when gluing.
Such an original lamp will decorate country house even during the daytime. Definitely worth spending a few hours creating.

Country ceiling lamps
A spectacular chandelier can be made from thin slices of wood and sections of bark - the most difficult thing is to make a neat cut. Connect them one by one, taking into account that the tiers should be different sizes and arranged in descending order, imitating a bump.

Chandelier pinecone
We found a lush rhizome - great. This is a ready-made lamp for the bedroom - you just need to paint it to match the existing interior.

Rhizome chandelier
And in the evening your room turns into a forest thicket - the chiaroscuro is so realistic.
We arrange driftwood
Amazing lamps are made from ordinary driftwood. Of course, they can be refined by sanding and varnishing, the main thing is to choose a more interesting “plot”.

driftwood lamp
Complete the block with a modern one spot light on a thin “leg” - the result is clearly a designer item, and you can’t say that it was all made by hand
Sanded and varnished knotted koryaks, coupled with a laconic lampshade made of paper (fabric or bamboo straw), look very stylish.

Driftwood lamps
Naughty twigs
A lamp made from grapevine. Cute mustache curls add playfulness and charm to the product. And there is no need to injure the plants - use the branches remaining after the next autumn pruning.

Lamp made of wicker
You can build unusual chandeliers from straight sections; although they look a little ominous, they allow you to maintain the eco style in your country house.

Chandeliers made of wicker
Moreover, it is not at all necessary to adhere to a certain geometry. Both the mentioned twig ball and the “broom” dotted with LEDs will look great.

Geometry of lamps
Here's how to decorate boring rectangular desk lamp. This option is good not only for a summer residence, but will also bring an atmosphere of natural warmth and comfort into the apartment.

Decoration for lamps
This lampshade is easy to make with your own hands. Cover the wooden or metal carcass, attach the lamp socket inside. Use twigs of different sizes as decoration - no one else will have this.
Using the “gifts of the forests”

Street light
But this is not a troublesome option at all. Make a hole in the trunk of a dead tree in the area, and insert a kerosene stove or LED lamp inside solar powered. Original, simple and sincere! This street lamp is well protected from bad weather and warms the soul on long winter evenings, shining from under the snow cap.
By the way, there is another plus - you don’t have to worry about uprooting the stump.
Very unusual lampshades are made from birch bark; cover it with a finished lampshade made of thick paper or fabric. Just use such a lamp with caution.

Bark lampshade
Since strong heat can quickly dry out the bark, crack and even ignite - safety comes first. It is preferable to install fluorescent or LED lamps - they heat up significantly less than conventional ones, and they consume significantly more energy.
Or you can simply cut a birch log, drill holes (not through holes - to the size of the base), screw several light bulbs in a row and attach them above the dining area or work table.

Birch lamp
During the New Year holidays, lampshades decorated with pine cones would be appropriate. Provide them with small, barely noticeable LEDs and the lamp will shine, spreading intricate patterns of chiaroscuro on the walls, which will further emphasize the festive atmosphere.

Lampshades with cones
Paint the pine cones with white paint to create a frost effect; you can dust them with salt crystals on top.
Trimming boards
A wonderful lamp comes out of scraps of boards for shelves - nail them to the base - with the ends in a circle. The main thing is to properly adjust them to size and carefully sand the cuts so that there are no burrs.

Board lamp
You can slightly reduce the thickness of the boards closer to the center so that more light penetrates outward.
If you are familiar with figured wood cutting, try to recreate something similar. Form simple geometric patterns from diamond-shaped notches and cuts - this will make the craft look neater. These wonderful lampshades are appropriate in any interior - as a chandelier, sconce or floor lamp.
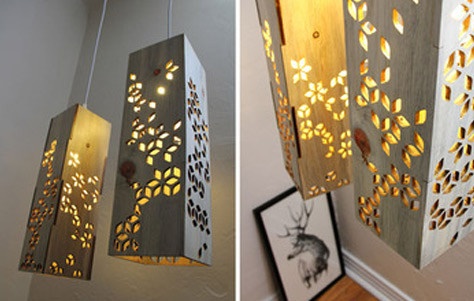
Shaped cutting
Or you can simply place an ordinary candle inside and place it on the table, extinguishing all other light in the room. We are sure that your household will appreciate this work!
On summer cottage A hanger lamp like this would be nice. This versatile craft can also be used as a street lamp in a gazebo, and you can hang frequently used items nearby (kettle, keys, towel, etc.)

Lamp with hanger
All you need to do is to put together figuredly cut boards in any order, cover them with varnish or stain, and attach metal plates, hooks, a lamp socket or a kerosene stove. This is easy to do with your own hands, even without any carpentry experience.
Safety
And finally, a little about safety. Considering that wood burns well, you should not use incandescent lamps in products made from it. Overheating and a small spark are enough for the chandelier to burst into flames under the ceiling. So use led light bulbs– they do not heat up at all even after prolonged use. When processing products, use non-flammable and non-toxic materials.
Since the tree is natural material, and is an excellent environment for the development of mold and insect pests, so be sure to treat the street lamp with fungicides (antiseptics, insecticides). Due to the fact that such a lamp is in the open air, you should not be afraid of harmful fumes. LED strip - what you need to know when choosing Review and installation of ceiling LED panels, advantages and disadvantages How to quickly make homemade lamp


