Gutters for draining water on the ground - storm drains for sewers. Galvanized and plastic gutters - installation Rainwater pipe from the roof drawing
There are no trifles in construction, even the drainage of storm water requires careful planning at the project stage. This is primarily due to the functional features of the diversion system and the materials used. A properly organized drainage system ensures that moisture does not flow under the roof and the integrity of the building is violated.
Functions
- Protection of the foundation and walls of the building. Despite the type of construction, meltwater from the roofs can erode the foundation for some 5 to 10 years. Flowing down the walls of the building, water can penetrate into the smallest cracks and gradually break the structure. Getting into the ground near the foundation, rain and melt water washes away and destroys it. A storm watercourse will help protect the building from this.
- Ability to collect rainwater. Melt and rain water is often used for irrigation, especially indoor and greenhouse plants. Although rainwater harvesting is not as high a priority as building protection, using it can be a bonus, because if the building is already equipped with a storm drain, you can use it as an auxiliary watering tool, at least for flower beds and flower beds.

- Decorative function also matters. A building without installed drainage systems will not be very attractive from the outside, but will create an unfinished look. The use of commercially available standard drains is often not consistent with the general exterior of the building, so in this case you can think about self-manufacturing or "custom" products.

Gutters and storm systems play important role at final finishing buildings. There are many options for this design, a specialist will help you choose the optimal one, and you can do the simplest and most uncomplicated one yourself.
What are
If the roof of the house is gable, there are no problems with the drain. To do this, it will be enough to protect the upper docking part and install along the edges of the gutter with a slight slope. Rain and melt water will drain naturally without getting inside and without causing any harm to the building.

Most often, the problems of proper drainage lie in wait for the owners of modern houses with a more complex roof structure. Usually this point is planned at the project development stage, but there are times when a seemingly insignificant nuance was not considered and there were problems with drainage.

In order to understand clearly how the storm water drainage system works, you can understand in detail the types and configurations of the gutters. So, in shape there are rectangular, rounded and triangular gutters for draining storm water.
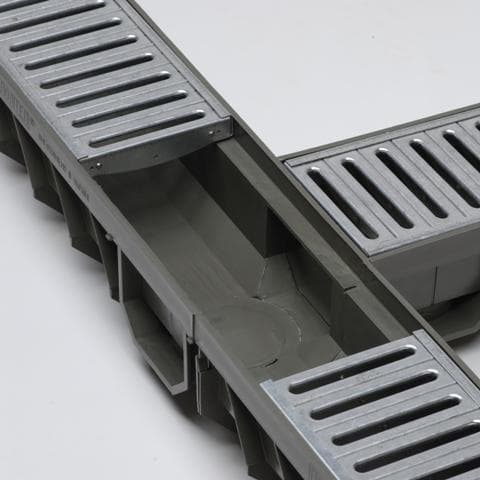
The most popular are semicircular designs. It is believed that in this way the water passes its way faster and the storm drain is less clogged with leaves and dirt than structures with a corner arrangement. Rectangular gutters can be used as drainage grooves in floor coverings. In this case, they are equipped with an additional grate that acts as rainwater. Such precautions are often used both for ease of movement (puddles do not accumulate) and for protection floor tiles and asphalt (water does not erode the surface structure).
Triangular grooves are usually homemade designs, but are also found in the purchase assortment. The choice of one or another configuration usually depends on the preferences of the owner and the architectural features of the building. All three options are quite convenient and functional, so there are no special differences between them, except perhaps a visual image.
On the video - gutters for the removal of storm drains:
What material are they made from
There are three main types of materials that are most suitable for these purposes. The main selection criterion will be the ability to withstand weather precipitation and temperature changes. There is also a tendency to choose storm systems to match the windows and walls of the building.. This important detail will give a harmonious look to the building, and will not look like an alien element against its background.
What material is used:
- Polymer compounds, usually common polyvinyl chloride (PVC). Main advantages: light weight and affordable price. Among the disadvantages can be noted heating under the sun's rays, which can lead to deformation and the risk of damage during heavy precipitation, such as hail or under the weight of snow. Estimated service life - 50 years. For hot climatic zones, plastic is usually used. white color, in temperate zones, brown is also suitable. There are varieties of green, brick and black colors.

- Cink Steel differs in the big weight and good quality of a design therefore and fastenings have to be corresponding. Usually home-made gutters are made of galvanization, but purchased options can also be purchased from this material. The service life will be in the region of 10–15 years, and then with enough good care. The annual audit should include timely cleaning of dirt and debris. Despite the "stainless" characteristics, galvanized steel is prone to corrosion, so the service life of such gutters is relatively short.
- Copper storm systems- the highest quality and prestigious option. The service life is approximately 100 years, while such systems have a more complex configuration and usually amount to harmonious composition with a roof, which is also made of this material. High strength and performance characteristics also have their drawbacks, the main of which is a significant price. Such a system must also be taken into account when planning a building, since the serious weight of the structure requires additional reinforcement.

It is quite difficult to determine the best manufacturers in the domestic market, because special studies in this area have not been conducted. Among the most competitive companies, the following categories can be distinguished:

As you can see, the choice is quite large, so purchasing suitable products is a matter of time and financial investment.
How to properly organize a drainage system
The main nuances that must be considered when buying are usually negotiated with the contractor, but if you decide to do this work yourself, this information will be very useful to you.
Components of the storm system:
- gutter- the main part, its size depends on the area of \u200b\u200bthe slope, the higher this indicator, the more the volume of the gutter will be needed.

- Storm water inlet has the shape of a funnel and serves to connect the gutter and the pipe that directly discharges water.

- The pipe usually has the same diameter as the gutter and is designed to divert drainage water away from walls and foundations.

- Stubs are used in places where no storm water inlet is installed and water drainage is not planned, usually this is the highest point of the system.

- Corners and swivel joints designed to create the most convenient design that allows you to cover the entire perimeter of the building. There are internal and external corners, which can also differ in the degree of rotation.

- Fasteners are classified according to the type of connection and usually come with gutters.

When planning the system, one should also take into account the optimal fastening step: too frequent will look ridiculous and create disharmony (not to mention material costs). If you fasten the gutters at a fairly large distance from each other, there is a high risk of the gutter breaking under the mass of flowing water.
The optimal dimensions, established empirically, are:
- The gutter must be fixed every 600 mm.
- The pipe is at least 1 meter apart.
- The minimum slope of the gutter is 2–3 mm per meter of length.
Do not be lazy before going to the store to draw up a tentative plan for the location of the storm system. Thus, you can visually calculate all the necessary elements and avoid unnecessary expenses or constructive blunders.
On the video - the correct installation of gutters for the removal of storm drains:
If you plan to install the gutter with an overlap in the direction of water flow, you must take into account the additional length when purchasing. Often, sealants are used to additionally seal joints. It is best to use special formulations designed for outdoor use and weather conditions. It should be borne in mind that the annual audit in such cases will include monitoring the condition of the seams and, if necessary, editing in place.
Purchased gutters and accessories
Despite the availability homemade version, most owners of private houses still prefer to seek help from specialized products. Buying such goods is usually not difficult, the range of any hardware store or the site will offer a choice of several options at once. Enjoy great success plastic gutters, which are distinguished not only by durability and ease of installation, but also have a low weight, which significantly reduces the load on the roof and building.
Many construction companies offer their services for the design and installation of a storm system. If the roof configuration is quite complex, and you do not have enough experience in similar works It is best to trust the professionals. Otherwise, it is quite possible to perform these works independently, and ideally with at least one assistant.
A storm drainage system is not vital, but it is impossible to do without it in construction. In addition to giving a building a finished look and visual appeal, a well-planned gutter helps protect the foundation from washout and the walls and roof from leaks. Usage modern materials will help to solve the problem of rain and melt water quickly and optimally.

Usually storm system goes through the design stage along with everything architectural project, but for independent design, it is not particularly difficult. Modern manufacturers represent a wide range of these products, which is also not difficult to purchase in any building supermarket or on the corresponding website.
It is impossible to do without drainage systems fixed on the roof of the house, if you do not want the rain streams, flowing down from the height of the roof, to splash onto the walls and undermine the foundation. Do-it-yourself roof spillway can be assembled by purchasing ready-made systems from well-known companies, or you can do it yourself, for example, from their galvanized sheet or even from plastic sewer pipes.
By purchasing professionally made and structurally thought-out kits, you can pick up all the necessary elements for them - from small fastener details to complex corners and joints.
If a decision is made, then you will have to try and think carefully about what the elements of this system will be made of and how functional they will become.
What are drainage systems made of?

The most popular materials for the manufacture of gutters are currently special polymers that can easily withstand low and high temperatures, as well as their sudden changes. Such systems are produced by companies specialized in the development of plastic products for construction and external design buildings. Kits of professionally manufactured systems are quite expensive, and they are mainly installed on the roofs of respectable mansions and less often in — ordinary houses of the private sector, although they are able to transform any structure.
 Gutters made of galvanized steel - a kind of "classic of the genre"
 Since time immemorial, gutter systems have been made of galvanized metal. Such elements are usually ordered from tinsmiths or purchased in specialized stores. Metal gutters are more affordable and therefore used more often. Despite the low price compared to other systems, and perhaps not so aesthetic appearance, galvanized gutters have their positive aspects, in which they even surpass similar sets made of plastic or metal alloys. The main disadvantage of galvanized systems can be called the divergence of the connecting seams during drops temperature conditions. However, here much depends on the skill of the tinsmith who makes them.

Steel gutters can be coated with a layer of highly resistant polymer paint. This significantly improves their decorative characteristics and provides additional protection against corrosion.
 Almost "eternal" gutters made of zinc-titanium alloy
 Gutter systems are also made from a metal alloy called zinc-titanium, which are also coated at the final stage of production. polymer paints. The content of pure zinc in the alloy reaches 98 - 99% - a guarantee of corrosion resistance, the addition of titanium is a condition for the strength of products, and very small inclusions of aluminum and copper give this material high ductility during its processing.
Such gutter systems look as aesthetically pleasing as plastic ones, but they are more reliable, as they better withstand the impact external environment. Their external disadvantages, with a poor-quality coating, include the possible delamination of the polymer coating, therefore, having settled on this option, it is better to purchase kits from a trusted manufacturer with a steady reputation.
All of these materials are well suited for gutters - they are easy to process, install and look neat, organically merging with the exterior of the building and at the same time becoming both a necessary functional detail of the building and an important addition to its design.
The main elements of the drainage system
If gutters are purchased in a store, you don’t have to think about how and from what to make one of the elements of the system - the manufacturer has already thought through all the nuances of the roof structure. By measuring and specifying all the parameters at your own home, you can buy all the necessary details.
Despite the variety of options for drainage systems, they all have an approximately common structure and consist of similar structural details:

1. Gutter - the main part of the drain, which collects water flowing from the roof slopes. Usually gutters are made up to 4 meters long.
2. Hooks-brackets on which the gutter is laid. Plastic brackets are commonly used for systems also made of polymers.
3. Cap for the edge of the gutter for the right and left side.
4. Funnels installed along the edges of the gutters.
5. Central funnel, fixed with glue or with the use of grooves and seals (5a).
6. Connecting piece (coupling) for the gutter. It can also be mounted with glue or with a well-thought-out groove connection using gaskets (6a).
7. Universal connecting angle of 90º external and internal (7a).
8. Drainpipe with connecting clutch
9. Screw clamp, tightening the coupling connection of pipes and other elements.
10. A tee that connects two downpipes.
11. Transition coupling - used when it is necessary to connect pipes of various diameters.
12 and 13. Elbows (elbows) for connecting downpipes. Usually they have an angle of 60 ÷ 70º - different manufacturers can use own standards. It is clear that in one system there must be elements with the same angle values.
14. End outlet with an angle of 45 º - for directing wastewater into the storm sewer storm water inlet. This detail is also called a mark.
15. Hook-bracket made of metal.
In addition to the presented elements, for some drainage systems, instead of brackets, the kit includes a cornice strip, which is an additional bracket holder or even performs their function itself.

Before going to the store, you need to make a drawing of the edge of the roof with all the turns and ledges, while measuring the corners. A drawing with detailed parameters of the drain must be provided to a specialist who should help select all the necessary elements for a complete set.
Video: an example of installation of a finished GAMRAT gutter system
Prices for drainage systems
Gutter systems
Independent production of drainage elements
1. If a system made of galvanized metal is to be installed, then, in order to save money, the gutters can be made independently, since sheets of material are much cheaper than finished elements.
You can make a semicircular or square gutter from galvanized steel, but the semicircular shape is still considered traditional.

It is easy to shape a thin sheet of metal into a pipe of the desired diameter by making special bends at the edges so that they are securely held on the brackets.
If you can make a gutter for a drain, then making brackets will also not be ore. Their semicircle should have a slightly larger radius, as the gutter should fit easily and be fixed in the bracket.

It is easy to make a box gutter from galvanized metal. Its shape is displayed on a wooden bar of the desired size. One of the sides is made a little larger and folded to the side so that the flowing water gets into Right place. Then, its edges are bent in a special way.

2. If you want to make a drain only on a straight section to the roof, then the gutter can also be made from plastic sewer pipes. Such gutters will cost, in terms of price, almost for nothing, since two gutters are obtained from one pipe at once.
- The pipe at the beginning and end is fixed on two boards with the help of self-tapping screws, in its upper part, exactly opposite the lower fixation points, one more self-tapping screw is not completely screwed in. On their protruding parts stretched thin rope, a straight line is marked along it. According to this marking, using a grinder, the pipe is cut from beginning to end.
- The tube is then inverted and the process repeated. Thus, two halves are obtained, which will serve as gutters. When assembling, individual parts can be twisted with self-tapping screws from the inside. Using sewer pipes, corner parts can also be taken from the same system, also sawing them along.
Video: making gutters from a plastic sewer pipe
Of course, homemade parts will not have such a spectacular look as professionally made ones, but you can save a decent amount on this.
3. If desired, you can pick up other components to assemble the whole complex, since you can currently find a lot suitable materials, which will serve as blanks. The only parts that you still have to order or buy are funnels. It is quite difficult to make them on your own, without experience in tin work.
Installation of a drainage system
The installation of the system is carried out in different ways, depending on the selected fasteners and the installation period.

The optimal installation is considered to be on the extreme crossbar or rafter of a pitched roof to the flooring and fixing the roofing.

The presented diagram clearly shows how the brackets are fixed and closed with a cornice strip. In this case, it is a kind of shield for the spotlight, protecting it from direct moisture.
In other cases, the cornice strip is made from a board, and if the brackets are not fixed before laying the roof, then they are attached to it.
Sometimes gutter mounts are fixed on the bottom of the slope directly to the roof, but this is not quite the right option.
Wherever brackets for gutters are fixed, their location must be calculated in such a way that water flowing from the roof in a large stream falls into this channel, and does not spill beyond it.
This parameter depends on how far the edge of the roof protrudes. If it goes to a sufficiently large distance, sometimes it makes sense to use the option of mounting installed on the roof itself.
Video: an example of the calculation and installation of a gutter system at home
So, having acquired or manufactured a suitable drainage system, you can proceed with its installation.
1. The first step is to install the gutter brackets.
They are fixed at a distance of 550 — 600 mm apart, with a slight slope towards the drain. The brackets must be fixed in such a way that the roof overhang is on the gutter 1/3 of the size of the semicircle, and 2/3 of the gutters will "catch" water from the roof.

If the brackets are fixed on a wooden cornice strip, then in order to clearly see the slope and the fastening line, the following actions are carried out:
- First install the bracket that will support the highest edge of the gutter, taking into account all the rules and recommendations.
- The next step is to fix the last bracket in the row. It is fixed with a slope of 4-5 mm per linear meter. An improperly calculated and installed system will not work effectively, and over time, leaks will certainly appear in it.
- Then, the brackets are fixed in the marked places. Thus, the required general slope of the gutter will be observed. gutters
- The gutter is laid and assembled, and a plug is installed on its raised edge.

- If a funnel will be installed at the end and in the middle of the gutter, and it is necessary to make a hole for it corresponding to the size of the funnel, then it is installed on the gutter and fixed.

- An additional middle funnel is installed if the length of the side of the house exceeds 12 meters. If it is shorter, then it is enough to install this element only at the end of the gutter, in its lower part.
- The gutter is fixed by putting the groove on its edge onto the ledge of the bracket.
- If a ready-made gutter system is installed, then the individual parts of the gutter are fastened together with special connecting parts, which provide for precise mating and appropriate sealing. If the system is made independently, then the gutters are overlapped and twisted with self-tapping screws. In this case, it is also useful to provide a thin sealing gasket, for example, from a rubber strip.
- When the sewer channel is laid and funnels are installed in it, sewer pipes and elbow bends are mounted to them, which are pulled together with clamps in the joints. Drain pipes are attached to the wall with clamps. Using bends will allow the pipes to be positioned along the wall so that the clamp posts do not protrude too much.

- If the water from the roof goes into the ground, then the sewer pipe fixed to the wall should end at 300 — 350 mm from the ground.
- If for collection and withdrawal rain or melt water around the house, a storm sewer is arranged, then pipe from the roof sometimes connect directly to it or place a cut-off drainpipe with a mark directly above the storm water inlet or gutter.
Find out how to do various systems, from our new article.
Something that many people forget or simply do not know about. It is highly desirable to install a protective mesh on the gutters, which will not allow large debris and fallen leaves to collect on its bottom. In finished systems, it is usually provided in the form of a strip that is attached to the edges of the gutter.

For a home-made system, you can purchase a mesh with a footage, and lay it in a gutter, rolling it into a roll, which is fastened with special plastic clamps.
 You can make such a “filter” yourself by folding the mesh into a tube according to the diameter of the drain
 Video: an important element of the drainage system - a mesh to protect against large debris
Whatever drainage system is installed on the roof of the house, it needs periodic monitoring and regular preventive cleaning. Even if a mesh is installed on the gutter, it needs to be washed sometimes, since the rum of large fragments from the roof gets into the drains a large number of dust and dirt, and the soaked fallen leaves that fall on the net are not always blown away by the wind. If the drain system is clogged, all the water that accumulates in it, along with the dirt, will one day end up on the walls of the house.
Taking on the installation of a finished system or for independent production drain, you need to correctly calculate all the parameters and slopes, make a drawing and, of course, evaluate your strength in performing this work. If you are not sure that it will be done with proper quality, it is better to seek help from specialists.
Properly equipped water drainage from the roof of the house will provide reliable and timely protection of the foundation, wall structures and roofs from the negative effects of precipitation.
The practical drainage system is made of durable and reliable materials, is easy to install and maintain, and gives the facade of the building an attractive and aesthetic appearance.
Features of the roof drainage system
The roof drainage system is an important functional part of any building, which ensures its reliable functioning and protection throughout its entire service life.
Such a system is intended for the following purposes:
- protection of the finished structure from moisture;
- collection of any liquid - melted, rain;
- decorative design of the facade.
Drainage systems for private households are divided into two types:
- Internal. Designed for setting up flat roof. In this case, the laying of the roofing material is carried out at a slope towards the funnel to collect and transfer water to the drain. The pipe is installed in internal walls buildings or in technical channels.
- External. Used for pitched roofs (with one and two slopes). The main elements - drain pipes, funnels and gutters - are mounted along the edge of the roof, and the liquid is drained from outer side building.
Structural elements of the external drainage system
External drains are used in most private houses equipped with pitched roofs, so this particular version of the system will be considered in more detail.
The drain system includes the following elements:
- Gutters for collecting water from the roof surface when it rains or snow melts, as well as its further withdrawal through pipes to the drain system. Gutters for drainage differ in configuration, dimensions and material used for their manufacture.
- Gutter connectors. Given the standard length of the gutters of 250 cm, in order to organize a system of drains from the roof, it is necessary to correctly connect all structural elements. For these purposes, connectors equipped with rubber-based seals are used. They provide reliable tightness of the joints between the elements and compensate for the expansion of materials during heating or cooling.
- Angular-type transition elements are used to organize the bypass of the sewage system along the internal corners of the building. Corner connectors help to increase the hydrodynamic performance of the finished structure.
- Fasteners - metal brackets designed for secure fixation gutters to the roof structure. They are represented special hooks with different lengths and configurations.
- Funnel for redirecting water from the roof through the gutters into the pipes. An important structural element of any drainage system, it is mounted between the gutter and the downpipe.
- Protective plugs that prevent water from overflowing through the edges of installed gutters.
- Drainpipes are designed to drain liquid into a storage tank or drainage system. Installation of pipes is carried out to the funnel with fixation to the facade of the building.
- Pipe and waste elbows are designed to drain Wastewater at a safe distance from the foundation and the blind area of the building. A pipe elbow allows you to adjust the rotation of the pipe, and a waste elbow ensures that water is discharged into the sewer system.
- Fasteners for fixing pipes. Such elements are used to securely fasten pipes to the facade of the building.
- Mesh caps to protect the structure of the gutters from contamination and clogging by third-party objects.
Specifications for gutters and pipes
Gutters and pipes - the main structural elements drainage system installed on the roof. To organize the flow of water from the roof, it is necessary to choose the right structural elements, taking into account their sizes, configurations and materials.
Gutter configuration
This parameter determines the geometry of the finished system, on which the effective .
Gutters come in the following forms:
- semicircular;
- square;
- rectangular;
- trapezoid;
- semi-elliptical.
The most reliable and affordable are semicircular elements, which are widely in demand for private households, are easy to maintain, and can provide a large flow of water. The special design of semicircular gutters, reinforced with stiffeners, provides increased resistance to extreme loads and deformations.
Square and rectangular products are not suitable for all types of roofs, moreover, they require additional protection against deformation by additional installation of snow retainers.
Downspouts are selected according to the shape of the gutters: square pipes for box-shaped gutters, round pipes for semi-circular and semi-elliptical gutters.
Pipe and Gutter Diameters
An equally important parameter is the diameter of the gutters and pipes, which is determined by the area of the roof - the larger the area, the larger the diameter.
Gutters come in diameters from 9 to 15 cm, pipes - from 7.5 to 12 cm. When choosing elements, it is recommended to follow the following recommendations:
- For small roofs with a slope area in the range of 11–72 sq. m. suitable gutters with a diameter of up to 10 cm, pipes - 7.5 cm.
- For medium-sized roofs with a slope area from 110 to 205 sq. m. it is worth choosing gutters with a diameter of 10-13 cm, pipes - from 9 to 11 cm.
- For large roofs, the slope area of \u200b\u200bwhich is from 210 sq. m., gutters with a diameter of up to 15 cm and pipes - up to 12 cm are provided.
Production material
The reliability and durability of the roof drainage system depends on the quality of the material used to make the gutters.
Gutter systems with basic elements can be made of plastic or metal. For metal structures, products made of steel, copper, polymer and aluminum are used.
- Steel. The products are low cost, light weight and easy to install. To improve the performance of the material, steel products are coated with special polymer components that are able to withstand temperature extremes, exposure to ultraviolet radiation, mechanical damage and deformation. The connection of individual structural elements is carried out using fasteners equipped with seals, brackets and locks. The disadvantages of the material include brittleness upon impact and susceptibility to the appearance of rust in places where the surface is damaged.
- Aluminum. The roof drain, equipped with aluminum elements, is practical, durable, easy to install and light in weight. This design has an attractive appearance resistant to UV and fading. The disadvantages of the material include high cost and susceptibility to the appearance of electrochemical corrosion. To connect the products, special rivets, an adhesive mixture or silicone for aluminum are used.
- Copper. Pure copper products are the most durable and reliable. The connection of individual elements is carried out by hot soldering or folding. Copper elements are designed for installation on seam type roofs. During operation, copper undergoes oxidation, as a result of which it acquires a characteristic green tint. If the copper water drain from the roof comes into contact with aluminum or steel elements, electrochemical corrosion can occur. In this case, copper drains are recommended to be installed on roofs made of the same material.
- Polymer. The most popular and affordable option for drains for private houses and cottages. To increase the resistance of products to ultraviolet radiation and temperature extremes, the surface is coated with acrylic or titanium impregnation. The elements are connected by couplings with sealing rubber bands, latches or adhesive mixture. Gutters made of polymeric materials are resistant to corrosion, mechanical stress and damage.
How to install a roof drainage system yourself?
Do-it-yourself installation of a drainage system requires technical training and compliance with safety rules when carrying out work at height.
Before starting work, it is recommended to take some measurements, namely, to calculate the perimeter of the outer walls and the number of fixing brackets. In addition, you should prepare a simple circuit placement of brackets, gutters, funnels and pipes with gutter elbows.
To equip a simple rainwater drain with gable roof, calculations of the required number of components are carried out in the following ratio - every 10 meters of the gutters are equipped with 1 funnel, to which 1 pipe is fixed. Next, the required number of funnels and pipes is calculated.
The number of fixing brackets is determined by the total length of the gutters and the minimum distance at which they are installed. The calculation of clamps for drain pipes is simple - 3 clamps for each pipe.
Assembly and fixing of the system structure is carried out in the following order:
- Places for fixing the brackets are marked. To provide them with the necessary slope, two points are marked - the initial and final, are connected to each other. Points for fastening the bracket are marked on the line. Next, the elements are fixed on the roof surface.
- The gutter structure is being assembled. All the main elements are interconnected into a single hermetic structure, funnels are installed.
- The assembled gutter is mounted on the place provided for it with fixation on the brackets.
- After securely fixing the gutters, the funnel is connected to the elbow to install the downpipe. It is important to observe a minimum technological gap of 3-4 cm between the pipe and outer wall at home. For vertical pipe installation, you can use building level or plumb. Clamps are installed in appropriate places, the pipe is fixed.
- An elbow is attached to the bottom of the pipe to drain water.
- All unused sections of the gutter are closed with protective plugs.
- To outline the system around the entire perimeter of the roof, corner gutters are installed at the corners.
The closed drain of rainwater from the roof provides for effective drainage of liquid outside the foundation and basement: into the storm sewer system, drainage or sewer well and storage tank.
Rainwater flowing from the roof has tremendous destructive power. Firstly, the walls and foundation of the house get wet, which leads to their rapid wear. Secondly, water falling from a height onto the blind area knocks out and washes out the hollows on it in a short time. Concrete pavement can quickly collapse, like paving slabs. Thirdly, all the water flowing from the roof is absorbed into the ground right next to the house, which leads to flooding of basements and basement floors. You can list the consequences for a long time, but it’s already clear that it is necessary to drain water from the roof. To do this, a gutter system must be installed under the roof overhang, which collects water flowing down from the roof and directs it to the place intended for this on the site. To do everything right, you should familiarize yourself with what elements of the drainage system will be needed, what materials they can be made of, as well as with the technology for their installation.
Roof drainage system - elements
There are two types of drainage systems - external and internal.
External drainage system installed on roof overhangs if the roof is pitched (single-pitched, double-pitched, hip, etc.). This type of system is used in most country houses, so we will consider it in more detail.

Settles down on flat roofs, where roofing material has a special slope leading to a funnel - a receiver of rainwater, which then enters the downpipe inside the building or in technical cavities.

- gutter. Serves to collect water flowing from the roof of the house. It can have a different shape and size, it is made of various materials. Further down the gutter, the water is directed to a downpipe, which directs the water to a water drain from the roof.

- Usually the gutters of the gutter system are not longer than 2.5 m, therefore, to install the gutter on the roof, the length of which is longer, it is necessary to connect the gutters to each other. The connectors are equipped with rubber seals, which ensure the tightness of the connection, and also serve to compensate for the thermal expansion of the gutter material.
- Gutter Angle. Various corner elements for bypass internal corners at home. Provides excellent hydrodynamics.
- brackets. Various kinds of elements that are necessary to fix the gutters to the roof. It can be a long hook for hanging gutters, a short hook, a compact hook. All of them have a different design and are used in different situations.
- Funnel gutter. With the help of it, water from the gutters is collected into the downpipe. Mandatory element for the installation of a drain, with correct installation additional sealing is not required.
- Gutter plugs are installed along the edges of the gutter so that water does not drain.
- Pipe. It drains water from the gutters. Further along the pipe, the water is drained to the place intended for this. Installed under the funnel and securely fixed to it.
- pipe elbow and drain elbow used to drain water away from the basement and blind areas of the building. The pipe elbow is used to change the direction of the downpipe. The drain elbow is installed at the bottom so that the water goes straight into the storm sewer.
- Brackets for fixing the pipe. They serve to fix the downpipe to the wall of the house, so that its position could not be disturbed by gusts of wind.

In addition to the above elements, a protective cap-mesh on the gutter so that debris, such as leaves, does not get into it. After all, a clogged drain begins to perform its functions poorly. Also, instead of a drain pipe, decorative drain chains can be used, through which water flows into a container or a flower bed located immediately below the funnel. Such a chain can be a real decoration of the house, if it is correctly beaten with other exterior items and you choose gutters that are organically combined with the chain.
Types of gutters and downpipes

Gutters and pipes are the main elements of the system that ensures the drainage of rainwater from the roof. On the market, you can purchase ready-made sets of drainage systems, consisting of various elements, after connecting and installing which you can be sure that the collection and runoff of rainwater is ensured. The main thing is to choose the right size. Typically, the gutter diameter ranges from 90 mm to 150 mm, and the downpipe diameter ranges from 75 mm to 120 mm.
What diameter gutter and downpipe to choose depends on the size of the roof of the house. For roofs with a small slope from 10 to 70 m2, gutters with a diameter of 90 mm are suitable, and pipes - 75 mm. For roofs with a slope area of more than 100 m2, gutters with a diameter of 100, 120, 130 and 150 mm are used, and pipes - 90 mm, 100 and 120 mm.
In addition to size, the elements of the drainage system differ in the material of manufacture and even in shape.
Gutter material
Gutter systems, including gutters, can be either metal, or plastic. Metal gutters include galvanized steel, aluminum, copper, titanium-zinc and pural gutters (galvanized steel coated on both sides with a polymer).

Although more resistant to water than the tin gutters that have been used in the past, however, they quickly fail under the influence of acid rain. Therefore, in recent times they are used less and less, and then only because they are the cheapest. But products coated with polymers, for example, pural, are resistant to corrosion, fading of the material, as well as mechanical stress. These gutters are available in a wide range color scheme so that you can choose the product that best matches the facade of the building. The connection of gutters made of galvanized steel coated with a polymer is carried out using special connecting elements with sealing rubber bands, locks and brackets. And the brackets have a snap-on design. The disadvantage of such products is the fragility of the coating, which can be damaged during transportation or installation, and then rust will form at the site of the chipped polymer coating.

varnished or painted in various colors, so they serve for a long time. Products are bought ready-made and connected with rivets and glue for aluminum; special paste or silicone can also be used for sealing. In addition to finished products, it is possible to manufacture a roof water drain from sheet aluminum directly on the construction site by cutting the sheet and bending it in a certain way.

They are considered the most durable. They are made of pure copper without additional coatings. They are connected to each other with a seam or soldering. Most often mounted on seam copper roofs. Over time, copper oxidizes, acquiring a greenish tint, and later - almost malachite. This is the so-called patina - copper oxide. It gives the whole roof a certain sophistication. Against the general background of such a roof, the gutters and drains will not stand out at all, as if they are one with the roof.
When installing copper drains, it must be remembered that they should not come into contact with other metals - aluminum or steel, and the roof of the house should also not be made of these materials, otherwise the water flowing from them will corrode the copper.
Trough made of titanium-zinc may have a natural silver color, or may be specially coated with a patina. By the way, titanium-zinc is a material that is 99.5% zinc, and the rest is copper, aluminum and titanium additives. Titanium in this case gives a certain strength to the product, since zinc itself is very fragile. The zinc-titanium gutters are connected by soldering, during which special pastes are used. This type of gutters is the most expensive of the currently existing ones, therefore it is used extremely rarely. But it can last up to 150 years.

The most common. The plastic from which they are made is stained in its mass, so the color of the product is uniform and even if the surface is damaged, this will not be noticeable, as if the material was painted only on the outside. To make PVC more resistant to UV rays and chemical aggression, the surface of the gutters is coated with acrylic or titanium dioxide. PVC gutters are interconnected by means of couplings with rubber seals, latches and adhesive joints. The service life of a PVC drain can reach 50 years, and all due to the fact that PVC is not afraid of corrosion, withstands temperature extremes (-50 ° C - +70 ° C), as well as large snow and wind loads. In the process of snow falling from the PVC roof, the gutters are not damaged due to the fact that they do not have a vulnerable coating. For example, if the ice from the roof scratches the pural, such a gutter will not last long.
Gutter shape

In addition to the fact that gutters are made of various materials, they can also have a different shape. The sections of the gutters are as follows: semicircular, trapezoidal, semi-elliptical, square and rectangular, as well as imitating the shape of the cornice.
Semi-circular gutters are the most common and fit any roof structure. Their edges turned inward and outward are stiffening ribs, which increase the resistance of the gutters to mechanical stress. Semi-elliptical gutters are able to contain and move a larger volume of water, therefore they are used to drain water from the roof of a house with a large slope area. Square and rectangular gutters are selected for a specific design, so they are not used everywhere. In addition, such a design can be easily damaged during snow melting from the roof, therefore it is mounted in a special way, and snow retainers are installed on the roof.
Whatever shape of the gutter is chosen, the pipes to them must match: for semicircular and semi-elliptical gutters - round pipes, and for boxed (square, rectangular and trapezoidal) - square.
Brackets - hooks for attaching gutters differ in size and shape, as well as in the place of fasteners. It is from the place of fastening that the shape depends:

- Brackets attached to a windboard that is nailed along the roof slope. Such hooks are called front brackets, they are screwed to the wind board and have an adjustment mechanism.
- Flat curved brackets are fixed to the rafter leg, if the step between the rafters does not exceed the allowable distance between the brackets for the gutter, and can also be fixed to the extreme lath of the crate or to a solid boardwalk.
- Flat curved brackets can be attached to the side of the rafters, only they must first be bent.
- Universal brackets can be attached anywhere: to the windboard, to the last batten, to the rafters in the front or side, as well as to solid boarding.
Usually the brackets come with the gutters and the entire gutter system, so they match the shape and color of the gutter exactly. For example, for trapezoidal gutters, brackets of a special trapezoidal shape are used. The same applies to other types.
The material of the brackets depends on the material of the gutters. For copper products, copper or steel brackets are used. For titanium-zinc gutters, only titanium-zinc fasteners. But for gutters made of PVC or galvanized steel coated with a polymer, metal brackets are used, which are covered with a composite sheath or painted to match the color of the drain.
The dimensions of the holders and brackets must match the dimensions of the gutters. Although there are universal models that can be adjusted, so they are suitable for gutters and pipes of any diameter.
Installation of a rainwater drainage system from the roof
Installation of a drainage system on pitched roof- a task easy enough to be done by one person with a partner. Although the installation technology itself has some important nuances and little things that determine the reliability of the entire system. If you doubt your abilities, then it is better to entrust the installation to specialists. The fact is that manufacturers of drainage systems for the most part give a guarantee for the product. If the elements of the system are damaged during transportation or installation, the warranty will be void. If you turn to professionals for help, you will have a guarantee not only for products, but also for the work performed.
If you decide to install a drain for water from the roof yourself, then the instructions below will come in handy.
First of all, you need to decide what material you need the drain from, what shape and color. Then it calculates how many elements are required. After buying everything you need, you can proceed to the work itself.
Fixing brackets
It is extremely important to correctly determine what it is better to attach the brackets to specifically in your case. Remember, the distance from the gutter to the wall should not be less than 6 - 8 cm. Otherwise, the wall will get wet, if not from sewage, then from condensate.

The next rule is that the gutter should be located with a slope of 5 - 20 mm per 1 m running, so that water does not accumulate in it, but rushes by gravity into the funnel and pipe. Therefore, the brackets must be mounted not on the same horizontal line, but with an offset. Before you start installing the brackets, you need to verify the required slope and outline it. Only then can installation begin.
How to collect water from the roof and correctly calculate the slope? We take the length of the ramp, for example, 8 m. The slope should be 10 mm per 1 m. It turns out that the difference in height between the upper and lower brackets should be 80 mm. If the length of the slope is more than 12 m, then it is necessary to equip two drain pipes, and make the gutter with a slope in two directions. Starting from the middle of the slope, the left side of the gutter should slope to the left and down, and the right side should slope to the right and down.
The topmost bracket is attached first.. It should be located on the opposite side of the drain pipe. It must be installed in such a way that the water flowing from the roof gets into it, but it is not in the way of the descending avalanche-like snow, otherwise the system will not withstand. The distance from the edge of the roof to the first upper bracket should be 10 - 15 cm. It is fixed with self-tapping screws.

The second is attached to the last lowest bracket. It must be fixed on the screws, without twisting to the end. Then a building thread is stretched between the brackets and places for attaching intermediate brackets are marked along it. The distance between the brackets should be 40 - 70 cm depending on the system, the most common spacing is 50 cm. All intermediate brackets are fixed.
Important! When installing brackets, it is important to remember that the gutters will be connected to each other, and the bracket should not fall into place under connecting element. Also, it should not be under the receiving funnel, but at a distance of 10 - 20 cm from it.
By the way, the receiving funnel is not installed in the corner of the slope, but 40 - 70 cm closer to the middle, at the level of the walls of the house.
Therefore, the last lower bracket must be rearranged slightly higher than the position on which it was first attached so that water can drain into the funnel.
Installation of gutters

Next, the gutter is assembled and installed on the brackets. Gutters are usually produced in lengths of 1 m, 2 m and 2.5 m. Therefore, the elements must first be connected. To do this, use elements with sealing rubber.

Plugs are installed along the edges of the gutter, and a receiving funnel / storm inlet is installed in the right place. The axis of the funnel watering must coincide with the axis of the hole cut in the gutter.
The gutter should have a slope not only towards the receiving pipe, but also away from the house. This will ensure safety and reduce the possibility of damage to the gutter during an avalanche.

The drainpipes are installed last. Drain pipe must be positioned exactly under the funnel/drainpipe. The pipe is fixed to the walls with special holders or clamps. The fastening of the clamps depends on the material of the walls, it can be screws, nails, self-tapping screws or dowels.

Pipe holders must be placed at the pipe junctions - under each socket. The maximum distance between the holders is 1.8 - 2 m. The last element of the pipe - the drain elbow - must be positioned so as to drain water to the place intended for this.
Where to divert water from the roof
Well, the drainage system is installed on the roof, it remains to decide where all the collected water will be discharged. And there are several options:

- . A barrel or tank for rainwater can be placed at a distance from the house (about 0.5 - 5 m) from above, or it can be buried in the ground. Water flowing from the roof will accumulate in the tank, and then it can be used to water the garden or garden.

- If rainwater is not needed, and you are not going to water anything, then it can be diverted to a collection filtration well. A pit is dug in the ground, on the bottom of which a layer of rubble is poured. Then equip from above concrete well, which is also covered up to half with crushed stone interspersed with sand, and on top with sand. This bedding serves as an absorbent element. Seeping through the sand and gravel, the water is purified. Such a well should be located at least 2 m away from the house, otherwise the groundwater level around the house may rise.

- . If a a private house connected to the central sewer, then rainwater can be diverted into it, but only by agreement and for a fee.

- Draining rainwater into a drainage ditch or pond. Rainwater is clean enough not to harm the ecosystem if poured into a drainage ditch or water body (lake, river, artificial kopanka). The main thing is to calculate that the water level in the drainage ditch does not rise too high in case of heavy rains.

The removal of water from the roof of the house is mandatory so that it does not undermine the foundation and does not destroy it. Therefore, if possible, it is necessary to equip a complete drainage system. If this is not possible, for example, this happens if the roof is sloping and made of natural materials- reeds or straw, then its overhangs should protrude at least 50 cm outside the house. At the bottom, it is desirable that the water flows directly to the ground.
Erected in accordance with all the rules, taking into account the characteristics of the soil and in compliance with the construction technology, then only soil and ground moisture will pose a danger to its strength and durability. The integrity of the foundation of the house can be broken under the influence of rain and melt water entering the soil and not being able to take care of it in time due to the seasonal rise in the groundwater level, or if they pass close to the surface.
As a result of such waterlogging of the soil near the foundation, the details of its structure become damp, and undesirable processes of corrosion and erosion may well begin in them. In addition, dampness is always a prerequisite for defeat. building structures fungus or other representatives of harmful microflora. Fungal colonies on the walls of the premises quickly capture the territory, spoiling the finish and negatively affecting the health of the residents of the house.
These problems need to be addressed at the design and construction stage of the building. The main measures are the creation of reliable waterproofing of structural elements and properly organized water drainage from the foundation of the house. About waterproofing - a special conversation, but the water drainage system requires careful calculations, the selection of appropriate materials and components - fortunately, they are in our time in a wide range presented in specialized stores.
The main ways to drain water from the foundation of a building
To protect the foundation of the house from atmospheric and ground moisture, they are used various designs, which are usually combined into one system. This includes blind areas around the perimeter of the house, storm sewers with a roof drainage system included in it, a complex of rain inlets, horizontal drainage with a set of transport pipes, revision and storage wells and collectors. To understand what these systems are, we can consider them in more detail.
- blind area
The blind areas around the perimeter of the house can be called an indispensable element for draining rain and melt water from the foundation. In combination with a roof gutter system, they are able to effectively protect the foundation of the house even without arranging a complex storm sewer, if the amount of seasonal precipitation in a given region is not critical, but ground water extend deep from the surface.
The blind areas are made from different materials. As a rule, their placement is planned with a slope at an angle of 10 ÷ 15 degrees from the wall of the house, so that water flows freely into the soil or storm sewer gutters. The blind areas are located around the entire perimeter of the building, while taking into account that they should have a width of 250 ÷ 300 mm more than the protruding cornice or gable roof overhang. In addition to good waterproofing, the blind area is also assigned the function of an external horizontal boundary for the insulation of the foundation.
Construction of blind areas - how to do it right?
If everything is done "in the mind" - then this is a very difficult task. It is necessary to thoroughly understand the design, to know which materials will be optimal for specific construction conditions. With all the necessary details, the process is described in a special publication of our portal.
- Storm sewer with drainage system
A drainage system is required for every building. Its absence or incorrect layout leads to the fact that melt and rain water will fall on the walls, penetrate to the base of the house, gradually washing away the foundation.

Water from the drainage system should be diverted as far as possible from the base of the house. For this purpose, it is used whole line devices and elements of storm sewers of one type or another - storm water inlets, open gutters or pipes hidden under the demolition of the earth, sand traps, filters, revision and storage wells, collectors, storage tanks and others.
Roof drainage systems - we mount it ourselves
Without a properly organized collection of water from a considerable area of the roof, talking about the effective removal of water from the foundation is simply ridiculous. How to correctly calculate, choose and on the roof - all this is described in a special publication of our portal.
- Drainage wells
Drainage wells as independent, autonomous elements of the water drainage system are usually used in the arrangement of baths or summer kitchens that are not connected to the domestic sewerage system.

To build such a well, you can use a metal or plastic barrel with perforated walls. This container is installed in a pit dug for it, and then filled with rubble or broken stone. The sewage system of the bath is connected to the well with a gutter or pipe, through which water will be drained from the foundation.
This system, obviously, is extremely imperfect, and in no case should it be combined with storm sewers, since in case of heavy rain, a quick overflow with a spill of sewage is not ruled out, which, of course, is not very pleasant. Nevertheless, in the conditions of country construction, it is resorted to quite often.
- drainage system
The arrangement of a full-fledged drainage system in conjunction with storm sewers is a very responsible and time-consuming process that requires considerable material investments. However, in many cases it is impossible to do without it.
For this system to work effectively, it is necessary to carry out careful engineering calculations, which are most often trusted by specialists.
Storm sewer prices
storm sewer

Since this is the most complex, but at the same time the most effective option for draining water from the base of the building, and can be done in different ways, it needs to be considered in more detail.
Drainage system around the house
Is a drainage system always necessary?
By and large, it is highly desirable that drainage be provided around any building. However, in some cases, a water drainage system is simply vital, since there are a number of objective reasons for this, which include:
- Groundwater is located between the layers of soil close to the surface.
- Very significant amplitudes of seasonal groundwater rises are noted.
- The house is located in close proximity to a natural reservoir.
- The construction site is dominated by clay or loamy soils, wetlands or peat bogs saturated with organic matter.
- The site is located on a hilly area in a lowland, where melt or rainwater can obviously collect.

In some cases, it is possible to abandon the arrangement of the drainage system, bypassing the blind areas and properly organized. So, there is no urgent need for a full-fledged drainage circuit in the following situations:
- The foundation of the building is built on sandy, coarse or rocky soil.
- Groundwater runs below floor level basement not less than 500 mm.
- The house is installed on a hill where melt and rain water never collects.
- The house is being built away from water bodies.
This does not mean that such a system is not needed at all in these cases. It's just that its scale and overall performance may be smaller - but this should already be determined on the basis of special engineering calculations.
Varieties of drainage systems
There are several types of drainage systems that are designed to remove moisture of various nature. Therefore, the choice is made on the basis of pre-engineered geological studies, which determine which of the options are most suitable for a particular site.
Drainage can be divided into the following types according to the area of application: internal, external and reservoir. Quite often, all varieties are installed, for example, to drain groundwater from the basement, it is used internal option drainage, and for soil - external.
- Reservoir drainage is almost always used - it is arranged under the entire structure and is a sand, crushed stone or gravel "cushion" of different thicknesses, mainly 100÷120 mm. The use of such drainage is especially important if groundwater is located high enough to the floor surface of the basement.

- The external drainage system is mounted at a certain depth or placed superficially along the walls of the building and on the territory of the site, and is a set of trenches or perforated pipes that are mounted with a slope towards the catchment tank. Through these channels, water is discharged into a drainage well.
- Internal drainage is a system of perforated pipes that are laid under the floor of the basement of the house, and, if necessary, directly under the foundation of the entire house, and lead to a drainage well.
External drainage system
The external drainage system is divided into open and closed.
The open part, in fact, is a system for collecting storm or melt water from the gutter system of the roof and from concreted, asphalted or lined paving slabs areas of the territory. The collection system can be linear - with surface extended trays, for example, along the outer line of blind areas or along the edges of paths and platforms, or point - with storm water inlets connected to each other and to wells (collectors) by an underground pipe system.

The closed drainage system includes perforated pipes buried in the ground to a depth determined by the project. Very often, open (stormwater) and closed (underground drainage) systems are combined into one and used in combination. In this case, the drainage contours of the pipes are located below the storm ones - the drainage, as it were, "cleans up" what the "storm drain" could not cope with. And their storage well or collector may well be combined.
Closed drainage system
Starting to talk about installation work ah on the arrangement of the drainage system, first of all, you need to say what materials will be required for this process, so that you can immediately determine the required amount.
So, to install a closed drainage system, the following are used:
- Bulk Construction Materials- sand, crushed stone, coarse gravel or expanded clay.
- Geotextile (dornite).
- Corrugated pvc pipes for installation of collector wells, with a diameter of 315 or 425 mm. Wells are installed at all points of change of direction (at the corners), and on straight sections - with a step of 20÷30 meters. The height of the well will depend on the depth of the drainage pipes.
- Perforated PVC drainage pipes with a diameter of 110 mm, as well as connecting parts to them: tees, corner fittings, couplings, adapters, etc.
- Capacity for arranging a storage well.

The quantity of all necessary elements and materials is calculated in advance according to the draft water drainage system.
In order not to be mistaken in the choice of pipes, it is necessary to say a few words about them.

It is clear that drainage pipes are not used to drain rainwater, since through the holes water will fall under the blind area or to the foundation. Therefore, perforated pipes are installed only in closed drainage systems that drain groundwater from the structure.
In addition to PVC pipes, drainage systems are also assembled from ceramic or asbestos concrete pipes, but they do not have factory perforations, therefore, in this case, they are non-functional. The holes in them will have to be drilled on their own, which takes a lot of time and effort.
Corrugated perforated PVC pipes are the best option, as they have a small mass, pronounced flexibility, they are easily assembled into a single system. In addition, the presence of ready-made holes in the walls allows you to optimize the volume of incoming water. Except flexible pipes PVC, on sale you can find rigid options that have a smooth inner and corrugated outer surface.
PVC drainage pipes are classified according to the level of strength, have letter marking SN and digital from 2 to 16. For example, SN2 products are only suitable for contours at a depth not exceeding 2 meters. With a depth of 2 to 3 meters, models marked SN4 will already be required. At a depth of four meters, it is better to place SN6, but SN8, if necessary, can cope with depths up to 10 meters.
Rigid pipes are available in lengths of 6 or 12 meters, depending on the diameter, while flexible pipes are sold in coils up to 50 meters.

A very successful purchase will be pipes on which a filter layer is already provided on top. In this capacity, geotextiles are used (more suitable for sandy soils) or coconut fibers (they show their effectiveness well on clay soil layers). These materials reliably prevent the rapid creation of blockages in the narrow openings of perforated pipes.

The assembly of pipes into a common system does not require any special tools or devices - the sections are joined manually using special couplings or fittings, depending on the model. For tightness of connections in products special rubber sealants are provided.
Before proceeding to the description of installation work, it must be clarified that drainage pipes are always laid below the freezing depth of the soil.
Installation of a closed drainage system
Starting the description of the arrangement of the drainage system, it is necessary to mention and clearly imagine the fact that it can be laid not only around the house, but also throughout the site, if it is very wet and requires constant drying.
Prices for geotextiles
geotextile

Installation work is carried out according to a pre-compiled project, which is developed taking into account all the parameters necessary for the normal functioning of the system.

Schematically, the location of the drainage pipe looks like this illustration.
| Illustration | Brief description of the operations performed |
|---|---|
 | First of all, according to the dimensions indicated on the project, the marking of the passage of drainage channels is done on the territory of the site. If it is required to divert water only from the foundation of the house, then the drainage pipe is often placed at a distance of about 1000 mm from the blind area. The width of the trench for the drainage channel should be 350÷400 mm. |
 | The next step, according to the markings, trenches are dug around the perimeter of the whole house. Their depth should also be calculated on the basis of data obtained from soil surveys. Trenches are dug with a slope of 10 mm each linear meter of length towards the drainage well. In addition, it is good to provide for a small slope of the bottom of the trench from the walls of the foundation. Further, the bottom of the trench must be well tamped, and then a sand cushion 80 ÷ 100 mm thick should be laid on it. The sand is spilled with water and also compacted with a manual rammer, in compliance with the previously formed longitudinal and transverse slopes of the trench bottom. |
 | In the course of arranging the drainage of the foundation of a built house, obstacles in the form of floor slabs may arise in the path of the trench. It is impossible to leave such areas without a drainage channel, otherwise moisture, having no way out, will accumulate in these areas. Therefore, under the slab, it will be necessary to carefully dig a tunnel so that the pipe is laid continuously along the wall (so that the ring closes). |
 | In addition to the remote drainage system, in some cases, a wall-mounted version of the channel for water drainage is equipped. It is relevant if the house has a basement or basement floor, under which an internal drainage system was not installed during the construction of the house. The trench is dug deep below the floor of the basement, without a large indent from the foundation wall, which needs to be additionally covered waterproofing material bituminous. The rest of the work is similar to those that will be carried out when laying pipes passing at a meter distance from the wall. |
 | The next step is to lay the geotextile in the trench. If the trench has a great depth, and the width of the canvas is not enough, then it is cut and laid across the pit. The canvases are stacked on top of each other by 150 mm, and then glued together with waterproof tape. Geotextiles are temporarily fixed along the upper edges of the trench with stones or other weights. When arranging wall drainage, one edge of the canvas is temporarily fixed on the wall surface. |
 | Further, at the bottom of the trench, on top of the geotextile, a layer of sand is poured, 50 mm thick, and then a layer of crushed stone of an average fraction of 100 mm. The embankment is evenly distributed along the bottom of the trench, while you need to make sure that the slope laid earlier is observed. |
 | In order to insert a sleeve into the corrugated pipe of a plastic drainage well, a diameter is outlined on it, and then, with a sharp knife, a marked area is cut out. The coupling should stand tightly in the hole and protrude into the well by 120 ÷ 150 mm. |
 | On top of the embankment made in the trenches, drainage pipes are laid and, according to the project, manholes are installed, to the couplings of which pipes intersecting at a given point are docked. |
 | After completing the installation of pipes and wells, the design of the drainage circuit should look something like the one shown in the illustration. |
 | The next step is to fill the top of the drainage pipes and around the wells with coarse gravel or crushed stone of the middle fraction. The thickness of the embankment above the top of the pipe should be between 100 mm and 250 mm. |
 | Further, the edges of the geotextile, fixed on the walls of the trench, are released, and then the entire resulting “ply structure” is closed from above. |
 | On the rolled geotextile, which completely covered the filter layer of crushed stone or gravel, a sand backfill is made, 150 ÷ 200 mm thick, which needs to be slightly compacted. This layer will become additional protection systems from subsidence of soil, which is poured into the trench with the last top layer and also compacted. You can do it differently: before digging the trench, the sod layer is carefully removed from the ground, and after the installation work is completed, the sod returns to its place, and the green lawn is again pleasing to the eye. |
 | When equipping the drainage system, it must be remembered that all the pipes that make it up must have a slope to the inspection, and then to the storage well or collector, which is installed at a distance from the house. If the drainage option of the water intake is being equipped, then it is completely or its bottom part is covered with coarse gravel, crushed stone or broken stone. |
 | If you want to completely disguise the covers of inspection, drainage or storage wells, you can use decorative garden elements. They can imitate round logs or a stone boulder that adorns the landscape. |
Storm and melt water drainage
Features of storm sewers
An external drainage system is sometimes called an open drainage system, referring to its purpose for draining rainwater from a drain on the roof and from the surface of the site. Probably, it would still be correct to call it a storm sewer. By the way, if it is assembled according to the point principle, then it can also be hidden.

It seems to be easier to install such a water drainage system than in-depth drainage, since less volume is required during installation. earthworks. On the other hand, elements of external design become important, which also requires certain costs and extra efforts.
There is another important difference. The drainage system is designed, as a rule, for constant “smooth” operation - if seasonal changes in the saturation of the soil with moisture occur, then they are not so critical. Storm sewerage should be able to very quickly, within literally minutes, divert large volumes of water into collectors and wells. Therefore, increased demands are placed on its performance. And this performance is ensured by properly selected sections of pipes (or gutters - with a linear scheme) and the slope of their installation for the free flow of water.

When designing storm sewers, the territory is usually divided into water collection areas - one or more storm water inlets are responsible for each area. A separate section is always the roof of a house or other buildings. They try to group the remaining fates according to similar external conditions - the outer coating, since each of them has special characteristics of water absorption. So, from the roof you have to collect all 100% of the fallen volume of storm water, and from the territory - depending on the coverage of a particular area.
For each plot, according to its area, the average statistical water collection is calculated by the formulas - it is based on the coefficient q20, which shows the average rainfall intensity for each specific region.

Knowing the required volume of water drainage from a particular area, it is easy to determine the nominal diameter of the pipe and the required slope angle from the table.
| Hydraulic section of pipes or trays | DN 110 | DN 150 | DN 200 | Slope (%) |
|---|---|---|---|---|
| The volume of collected water (Qsb), liters per minute | 3.9 | 12.2 | 29.8 | 0.3 |
| -"- | 5 | 15.75 | 38.5 | 0,3 - 0,5 |
| -"- | 7 | 22.3 | 54.5 | 0,5 - 1,0 |
| -"- | 8.7 | 27.3 | 66.7 | 1,0 - 1,5 |
| -"- | 10 | 31.5 | 77 | 1,5 - 2,0 |
In order not to torment the reader with formulas and calculations, we will entrust this matter to a special online calculator. It is necessary to indicate the mentioned coefficient, the area of the site and the nature of its coverage. The result will be obtained in liters per second, liters per minute and in cubic meters in hour.