Change house drawing and list of materials. How to build a shed - step-by-step instructions. Double-layer floor and sheathed walls are the best choice
If you have purchased a plot of land without buildings, the question arises of where to live at first or store necessary tools. A summer cottage will help solve this problem. It’s quite simple to build it with your own hands, the main thing is to make the correct calculation of the amount of materials, purchase them and start construction.
Determining the size of the structure, preparing the territory
It's important to choose right place. The future building should not be located in a low area; allocate a flat area for it, then the preparatory work will take a minimum of time. It is better not to install a change house in an area of strong cross winds, on an open hill.
Inspect the area where the cabin will be built with your own hands. If there are bushes on it, they need to be dug up, trees cut down, stumps uprooted. After this, you can begin marking the site for construction.
Usually the cabins are made small, for example, 6 x 3 meters. The size depends on the purpose of the future house. If it will house a utility unit and store tools, then it can be even smaller. A cabin built with your own hands can consist of two rooms: residential and utility. This size is enough for temporary residence of a small family.
Pegs are driven into the corners of the perimeter of the future building, and a rope is pulled along them. It is necessary to align the lines, two opposite sides must be strictly parallel, the other two must be perpendicular to them. For accuracy of measurements, the rope is pulled not only along the perimeter, but also along the diagonals. Once the boundary of the future structure has been determined, the next stage of work begins.
Construction of the foundation
When deciding how to build a shed with your own hands, it is important to think about what it will stand on. A foundation is necessary, but for such a light structure a columnar one is sufficient. You can make it as poured or from ready-made blocks.
The pillars are installed in the corners, along the perimeter, in the center every 1.5-2 meters and on both sides of the front door. If you want to make a poured foundation, you need to dig holes in these places. Depending on the type of soil, they can be from 20 to 170 cm deep. The latter method is preferable in places with high level groundwater, but it is expensive. Therefore it is better to do shallow foundation, removing the soil to 20-50 cm. Next, install asbestos-cement pipes into these holes, fill 7 cm with crushed stone, compact it, then 10 cm with sand and spill it with water. After this, concrete is poured on top and allowed to dry completely.

Even a poured shallow columnar foundation will require quite a lot of physical effort. A change house built with your own hands usually stands perfectly on ready-made concrete blocks measuring 20x20x40 cm. A cushion of sand and crushed stone is made under them, then the blocks are laid horizontally in twos - one on top of the other.
Level is in progress
After the concrete has completely dried (in the case of a poured foundation), proceed to the next stage. Pieces of roofing felt, folded in half, are placed on pillars made of concrete or blocks. This is necessary so that the beams placed on top do not rot at the points of contact with the foundation.
Now you need to lay long boards on the pillars and check with a level whether the surface is even. If not, install some blocks a little lower, digging them up from the sides or simply jumping. This method is suitable when the foundation consists of ready-made blocks. If you made poured pillars, then check the evenness of the surface with a level at the time of concreting them.
How to make a harness
The construction of a change house with your own hands is moving on to the next stage. Place timber 100 x 150 mm thick around the perimeter. If you are building a small structure 6 by 3 meters, then you will need three 6-meter beams - 2 at the edges and one in the center; as well as two 3-meter ones. At the joints you need to cut out and then cut out part of the upper and lower beams in half height to get a flat surface. In the same way, connect the six-meter central beam with the outer three-meter beams.

Now make a second crown of timber 100 x 100 mm, laying it around the perimeter. In the six-meter ones, cut out small recesses to place the edges of the floor joists in them. In this example, they consist of three-meter beams, they are nailed in 1-meter increments.
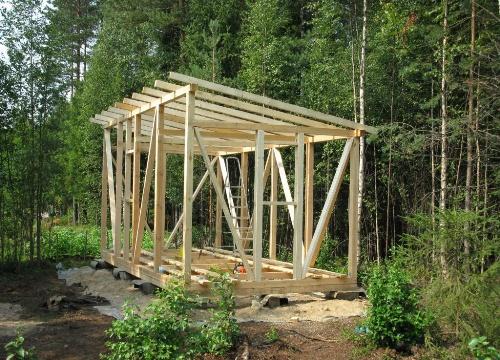
How to knock down a frame
The drawings will help you understand how to make a change house with your own hands. The next stage is the fastening of the vertical beams. They can be 100 x 100 mm or 100 x 150 mm. Place the first one, attach it with metal corners and screws. In order for this post to stand firmly, it is necessary to nail one side of the rail just below its top, and the other to the corresponding side of the strapping. Nail the second picket on the other side at the top of this vertical beam, and its lower edge to the corresponding trim beam.
In this way, vertical posts are placed in the corners and every 2 meters, secure them with long screws or nails. If you are making a gable roof, then these vertical beams will be at the same height, if you are making a pitched roof, then on one side of the long wall they will be the same, and those on the opposite side will be lower than the data.
Lay the floor beams horizontally on a row of vertical timber on one side and nail them in place. On the opposite side, arrange them in the same way. Where there will be windows and a door, you need to install additional vertical bars.
Roof and floor

The change house, made with your own hands, will be ready very soon. But first, thick boards - rafters - must be placed on the floor beams every meter. Typically their dimensions are 50 x 100 mm. Nail the roofing sheathing across the rafters. It can be made from galvanized iron, ondulin. Do not forget to lay waterproofing between the board and the roofing material. To build a gable roof, you need to cut the ends of the rafters at an angle of 45° and connect them, knocking them down in pairs at the top.
Before installing the floor, do not forget to treat the parts with an antiseptic and let it dry. Then attach and nail the rough boards close to each other, spread a waterproofing film on them, insulation on it, and a waterproofing film is also placed on top. Then the finished floor is laid, for example, from Euro-boards. Here's how to build a change house with your own hands, there's just a little bit left.
Internal and external walls

The walls also need to be insulated. To do this, they are first upholstered on the outside with clapboard, then with inside The waterproofing film is fastened with a stapler, a layer of insulation is placed on it, and a film is placed on it. The interior walls are also covered with clapboard. Instead of boards, chipboard panels are also used.

In this case, the walls may not be insulated or the outside may be upholstered. finishing materials, for example, imitation timber. All that remains is to insert window frames with glass, a door, treat the walls with an antiseptic composition of the desired color, and you can admire your creation.
DIY change house - calculation of materials
This important issue also needs to be addressed. If you decide to build a building 6 x 3 meters, depending on the type chosen columnar foundation, you will need a certain amount of sand and crushed stone. For a block one, a cubic meter of both is enough, as well as 24 blocks.
- 3 six-meter, thickness 100 x 150 mm;
- 2 three-meter 100 x 150 mm;
- 10 measuring 100 x 100 mm - racks.
For the floor joists and upper horizontal floor beams you need 10 boards measuring 50 x 100 mm and the same number for the rafters.
Here's what you need to buy to build a cabin with your own hands. The calculation of materials also includes boards for rough and finished floors, and for roof sheathing. Insulation, waterproofing, door, nails, screws, window frames and roofing material complete this list.
A change house is small house, which is easy to transport on a truck trailer. The change house is used as temporary housing for builders, or a garden (dacha) house during the construction of a full-fledged dacha. The advantage of a homemade cabin is that it is inexpensive and provides at least a minimum level of comfort, so it is well suited for temporary living. There are wooden and metal cabins, read about the latter on this site. The cost of cabins that can be bought on the construction market or in stores starts from 30 thousand rubles (size 2x3 meters), so many people prefer to make a cabin themselves. This will not only save at least a third of the amount, but also make the change house more convenient for yourself. In this article we will talk about building a cabin with your own hands from the most available materials.
How the change house works
Any change house consists of the following elements:
- frame;
- roof;
- exterior decoration;
- insulation;
- interior decoration;
- window;
- doors.
Frame

The frame is the basis of any shed; it is what determines its size and shape. The strength of the cabin, its ability to withstand wind and any other loads depends on it. To make the frame they use different materials- from debarked logs to galvanized steel profiles, but the most popular material remains sawn dry board 25 mm thick and 100 mm wide. To create a frame 6 meters long and 3 meters wide, 60–100 meters of board are needed, which is 0.15–0.25 meters³.
With the average cost of such a board being 10 thousand rubles, 2.5 thousand rubles are enough for boards for the frame. Metal profiles and wooden beams are much more expensive. And the cost of ready-made cabins of this size starts from 40 thousand rubles.
Roof

The roof is made of dry boards 25x100 mm. To create a gable roof 1 meter high for a cabin 6 meters long and 3 meters wide, 100 meters of boards are enough, which will cost 2.5 thousand rubles. This board is used to make triangles that form the ceiling joists and roof rafters. For a change house 6 meters long, 7–8 such triangles are enough. From above, the triangles are connected by one board - a ridge. After this, the resulting roof frame is sheathed with the same board or OSB sheets (oriented particle board). The board is stronger, but more expensive.
If gable roof is perceived as unnecessary luxury, then they do pitched roof, the cost of creating which is a quarter less. Such a roof consists of triangles formed by the ceiling joists, the gable wall and the roof rafters. Then the roof frame is also sheathed with OSB sheets or boards. After completing these works, the roof is covered with a roofing, which uses the following materials:
- roofing felt;
- slate;
- roofing iron;
- galvanized iron;
- metal profile.
Exterior decoration

For exterior finishing use the most various materials. The most popular are:
- roofing iron;
- plastic and metal siding;
- moisture-resistant plywood or OSB;
- clapboard board.
Each material has advantages and disadvantages. Roofing iron is very cheap, but on a wooden frame it begins to rattle under strong winds. Plastic or metal siding is durable and beautiful, but is much more expensive than any other materials. Moisture-resistant plywood or OSB are inexpensive, but they must be treated with water-repellent compounds at least once every two years. The lining board creates a beautiful and stylish appearance, but is expensive and requires treatment with hydrophobic compounds at least once every 2–3 years.
Insulation

To insulate a cabin, use:
- Styrofoam;
- foamed cellophane;
- mineral wool;
- polyurethane;
- ecowool;
- wood concrete;
- fiberboard
Interior decoration
- For interior decoration most often used:
- Fiberboard (fibreboard);
- drywall;
- carriage board.
The finishing material is chosen based on the desired interior of the cabin and the cost of materials.
Windows and doors
In most cases, either new or dismantled but fully functional windows and doors are used for change houses. Such windows and doors can be purchased inexpensively at some hardware stores that accept them on consignment. It is advisable to clean a new window or used door from old paint and repaint. There is no need to paint new windows and doors.
How to make a change house - step-by-step guide and drawing
Below we will tell you how to make a change house with dimensions of 2.2x3x2.2 meters (width, length, height), one window and one door. Here are the materials you will need for this:
- sawn board 25x100 mm – 0.5 m³;
- Moisture-resistant OSB with a thickness of 9–15 mm and a size of 2.44x1.22 meters - 20 sheets;
- plywood 5–7 mm thick or fiberboard of the same thickness – 7–8 m²;
- roofing material 7–10 m²;
- fine wave slate (used in good condition) 7 waves – 5 sheets;
- used wooden window and door, completely ready for installation;
- foam insulation 10 cm thick or any other area of 32 m²;
- floor and ceiling plinth 22–25 meters;
- galvanized ridge - 8 meters;
- hydrophobic impregnation with an antiseptic (for example, Senezh OgneBio);
- brush or roller;
- self-tapping screws of various lengths;
- nails of various lengths;
- reinforcing corners made of galvanized sheet metal 0.4–0.9 mm thick.

Required Tools
You will also need the following tools:
- electric circular saw;
- drill with a set of drills for wood and metal;
- screwdriver;
- jigsaw;
- grinder with a disc for stone;
- extension;
- electric generator (if it is not possible to connect to a 220 volt network);
- tape measure 5 meters long;
- hammer;
- axe;
- chisels;
- stapler;
- sharp knife;
- wood hacksaw;
- pliers;
- level;
- square;
- protractor;
- pencil;
- construction tape.
Step-by-step instruction
- Cut the following elements from a 25x100 mm board:
- vertical posts 230 cm long – 12 pcs;
- floor joists 220 cm long - 7 pieces;
- ceiling and roof logs 260 cm long – 7 pcs;
- roof rafters 3 meters long - 7 pieces;
- roof supports 120 cm long - 7 pieces;
- vertical roof posts 20 cm long – 7 pcs;
- cross boards 305 mm long - 7–8 pcs;
- cross boards 220 cm long – 15–20 pcs.
- Treat all cut elements with hydrophobic materials. Perform the same operation with other wooden parts that you will cut from boards, plywood, fiberboard or OSB.
- Place two vertical posts on the ground parallel to each other at a distance of 220 cm from each other (measure the distance from the far sides). Place the ceiling joist along one edge so that it protrudes the same distance in both directions.
- Using a square, align the boards relative to each other so that all angles are equal to 90 degrees.
- Nail the ceiling joist to each board using nails 70–90 mm long. The nails must go right through.
- Step back 15 cm from the bottom edge of the vertical posts and lay the floor joist.
- Align all corners with a square and nail the joist to both vertical posts with nails 70–90 mm long.
- Attach a vertical roof post to the front edge of the ceiling joist at an angle of 90 degrees and nail it with two nails 70–90 mm long.
- Connect the top of the roof joist and the back of the ceiling joist with a rafter, so that the top edge of the rafter runs over the top corner of the ceiling joist and the outside corner of the vertical joist, then nail in place.
- Support the corner between the ceiling joist and the vertical roof post and rafter, then nail it in place.
- Turn the structure over and use pliers to bend the ends of the protruding nails into an “L” shape.
- Have a helper hold the head of each nail with an ax so you can drive the bent nails into the boards. Do not try to simply bend the nails with a hammer, this type of connection is very fragile, be sure to bend their ends in an “L” shape first.
- If necessary, cut off the protruding piece of the lid support.
- You need to make 5 such structures. Then make two more structures, but without the front vertical post; you will place them where you will install windows and doors.
- Determine the most convenient location for installing the cross boards. We recommend placing the bottom board under the door so that the door rests on it, placing the top board directly above the door, and the middle one approximately between them. Another option is also possible, for example, placing the bottom one directly above the floor joists, the top one directly under the ceiling joists, and the middle one between them.
- Mark the locations for them on each structure and select a groove for their installation. To do this, use a jigsaw to cut 25 mm deep cuts at the end of the vertical board, the distance between the cuts is 100 mm, then carefully chop the wood with a chisel. If for some reason it is impossible to make such grooves, then double the number of transverse boards and nail them directly to the ends of the vertical posts, with the exception of the boards passing through the window and door.
- Place each structure vertically (as it should stand in the frame of the house), level it and nail a cross board to it.
- Nail the side cross boards to the vertical posts at a distance of 30–40 cm from each other.
- Nail vertical boards at 50 cm intervals to the side transverse boards; they will create a frame for interior decoration and insulation.
- From inside the change house, nail braces to the transverse boards, installing them at an angle of no less than 30 and no more than 60 degrees, which will increase the rigidity of the structure. It is advisable to install at least 2 braces on each wall. The optimal length of the braces is 80–120 cm. Use nails 70 mm long to fix the braces and bend them as described above.
- Place the change house on its side and hem the floor joists from below with plywood or OSB with a thickness of at least 6 mm. This is necessary for laying the insulation, then install the change house normally again.
- To insert a window and door, nail horizontal spacers to the vertical posts (they must be installed level), the distance between which is 2–5 mm greater than the height of the window and door frames.
- Insert windows and doors, support their frames with wood chips and make sure that the panel and sash open and close normally. After this, secure with self-tapping screws. To do this, drill holes in the horizontal boards of the box according to the diameter of the self-tapping screws, and in the spacers, drill holes with a diameter 2 times smaller than the diameter of the self-tapping screw. Then tighten the screws and make sure that the door leaf and window frame open and close normally.
- From the inside of the cabin, line the ceiling with OSB sheets, then tightly lay insulation on these sheets from the roof side.
- Lay a 25x100 mm board decking on the roof joists. We recommend using solid flooring when there are no gaps between the boards. It is more expensive, but it provides better warmth and sound insulation.
- Lay sheets of roofing felt over the flooring and secure them with a stapler.
- Lay slate on the roof.
- Cover the gable with a 25x100 mm board, laying the boards without gaps. Drill 6–8 holes with a diameter of 20 mm in the lower gable boards; they will ensure sufficient air movement for ventilation.
- At the front and sides, cover the joints between the pediment and the slate with a galvanized ridge.
- Sheathe the outside of the change house with OSB sheets, trying not to allow gaps larger than 0.5 mm. If cracks appear, they will need to be sealed with putty made from PVA glue and sawdust.
- Cut the foam to size and insert it from the inside of the cabin into the space between the vertical boards and secure it with construction tape. Then line the space between the floor joists with foam. Sew the floor with a 25x100 mm board. If it is possible to cover the floor with a thicker board, take advantage. Lay OSB over the floorboard.
- Sheathe the inside of the walls with OSB.
- Install the sex and ceiling plinth. If necessary, you can install plinths in the corners to hide the cracks.
- Treat the inside and outside of the cabin with hydrophobic agents and fire bioprotection.
Conclusion
Now you know what tools and materials are needed to build a shed, so with minimal construction and carpentry skills, you can build a shed yourself. Is our step by step guide on how to build a shed yourself will help you avoid many mistakes and severe waste of material.
A change house is a utility room in the form of a house that you can make with your own hands. It can be used to store garden tools and other little things that get in the way in the house. This could be clothes or shoes for the garden, sun loungers, a folding bed, children's toys, a fishing rod or lawn mower.
On garden plot an outbuilding is an irreplaceable thing. As mentioned above, you can store garden supplies in it. Some people use this building as a mini-garage, while others winter period raises quails or rabbits in it, and leaves the hives to winter. A drawing can be made for any need.
Some people use the cabin as a temporary home during construction. And someone arranges a shower or bathhouse in the outbuilding. Each owner has his own ideas for operating the cabin, therefore, the project will be different.
Advantages and disadvantages of frame cabins
Like any thing, a change house has its advantages and disadvantages.
Advantages:
- Price – frame construction will cost several times less than other materials;
- Weight – the frame structure is very light;
- Versatility - when assembling a change house, you can arrange everything as the owner needs;
- Easy to install - one person can assemble the structure, without outside help, with the necessary tools;
- Ease of disassembly - dismantling a cabin is much faster and easier than installation;
- Ease of transportation - the dismantled structure is quite easy to transport, the main thing is accuracy. But it is more difficult to transport the assembled change house, since the structure is very fragile.
Flaws:
This structure has one drawback, but a very significant one - it is fragility.
Especially if the structure is often transported from place to place. The materials from which the outbuilding is made lose their properties.
What types of frame cabins are there?
Frame change houses can be of three main types. Owners choose the one that suits their needs.
- Wooden frame construction This option is most suitable for owners who are going to build a house with their own hands. After construction is completed, the shed can be disassembled and transported, or left in its original place and used as an outbuilding. Also, a wooden shed can be equipped both inside and outside, for example, decorative cladding and strengthen it with the help of a foundation. If a cabin with a wooden frame is often transported assembled, it will very quickly lose its properties. Such a building has many advantages: environmentally friendly materials, good thermal insulation, minimal cost.
- Metal frame buildingIf the owner cannot afford to build a house in a short time, then the best option will first build a change house with a metal frame. This is the same building with a wooden frame, only it is built inside a welded frame made of steel channels and metal posts. A frame made of steel can protect the wood from deformation. The design is stronger and more durable. It can also be transported assembled without worrying about its destruction during the trip. This option is rarely used by those who intend to carry out construction on their own, since the structure has a high cost and heavy weight.
- Portable sheds For a construction crew that moves from one construction site to another with their tools, a portable shed is suitable, which is almost impossible to do without. The frame of such a cabin can be either wooden or metal. A steel structure, with proper assembly and proper care, can last more than 15 years, which cannot be said about wooden structure. The portable design has a high price and is very heavy. You also need to constantly tint the portable structure with your own hands and monitor the condition of the cladding.
How to choose a place to build a cabin
Before you start building a shed, there are a few things to consider: important points.
- If a 6x3 change house will be used for a short period of time on one site, and then it is planned to transport it to another place, then it is better to build it closer to the exit.
- You should consider how the building will be used. If the structure is intended to store tools, then it must be placed so that it can be easily approached from any angle.
- If, after the house is built, the 6x3 timber cabin will be used as a bathhouse, then it is better to place it where it will stand in the future.
Drawing of a 6x3 cabin
Most often the owners summer cottages they prefer to build 6x3 cabins with their own hands, since this size is more universal. Different owners use the room differently, so everyone needs their own drawing, which is quite realistic. You can take as a basis standard diagram cabin frame. And then add the necessary openings and partitions.
Internal partitions are needed only if the structure will serve as temporary housing. Partitions should be used to separate the toilet room, kitchen and warehouse space. In other cases, partitions will not be required.

Shelter scheme
The basis of the frame change house consists of timber. Take two rectangles 100*100 mm or larger. The rectangles are connected by vertical posts. The size of the cabin is 6 m long and 3 m wide. From below it is better to use timber 100*150 mm or larger. The height of the front pillars should be 0.5 m greater than the rear ones.
Racks must be installed based on the location of doors and windows.
DIY change house
First you need to purchase all the necessary materials for construction and prepare the tools. If the owner of the site has decided on the location and an estimate has been prepared, you can begin to make a drawing of the future cabin. The room can be either simple or more complex, it all depends on the needs of the owner. If all the materials are prepared, the drawing is in hand, you can begin building the cabin.
- The first thing to do is prepare the site for construction. The top layer of soil is removed with a shovel and compacted. Then you should lay down a waterproofing material - not a single project can do without this.
- Laying the foundation. The place where the frame structure will be located should be filled with sand and compacted again. To ensure that the structure can be transported, it is better to use cinder blocks instead of a foundation. They need to be laid at a distance of 1.5-2 meters from each other. And to prevent the destruction of the blocks, they should be wrapped in roofing felt. If the structure will not be transported anywhere, then you can dig a trench and fill it with concrete mortar.
- How to assemble the frame? The beams are attached to the laid cinder blocks with anchor bolts. Support posts are mounted to the lower part of the cabin, assembled with your own hands, in the corners of the structure. The entire structure is fixed using metal corners and screws. It is important that the beams are firmly attached to each other, and that the base is strong and not rotten. Only in this case will the project be useful, and the design will last for a long time.Vertical racks located from the front and back side should be of different heights if the roof is pitched. This is necessary so that precipitation drains from the roof.

- Roof installationBuilding a roof is not difficult, the main thing is to use a drawing. First you need to attach the rafters with sheathing to the frame. After which you can install the roof yourself. You can use any roofing material you like: slate, ondulin or profiled sheet. Insulation and vapor barrier material should be installed under the roof.
- Windows and doorsCountry cabins may have no windows, but there must be a door there. Therefore, you need to mark where the door will be and install additional racks that will strengthen the door opening. If the project does include windows, then additional racks should also be placed under them.
- How to sheathe the floor and walls The frame structure can be sheathed in either one or two layers. If there are two layers, then insulation should be laid between them. The outside of the frame can be covered with any cladding material yourself.
If desired, you can produce Finishing work, install a water supply or build a porch.
If the frame cabin will be used as a sparrowhawk or rabbitry, it can be heated for the winter.
As can be seen from the article, country cabins can be very diverse. But if the owner of the dacha has the ability, required material and tools, the design is easy to make yourself.
Every owner land plot strives to arrange it in accordance with his preferences. During the construction period, a change house will serve as a comfortable accommodation for a family or a team of workers. A special type of temporary housing can be a mini-house with comfortable conditions. This article will talk about how to do country house with your own hands.
Purpose of country cabins
A simple-looking structure carries great functionality. Its presence on the site is determined by many factors:
- An insulated change house is perfect as the main housing on a summer cottage. If it is equipped with communications, then it is quite possible to live all year round;
Change house, summer cottage vest

- while construction is underway, the change house can be equipped for short-term accommodation;
- it is often used as a utility room, storage of garden tools, mini-warehouse for very “necessary” things;
- the building can be equipped for summer kitchen, a barn for breeding poultry, a workshop or a bathhouse.
Change houses country houses
- Available on the market huge selection ready-made cabins. Manufacturers offer to additionally equip them to meet the current and future needs of the client. They can be delivered to the site either assembled or disassembled.
- The standard width of wooden summer cottages is 2.3 m, height - 2.5 m, as for the length, it can be 5, 6, 7 m. The maximum dimensions of a non-permanent structure are 3x12 m.
- The strength of metal buildings, as well as the environmental friendliness of wood, leaves no doubt, so the choice of material remains only with the consumer. To the advantages of metal should be added the possibility of manufacturing 2- and even 3-story buildings.
- On individual orders, we produce country houses with verandas, equipped with a heating system, air conditioning or other equipment. It is proposed to install related elements: sockets, plumbing fixtures with the ability to connect to various communications. The interior space is planned with partitions that are located in standard version or according to the customer's request. You can often find two-story country houses on sale.

Building a shed with your own hands
Construction of non-permanent housing is quite feasible on our own. The work can take from a week to a month, this time period depends on the material used, the complexity of the project and, of course, skill.
- If you plan to operate the cabin for a short period of time, then this fact will allow you to significantly save on interior design premises. You can abandon internal partitions, install a minimum of sockets, use cheaper materials for cladding, etc. If the building is planned to be used for a long time, then it is recommended to choose a country house project with a shower and toilet.
Country house layout photo

- Before construction, you should think through many important points, even with the condition of temporary residence.
- A foundation is necessary in any case. Typically, a base of pillars is used, which are placed in the corners and long sides of the building. The distance between them should not exceed 2.5 m.
- The gravel bed, arranged before laying the pillars, will serve as an obstacle to emerging trees and plants.
- The site for construction is selected on a hill, which will prevent flooding by melt and rain water. If this condition cannot be met for a number of reasons, then storm drains must be installed.
- Window and door openings are placed on one side or on adjacent walls with access to the south or east.
- If you install a change house near a power line, you can significantly reduce the cost of laying overhead electrical wiring.
Material for making a summer cottage
Materials for a mobile structure are selected depending on the area of application of the structure and financial capabilities.
- Foundation. During construction, preference is given to columnar or pile foundation. The farther the pillars (piles) are from each other, the more reliable the grillage should be. It makes no sense to carry out labor-intensive and expensive work on arranging a capital foundation.
- Frame. The basis of any structure is a frame made of metal or wood. From channels and metal corners, cabins are produced that are completely ready for use. A wooden frame implies both prefabricated and stationary structures.
- Exterior finishing. Sheathing is done using profile sheets, siding, clapboard, block house, etc.
- Insulation. Special attention is paid to thermal insulation. To insulate a country house, foam plastic and glass wool are used, and the seams are sealed with foam. Floors are also laid with thermal and waterproofing materials.
- Interior decoration. The room is sheathed with hardboard, clapboard, MDF or PVC panels. During temporary use, the walls are covered with edged boards.
- Doors. Iron and plastic wooden products are installed on doorways. When arranging openings, special attention is paid to strengthening them. Due to soil movements and the lack of solidity of the mini-house, horizontal and vertical beams may become skewed and make it difficult to open/close the door leaf.
- Window. There are only two materials for making frames - wood and plastic. To protect windows from intruders and vandals, you can install metal shutters. IN Lately Roller shutters are popular among developers.
- Roof. Often the roof for a given building has one slope; less often a gable roof is installed. The slope should not be less than 20°, this will prevent snow and rainwater from accumulating on the surface. A profiled sheet or slate is chosen as a covering.
- Layout. A country house can be two-room or not contain any partitions. Change houses come with attached veranda, shower, toilet, etc. The layout and availability of various amenities depends on the desire and financial capabilities of the developer.
Stages of building a summer cottage with your own hands
Based general information regarding the choice of material is approximate estimate expenses. A more accurate calculation is carried out using a plan-drawing of the future construction.
Frame base
- The area under the foundation is cleared of debris, plant roots, etc. The soil is excavated to a depth of 15-20 cm, slightly larger than the perimeter of the building. Sand is poured into the bottom in a layer of 10 cm, moistened and thoroughly compacted.
- Brick pillars cement mortar laid out 20-30 cm high. Perfect for these purposes concrete blocks. They are placed in the corners of the cabin; pillars installed in the middle of the long side of the building will help to further strengthen the base.

- The area around the pillars is covered with coarse crushed stone. Adding lime to the gravel will help protect the subfloor space from nesting of rodents or other living creatures.
- If the site on which construction is being carried out has a slope, then the height of the columns must be varied, that is, installed at different heights.
Bottom harness
- The channel acts as a grillage. Its fixation can be carried out using anchor bolts in advance drilled holes in metal and supports.
- If they are laid on pillars (piles) wooden beams, the thickness of which should be at least 100x50 mm, then the heads are covered with 2 layers of roofing material or coated with bitumen mastic. The wood is treated with impregnations that protect against rotting and damage by insects.

Frame assembly
- Vertical bars with a section of 40x40 mm or 50x50 mm are placed in the corners. The beams forming a wall with front door should be 15-20 cm higher than the rear ones, depending on the planned roof slope.

- The top trim is made from above. Fastening of wooden parts is carried out with nails, self-tapping screws or using metal corners.
- The distance between the verticals, as a rule, is 60 cm. The count should be taken from the corner of the building to the windows, from the windows to doorways. Horizontal lintels are immediately installed, which will serve as supports for the double-glazed windows and the door frame.
- Transverse bars, which serve to strengthen the frame, are placed in the middle of the length of the wall. If you plan to install drywall, then the crossbars are installed to match the dimensions of the sheet.
- Along the short wall, logs are placed on the bottom trim; here you can use lumber with a cross-section of 100x50 mm. To do this, grooves are cut in the lower beams along the width of the logs with a depth of 25 mm, and grooves are selected from the ends of the supports in the same way.
- Logs can also be installed in the form of spacers between the beams of the lower frame. In this case, fixation is made with metal corners and self-tapping screws. On top of them they are nailed tightly to each other edged boards, you can also lay sheet material - chipboard or fiberboard.
- Then logs are installed again, which can be placed both along and across the walls. The step between the floor supports is selected according to the floor covering, but it should not be less than 50 cm. A layer is laid between them waterproofing material and a layer of insulation.
- Next, the flooring is laid. If linoleum is used, then a wooden slab or plasterboard sheets are fixed to the logs.
Roof, ceiling
- Set up on the top harness rafter system, the pitch of which is 600-800 mm. Cross bars are mounted at a distance of 500 mm. This sheathing design is suitable for coverings made of profiled sheets and slate.
- On the inside, waterproofing and insulation are placed into the resulting cells. The pie is covered with sheets of plywood, fiberboard, chipboard, you can also use drywall.
Walls
- WITH outside surfaces are sheathed with clapboard, siding, corrugated sheets, and glass-magnesium sheets.
- Sheathing can be done with horizontal boards. Their installation begins from the lowest point, the next row is placed with a slight offset on the previous board. This method will increase the consumption of lumber, but at the same time provide protection from the penetration of wind and raindrops.
- It would be useful to recall that all wooden components of the structure are pre-treated with impregnating agents. The preparations will protect surfaces from exposure to aggressive environments, thereby significantly extending their service life.
- The inside of the walls can be sheathed with the same materials that were used for exterior work. Between external and internal walls if necessary, insulation boards are laid.
- If the country house is equipped with a toilet or shower, then it is advisable to cover the walls with plastic panels.
- Wiring is carried out in metal or plastic sleeves;
- the location of electrical appliances (lamps, sockets, switches, air conditioning, etc.), as well as showers and other plumbing fixtures, is calculated in advance;
- in places where heavy objects are attached to the wall, it is necessary to install an additional crossbar, on which, in principle, they will be fixed;
- For the arrangement of the bathroom area, only moisture-resistant materials are used. Portable dry toilets are an excellent option;
- You can install a tank on the roof from which water will flow to the shower, taps, etc. To operate the cabin in the winter, a boiler is installed;
- used as insulation: bulk materials, mineral wool, sheets of expanded polystyrene, glass wool.
- To heat the room, stoves and heaters are used that run on solid and liquid fuels, gas, as well as electrical devices. It should be remembered that heating efficiency is achieved in conjunction with properly and efficiently insulated structural elements (floor, walls, roof).
Country cabins of increased comfort
- The cabins, which have 2 floors, are characterized by increased living comfort. This, of course, is due to the increased area. The space allows you to place a bathroom and shower, a kitchen area, and allocate a place for relaxation.
- Access to the 2nd floor is carried out using ladder, due to the mobility of the structure, the arrangement of stairs inside the change house is not provided.
- When choosing such a structure, more solid foundation. Here a strip type of foundation is formed; a pile-rammed foundation is also perfect.
In any case, do you want to buy a ready-made country house or build one? with my own hands The main thing is to choose the right material and make a layout depending on its purpose.
The construction of a private house usually begins with a “construction trailer”. On the market you can find many offers for the purchase of new or used wooden cabins. Even such a concept as a “block container” has appeared in everyday life. It is made of metal and has a large number of configuration options and can be used as an element of modular housing construction.
But it is precisely the do-it-yourself cabin trailer on a wooden frame that is the most economical and optimal solution for the thrifty owner. After completion of construction, it can be used as a guest house, a shed for tools and equipment, converted into a bathhouse, or transported to country cottage area and build a house out of trailers.
Do-it-yourself cabin car: cabin project
The further use of the cabin depends on its size, design and finishing materials.
As a small shed, internal partitions are not needed. There is also no need to insulate walls, floors and roofs.
If you plan to use the cabin as a seasonal residence (for example, summer garden house), then it is possible to envisage the presence internal layout. It is better to carry out insulation at the construction stage - when using heaters, the cabin with your own hands will better retain heat in the spring and autumn, and in the summer it will not get too hot in the sun.
For a construction trailer, the internal lining may be limited to inexpensive and simple materials. Conversion into a garden or country house will only require modifications in terms of decorative finishing.
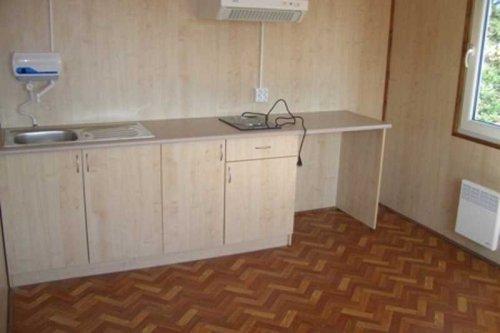
It's best if inner space will be divided into at least two rooms. For example, the house in the first photo can be imagined like this.
Projects of cabins
A small vestibule-hallway and a large room with one small window- a typical DIY construction trailer.
And this is an improved version with three windows, which can roughly be called a house with a living room and a bedroom.

In this diagram, the change house consists of three rooms - a vestibule and two equivalent rooms.

And of course, before starting construction you need simple drawing indicating the main dimensions.

Drawing of a cabin
foundation
How to build a cabin — step-by-step instruction Construction of a cabin begins with the foundation.
The peculiarity of a small wooden structure is its low weight. But even this does not mean that it can be placed directly on the ground. To protect against the effects of soil moisture (including precipitation in the form of rain and snow), a raised base is necessary.

which can be painted or covered with vinyl wallpaper.
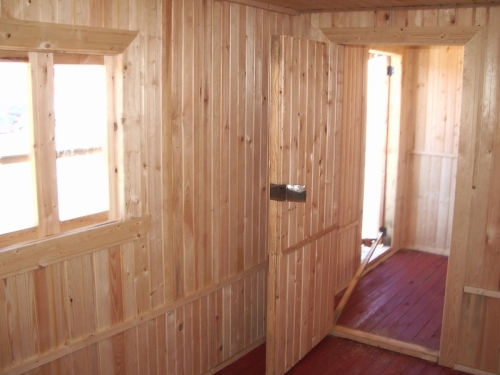
But cladding with wooden clapboard is more common.

The internal partition must be provided for while developing the design of the change house, but it is not too late to equip it later. The main thing is that it is attached to one of the floor joists from below and the beam of the ceiling beam from above.
Window and door frames are attached externally and internally. Corner joints are trimmed from the outside with planks or wooden profiles, and from the inside with plinths and fillets.
Finishing is completed by sanding the wood surfaces, priming and painting.


