How to make a Russian stove from a bathroom. How to make a stove from a cast iron bath. Sauna stove from a cast iron bath: how to make it yourself
Of all the homemade ones furnace devices and designs, a stove made from a cast iron bathtub is best suited for a home steam room. It cannot be said that a homemade heater made from an old cast iron is different exquisite design or very easy to maintain. You can’t argue with this, the homemade product doesn’t look as impressive as modern cast iron boilers, but it heats just as well, and in the construction of a bathhouse, a stove from a bathtub will cost an order of magnitude cheaper than a heater made from industrial cast iron.
Why build stoves from a bathtub
At first glance, the idea of a homemade cast iron heater looks quite unusual and strange. Why make a stove from a cast-iron bathtub with your own hands, if you can buy a factory-made steel boiler-stove. In fact, there is a rational grain in such an undertaking:
- Any metallurgist will confirm that thick-walled cast iron is ideal for arranging stoves, fireplaces, boilers of the most different designs and models;
- A good cast iron boiler costs fabulous money, while the construction of a stove from old bath it will take a maximum of a couple of thousand rubles and a few days of work;
- The semicircular cross-section and shape of the bathtub body are ideal for organizing the combustion process; there are no stagnant zones or sharp corners leading to local overheating of the bowl walls.
It is clear that the bowl body should not have cracks, metal chips or through corrosion. Due to poor workability, fragility and low ductility, cast iron is quite difficult to process, cut and weld in the makeshift conditions of a garage or cottage. Therefore, in order to make a stove from a bathtub with your own hands, some practice will be required. At the very least, it will take quite a long time to select the mode to electric weld the cast-iron walls of the furnace.
Preparing a cast iron bathtub body for remodeling
The first stage of construction of a heater, regardless of its design and size, always begins with the removal of layers old paint, limescale, rust, all the debris that has accumulated on its surface over decades of use.

Some craftsmen recommend burning the body on wood in the open air. The stove is placed on bricks and a small fire is lit. It will take a long time to heat the cast iron bowl, at least 2-3 hours, until the remaining contaminants burn out. In this way, it is possible to get rid of ingrained odors and at the same time “reveal” the surface from layers of lime and rust.
Cutting the cast iron bathtub body into blanks
Cutting cast iron, especially thin-walled, is quite difficult; the material itself is soft and has little plasticity; at the slightest overload or excess pressure may crack in the most inopportune place.
The body is cut in the following sequence:
- The cutting line is marked on the enamel surface;
- Using an electric drill and a thin drill, drill through holes in the corners, at the break points of the marking line. On a rounded surface, drilling is performed every 4-5 cm;
- A metal hacksaw is passed along the completed markings with a file or a sharpened blade in order to remove the enamel and prevent chipping of the coating;
- The last stage is the most critical. The cast iron bath is placed on a flat, absolutely flat surface and cut with a grinder along the marking line.
Advice! Usually, to avoid punctures, the body is cut along the contour, leaving several jumpers of a couple of centimeters connecting the two parts of the cast-iron bathtub.
The remains of the lintels are cut around the stone or removed with a grinder. It is worth remembering that when cutting cast iron, a huge amount of black metal dust is formed, which can eat into the skin of your hands like soot. Therefore, before you start making your own stove from a cast iron bathtub, you need to stock up on respirators and protective clothing.
Options for building a heater
For heating and heating a bath, you can use three types of stoves based on a cast-iron body from an old bath:
- Classic two-chamber stove with a closed firebox and heater;
- Fireplace stove with screen;
- A dome stove is the most complex and interesting to make with your own hands.
The decision about which type of cast iron bath stove to use in the steam room is made based on the size of the bath and the heating method. For example, cast iron fireplace stoves are great for a sauna, while a classic two-section stove can be used for heating a sauna room and even cooking.
Cast iron heater for a large steam room
Ideally, if you have experience and skills in working with metal, you can try to build a two-dome stove from an old bathtub, as in the video. IN in this case To make a real cast iron firebox, you will need a full-size bathtub, at least 180-190 cm long.
The basis of such a stove for a sauna made of a cast iron bath is a whole body with the short side or “back” cut off. The bowl is laid upside down on a base lined with fireclay bricks on vermiculite cardboard. The design of the stove does not provide for a blower or grate; the firewood is laid out in layers directly on a heat-resistant base.

In terms of design and operating principle, a cast iron stove from a large bathtub is almost identical to a Russian stove. The chimney or pipe for removing combustion products is located directly at the loading window of the furnace. Firewood laid out in a woodpile burns in layers, and the hot combustion products go around the cast-iron roof of the stove along a horseshoe-shaped path and are removed through the chimney in the front of the firebox.
For your information! To seal the joint between the body and the heat-resistant fireclay base, asbestos tapes, basalt cardboard and heat-resistant sealant are used.
The cast iron bathtub is lined with red brick walls. Remaining space between ceramic cladding and the cast iron body is filled with foam glass granules. The upper plane is covered with a metal sheet. Thanks to the enormous weight of the cast-iron body and brick shielding, the entire structure heats no worse than a real Russian stove. According to reviews from owners, heat and smoldering coals in a cast-iron combustion chamber are retained for 24 hours.

Simple dome stove
If we are talking about heating a room of up to 10 m2, then instead of an uneconomical fireplace, you can try to build a stove with your own hands from a single-dome cast-iron bathtub.

To make a firebox you will need half a standard length cast iron bath. As in the previous version, a massive body is used to arrange the combustion vault, but in this case the dimensions of the combustion chamber are half as large, which means it warms up faster.

The combustion chamber is also not provided with a grate, so such a stove has to be lit using a small woodpile placed deep in the firebox. After the wood burns out and draft appears, you can fill the chamber to half its volume. This is no longer possible, cast iron is not a brick, so the roof of the stove may crack if it overheats.

Fireplace stoves made from cast iron baths
Of course, it is not necessary to build a stove from a bathtub onto half the wall of the bathhouse. For a small steam room, you can get by with a small fireplace loading the hearth from the dressing room.

To make a small stove from a bathtub with your own hands, you can adapt the third part of the body of a standard bowl or use one of the small-sized models with a length of 120-130 cm.
For your information! Housings cast iron bathtubs ideal for making fireplaces, including fireplace stoves for a bath. If the chimney assembly technology and heater design are followed, such a stove will heat no worse than an industrial model.

The cut off rear part of the body is installed on a foundation made of heat-resistant bricks or blocks. The area for laying firewood must be covered with a stainless steel sheet, and the place for firewood must be pushed to the maximum depth inside the housing. During the combustion of fuel, hot gases will flow around the wall or former bottom of the cast iron bath, thereby increasing the efficiency of the furnace.

The depth of a standard cast-iron bathtub ranges from 40 to 60 cm, so the fireplace body can easily fit into the wall between the steam room and the dressing room. The back side of the body must be sheathed with metal, covered with a fine-mesh stainless steel mesh, and the backfill of the future heater can be laid.
The classic version of a cast iron bath stove
One of the most popular models is considered to be a two-section combustion chamber, made according to a standard design with a firebox, ash pit, ash pan and a hot chamber, where, in fact, most of the released heat is collected.

The design of the oven consists of two sections - upper and lower, each of which is equipped with its own door. To make one stove, one full-size cast iron bath, 180 cm long, is consumed. The body is cut into two halves, which are connected to each other along the contour of the side. A sheet of steel with a thickness of at least 10 mm is laid between the sections. This sheet is welded steel pipe for the chimney, which is discharged through the location of the drain hole in the bottom of the cast-iron bath.

Features of furnace assembly
The two sections are connected to each other only mechanically; any attempt to weld or glue the cast iron halves will lead to destruction of the structure. To assemble, the furnace parts are placed on top of each other, holes for M10 bolts are drilled around the perimeter and connected using spring washers. The joint line between the steel sheet and the edge of the upper chamber is sealed with heat-resistant fireplace sealant.

In the bottom part of the lower compartment, which is also the firebox, a window for the grille is cut out. The grate bars are made from an ordinary square pipe 20 mm thick. The front walls of the upper and lower chambers are cut out of sheet steel with a thickness of at least 5 mm; doors and latches are also made from it.
The design is very simple, the only thing you need to pay attention to when assembling a stove from a cast iron bath with your own hands is welding. All parts are hung and installed on the body by welding.
For your information! Fulfill welding work only necessary DC, specialized electrodes type UONI13-55.

The walls of a cast-iron bathtub are quite thick, so you will have to spend several hours choosing the appropriate operating mode. The seam looks like it was soldered, but the strength of such a connection is sufficient to withstand any thermal loads.
Conclusion
Making a stove from a cast iron bathtub is much easier than building a domed heater, fireplace or heating pad from brick. On average, it will take three full working days to make one full-fledged stove with brick and tile lining. The quality of operation of such a stove is practically in no way inferior to factory cast iron.
There comes a time when plumbing fixtures, due to their type or malfunction, become unsuitable for use. But, having replaced it with a new one, you should not rush to throw it away. Summer residents and home owners can easily make a garden stove from a cast iron bathtub, which in terms of strength and service life will not be inferior to factory models.
Advantages of using cast iron
This type of metal is rightfully considered one of the best stove materials. Its main advantages include:
- Environmental safety. When heated, it does not emit harmful substances.
- Resistance to temperature changes. An outdoor stove made of brick may begin to crumble after just a few years.
- High thermal conductivity. A fireplace made of cast iron will warm up a room much faster than one built from other materials.
- Durability. Cast iron is the leader among metals in terms of strength. Even steel stoves are less reliable.
- Ease of use.
- Fire safety.

The disadvantages of cast iron that are worth paying attention to are brittleness and susceptibility to corrosion. In the first case, unnecessary mechanical influences should be avoided; in the second, the surface should be treated with special solutions.
A homemade cast iron structure will not turn out very beautiful, so it is recommended to cover it with brick or stone.
Preparation of materials and tools
To create such a miracle stove from a bathtub, you need to prepare:
- angle grinder (grinder);
- 2–3 circles on metal with a thickness of at least 1 mm and a diameter of 12.5 cm;
- electric drill;
- metal drills with a diameter of 9, 11 mm;
- grinding wheels;
- files;
- hammer;
- level;
- construction gun (for applying sealant);
- plumb line;
- putty knife;
- Master OK.

Materials you will need:
- iron or steel sheet 5 mm;
- fireproof red brick;
- grate;
- sealant;
- clay;
- sand;
- metal corner;
- bolts with nuts, washers;
- chimney pipe with a diameter of 12 cm.

Photo: the material is prepared, all that remains is to choose the purpose of the oven and get to work
When all the materials and tools have been collected, you can start cutting the container. For convenience, you can turn it upside down or lay it on its side.
Users often search:
You need to handle the grinder carefully so as not to damage the surface.
Before you start sawing the bathtub, there are several nuances to consider:
- Marking will make cutting the product easier.
- The first layer of enamel is removed strictly along the drawn line. This will help prevent chipping along the edges.
- The next step is to cut the cast iron. Do this gradually, in small pieces of about 10 cm, so as not to overheat the grinder.
- When the bathtub has already been cut in half, supports are placed under each part. They will prevent parts from falling and damaging the tool or material.
According to experienced builders, grinder It's better to work at an angle. This way the enamel will not begin to peel off and all cuts will turn out smooth without burrs.
If you use a high-quality grinder, processing cast iron will take no more than 1 hour.
For a barbecue you will need two halves of the bath: one part will serve as a fuel loading chamber, the other is necessary for cooking. For a sauna stove or fireplace, one half will be enough.
Step-by-step creation of a stove from a bathtub
Without construction experience, it is worth consulting with a specialist about all the intricacies of masonry and installation of parts, and it is better to carry out the work under the supervision of a foreman. This way the product will be of high quality and standard. fire safety will be respected.
As for the construction of the foundation, its type depends on the total weight of the furnace:
- For structures over 700 kg, a monolithic or strip base a depth of 50 cm. Formwork is constructed around the perimeter of the pit and covered with a layer of crushed stone or broken brick. It gets compacted. Filled with concrete.
- For furnaces small sizes A brick foundation will suffice. It is recommended to purchase cement grade no lower than M300. The bricks are placed edgewise and fastened together with mortar.
Now let's consider detailed instructions for the manufacture of each of the furnaces for different purposes.
For the bath
To create in the steam room the necessary conditions, the design must meet the following requirements:
- have high thermal power;
- regulate convection currents;
- produce sufficient steam.
The procedure for constructing a sauna stove:

It is important to note that the foundation must have a protrusion towards the borders of the furnace of at least 50 cm, and 1–1.5 m of free space must be left in front of the firebox.
An interesting idea to make a sauna stove from both halves of the bathtub. The second part will be needed as an extension for heating water, or you can use it to build a Russian heater.
For cooking
You can’t do without a barbecue or grill at your summer cottage. And the opportunity to bake delicious bread, fry meat on fresh air forcing owners to install small outdoor stoves on their property.

Here is a description of how to build a barbecue step by step from a bathtub.
The sequence of work is as follows:

Some craftsmen leave the barbecue in this condition, but in order for your stove to look beautiful, you should still do exterior finishing.
There are several options:
- Whitewashing the clay part.
- Whole masonry ceramic tiles or pieces of it.
- Surface finishing with natural stone, pre-cut into pieces 10 mm thick.
The materials are attached to the oven with heat-resistant adhesives.
A good solution is to install a chimney to the stove through the bathtub drain hole, widening it in advance, and only then weld it to a steel sheet.
For heating
At the dacha it is easy to build a fireplace from half a bathtub. He can be:
- Built into the wall. Suitable if the house has brick walls. Significantly saves free space.
- Leaned (half open). The firebox is located at a considerable distance from the wall. This fireplace does not require a separate foundation; it is mounted directly into the floor. It has good traction and a built-in ash pan.
The advantage of using a cast iron bath for the combustion part is that the fireplace is shaped like an arch and eliminates complex brickwork. The hole for the chimney pipe is made at the top of the bathtub. External part decorated with a fireplace portal.

When building a semi-open fireplace, the following recommendations should be taken into account:
- Poured under the base cement mortar up to 15 mm thick.
- A metal mesh is laid on top.
- A layer of waterproofing is applied.
- Insulation such as asbestos cardboard is laid.
- A pedestal for the firebox is being built. Brick or aerated concrete will do. The binder mixture is cement mortar or heat-resistant glue.
- The structure is plastered. You can decorate it with stone or ceramic tiles.
- A gap is left between the lining and the firebox for the convection heating system.
- The chimney pipe is mounted in the hole made and discharged through the ceilings and roof. Often done in the shape of a sleeve.
- The inside of the firebox and chimney are lined with heat-insulating, non-combustible material.
- The lower part of the fireplace is being finished.
- The product is closed on the side and top with a frame made of aluminum corners connected with self-tapping screws.
- The frame is covered with plasterboard.
- Holes are made in the cladding for air ventilation.
When installing a chimney, it is important to take into account that with a pipe height of up to 5 m, the deflection angle is 45 0, over 5 m - no more than 20 0.
For waste disposal
An unusual solution to build a waste incinerator from an old bathtub.
The principle of its construction is similar to a street barbecue.
Layout of the stove on a brick base
An alternative is to remodel an old heater by removing all parts except the grate and body. Part of the cast iron is welded to the base from the inside to strengthen the structure.
You can load waste into this fire bin directly from the top. When burning, the stove should be covered with another part of the bath so that the smoke does not disperse throughout the entire area.
So you shouldn’t rush to get rid of things that are out of order or out of shape. IN in capable hands even an old bathtub will get a second life and become a functional stove that will last for many years.
In this article we will look at how to make a stove from a cast iron bathtub. What materials and tools are required for construction. The advantages of such a stove.
If you have an unnecessary cast-iron bathtub at your disposal, do not rush to throw it away or sell it for metal. From this bath you can easily make a wonderful barbecue oven in your summer cottage.
A stove made of this, it would seem, no one the desired bath It will be a wonderful decoration and a wonderful stove for preparing various dishes. Cast iron is a metal with high thermal conductivity that excellently stores heat. In such an oven it is good to cook both regular food and baking bakery products and various amazing dishes.
Do-it-yourself stove from a cast iron bath
Advantages of the oven
Just the thought of making such a stove can help solve some accumulated problems and reveal the following advantages:
- year-round opportunity to cook your favorite food
- a beautiful stove will be a good decoration for your dacha
- cost savings during construction
- saving gas, electricity
- getting rid of unnecessary baths
How to make a stove from a cast iron bathtub
The bath needs to be divided in half. The halves are connected to each other with the concave part facing outwards. Between the separated halves lies a sheet of metal with a thickness of 10 mm, which separates the firebox from the place where the food will be prepared. In the upper cut-off part of the bathtub and in the metal sheet, through holes are made for the pipe, which in turn will serve as a smoke exhaust, and the pipe is welded. Then they fix the stove and give it an aesthetic appearance.
Tools and material for manufacturing

To make it you will need:
- unnecessary cast iron bathtub
- a metal sheet
- grinder with metal disc
- heat resistant sealant
- pipe, drill, bolts
- welding
Preparatory work
First you need to make blanks:
- the bath is marked in the middle, turned upside down and divided in half
- cut a blank from a metal sheet to the size of the resulting half of the bath
- Mark and cut through holes for the pipe on the sheet of metal and the top of the bathtub
- the pipe is welded and brought out through the upper part
- make markings to fasten the halves of the bathtub and the sheet between them

Foundation for a stove made of a cast iron bath
Since our oven will be heavy, we need to make under it. With a foundation, the stove will not shrink or become deformed. It can be made of brick or, for a larger structure, poured. Supports are embedded into it at the required height so that the stove is at the same level.

Assembling a stove from a cast iron bath
The edges of the combustion part are coated with heat-resistant sealant, then an iron sheet with a welded chimney is placed on it.


The parts of the bathtub with an iron sheet in the middle are pressed together with bolts.

The entire structure is fixed on supports. Then it is covered with bricks. A grate is inserted into the combustion part.
If the stove has a closed firebox, then the doors are immediately installed during the manufacturing process of the stove.
Furnace insulation
The upper part of the oven is covered with a metal mesh and covered with clay and sand. Then lays out decorative rock or heat-resistant tiles. If it’s easier, you can just whitewash it.

Problems in kiln construction
Problems during the construction of a barbecue oven can occur during the preparation stage during work related to cutting the bathtub. It must be divided very slowly, without haste. First you need to cut the enamel layer in order to avoid chipping. Then they begin to saw the metal at an angle, making small cuts. The grinder should not overheat. To prevent the bath halves from pinching the disk, the cut must be spread with a suitable board or fittings.
Do-it-yourself stove from a cast iron bathtub video
The video clearly shows a stove made from a cast iron bath. The structure of the structure and what materials are required to fasten all parts of the furnace are announced.
After repairing and replacing an old bathtub with a new one, it often happens that you don’t have the courage to throw out another good-quality cast-iron product. But what to do with it next? People who have a dacha usually take things that have become unnecessary to their country plot, doing this with the expectation that they will definitely find some use for them in the future. We will tell you how to make a sauna stove from an old cast iron bathtub.
Cast iron bathtub, which had to be replaced with a more modern version, may no longer look very fresh in appearance. But it still remains a strong and durable container of a fairly large volume, which you want to somehow adapt for your household needs.
 In the countryside, a cast iron bathtub can be used for many purposes.
 Most often in the countryside, a bathtub is used as a reservoir for water used for irrigation, or as a container for preparing compost. But there are other ideas. For example, from a bathtub you can make original garden furniture or build a small artificial pond, which will become a real decoration of the site. And here a lot depends on the imagination of the dacha owner. And looking at photos of options that have already been implemented will help you navigate the situation and find something extraordinary for yourself. But you can also make a stove from a cast-iron bathtub, because they are quite expensive in the store. Cast iron is a perfectly suitable material for this purpose, which differs:
- high strength;
- good thermal conductivity;
- resistance to high temperatures;
- unpretentiousness in operation.
 Decorated cast iron bathtub for collecting water in the country
 Of course, all cast iron products, despite their strength, are quite fragile. Therefore, you need to handle them carefully and avoid applying excessive mechanical forces to them. But still, an old bathtub will make a good stove structure. From it you can make one of several options for stoves for your summer cottage:
- street garden;
- fireplace for a country house;
- for a bath.
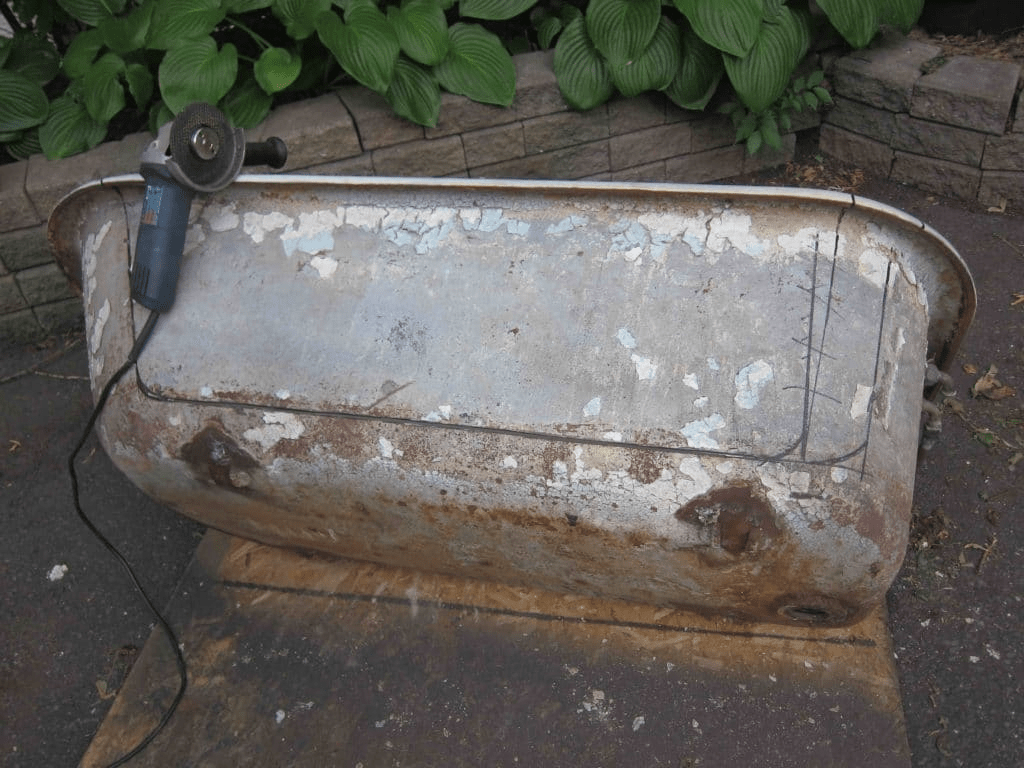
All these options are quite doable with your own hands, and watching the video on this topic will help you better understand the process of actions that will be required to build your own stove. The bath itself will have to be cut into pieces. But cutting cast iron is not an easy task, requiring certain skills, effort and time.
How to properly cut a cast iron bathtub?
This operation must be approached with full responsibility. You need to act very carefully so as not to damage the cast iron product. For cutting you will need a grinder and several metal discs. If possible, it is better to carry out work not indoors, but outdoors, doing it in a respirator, safety glasses and construction gloves. The following sequence of actions must be followed:
- First of all, the future section is marked;
 Sawing the bathtub carefully to avoid chipping
 - then, along the entire intended line, a layer of enamel covering the cast-iron base of the bathtub is first cut to avoid chipping along the edges;
- after this, they begin to saw the cast iron itself with cuts of 10-12 cm, taking breaks when the tool overheats;
- Having cut about half of the bathtub, you need to put supports under each of the parts, otherwise at the end of the work they may close and damage the tool.
Advice. It is advisable to cut the cast iron base at an angle. In this case, as a result of the reverse motion of the disc, the enamel will not peel off, and the cut itself will be smooth. With a good tool in hand, the job of cutting a cast iron bathtub into pieces can be completed in about an hour.
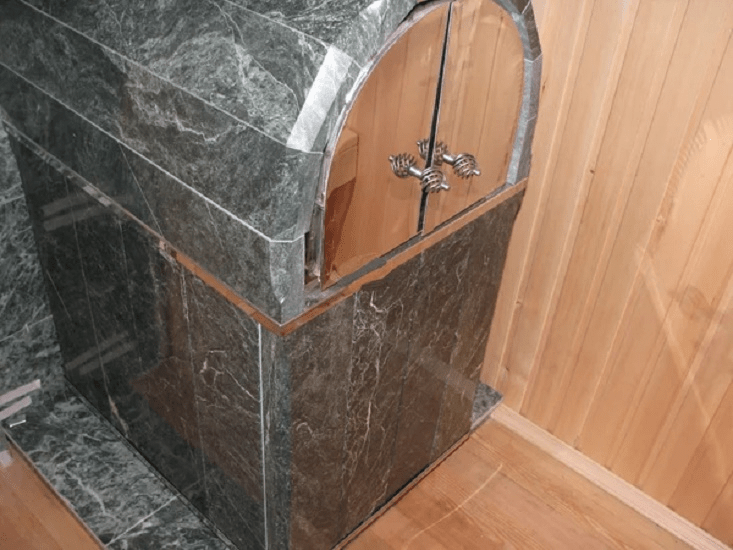
A stove for a bath from a cast iron bath: how to make it yourself?
Building a sauna stove is much more difficult than installing an ordinary garden stove on a site. After all, it must be not only effective, but also safe. Therefore, you need to take a responsible approach to installing a stove indoors. And in order to quickly navigate the process of necessary actions, you can look at the photo or get acquainted with the corresponding video material.
Attention! The construction of a sauna or any other stove requires compliance with fire safety rules. To properly equip it, you need to have at least minimal knowledge and experience. It is better, even before starting work, to first consult on this issue with a specialist, finding out all the subtleties and nuances.
The stove structure in the bathhouse must meet the following parameters:
- sufficient thermal power with the possibility of changing it;
- ability to accumulate heat and produce steam;
- the ability to regulate convection currents.
 A cast iron bath is suitable for building a stove. standard sizes
 After cutting the bathtub, you can begin building the stove structure. In this case, you can use only one half of the cast iron container for the combustion chamber equipment. But bath stoves are also made from two parts of the bath. The second half can be used to build a heater or to add a compartment for heating water.
Those who love to make things with their own hands can build such an unusual sauna stove on their own. To do this you need:
- Pour the foundation for the furnace structure from concrete mortar with or without filler. You can use, for example, broken brick as a filler.
- Place half of the cut bathtub on the foundation with the curved part up. With a cut, the cast iron container must be built into the wall with removal to another room from where the furnace will be fired. On this side, the hole is blocked with a brick wall and a combustion and blower door is installed in it.
- Around the installed half of the bathtub, at a distance of about 10 cm, red brick walls are also erected, equal in height to the cast-iron container. The resulting space is filled with stones, which, when heated, will heat up, then giving off heat to the steam room.
 Construction of the furnace
 A fairly simple sauna stove can be built in two tiers. Heat will accumulate in the upper chamber. The principle of operation is this: the gas, passing through the bath, warms up the stones, goes to the opposite side, then goes down, and then up, after which it exits the pipe.
Such a non-standard solution as a sauna stove from an old bathtub is not only original, but also quite simple. Its construction does not require the use of any special materials. A stove structure made independently will last as long as a purchased product. In addition, this option requires a significantly smaller investment than purchasing a ready-made stove.
Bath stove: video
Sooner or later, there still comes a time when you have to replace the bathtub with a new one, and an old cast-iron vessel, still made in the Soviet Union, is usually sent to a landfill and to a ferrous metal collection point. However, there is no need to rush - it can be used a second time, giving “ new life" Some owners of private houses make ponds out of bathtubs, others use them as garden benches, dividing the bowl in half lengthwise, finishing the edges and adding legs to each half.
But some craftsmen can make a stove from a cast-iron bathtub with their own hands, sawing it across. Such an original stove can be installed in a garden plot, or its cast iron parts can be used for the combustion chamber and cooking chamber of a conventional large stove or for arranging a fireplace.
If you have skills in working with plumbing tools, without which this process You can’t do without it; you can save money on some materials for building a stove.
Most often, an old cast-iron bathtub is used to make garden barbecue stoves, which, if designed correctly, become assistants in cooking throughout the warm season. Cast iron has a high heat capacity, so a chamber made of it will help not only prepare everyday dishes, but also bake bread products, as well as make preparations for the winter.
Materials and tools for work
To make such a stove you need to prepare necessary tools and materials. Since sawing a cast-iron bathtub, especially a Soviet-made one, when they really didn’t spare the metal, is not so easy, and “disposable” Chinese appliances may not be able to cope with such a task. For this work you need a reliable German or Russian tool.
Tools:
- A small angle grinder - “grinder”.

The grinder must be reliable - low quality tool may not even cope with such a task
- Circles for cutting metal, 1 mm thick and 125 mm in diameter, you will need 3÷4 of them, depending on the thickness of the cast iron.
- Grinding wheels - for processing cut sides of metal, files.
- Electric drill with a metal drill Ø 9 or 11 m (depending on the selected bolts). It is necessary for drilling holes in the sides of the bathtub to connect its two parts with bolts.
- Trowel and spatula for masonry and finishing work.
- Construction gun for sealant.
- Plumb and building level.
- Hammer.
Prices for angle grinders
Materials:
- The cast iron bath itself.
- Sheet metal, at least 5 mm thick.
- Two-burner cast iron hob. Instead, a regular metal sheet can be laid.
- Brick for building walls that will cover the lower part of the bathtub, which will be the combustion chamber, on three or even four sides.
- Grate placed in the firebox.
- Clay and sand for masonry mortar.
- Ready-made heat-resistant glue mixture for finishing walls outside with ceramic tiles.
- Heat-resistant sealant (material -).
- Bolts with nuts and washers for fastening the structure.
- Metal mesh “chain-link” for reinforcing the clay mortar, laid on the top of the bath, which will act as a cooking chamber.
- Ceramic tiles (possibly broken) for finishing.
- A metal corner, which may be required for the manufacture of brackets - for installing a grate separating the firebox and the blower.
- Chimney pipe with a diameter of about 110 ÷ 120 mm.
To ensure personal safety, work should be carried out in safety glasses, a respirator and construction gloves.
Prices for heat-resistant sealant
heat resistant sealant
Cutting a cast iron bathtub
The most difficult and responsible process in making a stove is, perhaps, cutting a cast-iron bathtub, and many even believe that it is almost impossible to carry out this process.

Perhaps the most important stage is a high-quality cut of a massive cast-iron bathtub
Masters who have carried out this work more than once recommend doing it as follows:
- If cutting the bathtub will be carried out indoors, then you first need to carry out preparatory work, since cast iron dust, flying in all directions, can damage the objects and things in it. Therefore, the room needs to be cleared of them. If the apartment is being renovated and the door from the bathroom is removed, then the opening must be covered with plastic film or unnecessary cloth (preferably moistened), because cast iron dust is quite greasy, and it will be extremely difficult to wash it off the walls and furniture. It is better to take care in advance that it does not get into living quarters.
- Next, the future cut is marked on the bathtub, since it needs to be divided exactly in half.
- The bathtub is covered with enamel, a layer 1.5÷2.5 mm thick, and first of all you need to cut it along the entire line of the future cut, otherwise chips will form at the edge of the coating.
- Then, the cast iron itself is carefully sawed, using small cuts of 100÷120 mm. Moreover, it is recommended to make the cut at a slight angle so that the reverse motion of the disc does not peel off the enamel. You need to make sure that the grinder does not overheat - if necessary, interrupt the work and give the device time to cool down.
- Having cut half of the bathtub, you must put supports under each of the future halves, for example, from stacks of bricks. Otherwise, at the final stage of work, the halves of the bathtub along the sawn line may close together, pinch or even rupture the disk (which is extremely dangerous) or damage the tool.
- Having a quality tool, with similar work can be done in about an hour.

- If the bathtub is taken to a summer cottage in its entirety, then it is best to cut it outside, turning it upside down in advance. In this position, it will be much easier to carry out work.
You may be interested in information about what to consider when choosing
How to make a garden stove from a cast iron bathtub?
When the cut bathtub is delivered to the installation site, you can proceed to the process of constructing the stove.
| Illustration | Brief description of the operation performed |
|---|---|
 | At the chosen location garden plot a foundation is laid for the installation of the furnace. It is necessary, since the structure will be quite heavy, and without a reliable base it will constantly shrink, which means the entire structure may become deformed. Then the lower part of the bath is placed on a finished, well-dried foundation. If it is necessary for the stove to be a little higher, then it is raised on supports and also secured to the concrete mortar. While the concrete solution under the bottom of the bathtub gains strength and matures, you can start preparing the remaining structural elements. It should be noted here that the stove can be made in two versions, and each master chooses the one that is more acceptable to himself. In the first option, the facade of the stove is completely decorated with metal walls, and in the other case, the firebox and ash pan are covered with a brick wall into which cast iron or metal doors are built. After the solution has hardened under the lower part of the furnace, it is best to immediately attach brackets for installing the grate to the walls of the lower half-cylinder. This structural element separates the firebox and the ash pan, so it must be raised above the bottom of the bath by about 150 mm. Metal corners are attached to the marked walls of the bathtub, on which the grate is laid. |
 | To assemble the furnace structure, a metal sheet is cut out, which will completely cover the lower combustion chamber. The chimney pipe can be welded into a metal sheet and passed through the cooking chamber, that is, the upper part of the bath, to the outside. To cut a hole for a pipe in cast iron, small holes are first drilled along the marked contour of the circle, which are then carefully joined together with a grinder, and then the resulting opening is brought to the desired configuration with a file. Or you can choose another option, less labor-intensive - installing a chimney pipe through the back wall of the stove. In this case, the pipe will have to be connected to the bathtub opening intended for the drain-overflow system. |
 | The next step is to coat the furnace part of the furnace along the contour with a fire-resistant sealant and cover it with a sheet of metal with a chimney pipe installed in it. Some craftsmen make a cutout in a metal sheet of the required size and install a cast-iron, more heat-intensive hob on it. |
 | Next, you need to install the second part of the bathtub, which has a hole for the pipe, on top of the metal sheet. Before its installation, the sheet of metal in places of future contact with the side of the bathtub is also coated with sealant. It turns out that the upper part is put on the pipe, and then the chimney is increased to a height of 1000÷2500 mm, depending on the openness of the space in which the structure is installed. |
 | The next step is to twist the upper and lower parts of the bathtub, as well as the metal sheet installed between them, using bolts with a diameter of 8÷10 mm. To do this, through holes are drilled in the sides of the bathtub with a pitch of 150÷200 mm, through which all assembled parts are fastened together. single design elements. |
 | In this figure you can see how the structure should look from the side after it is fastened. |
 | Here is a view of the cast iron stove body from the facade and it is clearly visible how the chimney pipe should be installed in the metal sheet and in the “ceiling” of the combustion chamber. |
 | Then, the combustion and ash chambers are separated by a grate. The grate is placed on metal corners fixed to the walls. But, in principle, it can be placed in a cylindrical chamber without brackets - if a suitable size is chosen that provides clearance at the bottom point of about 150 mm. |
 | Next, you can move on to masonry work. As mentioned above, walls can be erected only on three sides of the structure - on the sides and back, or along the entire perimeter of the cast-iron chambers. First, the masonry line is marked along the foundation, and then the walls are laid out. |
 | If on the front side the firebox and the ash pan are closed with a brick wall, then the blower door is mounted in the wall at the level of the bottom of the lower part of the bath, and the firebox door is mounted at a level just above the grate. |
 | Having folded the walls to the level of the cooking chamber, it is necessary to expand them inward so that the brick fits closely to the outside of the bath. Otherwise, the stove will not only look sloppy, but the heat created in the firebox will very quickly be blown out by the draft. |
 | In this option, to close the cooking chamber, which can also serve as an oven, a damper is made from a metal sheet. This structural element must close the oven as tightly as possible, otherwise baking bread or pie in it will be problematic. In order for the shutter to tightly close the camera, you need to secure a metal corner in front of the latter. The distance between it and the front cut of the bathtub should be 1÷2 mm greater than the thickness of the metal sheet of the door. The damper handle must be protected from overheating, otherwise there will be burns, so most often its gripping part is made of wood. |
 | The second design option for the front part is to cover the fuel part of the stove with a metal sheet, in which a hole is cut for installing the combustion door. To design the cooking chamber, a shaped element of the desired shape is cut out of the same metal sheet, which is secured from the outside to the walls of the cast-iron container using corners. It should be noted that this method of closing the furnace chambers is more labor-intensive and less effective than the first, and it is unlikely that it will be possible to save money by using metal instead of brick. |
 | After the lower combustion part of the stove is partially or completely covered with brickwork, you can proceed to insulating the cooking chamber. Because clay mortar It has low thermal conductivity and fits well on surfaces; it is perfect for creating a “fur coat” for the top of the stove. To do this, prepare a thick and plastic clay mixture with the addition of sifted sand, in approximate proportions of 1:2 or 1:3, depending on the fat content of the clay. Sometimes, in order to make the hardened solution crack less after drying, a little lime is added to it. While the solution is infused, the outer cast-iron surface of the cooking section is covered with a metal mesh “chain-link” with cells of 15÷20 mm - it reinforces the insulating layer well, and will also help to delay the solution until it hardens on a fairly smooth surface. The mesh is fixed to the brickwork located on the sides and back of the combustion chamber. Then, a clay solution is applied on top of the mesh. You can lay it in two layers, the first of which does not need to be smoothed to perfection, and the second is leveled using a trowel moistened with water, a wide spatula or a trowel. In total, the thickness of the layer after drying should be approximately 50÷70 mm. |
 | When the stove is ready and insulated, it needs to be given the most aesthetic appearance, that is, to make it not only a functional device, but also decorative decoration landscape design. Some plot owners prefer to leave the brickwork in natural form, and cover the clay “coat” with whitewash in several layers. |
 | Another option would be to finish the entire structure with ceramic tiles. Moreover, for this case, leftovers and even scraps from tile materials of different colors are suitable, and this will help significantly save on finishing. If you break the tiles into small pieces, they will make an excellent original mosaic. Sometimes finishing is carried out with natural stone, cut into plates 10÷12 mm thick. The finishing material should be laid on a special heat-resistant composition. |
 | The result is an excellent stove in which you can cook every day in the summer, saving electricity or gas. Moreover, food cooked in an oven is always more aromatic and tasty than food cooked on a gas or electric stove. |
Thus, by building a stove from an old bathtub, you can get several benefits at once:
- Attach old thing with maximum benefit.
- Decorate your landscape design with an exclusive and, most importantly, very functional accessory.
- Save on building materials, and later - on fuel (energy source) when cooking.
- Get the opportunity to cook a variety of not only tasty, but also healthy dishes every day.
You might be interested in information on how to make with step by step instructions
How to reuse an old cast iron bathtub?
In addition to the barbecue oven for summer cottage, an old cast iron bathtub can be used to make several other useful things.
- Part of a cast iron bathtub will make an excellent fireplace insert. The convenience of this use is that there is no need to make complex semicircular shapes of the hearth out of brick. To build a neat fireplace with a firebox that has an arched vault, you will have to make a template from boards or plywood, and then perform complex manipulations of lining it with brick. The cut-off part of the old bathtub already has the desired shape, and can easily withstand the weight of the masonry. All that remains is to make a smoke exhaust hole in its “ceiling” and line the cast-iron firebox brickwork, and then decorate the outside with a fireplace portal.

- From a sawn cast iron bathtub you can also make a combustion chamber for sauna stove. In this case, it is installed in the same way as when making a fireplace - with the dome up. Part of the bathtub is installed on a concrete base located in the steam bath, and the edge where the bathtub section is located is built into the wall and taken to another room, from where the stove will be fired. Then, the cut hole is covered with a brick wall into which the combustion and blower doors are installed.

In the steam room, along the entire perimeter of the bathtub, at a distance of 80–100 mm from it, a wall is also erected, the height of which should be equal to the height of the cast-iron container. Next, the entire resulting space around the bathtub and the brick wall is filled with stones, which will warm up while the stove is heating and provide the necessary heat to the steam room.
- Another area of using old cast iron bathtubs is making garden furniture, reliable and durable that will last for decades. By carefully cutting the bathtub lengthwise, you can get a comfortable “sofa” that can be installed in a gazebo or near a barbecue stove. In this case, you will get a whole set for decorating the landscape design of your garden plot. This “sofa” is not afraid of rain, snow, high and low temperatures. It does not require special care - just wipe it with a damp and then dry cloth. The smooth surfaces of the sofa are easy to paint, both inside and outside, and sewing soft pillows, you can relax on it not only while sitting, but also lying down, stretching out to your full height.

In addition to “sofas,” you can also make two comfortable “armchairs” from any bathtub by cutting it across. By equipping such “chairs” with beautiful legs, you can get an exclusive and almost eternal thing. The only drawback of cast iron “furniture” is its heavy weight, since moving it from place to place will be problematic.

Some craftsmen manage to make a set out of a bathtub, consisting of a designer chair and an original coffee table with a built-in lamp or even a floor lamp.
- Most often, old cast-iron bathtubs exported to suburban areas, are used as containers for the construction of an artificial pond, which will certainly become an excellent decoration of the territory. The bowl is installed in a prepared pit, to which a waste pipe is connected, and its above-ground part is designed to the taste of the dacha owners.

Another use option is an artificial pond in the garden.
In this case, you will not have to cut the bathtub, and the labor intensity of the work will consist only in earthworks, lowering the container into the pit and connecting it to the drain.
You might be interested in information about how it works out
Russian summer residents very often surprise with their ingenuity, and seemingly completely worn out old things on their plots get a “second life.” Perhaps, after studying the presented options, someone will have the desire and inspiration to come up with their own model of a stove or other thing that is useful in dacha conditions. There will be slaves if such an inventor shares his achievements on the pages of our portal.
Video: a clear example of constructing a garden stove from an old bathtub

Evgeniy AfanasyevChief Editor
Author of the publication 13.01.2016
![]()


