How to make a grill smokehouse from bricks. Do-it-yourself grill oven smokehouse made of bricks. Brazier smokehouse made of metal
To make an outdoor oven in the country - a barbecue is capable of any home craftsman who knows how to work with bricks. The purpose of this article is to help the homeowner build a garden stove correctly with his own hands, using a ready-made project with orders. For convenience, we present some drawings and examples of masonry.
We build a barbecue complex with a hob
For the construction of an outdoor stove at a summer cottage, we propose to implement the project shown in the photo. We list the technical features of the structure:
- 2 workplaces that can function at the same time - brazier and hob;
- overall dimensions in the plan - 1660 x 1020 mm, height - 3220 mm (including the chimney with a head);
- collection of flue gases from both fireboxes is organized in one pipe;
- the design is simplified as much as possible - instead of the arched arch of the firebox used in, a direct overlap on a metal frame is provided;
- there is a niche for storing and drying firewood under the barbecue;
- the chimney is equipped with a closed brick head, which prevents precipitation from entering the flue.
Note. The scheme can be changed at the request of the homeowner. For example, to provide for the installation of a cauldron instead of a stove, and adapt the brazier for a grill. Cupboards or a smokehouse must be attached separately.
At first glance, the design of a universal barbecue stove seems complicated, but in reality it is quite simple to perform. It is better to place the structure under a canopy or inside, so that the masonry is not washed by rains and will stand longer.
Before starting construction on the veranda, it is necessary to provide a platform measuring 176 x 112 cm (a margin of 50 mm on each side of the furnace body). Make sure that the chimney does not line up with the supporting roof beams, otherwise the roof will have to be remodeled.

Building materials
To fold a complex do-it-yourself barbecue oven, shown in section in the drawing, you will need to buy the following set of materials:
- clay bricks of standard sizes - 720 pcs. (full-bodied is recommended);
- fireclay stone brand ША-8 for firebox masonry - 80 pcs .;

- loading door 25 x 21 cm, ash pan - 25 x 14 cm;
- cleaning doors 13 x 13 cm - 3 pcs .;
- equal angles 40 x 4 mm, 4 studs with M12 thread and nuts (length - 70 cm) for assembling the floor frame;
- cast-iron hob for 2 burners 71 x 41 cm;
- sheets of basalt cardboard and roofing material;
- reinforcement of a periodic profile Ø 12-16 mm in the basement.
Note. The number of bricks is indicated taking into account the construction of the chimney and the head.

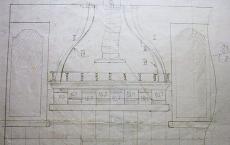
Sectional oven diagrams
For fireclay masonry, you should purchase a special refractory clay or mortar. The furnace body is laid out on a clay-sand mortar with the addition of M400 cement. Crushed stone, sand and Portland cement will be used for the foundation. How much building materials are needed depends on the stability of the soil and the depth of the laying.
We lay a reinforced concrete base
Since the weight of the structure exceeds 1 ton, it cannot be built on the ground or cement screed. A reliable foundation is required, spaced 5-10 cm from the base of the veranda. A foundation pit is dug for construction, whose depth depends on the occurrence of dense soil horizons. As a rule, it does not exceed 1 m.

Reference. In soils subject to the forces of frost heaving, it is necessary to arrange a pile-screw foundation, connected by metal beams or a concrete grillage.
Step by step, the technology for laying the base looks like this:
- Mark and dig a hole 1760 x 1120 mm, tamp the bottom with a vibrating plate or manually. Fill in a 0.1 m thick sand cushion and re-compact.
- Fill the pit to ground level with rubble - fragments of stones, bricks and other solid construction waste, excluding wood. Fill the voids with a slurry of clay and water, let it freeze.
- Make a reinforcing mesh by tying the rods at an interval of 10-15 cm. Install it over the backing, raising it 3-5 cm using the supports so that the rods are in the concrete.
- Make a homemade formwork from 20 cm high planks.

The last stage of pouring is the preparation of concrete grade 150 and placing the mixture in the formwork. The proportions of bulk materials - 3 parts of sand + 5 parts of crushed stone per 1 measure of M400 Portland cement. Bring the upper plane of the monolith horizontally and leave to harden for 4 weeks. It is recommended to remove the formwork after 7-10 days.
It is advisable to place a layer of roofing material under the reinforced concrete slab for the purpose of waterproofing, as shown in the diagram. Then the monolith will not be saturated with moisture from the soil. More details about laying furnace foundations are described in the video:
Preparation for construction
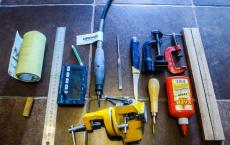
To begin with, cover the hardened concrete slab with 2 layers of roofing material in order to ensure waterproofing of the brick structure. Collect the standard set of tools shown in the photo: trowels, brushes, measuring tools, and so on.

Mortar for a yard oven - you can make a barbecue yourself or buy a ready-made building mixture. In the first case, proceed in this order:
- Soak the clay, as cleaned as possible from the earth, in a trough with water for 1-2 days.
- Pass the earthen solution through a sieve, separating pebbles and crushing lumps.
- Sift sand and stir with liquid clay in a ratio of about 1: 1.
- Before laying, add 200-300 grams of cement per bucket.
The finished solution should not stick very much to the trowel, and when squeezed by hand, give a minimum of cracks. For the best properties, experiment with the proportions of sand and clay.

Note. The mortar for bonding refractory bricks is prepared according to the instructions on the package (bag).
Masonry instructions
For the construction of a brick oven - grill, we suggest using step-by-step instructions, accompanied by a photo and orders:

Guided by the example of ordering, lay out the chimney with the head closed on top. The height of the pipe can be adjusted by decreasing or increasing the number of identical levels from the 28th to the 38th tier. The course of laying this barbecue design - barbecue is discussed in detail in the video:
Council. If you want to expand the functionality of the structure, simply add additional elements to the sides of the furnace. The laying of the back wall can be continued to the sides using any red brick.
When finished, let the stove dry for 2-4 days, depending on the weather. Then test fire both chambers of the barbecue using a small amount of wood.
How to properly lay oven bricks
To successfully fold down a workable outdoor stove, be sure to observe the following masonry rules:

Remove the solution protruding outward with a trowel, and wipe the inner surfaces with a damp cloth. If you lack experience, do not try to chop stones with a pickaxe, it is better to use a grinder with a cutting wheel for concrete.

In conclusion - the simplest options for stoves
We deliberately suggested building a serious garden barbecue complex right away, since the multifunctional oven is of greater interest to users. If you manage to lay a similar brazier out of brick, then the extension of bedside tables, a smokehouse and even the construction of a fireplace will not be a big problem.

Instead of a capital structure, you can make a simple structure shown in the photo. No mortar is required here, and no foundation is needed either: just buy a ready-made barbecue grid and lay out a brick cabinet according to its size. To prevent the structure from collapsing, select a flat, solid area.

The simplest grill with a smoke collector is built in the form of two retaining walls on a cement-sand mortar. For the installation of the brazier, a reinforced concrete slab is cast (or a ready-made one is used). An alternative option is to tie the brick walls with a frame from the corners. The smoke collection umbrella is made of ordinary roofing steel.

Design engineer with over 8 years of experience in construction.
Graduated from the East Ukrainian National University. Vladimir Dahl with a degree in Electronic Industry Equipment in 2011.
Related entries:

The brazier smokehouse is a multifunctional oven that allows you to cook a large number of dishes on your personal plot. You can both fry and smoke meat on it, and with some improvement, it turns into a full-fledged street kitchen. A homemade brazier of this type can be brick or metal; models differ in the complexity of manufacturing technology.
The brazier-smokehouse is assembled from separate modules, which allows you to adapt such an outdoor oven for any needs. In the maximum configuration, it consists of four main parts:
- brazier - an open hearth for barbecue and barbecue;
- smokehouse - a chamber into which smoke from the hearth enters;
- a stove that runs on wood or coal - is a hearth that is covered with a metal hob with ordinary burners;
- common chimney.
 The most interesting is the smoking chamber... It can be made in one of two versions: for hot or cold smoking. In the first case, it is a modification of a conventional chimney, in which hooks are installed for hanging meat or fish. The cold smoking chamber is installed at a distance from the hearth so that the smoke has time to cool down.
The configuration of the stove depends on the material chosen: if the most practical structure is usually made of metal, characterized by a small number of parts, then a brick brazier is a capital structure. A metal smokehouse can be made mobile and even collapsible. You can make a full-fledged universal kitchen out of brick by adding a sink, a cutting table, shelves for dishes, etc.
Thus, when drawing up a project of a barbecue with a smokehouse, you need to think over the following details:
- material of manufacture;
- number of main functions;
- availability of additional equipment;
- furnace appearance design.
Based on these parameters, a detailed design drawing is developed with an indication of the dimensions, the amount of materials required, and the mass of the furnace are calculated. You should also choose a suitable place for the barbecue where you can no will set the foundation.
Construction of a brick street oven
If the oven is being built for permanent use, combining a grill with a smokehouse in one brick structure is the best solution, as this will save materials, time and space. Building a brick oven is more difficult than assembling it from metal, but the result will be better.
Brick barbecues have the following advantages:
- reliability and durability;
- operational safety;
- aesthetic appearance;
- efficient work - food is evenly heated and fully saturated with smoke.
 In addition to the complexity of design and construction, the disadvantages of this option include the capital nature of the structure. It will stand on its own foundation, and it will be impossible to make changes to the project after its completion - if you want to add a street smokehouse to the existing brazier, the entire oven will have to be demolished and rebuilt.
The configuration of the brick oven can be any. The smokehouse, as a rule, is made hot - the camera is placed directly above the barbecue. To implement a cold smoking chamber, it will be necessary to develop a long chimney, which will significantly increase the size and weight of the structure, the amount of material and the cost of the project.
A brick grill oven is an expensive project; before starting work, you will have to prepare a lot of tools and materials. Individual items may vary depending on the project, but in general, the following set will be required:

Additionally, you should purchase steel plates, rods and doors based on the project.
Since the brick structure will have a large mass, it must be built on a foundation. You can choose the type of foundation in accordance with SNiP 3.02.01−87, taking into account the type and characteristics of the soil; in most cases, a monolithic reinforced concrete option is suitable. It is because of the foundation that construction will take a long time: concrete must gain strength for a month before it can start laying bricks.
The procedure for pouring the base is as follows:

It is recommended to prepare strong concrete of the M200 or M250 brand, the recipe can be found on the package with cement. To save money, rubble can be poured onto the bottom of the pit - the reliability of the foundation will not suffer, and the required volume of concrete will decrease.
At a great depth of the base, the cement-sand mixture should be poured in layers of 100 mm, waiting for 2-3 days. After pouring the last layer, the foundation is covered with plastic wrap to protect it from precipitation and atmospheric moisture.
For the convenience of laying out bricks, in addition to the drawing, an order should be prepared - a diagram that shows each row of masonry. The schemes may be different depending on the configuration of the barbecue, but in most cases the height of the stove from the base to the beginning of the chimney is no more than 30 rows, or 2 m.
It is important to know the following features of working with bricks:

In the chimney, it is important to make slots for the flaps that will help regulate the temperature in the smoking chamber. Hot smoking of meat is carried out at a temperature of about 65 ° C, fish - 75 ° C. If the length of the chimney allows the temperature to be reduced to 23 ° C, cold smoking is possible in the chamber.
When the laying is finished, all that remains is to install the hooks in the smoking chamber, the doors on the braziers and other accessories. You should also cover the finished oven with a canopy: the brick absorbs moisture well, so it must be protected from precipitation.
Making a barbecue from metal
If you need to quickly and with minimal financial costs to assemble an outdoor smokehouse, a brazier oven with a metal smoking chamber is the best option. In terms of the number of functions, this option is not inferior to brick, but the design will be less reliable and aesthetic.
The advantages of a metal grill-smokehouse include the following features:

With a lack of experience in working with metal, the result may not be a very beautiful furnace, but it will be guaranteed to fulfill its tasks. Unlike a brick grill, a steel smokehouse can always be modified by adding new details to it. If the modules are fastened not by welding, but with the help of fasteners, the structure can be disassembled and taken out into nature - instead of a capital oven, you will get a convenient and mobile multifunctional grill.
One of the main advantages of a metal barbecue is that it can be made from almost any material with sufficient strength. Sheet metal with a thickness of 2 mm or more is suitable; size affects the weight of the structure and its durability - thin steel will burn out faster. It is allowed to use any grades of steel, but stainless steel is the best option.
If it is not possible to purchase sheet steel, you can use the materials at hand: barrels, boilers, boilers, etc. A good option is old gas cylinders that are optimal for the barbecue. Before starting to work with them, the containers should be cleaned of gas residues. This is done like this:
- Drain volatile gas completely by opening the valve.
- Unscrew the tap, fill the bottle with water to the brim, drain. Repeat several times.
- To remove the odor of odorants, rinse the container from the inside with a solution of potassium permanganate or organic solvents (gasoline, hydrogen peroxide, etc.).
The cylinder should be cleaned outdoors, away from residential buildings - for fire safety purposes and to avoid the appearance of an unpleasant odor that takes a long time to disappear.
Before work, you should draw up a drawing of the barbecue. It is recommended to include three modules in the design: a roaster, a smoking chamber and a removable chimney section in which the smoke will cool down for cold smoking.
In addition to materials, you need to prepare tools: a saw for metal, a grinder with a diamond abrasive wheel, a drill, a welding machine, a screwdriver, fasteners, measuring instruments.
Since the design of a steel stove can be almost any, in each case there will be its own characteristics of the assembly of the barbecue. The general procedure for manufacturing a sheet metal product is as follows:
- In accordance with the drawing, the walls of the brazier and the smoking chamber are cut out of steel. Sizes can be any; should be guided by the planned volumes of cooking. It should be borne in mind that skewers are placed on the grill with a step of 8-10 cm for better roasting of meat. In order for the smoke to enter the smokehouse, you need to make a removable sealed cover for the brazier.
- Air holes are drilled in the long walls and the bottom of the barbecue.
- Parts are welded or fastened together using corners.
- The smokehouse is attached either close to the side of the brazier (for hot smoking), or at a distance of 3-4 m (for cold smoking).
- Legs are welded to the oven, fasteners for the fat pan, hooks for hanging food in the smokehouse and other parts are installed.
If cylinders or barrels are used instead of steel, the process of making the barbecue is similar - the only difference is that there is already a finished case, you just need to cut out part of the container wall, connect the smokehouse to the brazier and install the fittings.
When the oven is ready, all that remains is to paint its outer surfaces to protect it from moisture and put the structure away from flammable materials. For convenience, it is worth installing it next to the gazebo. A brick brazier can be designed in advance so as to combine the recreation area into a single whole.
The brick grill on the site can be called the most beautiful and functional decoration of the latter. Cooking amazingly delicious dishes over the heat or over smoldering coals, enjoying a live fire, spending time in a leisurely conversation - all this will become possible if you decide to make a brazier oven with your own hands. We will not argue that it is quick and easy, but with the desire and diligence, you will get a beautiful hearth that will not be afraid of rain, frost, or hot sun.
Choosing a place for a magnal
First, you need to decide where exactly you plan to build a brick brazier. First of all, this place should be close to the house or summer kitchen and next to the recreation area, so as not to run around with skewers throughout the site. Secondly, from the leeward side - so that there are no problems with lighting the fire, and it does not go out at every opportunity. Third, in a safe place for the whole family to use.
Most often, a brazier stove is placed in a gazebo or on a terrace so that a common roof can cover the device from precipitation. If this is not possible, be sure to provide protection over the barbecue. It can be an awning covering or cellular polycarbonate. In this article, we will talk about how to make a brazier oven with your own hands correctly - ordering, drawings and diagrams, and give recommendations from the masters. And how to arrange - the services of professional designers or your own imagination will help you with this question.

After you have chosen a suitable place, draw up a drawing of the brazier stove indicating all the required dimensions. This will calculate the amount of material.
In the drawing, indicate the ash pan, the blower and the place for storing fuel (firewood, coal). If you are planning a separate shed, determine the place for the mortgages.
The height of the barbecue should be selected taking into account the growth of the one who will most often "cook". To do this, it is convenient to stand up, pretend as if you are already frying kebabs, and measure the distance from the ground to the wrist.
The length of the barbecue is also selected based on the characteristics of a particular family. The standard is a meter, which will allow you to place 10-12 skewers at a time. If the firebox is one meter long, then the height of the barbecue in this case is 140x50 cm, 300-310 bricks will be spent on such a structure.
As with the laying of any other variety - Russian stove, Dutch, etc. - a lot depends on the quality of the material. The brick should be new, without chips or cracks. For the base, you need a solid oven brick, for a firebox - chamotte, it best withstands temperature peaks and a sharp change.
The ideal solution for masonry is a mixture of clay, sand and water, later we will tell you how and in what proportions to cook. It is undesirable to acquire ready-made refractory mixtures - instead of clay, cement is included in their composition, which over time begins to burst.
A mortar based on refractory clay increases its strength during operation. The more often a fire is lit in the stove, the stronger the masonry becomes. The minimum operation of such a furnace will be 25 years or more.
Grill oven masonry
Set of tools:
- grinder and 1 circle (for cutting bricks);
- electric arc welding (for the construction of a canopy);
- mounting level;
- master OK;
- jointing;
- ordering;
- shovel;
- hammer;
- capacity (trough and buckets).
List of materials:
- full-bodied oven brick;
- fireclay brick;
- sand;
- fire-clay;
- crushed stone;
- boards;
- fittings;
- metal corners;
- fasteners;
- material for the canopy.
After the tools and materials are prepared, you can start laying, cleaning the site before that.
Foundation
Since the brazier oven is a rather heavy structure, you will need to dig the foundation.
The foundation is necessary so that after the first winter the stove does not "float" and does not burst on the moving ground. If the soil is stable, then you can not do the reinforcement, but the foundation is necessary!
- Dig a hole 50-70 cm deep.
- 10-15 cm of sand is poured to the bottom, pour it abundantly with water and tamp it.
- Cover the sand with 2 layers of waterproofing material - roofing material is quite suitable for this.
- Prepare the solution from sand, cement and crushed stone and dilute with water so that there is a semi-liquid consistency.
- In regions with soft, mobile and heterogeneous soil, it is recommended to reinforce the foundation with reinforcement.
- Pour the ready-made solution into the pit and, as it is poured, stick a shovel or pickaxe several times to release excess air. Insert several reinforcing rods into the mass that has not yet been found, and when it hardens, cover it crosswise with reinforcement from above.
- Level the top layer with a long board (usually) and leave for 7-10 days, depending on how the temperature is outside. If the sun is too hot, pour water on top of the solution to prevent cracks.
- When the foundation is completely dry, cover it with roofing material or dense polyethylene folded in 2-3 layers.
.jpg)
Making a foundation with your own hands is not as difficult as it seems at first glance. But this will be a guarantee that even with heavy precipitation, the furnace will remain in place and will not change its geometry.
How to prepare a solution
A properly prepared solution is the key to the integrity of the oven for decades. Clay for mortar should be optimally oily and lean. These words, of course, do not mean that it needs to be tasted - it is enough to make a few balls and check them for wear.
- You clean the clay from debris, for which you pass it through a sieve 2-3 times. Soak the clay in plain water for a day. Prepare a small amount first to try it in action.
- Make dough balls or tortillas. Mix sand, clay and water in different proportions. The solution should be soft like plasticine and shiny. Make small balls (about a walnut) and leave to dry. A day later, select those that remained intact and throw them from a low height onto the floor (without acceleration). A whole ball will show you in what proportion to mix the solution.
We do the order
If you have a good eye, consider yourself very lucky. We recommend to everyone else to draw with chalk the parameters of the future barbecue on the foundation (it should protrude 5-7 cm outside the oven). This will help you lay out the bricks evenly.
For those who are first engaged in laying a furnace, experienced craftsmen advise to lay out the bricks dry without using mortar and number them. So you will get a grill oven the first time.
Before starting the laying, soak the bricks in water for several hours so that they do not compensate for the deficiency from the solution.

All work is carried out according to the scheme.
In each subsequent row, the brick is shifted by half to obtain a checkerboard pattern. Each new row ALWAYS starts from a corner.
- The first row is laid without mortar. After all the bricks are laid out along the perimeter of the future barbecue, spread a small - 5 mm - layer of mortar on top.
.jpg)
- From the second row, the formation of an ash pan and a blower begins. To increase the strength of the barbecue, reinforce every third row with a mesh.
.jpg)
- From the third row, you also continue to lay out the back wall in the brick, forming the right and left sections. Check the perpendicularity of the corners with a plumb line, straightness - with a mounting level.

.jpg)
- From the seventh row, you close the console with a frame, on top of which you lay a brick.
.jpg)
- From the 11th row (at a standard height), you begin to form a brazier.


- The photo of the brazier stove shows an example of a tile roof. What you will have depends on the design of the site and financial capabilities. The roof does not have to be connected to the chimney.
Since the order is identical for all types of barbecues, the following recommendations must be observed:
- the brazier is attached to the stove on metal corners, which "sit" on the mortgages;
- the firebox is lined with a metal sheet of 4-5 mm around the perimeter;
- in every third row, leave a few small slots without mortar - this will improve traction;
- in the grill itself, lay out a few bricks with a ledge so that you can put the barbecue grate on them.

A tabletop, a place for storing firewood can be stationary and connected by a common structure with a barbecue, or act as separate elements. In order not to waste time, make an initial drawing taking into account all the components.
And so you can make an outdoor brazier oven with a brick smokehouse with your own hands
The last stage of work
The finish of the barbecue depends only on personal preference. You can leave the brick in its original state, on the quality of cooking and service life, by and large it does not affect.

But it is better, nevertheless, to decorate the brazier, for which they are suitable:
- ceramic tile;
- tiles;
- wild stone;
- marble;
- porcelain stoneware;
- booth, etc.

For the laying of all materials, except for marble and porcelain stoneware, the same mortar is used as for bricks. It is better to use a special adhesive for marble slabs.
Doors for the grill will act as an additional functional detail. For their manufacture, you can use strips and fittings (forging) or wood.
To exclude the fire of a wooden structure, it must be impregnated with a fire retardant.

If you still have questions about laying a barbecue oven with your own hands, the video will help you
close ×
The grill smokehouse is used in suburban areas in order to cook meat, smoke fish and vegetables. You don't need a lot of space to put a smokehouse in the country or in the local area of \u200b\u200ba country house. It is necessary to put the grill-smokehouse so that the smoke from it does not go into the house and not on people. All smoke should go to food so that they are well smoked.
This smoking device can be bought in specialized stores or assembled by yourself. Some people make a smokehouse from other units that are in the household. Under the brazier, as a rule, it is necessary to fold a brick foundation, although there are models that can be installed without it.
Smokehouse-brazier 3 in 1 (or an ordinary smokehouse), assembled by hand, works according to the following principle:
- Foods to be smoked are hung or laid out on the wire rack.
- There should be sawdust, coals or wood at the bottom.
- The smokehouse is closed and put on fire.
- When the dish is ready, the grill can be removed from the fire.
Meat, fish and vegetable dishes should be cooked at a temperature of 50-120 degrees. The average cooking time is 2 to 2.5 hours. It is recommended to use raw firewood as fuel, which is sprinkled with dry sawdust on top. The firewood should smolder, not burn, so the fire in the stove should not be fanned. Considering that a smokehouse or barbecue grill works on the principle of smoking, the food should be smoked, and not boiled or fried. For smoking, smoke is needed, which will arise if a raw tree is hammered with sawdust and set on fire. So any dish will turn out to be especially tasty and aromatic.
What can be done
Do-it-yourself grills-smoking ovens are of several types:
Stainless steel stoves
For manufacturing, several sheets of stainless steel are required, which must be welded to form a rectangular oven. In the middle, 2-3 corners are welded on each side of the smokehouse in order to lay the grate on top. Such a barbecue should not have a bottom, and the top is closed with a lid. It is important that it closes tightly. In order to use the grill-smokehouse, it is necessary to put food, fish or meat on the lattice, close it and put it on fire.
Brazier smokehouse from an old refrigerator
It needs to be freed from the shelves and drawers, and then welded in the middle of the corners, which are located on the bottom of the refrigerator (one corner) and the upper part (two corners). Then a grease tray should be placed on the bottom. A hole is made in the lid of the refrigerator, into which a metal pipe is placed. It will act as a chimney.

An electric stove is mounted below, under which a pallet with sawdust will be located. Such a furnace complex will work according to the following principle: the stove turns on, due to which sawdust will quickly begin to smolder. As a result, smoke will be released, which is needed for smoking products. In two hours they will be ready to eat.
Brazier made from a bucket
This device is suitable for smoking fish or meat. To quickly assemble this type of outdoor barbecue, you need to take a bucket made of stainless steel. At the bottom, you need to put sawdust or wood shavings, laying out a layer of them three centimeters thick. A grate with food is lowered into the middle of the bucket, another grate is placed in the upper part. The bucket must be sealed with a lid, put on fire. After 15 minutes. the products will be ready.

From the barrel
There is such a smokehouse as a grill made from a bucket. It is necessary to remove the bottom from the barrel and remove the lid. Then a pallet is welded to the bottom, where the fat will drain, and grates are installed at different levels in two or three places.

Smokehouse with water seal
Such equipment can be bought in a special store or assembled by yourself. Such a grill has a compact size, which allows you to use a smokehouse at home.

A metal barbecue oven for a summer residence is more convenient to use and manufacture. However, such a smokehouse can only cook meat, fish, barbecue, and to expand the range of prepared dishes, it is recommended to use a brick grill with a smokehouse.
Such ovens have a different finish, appearance, design. The principle of operation for a metal or brick smokehouse is the same.
Street smokehouse drawings
The project diagram of a metal or brick oven is drawn up based on the following principles:
- The type of construction, i.e. the brazier can be collapsible or stationary. Furnace dimensions.
- The material from which the smokehouse is assembled. This affects the depth of the foundation to be laid.
- The functions that the oven will have. This can be a regular grill, barbecue, smokehouse or grill. You can independently assemble both a single-function oven and a multifunctional one. If you choose the 3-in-1 option, then the smokehouse is recommended to be made of bricks, which will allow you to equip a place under the oven for a cauldron. Its presence will allow you to cook the first and second courses, close the canning, heat water.
- The presence of additional space, for example, for firewood, a cutting table, shelves for dishes, skewers, etc.

Grill-smokehouse scheme

Grill-smokehouse scheme
The scheme of a conventional grill-smokehouse will consist of the following elements:
- Hearth with a camera.
- Mangala.
- Combustion chambers.
- Chimney.
Brazier with a smokehouse made of metal
In order to make a smokehouse for a barbecue, you need to take several sheets of iron or other metal, which are joined together by welding seams. Preference should be given to stainless steel sheets, up to 3 mm thick, which will allow the structure to operate longer. Particular attention is paid to the lid for smoking. This part of the barbecue can be done in different ways:
- Removable
- Retractable
- Consisting of two halves
- Folding with one half

The dimensions for the barbecue should be selected individually, taking into account the place where the device will be placed. When the stove body is welded, the seams and metal are cleaned with a grinder. Seams must be covered with a chalk solution prepared in water. When it dries, the seams are lubricated with kerosene inside. In the event that it bleeds through from the reverse side, then the seams are boiled again.
Brazier with a brick smoker
To make a brick grill with a smokehouse, you need to prepare the following tools:
- Master OK
- Level
- Trowel
- Shovel
You will need several containers to prepare the solution. It is recommended to buy bricks, sand, cement in advance.
The construction of an outdoor brick grill-smokehouse stove begins with the creation of the foundation. Its construction involves the following types of work:
- Digging holes up to 40 cm deep.
- Installation of formwork and metal fittings into it.
- Covering the formwork with roofing felt.
- Filling the structure with concrete.
- Waiting for the concrete to completely harden, which happens within two days.
The dimensions of the grill-smokehouse can be:
- Length - 1 m
- Width - 0.5 m
- Depth - 0.25 m
To create a barbecue oven, it is best to use a red brick or refractory brick. If possible, it is recommended to choose the first option of the material, since it has a higher fire resistance.

The orderly laying of bricks has several features:
- The first row must be created without mortar in order to carry out the correct marking of the barbecue. Use whole bricks.
- On the first row, the places for the grill and the skewer are determined.
- Bricks are moistened with water before laying and left for a day. This will allow the material to absorb water, making the oven sturdier.
- Prepare a solution containing lime (slaked), cement, sand. The consistency should be very thick, for this mix 3 parts of sand, one part of cement and lime. Pour water at your discretion so that the solution is thick.
Orderly construction of the barbecue
 Diagram of the order of creating a brazier-smokehouse made of bricks with your own hands
 - 1st row - the laying of bricks is carried out so that a gap between the seam and the second row is created. Rows 2-8 - laying bricks starts from the corner, observing the principle of horizontal position. For this, the level checks the quality of the masonry. The corners are reinforced with metal wire. Between the second and eighth rows, a place for the firebox is determined, for which only thick-walled material is needed. You should also take into account such nuances as creating open holes for air, determining places for countertops, pipes, wood burning boxes, utility niches.
- 9th row - after the brickwork, it is necessary to install plywood formwork. The thickness of the material should be 10 mm.
- 10th row - fireclay bricks are used, which helps to form the firebox. The bricks are laid on the ribs.
- 11th row - the surface of the firebox is leveled.
- 12th row - the table top is being formed. The row should cover the building niches, the bricks are laid in such a way that they have a quarter release.
- 13-15th row - a firebox is created.
- 16-19th row - formwork is formed, which will overlap the firebox. To create the formwork, you will need fireclay bricks.
- Rows 20-24 - bricks are trimmed that are inside the furnace, which is necessary to create the chimney masonry. On the 24th row, bricks are laid out along the perimeter with a release of ¼. This is the last row, after which the formation of the outer tube begins.
After the end of the ordinal masonry, the grill can be tiled with tiles.
The creation of a barbecue in a suburban area is the dream of many owners of private houses. When building a brazier, metal is often used - it is easy to work with this material, but the design is simple and not very functional. If you want to make an oven that allows you to both barbecue and smoke meat, it is better to use a brick. The construction of a grill-smokehouse takes a lot of time, requires adherence to technology and care during work - any mistake can nullify all efforts. But the advantages of such a furnace are worth it.
Design of a grill-smokehouse
Before you start drawing up a drawing, decide on the required set of functions - how many types of dishes you are going to cook, how many guests you plan to receive. Brick allows you to realize the most complete range of tasks, so it is better to make a solid three-in-one structure: a brazier, a smokehouse and a separate hearth for a cauldron. Any dishes are prepared in such an oven - from traditional barbecue to soups and pilaf. Even if now you only plan to smoke meat or fish, sooner or later the additional functions of the grill will come in handy, and you will no longer have to finish building the structure. You will save time, space and materials.
Furnace assembly diagram
Also decide what auxiliary components of the structure will be useful to you. Brick grill is easy to add:
- woodcutter;
- a cutting table;
- sink;
- shelves for dishes and other kitchen utensils.
Thus, the brazier consists of the following elements:
- Brazier - a container for coal with attachments for skewers and grill grates.
- Hearth and smoking compartment.
- A stove with a hob. The burners of the stove are made removable and of such a size that a cauldron is placed in the hole 2/3 of its depth.
- Chimney (one for all brazier components).
- Auxiliary components.
After determining the necessary elements and the general design of the grill-smokehouse, a detailed drawing is built indicating the location and size of the parts of the structure. Based on the project, the amount of material, the approximate mass of the structure and the parameters of the foundation are calculated.

It is more difficult to build a brazier with a smokehouse than a metal stove, but the end result will justify the effort and money spent. A correctly folded structure will not only serve for a long time and decorate a suburban area, but also provide a higher taste for the prepared dishes. A reliable brick smokehouse guarantees uniform heating of meat, product safety and full smoke impregnation.
Building the foundation
Even a compact brick brazier has a large mass, so the base of the structure is made of reinforced concrete. This process requires adherence to technology and does not tolerate haste - the foundation is gaining strength within a month. If you make mistakes while pouring the mixture or try to speed up the solidification process yourself, in the future the foundation will crack, which will negatively affect the integrity of the structure.

Step-by-step instructions for building a base:
- According to the drawing, mark the site. The optimal area of \u200b\u200bthe barbecue is 3 m 2.
- Dig a pit of the appropriate size and configuration. The depth is calculated individually - it depends on the mass of the structure, soil characteristics and other features.
- Formwork is made 50 mm above the ground level. From the inside, the boards are sheathed with waterproofing material - for example, roofing felt.
- Wet sand is poured onto the bottom of the pit with a layer of 100 mm.
- A reinforcing mesh is knitted. For this, rods with a thickness of 10–12 mm are used, which are laid at a distance of 100 mm from each other and tied with a wire. Two nets are made, which are connected with vertical rods 50 mm long.
- The reinforcing lattice is placed in the pit and poured with a layer of cement-sand mixture. The mortar is prepared from ¾ sand and ¼ cement, crushed stone is added for strength. The first layer of the foundation is ready. The rest, up to the edge of the formwork, are formed at intervals of a day.
- The last layer is leveled and waterproofed with plastic wrap.
Brick barbecue construction
When the foundation gains strength, they begin to erect the ground part of the structure. The masonry consists of several elements: a base, a blower, a brazier and a chimney. To assemble the barbecue, red oven bricks are used, which are resistant to strong heat and temperature changes. This is important when creating a street structure: during operation in winter, the masonry will not crack. Silicate brick for the construction of a brazier will not work.

Before the start of construction, an order is drawn up - a scheme for laying bricks. It is better to work with standard, already verified drawings, taking into account the design features of the grill-smokehouse.
The bricks need to be prepared for work. One day before the start of construction, the material is soaked in water. By the beginning of the masonry, the bricks will dry out on the outside, and moisture will linger inside, which will prevent water from absorbing from the solution.
To fasten the bricks, a mixture of sand, cement and slaked lime is used in proportions of 3: 1: 1. The first row of the barbecue is made dry in order to outline the masonry, adjust the size of the bricks and avoid mistakes in the future. For the first row, both whole bricks and halves are suitable.
Starting from the second line, the bricks are laid with an offset of half a stone so that the joints do not coincide. They start work from the corner, then lay out the partitions. Every two rows, the evenness of the lines is checked with a building level. At the height of the braziers, iron corners are installed to secure the base of the firebox, which is made of thick-walled metal. To ensure the flow of air, part of the bricks under the brazier are laid without mortar - two or three slots are enough for the fire to ignite well.

Thus, the main thing is to follow the drawings exactly. First, a base is laid out of bricks, then the walls of braziers, a barbecue, a smoking chamber are made and, finally, a chimney is built. When the masonry is completed, metal doors, skewer mounts, a hob and other elements are installed.
Modification of the design
At the final stage, the furnace is lined with decorative bricks, paving slabs are laid on the ground in front of the brazier to ensure fire safety, and a canopy is erected over the entire structure. They also carry out internal arrangement: install a cutting table, sink, shelves and other useful devices. Thus, the grill with a smokehouse turns into a full-fledged street kitchen, which allows you to easily cook different types of meat dishes.
Thematic material:
The smokehouse is equipped with a thermometer, since it is necessary to maintain a certain temperature in the chamber: about 60 ° C for meat and 75 ° C for fish. In this case, the product will be stored for the longest time. If you raise the smoke temperature to 100 ° C, the cooking process will go faster. Cold smoking is carried out at 23 ° C - under such conditions, the meat is the most tender and acquires a beautiful burgundy hue. The temperature is regulated by changing the length of the chimney, as well as by overlapping the pipe with a metal plate - the wider the gap, the more hot smoke enters the smoking compartment and the hotter it is in the chamber.

To use the cauldron, you will need a separate brick hearth, which is covered with an iron plate 20 mm thick. Using a burner, a hole of such a diameter is cut in the metal surface so that the cauldron drops by 2/3 - this ensures uniform heating of the dishes. To use the hearth as a regular burner for cooking soup or frying vegetables, the hole is covered with a product made of steel rings of different diameters.
Thus, it is not so difficult to build a brazier-smokehouse on your own, the main thing is to carefully think over the design and draw up a detailed drawing. Careful adherence to the design during operation will help you build a beautiful and efficient oven for cooking meat over an open fire.