Oven brick barbecue. How to properly arrange a barbecue oven with a cauldron. Tandoor, or Asian oven
In our guide, we will tell you how to make an outdoor grill complex and a brick barbecue oven yourself. Step-by-step instructions with a photo of the construction process will help you figure out the details self-laying this structure.
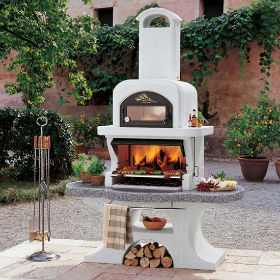
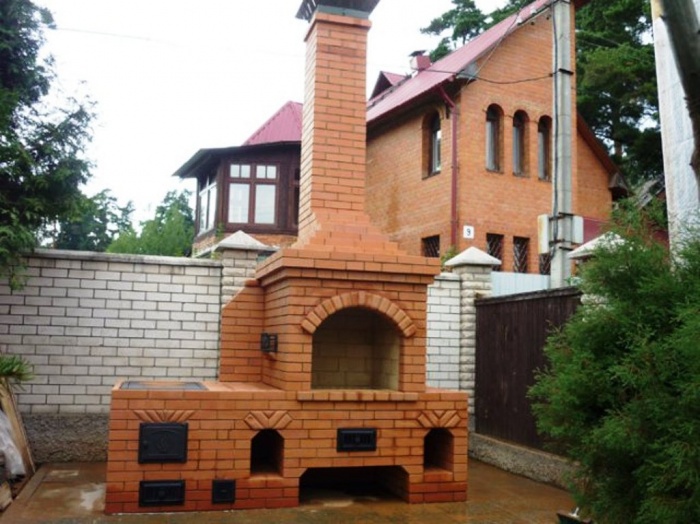
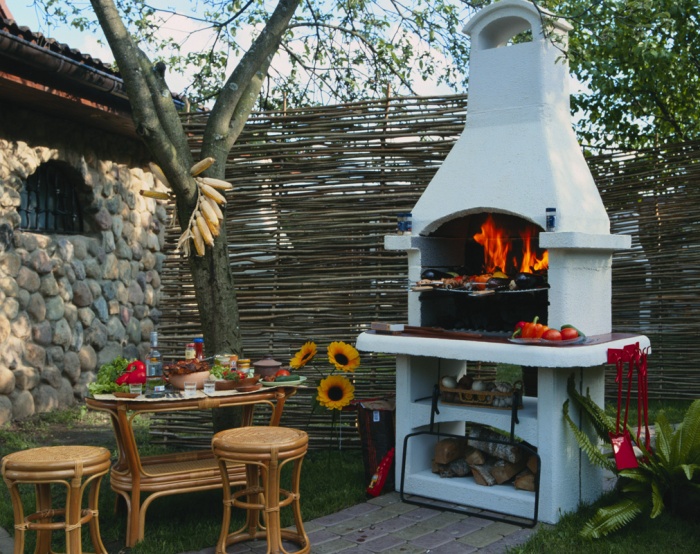
As a result, you should get a barbecue grill as shown in the photo below.
So, you have decided on the type of barbecue, its size and location. Now you need to build a foundation for it.
Usually such buildings are made on the street, in a gazebo or on a terrace. If the foundation of the gazebo or terrace can withstand the weight of a brick oven, which is about 3 tons, then you can start construction right away. If you are going to build a brazier from scratch, then first of all, fill in a suitable foundation for it: tape or tiled.
You will find instructions for building such foundations in our section ““.
The next step will be the installation of waterproofing under a brick brazier. It is done to prevent the bottom bricks from getting wet by capillary suction. It will be enough to spread a roll of roofing material or waterproofing material. At the end of the construction, cut off the excess with a knife.
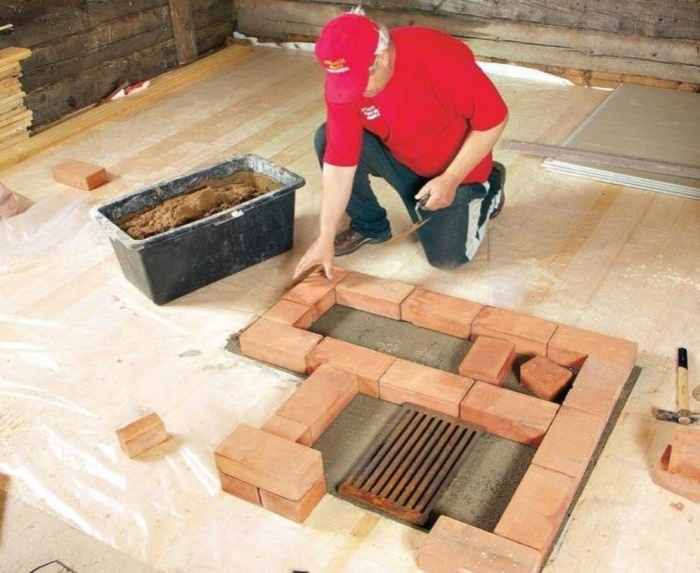
Do-it-yourself barbecue grill made of bricks. Step-by-step instructions with a photo.
We proceed directly to the laying of the barbecue.
We recommend that you first lay out the first row of bricks without mortar and evaluate how your future structure fits into the foundation. Do not forget to leave 1 cm gaps between the bricks. And also check the diagonals, they must match.
After that, you can start laying the barbecue. The facing brick is placed on cement-sand mortar (cement-sand ratio 1: 3). For the plasticity of the solution, add lime or a special masonry plasticizer from the nearest hardware store... The seams are made in sizes 8-10 mm, for this they use metal rod, fittings, etc. In the places where bricks adjoin without ligation, the masonry is reinforced with perforated tape, wire, etc.

We do the laying with an offset of each subsequent row by half a brick. For sawing bricks you need a grinder with a stone disc.
We continue to lay out the barbecue grill.

Do not forget to check the verticality of the masonry in the corners at least every 3 rows. And also, check the coincidence of the length of the diagonals of the barbecue.
We continue laying.

After you have made 8 rows of masonry, it's time to make jumpers for the barbecue and countertops. They should look as shown in the photo below.

There are several ways to make such jumpers.
First, you can hold the bricks together with a metal hairpin and mortar.

Secondly, you can use metal corners.
In our case, we used the second method. We folded the corners together in the form of an inverted T and sawed off half of the shelf. Here's what happened.

Take a corner at least 45x45 mm in size. A smaller corner will bend. But do not take too large so that it does not protrude beyond the edges of the brick.
Make a cut in the brick with a good margin so that the metal does not tear the masonry when heated.
Such a shelf is invisible to the eye, reliable and beautiful.

We begin to lay out under (bottom) the barbecue. We use refractory fireclay bricks for the furnace. We make the masonry on a ready-made refractory mixture from a construction supermarket from clay and sand. Can be used mortar... We make the seams as thin as possible, about 3-4 mm.
We use corners to support the bottom of the barbecue. Remember to leave at least 1 cm of space between the ends of the corners and the brick. This will prevent the masonry from cracking when the corner expands.
On the first row of the bottom of the firebox we put the second row, overlapping all the seams of the first. This will exclude the burning of the seams and the ingress of coal on the wood in the firebox from below. You can, of course, pour a concrete slab instead of the corners and the first row of the firebox. But in our case, it was cheaper and faster to do so.
If you pour a concrete floor, then one row of refractory bricks will be enough for the bottom of the firebox.
We continue to lay out the walls of the barbecue.

The facing bricks and fireboxes can be laid both in parallel and alternately. You can first make the walls of the firebox, and then overlay it with a facing brick.
Important! Leave a 1 cm gap between the facing and refractory bricks. The firebox and facing should not touch.
We put the next rows of the barbecue oven.

We come to the moment of construction of the furnace arch. We make a circle (an arc structure made of wood) and install it in the brazier portal. Then, we carry out the laying of the arch, cutting the bricks to the desired size. Put a brick castle in the middle of the upper point. The arch is ready.

Note! The facing brick arch is covered from the inside with a fireclay brick lintel. It is placed on a metal corner slightly above the top of the arch so that it is not visible. It looks like this.

The arch is assembled, we continue to display the walls of the barbecue.
Do not forget to check the verticality of the masonry.

We come to the moment of construction of the smoke collector.
We bring the top of the firebox and the cladding to one level and begin to lay out the smoke box. We make masonry from solid brick of the brand not lower than M150. We put on a cement-sand mortar. We put the first row flush with the inner wall of the firebox. We put the rest of the rows with an offset of about a third of the brick.
Do not move the bricks more than halfway, otherwise they will fall into the firebox.

We carry out the laying of the smoke collector until there is no hole for the chimney measuring 27x27 cm, taking into account the seams. Your chimney size may differ from ours. In this case, make a smoke box for the size of your chimney.
Some stove makers cut the inner edges of the bricks so that the inside of the smoke box is smooth. We did not notice any differences in operation between the smooth and ribbed inner surface of the smoke box. Of course, this is only true if you observed the correct proportions between the dimensions of the portal - smoke collector - pipe (read about the proportions below).
This is what the smoke box looks like without cut bricks from the inside.

We continue laying the pipe. Its dimensions depend on the size of your barbecue portal.
After finishing laying the chimney, cover it with a cap to protect the firebox from precipitation.
We have successfully built a brazier aka a brick barbecue oven with our own hands! Wait until the solution dries and you can do a test run.
Here we will analyze the most frequently asked questions about masonry brick barbecue (grill) with your own hands and the answers to them.
What size should the smoke box be?
The size of the smoke box depends on the size of the firebox portal. The optimal ratio should be at least 100-120%. So in our step by step instructions the height of the portal is 6 rows, and the height of the smoke box is 8 rows.
What is the height of the pipe?
The height of the pipe is proportional to the height of the smoke collector and is not less than 100-120% of its height.
What diameter of the chimney should be?
The section of the chimney pipe depends on the area of \u200b\u200bthe furnace portal. The optimal chimney area is 1/8 - 1/10 of the portal area. Extreme sizes from 1/6 to 1/13.
How to fill the gap between the firebox and the cladding?
In front, around the portal, you can fill the gap with basalt cardboard. There is no point in filling the rest of the space. Therefore, it is left blank.
Do I need to paint the metal corner in the lintels?
Brazier (grill) - do-it-yourself brick barbecue. Step-by-step video instruction.
Private and facing stone baked clay is a versatile construction material. Therefore, a simple brick brazier can be built even without a solution in haste. A stationary hearth made of this material is considered simple if there is no chimney in its design.
Clay and ceramic brick withstand extreme temperatures, but have a significantly lower resource in furnaces and hearths than refractory chamotte. Therefore, the simplest temporary barbecues are made of ordinary bricks, and in stationary hearths of a simple structure, the inner part of the firebox can be lined with fireclay.
Even if you add legs of the same material to a rectangular brick box, the structure will still remain a barbecue. As soon as the master covers the firebox with a roof, it will automatically turn into a barbecue oven, although without a chimney, but with an opening for removing combustion products.
"Walking"
From a few bricks accidentally found or specially taken for a picnic in the countryside, we get the simplest hearth for frying meat on skewers over coals. In this case, it is necessary to take into account the nuances:
- the brick has standard dimensions 25 x 12.5 x 6 cm, to save building materials and space in the trunk of a car, it should be installed on the edge;
- for normal roasting of meat without burning, the skewers must be 20 - 25 cm away from the coals, so at least 2 rows of bricks will be required;
- the width of the brick "box" is taken for standard skewers 37 cm, that is, 1 brick;
- the length of the barbecue for a small company is 75 cm, that is, 3 bricks.

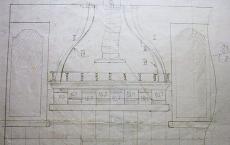
We just took a few bricks and made such a super fast construction on site according to this drawing!
Thus, a total of at least 16 standard format bricks are required. Each weighs 3.5 kg for a total of 56 kg minimum. The manufacturing technology of the hearth is as follows:

After the coals have cooled, the structure is disassembled, the sod is placed in place.
Classic BBQ
For a stationary hearth on the site, you will need a base of non-metallic material (sand or crushed stone), compacted with a vibrating plate or manual rammer. If the weight of the structure exceeds 450 kg, a monolithic reinforced concrete foundation will be required. For home master, with the minimum skills of a bricklayer, a do-it-yourself grill made of bricks is more suitable, the simplest and most inexpensive in the bottom photo in the form of a rectangular box.
Manufacturing technology is as follows:


You can make such the most inexpensive stationary barbecue grill
The main nuances for this modification of the focus are:
- no ordering scheme is needed, since it is impossible to make a mistake in this case;
- the bottom row (called a hearth in furnaces) is necessary to prevent the destruction of concrete from extreme temperatures, it is recommended to lay it out with refractory bricks;
- waterproofing is needed to prevent the destruction of the concrete foundation and masonry from soil moisture (not to be confused with groundwater!), is made of rolled bitumen materials, pieces of which are placed under the foundation before pouring it or the first row on the base of non-metallic material.

We must not forget to make waterproofing under the lower row
All other designs of brick barbecues are more complicated, so ordering is required. But they are more convenient to use. Here are a few more photos on which you can see other interesting options: 

Firewood option

Well, and a video on the topic of how to do the laying correctly:
BBQ oven
Unlike the classic barbecue, the barbecue simplifies the preparation of meat by placing it on the wire rack, and not on skewers. A simple budget barbecue grill made of bricks is being built using the technology:


Scheme of a ready-made budget brick barbecue
Attention: A brazier with a drawer for ash and a grate above it for placing coal is considered more convenient in service.
The indicated design is slightly different from the described option:
- after making the legs under the back and side walls of the barbecue on the spoon row, the brick of the next level is poked (only the side walls);
- then another spoon and butt rows are laid out.

Bogie hearth
The resulting bottom ledge houses a metal ash drawer. A grate for coal is laid on the upper ledge. If you make another ledge in the same way, you get a convenient dryer for berries and mushrooms.
Well, and a detailed video, for clarity:
Without solution
If there is a brick remaining from the construction site on the site, you can build an inexpensive temporary barbecue from it as soon as you see the suddenly arrived guests. The main manufacturing nuances are:
- without mortar, the legs in half a brick are too unstable, therefore it is better to replace them with 4 pedestals (columns) 1 x 1 brick with a bandage in order;
- instead of a sheet of iron, you can use a piece of any sheet material (OSB, plywood), but, above it, 2 solid rows of bricks must be laid;
- the height of the barbecue box is 2 - 3 rows, the dimensions are at the discretion of the home master.

Whip up without mortar
Attention: The construction is considered to be temporary "hastily", brick stained with coals and ash is difficult to wash, so it is better to use an ordinary stone, not a facing stone.
For detailed instructions, see the video:
Attractive enough barbecue grill original design is a variant of several rows of bricks without mortar in the form of a round pedestal.

Barbecue in the form of a pipe without mortar

This can be quickly built just from what is at hand
Additional elements for the simplest barbecues
When adding additional functions of a stationary hearth to the design, you will need to make drawings or sketches for it by hand. Since the hearth will turn out to be more complicated, errors in the construction of the masonry are possible. The main additional elements for a simple barbecue are: a cutting table, a brazier stove and a sink.
Cutting table
An inexpensive option that significantly increases the comfort of use is the simplest do-it-yourself brick brazier with a cutting table using the technology:
- the back wall is lengthened, it becomes more difficult to ligate with the central wall-rack;
- in addition to the above structures, on the side, close to the masonry of the hearth, another wall is being built;
- a countertop made of natural / artificial stone is laid on it and the side wall of the barbecue.

The cutting table can be located on either side, convenient for the user, relative to the hearth.
Brazier stove
In addition to meat on skewers, or a barbecue grill, it is often necessary to prepare other dishes in pots, pans, and heat or boil a kettle. Therefore, instead of a cutting table, space is allocated for a brazier stove.
To do this, you need to perform the following operations:
- lengthen the structure starting from the bottom row;
- make a front wall with a door for the combustion chamber;
- equip the hob with concentric cast iron rings to adjust the power of the stove.

On top photo a diagram of a barbecue with a hob of the simplest type is shown.
Washing
To equip the barbecue with a sink, it is enough to mount a plate with a slot for the sink instead of the usual countertop, bring the water supply in or increase the height of the rear stack and hang the washstand on it, as in the bottom photo.

Wiring along the cold water supply (cold water supply) section is much more difficult than collecting water in a washstand. Even with seasonal operation, it will be necessary to drain the liquid for the winter, preserve the system.
Thus, the structural material brick is suitable for the manufacture of quick-fix barbecues in the field and on suburban area... When laying on a mortar, you can increase the functionality of the simplest barbecues by washing, countertops, hob or something else that you find necessary and convenient when working. Here it is important to give free rein to your imagination and not be afraid, you will definitely succeed!
Filimonov Evgeniy
Reading time: 8 minutes
A A
How to build a brick barbecue. Stages of work. Decorative design. Preparatory work. Masonry instructions.
Having your own plot, you always want to spend time usefully; for this purpose, a brick barbecue will not be superfluous. To build it, you need to know how to properly lay the foundation. What kind decorative designs use. What is the difference between barbecue and barbecue.
The main stages of building a barbecue. Necessary preparatory work. How bricks are laid. The main nuances of masonry. Recommendations and advice for a reliable and durable construction.
A metal brazier is definitely good. But, in addition to functionality, I also want beauty, especially on the site: in the country or near the house. An attractive appearance without reducing functionality is given by a brick barbecue. There are very simple models that can be folded, even without skill, in a day or two, there are more complex ones - whole complexes. We do not recommend folding these without experience, but try a simple barbecue oven or just a brick brazier. Master the masonry, the basic techniques, and then you can take on more serious projects.
There is no exact separation between barbecues and barbecues. The main difference is that they cook on skewers on the grill, while berbeku is made on a wire rack. But both of these cooking methods can be used even over a fire, so - for us in any case - that the grill, that the barbecue maker is one design.
It can also be classified by the presence of a roof. A brazier is always an open device, without a chimney. In barbecues, especially made of bricks, chimneys are often made, although there are also simple open models.
Simple brick grill
This design is very simple, easy to change to suit any needs and desires. It consists of brick walls in which protrusions are arranged (the brick is placed on the edge). Heat-resistant sheets (metal, etc.), grates, skewers are laid on these ledges. Convenient, especially if there is some kind of roof over your head in case of precipitation, but it is built separately and at will.
Any brick structure requires a foundation, or at least a prepared foundation. Not even this small brick brazier. Since there are not many bricks - the wall is half a brick, then a rammed platform lined with some kind of hard coating is suitable for this structure.
Foundation preparation
Remove the fertile layer, if necessary, deepen the pit. The depth should be about 20-25 cm. The dimensions of the foundation or platform are 50 cm larger than the dimensions of the furnace in all directions. The bottom is leveled, crushed stone of the middle fraction is poured onto it. The thickness of the crushed stone layer is 15 cm. It is well rammed. Desirable - a vibrating plate, if not, a metal or wooden rammer.
Further steps depend on the chosen base. If this is one of the coatings - paving stones, paving slabs and similar materials, then a layer of fine-grained sand is poured into which the coating is placed according to the level.
If a slab foundation is chosen as the base, it is reinforced with a rod of 10 mm in diameter. It is laid along and across the foundation with a step of 20 cm, tied at the intersection. If you don't know how to knit with special wire, you can pull it off with plastic clamps. Reinforcement with ready-made thick wire mesh is allowed for this model. The formwork is exposed at the edges and everything is poured with concrete of the M250 brand. Work can be started in a week if the average daily temperature was not lower than + 20 ° C, and after two, if it was + 17 ° C.
Brick BBQ with chimney: ordering
For this brick barbecue, a solid ceramic brick M200 is used. You can take a stove, but it is more expensive, you should not put fireclay: the temperatures are not the same and it loves moisture too much to feel normal in an open grill.
The masonry is carried out on a clay-sand mixture, to which a little cement is added for greater strength. For beginners, it is better to take a ready-made mixture for stoves, just not heat-resistant, without chamotte. Knead according to the instructions, the seam thickness is 3-5 mm, keep strictly. Constantly monitor the verticality of the walls and the horizontalness of the masonry. This is essential for the normal operation of the oven.
Each odd row starts with a whole brick, an odd row starts with a half. In the 6th and 10th rows, bricks are placed on a spoon - sideways, and unfolded across the main masonry. If you are making a barbecue - under the grate - in the same rows, the back wall is made of bricks, also placed on spoons, and to maintain the thickness of the masonry, they are placed in two rows, as well as the others - with dressing - offset seams. If you are going to use ka brazier - for skewers - on the back wall, put a brick on the spoons too, making a ledge in this area as well. In front, as a support for skewers, use a profile metal pipe small sections, cut to size. You can make recesses in it for skewers.
Starting from the 7th row, the laying is carried out only in half - right or left - as you like, but this layout is given under the frying chamber on the left - it is wider, and there is a table on the left. If the opposite is more convenient for you, do a mirror image of this order.
Brick is a hygroscopic material, in order to reduce the amount of moisture that it will "pull" from the base and extend its life, waterproofing is needed under the first row. Can be stacked in two layers roll material (such as roofing material or waterproofing), walk around the perimeter with a hydrophobic impregnation. A layer of waterproofing between the first and second row will not interfere.
This barbecue option is a little more difficult, but also not the most difficult. The most important thing is that the combustion chamber here has a straight vault, and it is much easier to make it vaulted. The brick frying chamber is raised to a height of 90 cm, the total height - to the beginning of the pipe - 217.5 cm.
It all starts with preparing the foundation. For this barbecue oven, only a monolithic reinforced base (reinforcement pitch 15 cm) on a base compacted with rubble is suitable. On the dried foundation, waterproofing is spread in two layers, then laying begins. If the barbecue is done in a gazebo, the first row of masonry should start at floor level.
The first 9 rows do not require any special explanation. They are laid exactly according to the scheme, observing the order, using halves and cut bricks, if indicated on the plan. It is imperative to check the verticality of the resulting walls, as well as control the thickness of the mortar - 8-10 mm and the horizontal laying of each brick.
To control the thickness of the seam, you can use a reinforcement bar of the appropriate diameter. It is placed on the edge, the surface of the row is filled with a solution, the excess is cut off with a trowel just above the bar. After laying and tapping the bricks, an even seam is obtained - the bar does not allow the brick to go lower than necessary. The bar is then removed and shifted higher.
To be able to lay the 6th row (solid), after laying the 5th, put a strip of metal 4-5 mm thick, 40 mm wide. Length - slightly less than the furnace span - 1450 mm. Strips are needed 3 - one on the edge, two approximately in the middle of each row of bricks
Fireclay bricks (ША-8) are marked in light color in these rows. They put it on the same composition of clay and sand (a small proportion of cement can be added). It is better not to use mixtures based on chamotte: they need very high temperatures for sintering, which are unattainable in street barbecues. As a result, this solution may later simply crumble.
The formation of the arch continues, which in the 30th row turns into chimney... Next, the 30th and 31st rows alternate until the required height is reached.
What could be better than rest on fresh air with your family and friends? Cooking fish or meat allows you to have a pleasant time and a delicious dinner. It is for such purposes that people buy collapsible barbecues or grills.
But relatively recently, some owners of private houses or cottages began to build brick or stone barbecues around which the whole family can gather. Also, thanks to materials such as natural stone or brick, the heat will be retained for a long time and the structure can even be used as a fireplace.

This article will tell you how to make a barbecue with your own hands, and we will also look at drawings, photos and even videos. In addition, for people who do not have the opportunity to make a stone or brick oven, a barbecue made from scrap materials would be an excellent option. But first, let's look at how to make a brick barbecue.
Brick BBQ
In order to build a brick barbecue, you need to purchase some materials. For the construction of a furnace, you need to purchase refractory and facing bricks. Fireclay is perfect as a refractory brick. Due to the fact that this material contains a lot of clay, it can withstand high temperatures with ease. Also, it is very important that the brick is not too brittle and does not crumble. In addition to bricks, you need to buy clay from which the mortar will be made.
In order to prepare a solution, you need to purchase cement, red or refractory clay and sand. Cement and sand will be used for lining the barbecue oven, and clay for laying refractory bricks.
Solution preparation
To build a barbecue, you definitely need a well-prepared solution. Cook regular cement mortar it is impossible, since the oven will crack from high temperatures and it will be impossible to use it. Therefore, it is necessary to prepare a clay mixture.
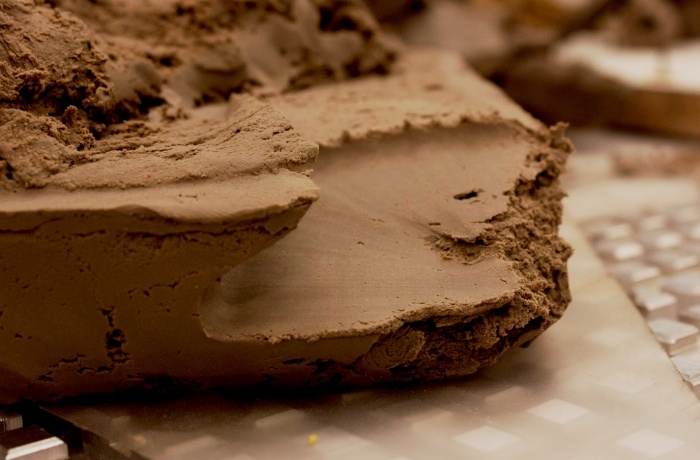
The clay solution is divided into two types - skinny and greasy. A skinny solution will not work, since after firing it will crack or, even worse, spill out of the seams. But the fatty mixture has plasticity, due to which the solution will be evenly distributed over the entire plane of the brick.
Cooking process clay solution for a barbecue oven is as follows:
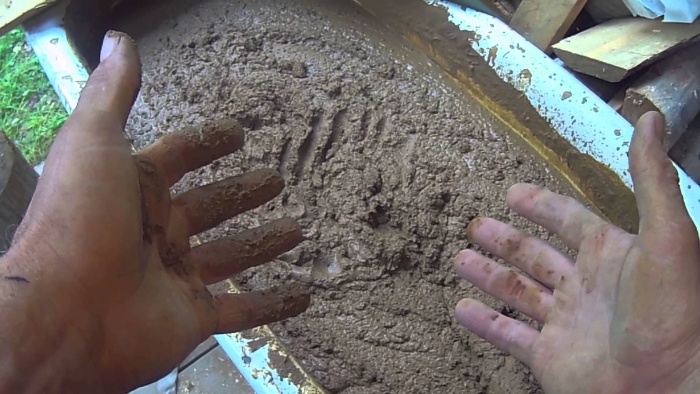
In order to understand a quality solution or not, you need to scoop up a little mixture with a trowel or a shovel. The solution should not stick to the shovel or leave too wet marks behind. A properly prepared solution should slowly slide off the shovel, and not blur.
For a high-quality solution, you need to clean the sand from gravel or other debris. This work can be done with a sieve.
In order to give the solution more strength, you need to add table salt to the composition. A bucket of solution needs about 200 grams of salt.
Brick BBQ Foundation
The first thing to do to build a barbecue is to choose right place... Particular attention should be paid to fire safety. No trees or bushes should grow near the stove.
Also, it is not recommended that the barbecue is located too close to the main buildings, bathhouse or utility block. Experts advise taking into account the direction of the wind so that it does not blow towards the main buildings. Also, during construction, it is necessary to think over everything in such a way that the sparks are not carried by the wind to the neighbors. You can see the barbecue project in the video below.
The controversy about who is the ancestor of barbecue does not subside to this day. In fact, almost every nation has a culture of cooking over an open fire or charcoal. Although the word barbecue itself is of English origin and means open fireovens on which food is prepared have a lot of varieties and design solutions.
Design selection
On constructive solution the oven is influenced by several factors. The barbecue area in the country with your own hands can be equipped, but for this you need a suitable place. If the territory is limited, and you plan to fry the meat on big holidays, then it is quite enough to buy or make metal. This is the simplest and most affordable solution.
Do-it-yourself barbecue in a dacha made of bricks is much more difficult to fold, plus the price of construction will be higher than in the portable version. But this design is more functional and durable. Also, do not forget about the aesthetic side of the issue, brick or stone ovens, with the right approach, can become a gem in the design of your site.
As for stoves exotic for our country, such as the eastern tandoor, it is better to entrust the arrangement of such structures to professionals. The same can be said about the oven complex, when, in addition to a barbecue with a grill, it is planned to build a smoking compartment, wood stove with oven, washing department, table and storage for firewood.

The video in this article shows how to make a simple grill.
Choosing a place for construction
Theoretically for himself simple barbecue or grilling 1.5 m² is enough, but cooking on a fire is a special ritual and the surroundings accompanying this action should also be appropriate.
As a rule, a barbecue area in the country with their own hands is equipped in places that are not accessible to prying eyes. It can be a freestanding gazebo or a shed, partially bordering on summer cottages.
Planning such a complex in the far corner of the garden would not be entirely the right decision. Of course, from the point of view of fire safety, this will be perfect option, but think how many times you will have to cross the site while you prepare the feast, and after all this will still need to be cleaned.

To ensure fire safety, there is enough distance from the fire at a distance of about 5 m. Most often, this resting place is located under a canopy near the kitchen. With this approach, it is much easier to bring water from the house and draw a conclusion to the drain pit.
Important: the entire furnace complex is being built separately, it should not border on any kind of utility or residential buildings, this is fraught with a fire.
When starting to build a barbecue in a brick country house with your own hands, pay attention to studying the wind rose on your site. The stove is installed on the leeward side, because neither you nor your guests or neighbors will enjoy breathing smoke from a brazier at all.

Undoubtedly central to such a complex. But for convenience, it will be useful to equip a small storage for firewood, some compartments for dishes, a place for storing skewers or grates for a grill. It would also be nice to supply water and equip a cutting table.
Let's talk about construction
When choosing the design of the complex, it is better to give preference to more open options. There are enough closed spaces in the city and once you get to the country house you want volume and closeness to nature. It should be noted right away that, having no construction experience, it is quite problematic to build a good indoor pavilion with your own hands. But the brick barbecue itself is quite within your power.

Unlike the classic barbecue, the barbecue is a multifunctional design. The hearth itself is practically no different from the barbecue; it also has a rectangular shape and guides for skewers.
But above, stops for grilling are mounted, sometimes with a spit, a smoking cabinet can be located above them, in addition, an oven and a number of related compartments can be attached, starting with shelves for dishes and ending with a minibar. Of course, the number of compartments is selected individually. Such a structure cannot be called easy and for its installation you need to lay the foundation.

Laying the foundation
After a worthy place has been chosen and a general sketch of the structure has already been sketched, you can start laying the foundation. The length and width of the barbecue is calculated individually, depending on the size of the firebox and the presence of related structures.
Important: the foundation slab or block must exceed the dimensions of the brickwork, along the perimeter by half a brick.

To lay supporting structure can be done in 3 different ways.
The choice of a suitable method should be based on data on the composition of the soil, the presence of quicksands and the climate in the region.
- The fastest option is to use a ready-made reinforced concrete slab. For this, the soil is selected, the depth is determined depending on the thickness of the slab. At the bottom, a sand and gravel pad of 50 mm is made and after tamping a slab is laid. Although the option is quick, you will need a crane to lay the slab, plus there is the possibility of uneven shrinkage.

- The next option is also a type of slab foundation, but it is considered more reliable. The point is that the reinforced concrete slab is built on site. For this, a pit is made with a depth of about 350 mm and a dense sand-gravel pad is laid.
After that, the formwork is mounted, the reinforcement cage is installed and concrete is poured. The mortar is made with the proportions of concrete grade M200 - M300. - But the most common and reliable is considered to be the usual strip foundation... Unlike the construction of houses, here it is done not along a closed circuit, but according to the U-shaped principle. The laying is carried out to a depth of 50 cm. Next comes the standard instruction, 150 - 200 mm sand and gravel filling, onto which a reinforced concrete base is poured.

Important: Traditionally, concrete gains its design strength within 28 days.
But according to the technology, in the first 10 days it must be regularly moistened, otherwise the monolith may crack.
Experts advise to cover the foundation with plastic wrap before gaining strength.
Wall masonry
To build a barbecue in the country with your own hands, 2 types of bricks are used. The firebox and that part of the klak that is directly in contact with high temperatures is laid out of refractory bricks. It can be fireclay bricks or solid, pre-fired red bricks.
The rest of the structure is made from facing brick or any block material, up to natural stone. We will consider brickwork, since its installation, in this case, requires less professional skills.
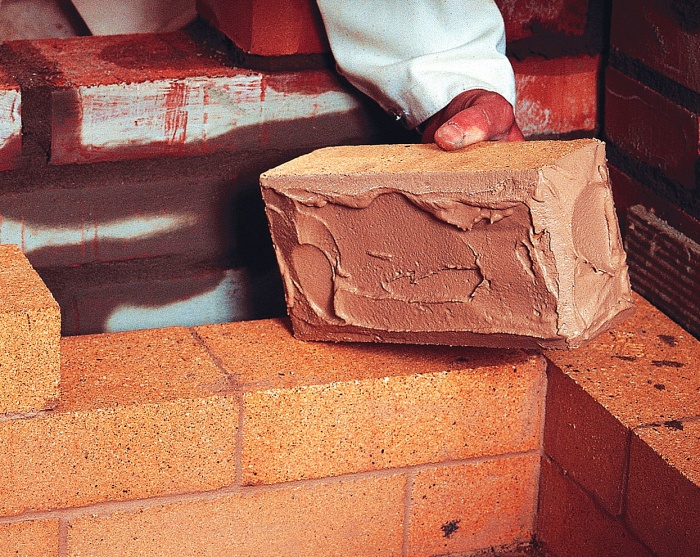
All bricks are soaked in water immediately before laying.
- When the foundation has settled down and gained strength, it should be checked for horizontalness, according to the level... Deviations are eliminated due to the thickness of the mortar when laying the first 2 rows of the base. Before starting laying, the foundation is covered with waterproofing, it can be roofing material or other rolled material.

Tip: after laying the first 2 rows and aligning it horizontally, it is better to let the mortar set within 3 to 4 days.
This is not necessary, but this will be less likely to distort the masonry in the future.

- Traditionally, the height of the furnace is 0.7 - 1 m from the ground... After laying 2 rows of the base, 5 more rows of ordinary bricks are laid on them. Next, the firebox will already go, so the brick must be fireproof. From this moment, after every 2 rows, it is recommended to lay a reinforcing wire, preferably copper, but ordinary wire rod with a cross section of 0.6 mm is also possible.
- The next, butt row is laid out with refractory bricks across, in such a way that an inner side is obtained... The bottom of the furnace will be based on it, it can be made of the same refractory brick, but it is faster and easier to use cast iron grates.
- Further, from 2 rows of refractory bricks, the furnace bath itself is laid out and the butt row of masonry is repeated again... Skewers with meat will lie on it. If it is difficult for you to lay the butt rows, then a wide metal strip 5 - 7 mm thick is suitable for the guides for the skewer, which is laid between the rows, but in this case a row of ordinary masonry is added.
- When the skewer support is ready, another row of bricks is laid, after which the bonded level of the masonry is repeated again... It is designed to support the grill mesh.
- It was empirically proven that for comfortable cooking, the furnace window should have dimensions of about 1 m wide and 70 cm high... Above the opening, another 2 - 3 levels are made and the pipe can be laid out.

Chimney and auxiliary structures
- The dimensions of the smoke intake are calculated according to the GOST standards, which state that for 1m³ of the furnace there should be 960 cm² of the chimney area, plus the height of the chimney, with such data, about 12 m should be made. Do not be alarmed, the average volume of the furnace ranges from 0.125 - 0.14m³, pipes for it will be 120 cm², this is 110x120 mm with a pipe height of one and a half meters.
- The chimney cone can be purchased or welded from metal. But if you decide to lay it out of brick, then this should be done with a gradual narrowing. For the front and rear walls, a quarter of the width of the brick is taken. For the side walls, half of the block length is taken. So they gradually bring to the desired section.
- Among the people, the masonry of this kind of structures is made on the basis of a clay-sand mortar. But we advise you to use a special fireclay composition for laying stoves. It is sold ready-made dry and has instructions on each package. The cladding is traditionally laid on a cement-sand mortar, the best option this is sand concrete of the M300 brand.

- After the firebox is ready, you can proceed with the installation of auxiliary structures and beauty guidance. As mentioned earlier, the oven is lined with facing bricks on top, at the same time the base for the sink and the cutting table are being erected. The masonry should be tied into a single structure.
- It is easiest to make stops for mounting a washing bath from a 45-50 mm corner, laying it directly into the structure. A table or other horizontal surfaces can be mounted from facing bricks by laying it on a metal corner. Or use an asbestos-cement slab, which is tiled for beauty.

The video in this article shows some of the subtleties in building a barbecue.
Output

When the barbecue area in the country is equipped with your own hands, the warmth of your hands remains in it, and for the rest of their life your children and grandchildren will remember that it was you who did it. At every meal or just watching the wood burn, they will remember you with gratitude.