Do-it-yourself tandoor (55 photos): tips for construction and operation. Do-it-yourself tandoor from clay Do-it-yourself tandoor from a clay pot
do it yourself using fireclay clay. Dishes in this asian oven they are prepared simply, have their own unique taste and aroma. Once you cook meat like this, you will fall in love with it at first sight. Moreover, all your friends will be delighted with the unusual and juicy dishes.
Today we will tell you how to make portable tandoor using fireclay clay. In addition, you will learn where the clay tandoor came from and the main secrets of why the food in it turns out to be so tasty and unusual.
History of the origin of the clay kiln
The tandoor stove, or as it is also called tandur, tunur, tanur, tandr, tendir, etc., came to us from the peoples of Asia, Korea, and China. Despite the fact that the oven has many names, its essence is the same - it is a bread oven, which can be located both in the ground and above it, it is usually made of clay, sometimes clay bricks are used.
These ovens were essentially used for baking bread, however, they are great for preparing other foods.
Conditionally, stoves can be divided into two types: above ground and underground. In addition, it is worth noting that tandoors of the first type can be vertical or horizontal - they are a bit like a Russian stove, but only without a chimney. Thus, you can apply cakes or samsa directly to the walls.
Furnace working method
The earthen tandoor is essentially a hollow vessel that is slightly narrowed towards the top. Naturally, at the top you can find a hole - this is how fuel and food are loaded into the stove. At the base you can find a blower, always with a damper, so that you can provide traction. If we are not talking about a portable stove, then in order to increase the heat, sometimes the clay base is covered with bricks. The resulting distance between the walls can be filled with sand, salt or the same clay.
When the fuel burns, the walls begin to accumulate heat, they can even heat up to high temperatures - 300-450 degrees. Due to the fact that the stove is made of clay, the temperature in it can be maintained for 4 hours. All this time, the vessel can be used: fry, boil, bake. Heat transfer goes inward, not outward. Despite the fact that the vessel was originally intended for making cakes, you cannot even imagine what delicious meat it will turn out to be. It will be evenly cooked, but will not burn. By the way, pilaf in such an oven also turns out to be simply magical - crumbly and aromatic.
We make a tandoor with our own hands
Usually, when you mention a stove, you imagine something that is set in the ground, has a foundation, and is built of bricks. A traditional tandoor is molded from clay by hand.
Since real Asian craftsmen still refuse to disclose the recipe for the mixture for making the oven, it is customary to mold their own tandoor from kaolin (fireclay clay), mixing in sheep's wool. If this is not the first time you are sculpting a stove, then not only must you use our tips and step by step instructions, but also consider the mistakes you made last time.

Step-by-step instructions for making a stove using a wooden barrel
To get started, prepare the necessary materials:
- kaolin (aka chamotte clay);
- fireclay sand;
- sheep's wool - you can take camel, if, of course, you can find it;
- an ordinary wooden barrel;
- oil - vegetable is suitable.
And now let's move on directly to the modeling of the stove itself.

- We take a barrel, fill it with water and leave it to stand for a day. So the tree is saturated with water, swells.
- Kaolin is mixed with wool, sand in a ratio of approximately 1: 0.05: 2. The consistency of the mixture should resemble thick sour cream.
- After that, be prepared to wait about a week, because the mixture will need to be left to dry and reach the required condition. The solution will need to be stirred throughout this week. During "drying", water may appear on the surface - it is best to drain it immediately, rather than knead it back into the solution. This is necessary so that the clay does not crack during heating, because the less water there is, the less likely it is that the vessel will crack. At the end of the week, the clay for the tandoor should resemble plasticine. We will sculpt our stove from it.

- Now the water from the barrel must be drained and wait until it dries. The barrel is oiled from the inside and the wood is again allowed to soak.
- The clay mixture is applied inside the barrel, while the layer should be about 5-6 cm. After that, the surface must be properly leveled with your hands, for this it is better to wet them first.
- It is worth remembering that the neck should narrow towards the top, which is why the clay layer will gradually thicken. Do not forget to mark the place for blowing at the base.

- Now the workpiece can be left to dry for 3-4 weeks in the shade, in a dry, well-ventilated room.
- As the workpiece dries, the wooden parts of the barrel will begin to lag behind the clay base. After the required time has elapsed, the metal rings are removed from the barrel, and the wooden parts, too.
- Now that the tandoor is almost ready, it is necessary to fire. For this, the product is placed on a sand pillow and the tandoor is melted for the first time. The fire inside must be very low, it must be maintained for about 5-6 hours. After that, it is necessary to make the largest and strongest fire as possible and cover the oven with a lid, thus bringing the temperature to the maximum. Cooling down should be gradual.
- The made tandoor can be "insulated", but then it will cease to be portable. However, this will increase the thermal insulation properties. To do this, the oven is lined with bricks and the layer between the walls is laid with clay, sand, felt or cotton wool.

Now you know how to make a tandoor with your own hands. This option can serve as an independent cooking device, or as a blank. As mentioned earlier, an earthen vessel can be placed on the foundation in the yard, covered with bricks, coated with clay again, well, and so on. This will help create a "professional" tandoor that can be used every day to make delicious meals.
But this option is only good if you are going to cook exclusively at home. The option without bricks and foundation will give you the opportunity to take the device with you wherever you go and delight everyone with amazing dishes from an Asian oven.
The tandoor is made in the form of a container, hollow inside. A hole is made on the upper surface for laying food and firewood. A blower is installed below, providing traction in the device. To strengthen the thermal insulation, an additional brick shell is made, and sand or clay is poured between the body and the brick fence.
During the burning of wood, the tandoor becomes hot, the temperature in it can rise to 400 degrees. The oven retains heat well, so the heat can be kept up to 4 hours, during which it is allowed to cook food continuously. The food is cooked quickly because the heat is not spreading outside, but inside the vessel. The device prepares aromatic dishes, evenly grilled meat, puffed bread and other uniquely tasty products.
Advantages and disadvantages
The original country oven for cooking is easy to erect, it is not difficult to operate it. But, despite these significant advantages, it also has several important disadvantages that you should pay attention to before starting to build.
Benefits
- Fuel economy.
- Maintaining optimal temperature.
- No difficulties in use and maintenance.
Heating a tandoor requires much less firewood or coal than a barbecue or barbecue. With the help of one bookmark of firewood, you can cook about five servings of kebab, when in the grill you will not get even two. Kebab in tandoor is prepared much faster and easier, you just need to hang the skewer inside and close the lid.
The meat will cook by itself, you do not need to turn it over constantly. Good tandoors with thick enough walls cook food much faster than thin-walled ones, due to the greater accumulation of heat and a longer preservation of it inside.
disadvantages
- There is no chimney.
- During operation, it is necessary to constantly use special gloves that resist burns.
- After the firewood is fired, a soot deposit appears on the inner surface.
- Heavy, thick-walled tandoors are difficult to transport.
- Food and fuel are put in the same hole.
If you want to use the oven indoors, you can make a portable tandoor on wheels, lighter and more compact. To get rid of soot, it is enough to clean the walls with a hard brush and rinse with water.
Making a real clay tandoor
The ancient technology involves the manufacture of an Uzbek stove using molding. Tandoor is molded from special kaolin clay, which differs from the usual one in good thermal insulation properties. During use, the device may crack, in order to avoid such unpleasant consequences, camel or sheep wool is added to the clay.
Asian craftsmen in the construction of real tandoor do not spread secrets that allow you to achieve a better result. Therefore, you have to make a furnace without knowing the exact composition of the mixture. How to make a tandoor out of clay with your own hands is described in the following paragraphs.
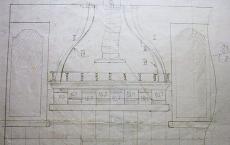
Scheme
This diagram of a classic clay tandoor, fortified brickwork simple enough to build.
The finished tandoor will measure 900 × 900 cm.The width of the upper opening is 350 cm.
Materials and their quantity
Tandoor is made of kaolin clay with an admixture of wool. Pieces of wool should be approximately 15 mm wide. The amount of clay used depends on the final consistency of the mixture and the presence of other components in the composition. The finished mixture should be viscous and thick. For the manufacture of the case, clay and chamotte sand are mixed in proportions 1: 2. The mixture is filled with water and left for several days.
The walls are made of refractory bricks. For the presented scheme, approximately 1000 bricks are needed. Sand is poured between the brickwork and the furnace body for better thermal insulation. It will take about 30 kg.
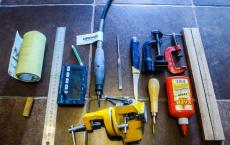
Tools
To build a tandoor with your own hands, you need the following tools:
- Shovel.
- Bulgarian.
- Construction level.
- Putty knife.
- Armature.
- Solution container.
- Wire for fixing brickwork.
Different circuits may require additional tools. For the presented scheme, the above elements are sufficient.
Step by step instructions for sculpting
- Kaolin clay is mixed with wool or fibers.

Mixing clay and wool
- The finished mixture is left to stand for a week to achieve the required condition.
- Flat "sheets" are molded from the mixture, their thickness should be at least 5 cm.

Clay sheets
- The body of the tandoor oven is made from the sheets, laying out a round container with them.

Construction of a tandoor from clay

View from above

Do not forget to make a blower
- It is recommended to lubricate the inside of the oven with vegetable oil.
- We leave the structure to dry for 24 hours.
- Lubricate the cracks that appear with clay milk and leave to dry further.

Lubricating cracks
- Next, we strengthen the tandoor with brick walls, using the same kaolin as a solution.
- Sand is evenly poured between the bricks and the body.

- The next step is to make the lid. It can be made from wood:

- After all the manipulations, you can proceed to drying the oven. Drying of the finished Uzbek oven should last at least two weeks. After the first drying is completed, the oven is heated with paper or shavings. After burning the fuel, the tandoor should completely cool down and heat up again the next day.

Ready tandoor
Typical manufacturing errors
- Incorrect preparation of the mixture. Any deviations can provoke cracks. It is important to respect the proportions while preparing the batch.
- Insufficient firing. Causes the device to transmit heat to the outside.
- Improper drying. Drying the oven should be carried out in a warm place with low humidity.
Clay tandoor from a wooden barrel
It is much easier to make an Uzbek tandoor with a base of wooden barrel do it yourself. It is not necessary to make flat sheets of clay to create a body, or to burn for a long time to give them a ceramic state. It is worth noting that the tandoor is made with a foundation for the reliability of the installation. The downside of this option is the impossibility of moving it.
An article on our website provides a description for a tandoor from a 120-liter barrel. The diameter of such a barrel is 526 cm, and the height is 170 cm. The following diagram represents detailed description tandoor devices with a foundation. Using the picture, you can understand how to make an Uzbek tandoor with your own hands:
Materials and their quantity
For the construction of a better and longer-lasting tandoor, it is best to use kaolin clay with an admixture of wool or fibers. Kaolin is better at preventing cracking. The mixture must also be made from clay with an admixture of chamotte powder in a ratio of 1: 2. The material from which the barrel is made is not important, it is still an oak barrel or cherry, the wood used does not matter. The following materials are also required for construction:
- Thermal filler such as sand.
- Bricks.
- Lattice.
- Armature.
- Water.
It is equally important to do the right mix, the durability of the furnace and its performance depend on the composition of the clay for the tandoor. If you want to strengthen the device, you can build a foundation of bricks and the same clay mixture. To improve the thermal capacity of the furnace, sand is poured between the base and the brick shell.
Better to use a good one, ceramic brick... Such a stove saves fuel much better due to the fact that it retains heat inside several times longer. It is not necessary to make a tandoor with a brick shell, the stove can be made simply from clay, but in terms of its qualities it will lag somewhat behind the most advanced version.
Tools
To make an Uzbek tandoor from a barrel, you need the same tools as for a simple clay tandoor with slight discrepancies:
- Bulgarian,
- Putty knife,
- Master OK,
- Drill,
- Shank.
Manufacturing instruction


Finished construction with brick finish
When the tandoor is ready, you should not immediately apply it; first, the structure must be thoroughly dried. The tandoor oven must dry for at least a month, and if the bottom of the barrel is not removed during construction, the drying is extended to one and a half months.
Errors
- Poor mixing of the clay mixture, from which the tandoor cracks or even spreads.
- Excessive thermal insulation of the walls.
- Fixing bricks on a poor-quality mixture. It is best to use the same kaolin clay.
Tandoor, like any other stove, is a flammable device that can harm human health. For best performance and your own safety, it is important to follow the operating rules.
- Locate the structure in an open area to avoid the ignition of nearby objects.
- For the need to move the oven, attach wheels to it.
- Be sure to check that there is no fire or hot coals in the device before leaving it unattended.
- The base of the tandoor must be heat-resistant.
- When melting, you should not use coniferous firewood, due to the release of carcinogenic resins.
- When using the oven, it is imperative to use heat-resistant gloves and oven mitts.
Output
With the help of simple actions, an exotic Uzbek oven is made that can cook delicious dishes. Tandoor food will give you a unique sensation of oriental sophistication. In this convenient and interesting barbecue substitute, you can cook not only meat or fish - the tandoor is famous for its fragrant cakes.
The dough is molded directly onto the inside of the oven base and baked in this way. Making a real tandoor with your own hands from clay is not only pleasant, but also very useful, because you can treat yourself and your loved ones with special dishes while relaxing in nature.
Making mistakes and getting burned. What are the secrets of building a tandoor, how to choose correct view and what to consider in order to get not black coals of meat, but a delicious flatbread and tender kebab.
What is tandoor
The homeland of the tandoor is most of the regions of Central Asia. In Tajikistan it is called tanur, in Uzbekistan tandoor, and in Turkmenistan it is called tonur. Tandoras in India and tonirs in Armenia are built on the same principle. However, no matter how you call this universal brazier stove, you will not see big differences in design.
It is a ceramic container of various sizes, with an opening on top or on the side. Fuel (coal, wood, brushwood) is put inside a kind of clay jug, and heats it up so much that the thick walls of the stove keep the required temperature for a long time.
Types of tandoor
Since the appearance of the first tandoor, it has not undergone any significant changes. All the same, kaolin clay, camel or sheep wool, sand and bricks ... It is these materials that are necessary for the construction of a real Central Asian tandoor. However, there is a division of the stove into types based on the place of installation.
Land tandoor installed in the yard, on a clay platform. For bread, samsa, shashlik, tandoor set vertically, horizontal installation only applicable for baking bread.
Yamny or earthen tandoorplaced in a hole dug in the ground. Clay and fireclay are used in its construction. In ancient times, this type was often used for heating a room.
Portable tandoor - this is modern look oven that has iron carrying handles. Small in size, in the shape of a barrel with a lid, it successfully replaces the usual for us brazier .
Principle of operation
The Uzbek clay tandoor is classic version oven, similar to an earthen pot, which was turned upside down and the bottom and throat were reversed. Using his example, we will consider the features of the device and the principle of operation of the tandoor.
A hole (blowing) is made in the lower part of the tandoor. Outside, the clay base is lined with bricks. Sand or salt is poured between the brick and the walls of the tandoor. Fuel (coal, wood) is placed on the bottom of the boiler through the upper hole, and ash is removed through it. A grill is installed inside for cooking meat, fish or vegetables.
All materials from which the tandoor is made have a high ability to accumulate (accumulate) heat. When heated, the walls of the furnace retain a high temperature for a long time (from 250 to 400 degrees). After the tandoor reaches the required temperature, the walls are thoroughly wiped from soot and ash, and the famous Uzbek flatbreads are laid on them.
We have prepared for you step-by-step instructions for the construction of a clay tandoor in the form in which it still faithfully serves many residents of these regions.
- The classic size of the tandoor is the height of 1-1.5 m, the diameter of the boiler body is 1 m, the diameter of the upper hole is 50-60 cm. To form a clay jug, kaolin clay is taken, which experienced craftsmen call "living". Brick is used for facing the furnace. Therefore, you need to stock up on clay, bricks and some sheep or camel wool.
- The wool fibers are cut into pieces 10-15 mm long and mixed with clay. After kneading, the clay should acquire the consistency of sour cream.
- The resulting mixture is exposed in a dark place for a week so that it settles.
Attention! The finished solution must be checked periodically, remove excess water, but make sure that the mixture remains moist. If you dry it, the tandoor will crack.
- Usually, clay sheets with a thickness of 5 to 15 cm are molded from the settled mixture. It is difficult to form a tandoor from such sheets without a well-developed skill, so you need a barrel.
- To make a tandoor from a barrel with your own hands, loosen its hoops a little, fill it with water, and leave it to swell for 5 days. Then drain the water, let the barrel dry, and treat the walls from the inside with sunflower oil. Give it 12 hours to soak and the tandoor mold is ready.
Please note that both clay and barrel it is necessary to start preparing for construction at the same time.
- Now we roll sausages about 50 cm long and 6 cm in diameter from the finished clay. Roll each of them to a thickness of 2 cm, cut into ribbons and begin to lay out the inside of the barrel.
Combustion, the fuel heats the clay located between the side elements of the device to a temperature of 250-400 degrees. Such indicators remain inside the structure for up to 4 hours due to the good properties of the rock to retain heat.
Cooking is done as follows. Hinged skewers or grates are installed inside the oven. They are loaded with products such as meat, fish, vegetables.
And if you do not know how to bake flat cakes in a tandoor, we will advise one method of cooking. After the clay walls are heated, it is necessary to wipe them from possible dust or combustion products. Then you need to sprinkle the side elements with water and attach dough products to them. Baking occurs due to the heat accumulated in the walls. You can get the bread out of the oven using a long-handled hook or a special bucket.
In this unique oven, food is cooked to completion due to the heat of the clay walls, which accumulates during the combustion process. This ensures that food cooks evenly on all sides and remains juicy. Cooking on skewers does not require turning, as these elements are arranged vertically. The cooking process in the tandoor is much faster than in other traditional grills or barbecues. 
Varieties
Modern units for summer cottages have various modifications: they can be stationary or portable, with a vertical neck or horizontal.
Summer residents use the classic type of unit for frying barbecue or any other meat dishes. Modernized tandoors with a vertical neck arrangement provide the ability to cook any food. In the regions of Central Asia, a device with a horizontal hole is common, which is suitable for frying flat cakes and samsa.
The main advantage of the vertical arrangement of the neck is the fact that such a furnace is equipped with a firebox. It can have a diameter of 200 mm and be located in the lower side wall.
The convenience of the device for burning fuel is evident. To heat the stove, you do not need to bend your whole body towards the hole. After the tandoor heats up, its neck is closed with a flap, and the food is cooked as usual. You can remove burnt wood by simply opening the latch.
The vertical neck oven is easy to move with a special platform. 
This design should have at least one pair of swivel castors for better maneuverability. An old garden cart can serve as an ideal platform.
Unit modifications
Modern manufacturers offer designs for every taste. Today, furnaces with a forged design are quite in demand, which makes structures attractive, and also gives them some protection. In this design, the tandoor is pleasant to use both in summer cottages and in restaurants and open-air cafes.
You can make the structure yourself using clay, bricks or flower pot... Such devices are actively purchased in online stores and offline points. Modern modifications of furnaces are represented by the following varieties.
Electric tandoor "Master"
Options:
- height with a lid - 0.7 m;
- without a cover - 0.62 m;
- diameter - 0.53 m.
The set includes the following items:
- waste pallet;
- stainless steel skewers - 6 pcs.;
- a shelf device for meat and vegetables;
- electrical cord.
The kiln weighs 70 kg and has a power of 1.9 kW. The device is powered from a network with a voltage of 220 V. The price of an electric tandoor is 60 thousand rubles.
Portable tandoor "Sarmat Nomad"
This type of oven is characterized by its compactness and ease of transportation.
Options:
- height with a lid - 0.63 m;
- without a cover - 0.4 m;
- diameter - 0.43 m;
- neck diameter - 0.18 m.
- grate;
- poker, scoop;
- lattice mounts.
The unit weighs 50 kg and costs 12 thousand rubles. 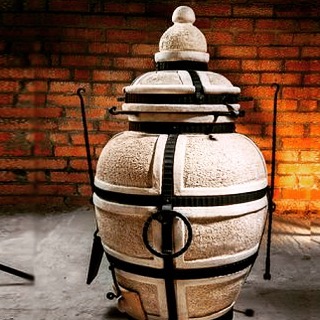
Ceramic tandoor "Sarmat Premium Big"
Options:
- height with a lid - 1.05 m;
- without a cover - 0.7 m;
- diameter - 0.6 m;
- neck diameter - 0.22 m.
The kit includes the following items:
- grate;
- guide for skewers "sun";
- stainless steel skewers - 8 pcs.;
- poker, scoop;
- lattice mounts.
The tandoor weighs 130 kg. Its price is 18.5 thousand rubles. 
Platform for the unit device
If you plan to build a tandoor oven at your summer cottage, then first of all you need to decide.
Whatever the device, traditional Central Asian or modern portable, the eastern part is considered the best location. suburban area... Outbuildings, cottage, fruit trees and bushes should be at least 10 m from the selected site. It is desirable that the area be as flat as possible, since it is required to erect a clay base under the oven on it.
If necessary, the foundation for the platform can be deepened into the ground.
For the safety of the structure and the surrounding tandoor, it is located far from gas pipes and electrical wiring. The area around the unit must be cleaned of leaves and rags.
As a rule, the tandoor is installed outdoors, but it can also be placed under a roof or in summer kitchenby providing the structure with a chimney. 
A purchased unit is not a cheap pleasure. However, you can make such a stove from scrap materials yourself. It takes a minimum of time and effort to implement this idea.
Clay aggregate
The masters of ovens do not build tandoors, but mold from clay. The special material for traditional stoves is of Akhangaran origin with good heat retention properties. To prevent the mixture from cracking at high temperatures, the stove-makers mixed with the wool of sheep or camels. The composition of the rock and its components is a secret of the old masters, which they carefully hide. Therefore, it is impossible to make a furnace using traditional Asian technology on your own. There is only one way out - to experiment.
For a more complete picture, print out a drawing of a clay tandoor lined with bricks and use it during the construction of equipment.
Below is the do-it-yourself sculpting technology that should be followed:

Option of the oven that can be transported
For the construction of a portable tandoor type, the following elements must be prepared:
- large floor pot for flowers;
- middle vessel;
- small container with holes in the bottom;
- a metal disc with a hole in the middle (you can take a weight from the bar);
- decorative stones for flowers;
- hacksaw.
The process of making a device with your own hands consists of several successive stages:

For more details, see the video:
Brick tandoor
If desired, at the summer cottage, you can make a stationary brick oven with your own hands.
It will take more effort to build it than to build a portable clay device. It is required to prepare the following materials in advance:
- fireclay brick;
- oven solution;
- kaolin or;
- concrete, sand, reinforcement;
- wood frame - template.
The tandoor order presented below will help when laying bricks.
Facts to consider when installing:
- Refractory brick on clay solution or a special oven mixture should form the basis of the interior of the oven. From it are made under, arch and back wall. The inside of the device must be sized to reach all parts of the oven with your hand.
- It is customary to make the arch of the tandoor, which is a rather difficult task. Therefore, you can make a rectangular floor. During its construction, it is impossible to use metal bookmarks, since metal and brick have different values \u200b\u200bof the expansion coefficients under thermal action.
- As a rule, the block is laid on the edge, which helps to save heat. However, single brick laying is considered a more economical method. In any case, it is important to be able to handle the grinder in order to grind the material if necessary.
- A plywood blank will help make the walls of the unit even. For the template, you need to pick up short bars commensurate with the diameter of the tandoor, a long product and a plastic piece of plywood. To make a template, short products should be attached to a long bar, taking into account the reduction in the radius of the furnace walls. A sheet of wood-laminated board is fixed on top. The plywood blank is placed in the center of the base. With its help, bricks are laid in a circle.
- In order to prevent the laid out structure from mowing, each row should be checked by level and made with wire, which is removed after the solution has hardened.
- In order to round off the tandoor oven with the method of laying in the width of a brick, the first bar is sawn with a grinder in the shape of a trapezoid. All subsequent products are cut from one side. If the bars are laid on the edge, then the furnace is rounded using a template and sawing the bricks from below.
- To fix the skewers, a metal ring is installed, which is put on top of the structure. This element is removable or attached with clay. Using a grinder, it is recommended to arrange cuts inside the oven, which will be required for laying skewers.
To make a tandoor from a brick with your own hands without hindrances in the form of a misunderstanding of the sequence of actions, it is most convenient to divide the entire construction process into several stages:
- Erection of the base. You need to dig a hole with a diameter slightly larger than the diameter of the tandoor. A sand cushion 10 cm high is laid at the bottom. For strength, the foundation is lined with reinforcing mesh and poured with concrete. The surface is leveled using a rule. The base dries within 1.5-2 weeks.


At the end of the third level, each next row must be narrowed until the neck becomes 0.5 m.This can be done by adjusting the slope of the brick by changing the thickness of the mortar to be laid or by cutting the blocks with a grinder.
- Coating the furnace with chamotte clay. After the completion of the masonry, the outside is coated with a thick layer of clay. Instead, the device can be lined with ordinary brick. If you stick to traditional methods, add sheep's wool to the mixture.
- Tandoor firing works. After all layers of the oven have dried out, it is necessary to proceed to heat treatment. To do this, the device is heated in a moderate mode, using small armfuls of firewood.
- Decorating. In order for the heat not to leave the device, outside it can be overlaid with natural decorative stones... Another design method is as follows: insert small pebbles into the seams between the bars. A homemade brick tandoor is required to be equipped with a lid and a blower flap.

Conclusion
To cook delicious kebabs and cakes you can without leaving your summer cottage. For the construction of a tandoor, choose the type of device that you liked, purchase materials and follow the order.